Difference between revisions of "Manual:Technical Manual"
(Added a link to the TOC version of the manual) |
(Plug screen readers into the manual) |
||
| (2 intermediate revisions by the same user not shown) | |||
| Line 1: | Line 1: | ||
{{TOC right}} | {{TOC right}} | ||
| − | {{note}} Would you like a section-by-section view of the manual instead? [[Manual:Technical_Manual_TOC| | + | {{note}} Would you like a section-by-section view of the manual instead? [[Manual:Technical_Manual_TOC|See here]]. |
| + | |||
| + | {{Manual:General Features}} | ||
| + | |||
| + | {{Manual:Using Variables in Mudlet}} | ||
| + | |||
| + | {{Manual:Alias Engine}} | ||
| + | |||
| + | {{Manual:Trigger Engine}} | ||
| + | |||
| + | {{Manual:Editor}} | ||
| + | |||
| + | {{Manual:Unicode}} | ||
| + | |||
| + | {{Manual:Timer Engine}} | ||
| + | |||
| + | {{Manual:Mapper}} | ||
| + | |||
| + | {{Manual:Advanced Lua}} | ||
| + | |||
| + | {{Manual:Event_Engine}} | ||
| + | |||
| + | {{Manual:Supported Protocols}} | ||
| + | |||
| + | {{Manual:Mudlet_Packages}} | ||
| + | |||
| + | {{Manual:Screen_Readers}} | ||
| + | |||
| + | {{Manual:Scripting}} | ||
| + | |||
| + | {{Manual:Best Practices}} | ||
| + | |||
| + | {{Manual:Lua Functions}} | ||
| + | |||
| + | [[Category:Mudlet Manual]] | ||
Latest revision as of 15:13, 23 December 2022
![]() Note: Would you like a section-by-section view of the manual instead? See here.
Note: Would you like a section-by-section view of the manual instead? See here.
Multi Session Gaming
Mudlet lets you play several simultaneous game sessions. However, currently we have the restriction that you cannot use the same profile twice. Consequently, if you want to play three characters on the same game at the same time, you need to make 3 profiles with 3 different names e.g. ernie@avalon.de, bert@avalon.de etc.
Each profile will be shown in a new tab as a session of its own. That means, your old session will not be stopped, when you start a second one. When you have more than one active session, try clicking the menu button "MultiView" to see them all together.
You can switch between profiles (characters) by pressing Ctrl+Tab or select a particular one with Ctrl+<number of tab>.
Want to be able to control all your profiles at once for games that allow multiplaying? Check out a package just for this. On Mudlet 4.10 and earlier, a pre-installed send-to-all-profiles package provided control through the :<command> alias.
Split Screen
Mudlet has a split screen: if you scroll up in the game text screen (or any other mini console window), the screen will split in two parts. The lower part will follow the game output while the upper part will stay focused on your scrolling: this way you can read easier through old passages without missing what is going on at the moment. Split screen can be activated via the scroll bar, page up / page down keys or the mouse wheel.
Scrolling back to the end will close the split screen automatically. A click on the middle mouse button will close the split screen immediately as well as pressing Ctrl+Enter on the keyboard (command+return for mac). The size of the 2 parts of the split screen can be modified by dragging the separator bar in the middle with the mouse. Split screen can be helpful when selecting text in order to copy it to trigger editor e.g. when making triggers. If you don’t use split screen when selecting text, new arriving text will upset your selection.
To scroll quicker, hold Ctrl while scrolling. Conversely, to scroll just one line at a time hold Shift (available in Mudlet 4.11+).
Automatic login


If your game takes in the characters name first and the characters password afterward, Mudlet can automatically login for you. To make use of this, put the name and password into the Connection information for your profile.
By since Mudlet 4.2, all passwords by default are stored securely in the computers credential store - which means you can't just open up the file with the password and look at it. When the password is stored securely on the computer, you can find it in the credential manager - see screenshots on the left for Windows/Linux/macOS.
The drawback of storing the password on the computer itself, however, is that if you use cloud sync for your profiles - the password won't the syncronised. You can go to Special Options in settings and change the password to be stored within the profile to make that work, if you'd like the password to be portable but visible in plaintext.
Command Line Auto-Completion, Tab-Completion and Command History
Mudlets command line is especially designed for playing MUD and MUSH games. It aims at reducing the amount of typing by using autocompletion and tab completion schemes that are optimized for typical game playing situations. The command line offers tab completion (TAB key with or without shift) and autocompletion (cursor up and cursor down keys).
Tab completion searches the last 100 lines in the game output buffer for words matching the word that you are currently typing. This is useful if you have to type complicated long names. You only have to type the first letters and then press the tab key until the proposal is what you want.
Autocompletion tries to match your current typing with your command history. Example: If you typed the same command a while ago, you only have to start typing the first couple of letters and then press the cursor up key until the proposal matches the command that you want to use.
Command history - if you haven’t started to type anything yet, you can browse through your command history with the cursor up and cursor down keys. However, if you have started typing pressing cursor up will result in a shot at autocompletion.
Escape key - to get out of autocompletion you can press the ESC key any time. After pressing ESC the entire text gets selected and you can overwrite it or get back into command history mode.
See also: Command line shortcuts
Logging Output to text or HTML Log Files
Press on the little button with the blue folder with the green arrow icon on the lower right side of the command line to turn on plain text logging. Click again to stop logging. This will inform you about the file name and path of the log file. If you want to log in color you can chose to log to files in html format, but note that due to the nature of HTML, these log files tend to get very large quickly.
Log files can be found at the Mudlet home directory in your profile directory. To get the path to your Mudlet home directory you can type in your main window:
lua getMudletHomeDir()Log files are stored in "<mudletHomeDir>/logs". Each profile has its own <mudletHomeDir> path. Log files have a similar naming convention to the autosaved profiles: date#time.txt or date#time.html
Using Variables in Mudlet
One of the major design goals in Mudlet was to integrate scripts and variables into triggers/aliases/buttons etc. as seamlessly as possible. The usage of variables in Mudlet is distinctly different from the other major clients, as native Lua scripting has been integrated into Mudlet from the ground up. As scripts are so closely intertwined with the core of Mudlet, variables do not need any special treatment as in other clients i.e. there is no need for code such as:
totalKills = getVariable("killedMonsters") + getVariable("killedVillains")
echo( "kills=" .. totalKills )
In Mudlet, the above code translates into:
totalKills = killedMonsters + killedVillains
echo( "kills=" .. totalKills )
If you define a variable in any given script in Mudlet, be it a trigger, a button, an alias key, an event handler, a free function, etc. It can be used from within any context without any special getVariable() type of function or any special variable symbols, such as @myVar etc.. In Mudlet all variables are native Lua variables. Each session (= profile/connection tab) runs in its own dedicated Lua interpreter. Consequently, all scripts of a profile are compiled into the same Lua interpreter and thus their code runs in the same variable space. All scripts from another simultaneously opened profile will not interfere because each profile uses its own Lua interpreter. Note Everything shares the same variables & functions.
To give you an example: Let’s make a little trigger that counts how many monsters you have killed. Each time you have made a new kill, the trigger matches on the kill message and runs a little script that increases the amount of kills by one each time the trigger fires - in other words, each time you kill a monster and the kill message is sent from the MUD. For the kill counter we declare a variable and call it myKills. This variable is going to hold the number of kills we’ve made so far. The script will look like this:
myKills = myKills + 1Then we add a little alias, a button or a keybindings that executes another little script that prints your current kill statistics on the screen. The attached script would look like this:
echo( "I have killed " .. myKills .. " monsters today." )Lua variables can be either a string of letters (aka string) or a number, among a few others. They are whatever there were initially created with or what data type they can be converted to.
a = "Jim"
b = "Tom"
c = 350
d = 1

--Then you can write:

e = c + d -- and e will equal 351
e = a .. b -- and e will equal "JimTom"
e = a .. c -- and e will equal "Jim350"
Note: You can't use a + b to concatenate string values. For this you must use the double-dot: ..
However, starting with Mudlet 4.11.0 we have included the f function to perform string interpolation. This is a very fancy way of saying "replacing code in strings with their value". When you run a string through the f function then it replaces anything inside a pair of {} with the value of the variable or outcome of the expression. To expand upon the example above:
a = "Jim"
b = "Tom"
c = 350
d = 1

function simple_addition(a,b)
  return a+b
end

--Then you can write:

e = c + d -- and e will equal 351 (no change here)
e = f"{c + d}" -- end e will equal "351". This is a string, not a number, if you need to do math with e then do it like above.
e = f"{simple_addition(c,d)}" -- same as above, but shows using the function we've defined.
e = f("{a}{b}") -- and e will equal "JimTom"
e = f"{a}{c}" -- and e will equal "Jim350"
A shrewd observer might notice that I have written the above uses of f without the usual parentheses. In Lua you can omit the () when you are only passing a single string argument to the function. It is usually considered best practice to include the () but in the case of f for interpolation I find it reads a bit better without them. As shown in the example above it works with or without them in place.
For a more 'real world' example and comparison of concatenation, f, and string.format consider the following:
-- For the following, we assume the following variables exist:
-- target which holds the target's name
-- target_health_color which is a cecho color determined elsewhere
-- target_health which is the actual health the target has.

-- this function uses the concatenation operator .. to glue strings together for display
function displayTarget()
  local msg = "\n<green>Target:<r> " .. target .. " <green>Health:<r> " .. target_health_color .. target_health
  cecho(msg)
end

-- this function does the same thing, but uses f
function displayTarget()
  local msg = f"\n<green>Target:<r> {target} <green>Health:<r> {target_health_color}{target_health}"
  cecho(msg)
end
There is another form of variables in Lua called tables which can be used for lists, arrays or dictionaries. This is explained later. For an in-depth coverage of variables in Lua take a look at a Lua tutorial e. g. this one on numbers http://Lua-users.org/wiki/NumbersTutorial and this one on strings http://Lua-users.org/wiki/StringsTutorial or this one on Lua tables http://Lua-users.org/wiki/TablesTutorial
Let’s get back to our example. The trigger script expects myKills to be a number so you have to initialze the variable myKills to 0 before running the script for the first time. The best place to initialize variables is in script script outside of a function definition as this code is executed when the session is loaded or if you compile the script again after you have edited it. To do this click on the "Scripts" icon and select the standard script "My Global Variable Definitions". If you are using an older version of Mudlet or a profile that doesn’t have this script item, simply click on the "Add" icon and make your own script. You can call it whatever you want to. Add following code to initialize your new variable myKills to a number and set its value to 0:
myKills = 0Whenever you edit this script, it will be recompiled and the code will be run as it is not part of a function definition. This is the major difference between trigger-scripts, alias-scripts etc. and script-scripts. Script-scripts can contain an unlimited amount of function definitions and also free code i. e. code outside of a function definition - code that is not enclosed by function xyz() …. end. On saving the script the script gets compiled and the free code is run instantly. All other item scripts, i. e. trigger-scripts etc., secretly define a function name for the script and thus the script is not free code, but function code. When a trigger fires Mudlet calls this invisible function name to run the script e.g. trigger738(), button82(), alias8(). This means that if you define variables inside a trigger script the variable will not be defined before the trigger runs for the first time. However, if you define this variable as free code in a script-script the definition becomes available immediately on script save. Now, whenever you add new variables to your variable definition script, the script gets run and your old variables will be reinitialized and reset to 0. This will be no big problem in most cases as you won’t work on your systems while really playing in most cases. To solve this problem you have two options:
First option: Add a script group (a folder) and add a new script item for each variable you define. This way, editing a variable definition will only reset the edited variable and none of the others that are defined in different scripts. This has the added advantage that you have a nice graphical overview of your defined variables. Note Organize your variables
Second option (more advanced): Change the variable initialization to only initialize the variable if it hasn’t been initialized before, thus keeping the values of previously defined variables. The following code initializes the variable myKills (to the number 0) but only if it hasn't been initialized before. This would look like this:
if myKills == nil then
    myKills = 0
end
In Lua all undefined variables are initialized to the value nil. The value nil is not the same thing as the number 0 or the empty string "". What it means is that a variable that has the value nil has not been declared yet and does not exist. If a variable does not exist, it cannot be used as its value is undefined at this point. Consequently, increasing the value of nil by one is impossible as the variable doesn’t exist yet and will lead to a Lua error. The above script simply checks if the variable myKills has been defined yet and if it hasn’t, it will declare the variable and set its value to 0.
Tables as Lists
Having variables that hold a single value is the most important usage of variables, but very often you’ll like to define variables that hold a list of values e. g. a list of your enemies, a list the items you are currently carrying etc.. To define a variable to be a list you need to declare it to be a Lua table. Let’s declare the variable myEnemies as a list containing the names of your enemies:
myEnemies = {}You can now add new enemies to this list by calling the Lua function table.insert( listName, item ). For example:
table.insert( myEnemies, "Tom" )
table.insert( myEnemies, "Jim" )
To print the contents of your enemy list on the screen, you can run this script:
display( myEnemies )Now, let’s make a little alias that adds a new name to your enemy list when you type "add enemy" followed by the name of the enemy (e.g., "add enemy Peter"). Open the alias editor by clicking on the "Aliases" icon. Click on the "Add Item" icon to add a new alias. Choose any name you like for your alias (e.g., "Add Enemy Alias"), and then define the following pattern for the alias: ^add enemy (.*). Next, add the following little script in the script input field below your alias:
table.insert( myEnemies, matches[2] )
echo( f"Added a new enemy:{ matches[2] }\n" )
Save the alias by clicking on "Save Item" and try it out by entering into the Mudlet's command input line. Aliases are explained in further detail below.
Another way to declare a list is to define its values directly. For example,
myEnemies = { "Peter", "Jim", "Carl", "John" }To remove an item from the list, you can use the function table.remove( listName, item index ).
Saving variables
You might notice that Mudlet doesn't save your variables between profiles restarts. The reasons for this are technical, but all it means is that you have flexibility in how to deal with them. There are several ways, so the most common and easiest ones will be explained here.
Tick the box in the variables view
Head to the variables view in the Mudlet editor and tick the box besides a variable - Mudlet will remember it between restarts now!

Saving by coding them in a script
The title sounds a bit complicated, but that's pretty much what you do. Go to Scripts, click `Add Item`, and create your variables like so:
myname = "Bob"
mypack = "pack1234"
rapierID = 67687
Now, since scripts are run when the profile is started, these variables will be created and assigned to those values. This was simple to do, but it has one problem - if you want to change the value of the variables to be saved, you have to edit the script by hand each time; and if you change the value of variables while playing via scripting, the new values won't be recorded.
Saving via table.save & table.load
Next, enter a more proper solution. This'll actually save the variables to a file and load them from it - so if you change the variable values, the current ones will be saved, and will be loaded next time properly. This method works with a table containing your variables though, not individual variables themselves - see Lua tables tutorial on how to create and use those.
table.save(where to save, what table to save) takes the location and name of a file to save variables to, and a table containing your variables to save. Location can be anywhere on your computer, but a good default place is your profile folder, whose location can be obtained with getMudletHomeDir().
mychar = {
  name = "Bob",
  age = 26,
  sex = "male"
}

local location = getMudletHomeDir() .. "/mychar.lua"
table.save(location, mychar)
-- sample echo to show where the file went:
echo(f"Variables saved in: '{location}'")
table.load(where to load from, what table to use) is similar - it takes the location and name of the file to load, and a table name to use for the loaded variables.
mychar = mychar or {}
table.load(getMudletHomeDir() .. "/mychar.lua", mychar)
display(mychar)
echo(f"My name is: {tostring(mychar.name)}")
Now that you have a way to save and load your tables, you can create triggers to load and save your variables at appropriate times, and you'll be set.
React on input - Mudlets Alias Engine
![]() Note: A screencast is available on getting started with aliases - watch it!
Note: A screencast is available on getting started with aliases - watch it!
Mudlet has a feature called "aliases" that allows you to set up certain phrases or commands that will automatically trigger certain actions or responses. These actions are defined using a specific type of language called "Perl regex expressions." Aliases only work on the input that the user types into the command line, while a separate feature called "triggers" works on the output that the game sends back. When you type a command and press enter, it is sent to the alias feature to see if it matches any of the phrases or commands that have been set up. If it does match, the alias will take over and either send a different command to the game or run a script (a set of instructions) that you have defined. This system is powerful because it gives you control over what happens when a certain phrase or command is entered. You can even change the user's input as it is being processed, allowing you to manipulate the command before it is sent to the game.

The example in the diagram above shows 2 matching aliases, but only one of them sends commands to the game - and only if the player is healthy enough to attack the opponent. The other alias that matched the user input (enemy) choses a fitting opponent and sets the variable enemy accordingly, otherwise it issues a warning that attacking one of the available enemies would be too dangerous.
For an alias to match the command text the same rules as explained above in the trigger section apply. However, to simplify matters there is only one alias type. As alias are not performance critical we could reduce the amount of trigger types to just Perl regex as this type can do it all and performance is no issue with alias as the amount of data is much less. Even if you type like a madman you’ll never get close to sending the same amount of text to the game than the amount of text the game sends back to you.
What does it mean that a regex is true or "matched"? A trigger or an alias fires - or executes its commands/script - when the text matches the pattern of the trigger or alias. In most cases this means that the text contains the trigger/alias pattern. If the regex pattern is reen then a text "The green house" will match because "reen" is contained in the text. More complex regex patterns can also hold information on where in the text a certain pattern must occur in order to match. ^tj only matches when the letters "tj" occur at the beginning of the text. Consequently, a text like "go tj" would not match. Regex patterns can also capture data like numbers, sequences of letters, words etc. at certain positions in the text. This is very useful for game related scripting and this is why it is explained below.
Let’s get back to alias. We start with a simple example.
We want Mudlet to send "put weapon in bag" whenever we type "pwb". Consequently, the pattern is pwb and as the task is so simple it’s enough to enter "put weapon in bag" in the send field. Then we click on save to save the changes and activate the alias by clicking on the padlock icon. Then we leave the trigger editor and test our new alias. After typing "pwb" and pressing return Mudlet will send the command "put weapon in bag" to the game.
Let’s move on to a more complicated example that is needed very often.
We want our script to automatically put the weapon in the correct bag as we have many bags and many weapons. The pattern stays the same. ^pwb The ^ at the beginning of the line means that the command starts with pwd and no other letter in front of this. If we define our pattern more clearly, the pattern will match less often. Without the ^ the alias will match and the alias script will always be run whenever there is the sequence of letters "pwb" in your commands. This may not always be what you want. This is why it’s usually a good idea to make the pattern definition as exact as needed by being less general. The more general the pattern, the more often it will match.
Back to our task: The pattern is ^pwb. Let’s assume that we have defined 2 variables in some other script. The variable "weapon" is the weapon we use and the variable "bag" is the name of the bag. NOTE: In Mudlet global variables can be accessed anywhere from within Mudlet scripts - no matter if they have been defined in a trigger script, in an alias script or in a key or button script. As soon as it’s been defined it somewhere it is usable. To make sure that a variable is local only, i. e. cannot be referenced from other scripts, you have to use the keyword local in front of your variable definition. Back to our alias: Pattern is: ^pwb
Script is:
send(f"put {weapon} in {bag}")Depending on the values of our variables weapon and bag the command "pwb" will be substituted with an appropriate command. To set your weapon and bag variables we use 2 more aliases: Alias to set the weapon: uw (\w)+
Script:
weapon = matches[2]
send( "wield " .. weapon )
To set our bag variable: Pattern:^set bag (.*)
bag = matches[2]Now let’s go back to our initial problem. We want an alias to put our current weapon into our current bag. But what happens if we are in the middle of a fight and absolutely need to sip a healing potions because we are close to death and cannot take the risk that the bag may be too full to take the weapon? We want to upgrade out little alias to take into account that the bag may be full and chose an empty bag instead. To do this we set up a trigger that detects messages that indicate that the attempt to put the weapon in the bag failed. In this trigger we execute this little bag-is-full-detection-trigger Trigger Pattern: (type substring) Your bag is full.
Script:
bagIsFull = true;This detection trigger will set the variable bagIsFull to true as soon as it sees the message "Your bag is full.". Then you know that you have to use your spare bag to take the weapon.
Now we have the tools to write an improved version of our little alias script:
if bagIsFull then
    send(f"put {weapon} in {spareBag}")
else
    send(f"put {weapon} in {bag}")
end
The next example is one of the most common aliases a tell alias: Pattern:^tj (.*)
Script:
send("tell Jane " .. matches[2])Sadly, Jane is your fiancée and the one thing she is a vegetarian and absolutely hates all words that relate to meat. Luckily, you know enough about aliases by now to make her believe that you’d never ever even think about meat. So you head to your global function script (any script item will do as long as you define your variables outside of your function definitions. See the scripts chapter below for more information. In your script "my global functions" you add a Lua table containing a list of all of all words that a vegetarian might hate. For example:
happyJaneTable = {"meat", "burger", "steak", "hamburger", "chickenburger"}Now you can upgrade your tell-jane script to automatically search our tell for all words that Jane might not like. In case such a word is found we substitute the entire tell with "How is the weather?".
for key, value in ipairs(happyJaneTable) do       -- looking at each element of the list
    badWord = happyJaneTable[key]                 -- check out the Lua table chapter below for more info
    begin, end = string.find(command, badWord)    -- begin holds the start position of the word, end* the end-position
    if begin ~= nil then                          -- we have found a bad word
        send("tell Jane How is the weather?")
        return
    end
end
Alias Examples
Alias:
^cc( .+)?Script:
local target = matches[2] or ""
send("c cure critical" .. target)
Default keybindings in the main window
| Keypress | Action |
| Left Arrow | Moves the cursor one character to the left. |
| Shift+Left Arrow | Moves and selects text one character to the left. |
| Right Arrow | Moves the cursor one character to the right. |
| Shift+Right Arrow | Moves and selects text one character to the right. |
| Home | Moves the cursor to the beginning of the line. |
| End | Moves the cursor to the end of the line. |
| Backspace | Deletes the character to the left of the cursor. |
| Ctrl+Backspace | Deletes the word to the left of the cursor. |
| Delete | Deletes the character to the right of the cursor. |
| Ctrl+Delete | Deletes the word to the right of the cursor. |
| Ctrl+A | Select all. |
| Ctrl+C | Copies the selected text to the clipboard. |
| Ctrl+Insert | Copies the selected text to the clipboard. |
| Ctrl+K | Deletes to the end of the line. |
| Ctrl+V | Pastes the clipboard text into line edit. |
| Shift+Insert | Pastes the clipboard text into line edit. |
| Ctrl+X | Deletes the selected text and copies it to the clipboard. |
| Shift+Delete | Deletes the selected text and copies it to the clipboard. |
| Ctrl+Z | Undoes the last operation. |
| Ctrl+Y | Redoes the last undone operation. |
| Ctrl+<Click> | Select the whole line. |
| Ctrl+Enter | Close split screen (scroll all the way to the bottom). |
| Ctrl+F | Search for text in the main output window. |
Trigger Engine
Unlike alias that define patterns that match on user input, triggers define patterns that match on game output. In other words, triggers react to text that has been sent by the game, whereas alias react to user commands that have been typed into the command line.
Simple Trigger Matching

![]() Note: QUICKSTART: Here is a simple video tutorial on how to make basic triggers in Mudlet.
Note: QUICKSTART: Here is a simple video tutorial on how to make basic triggers in Mudlet.
To begin with, click on the "Add" button to create a new trigger. Then put the text pattern that you’d like to trigger on into the trigger conditions table on the right side of the screen above the script editor. Afterwards, chose the correct pattern type of your trigger pattern in the drop down list on the right side of the trigger pattern i.e. in the second column of the trigger pattern table. If you define multiple patterns in the same trigger, your trigger will run whenever any one of these patterns matches unless you chose the AND-trigger option, in which case the trigger will only fire if all patterns match within a specified amount of lines from the game. For more advanced information on AND and OR trigger see the corresponding AND/OR trigger section below. The next step is to define what should happen when the trigger matches. Usually, this will be done by a Lua script in the Lua editor below the table with the pattern list. In the beginning, you can simply chose the "highlight trigger" option to make your trigger highlight the text that it has triggered on or send a clear text command to the game whenever the trigger fires until you have learned enough Lua to more meaningful scripts. Clear text command can be defined in the "send plain text" input box next to the trigger name above the pattern table. Finally, you need to save the new trigger and then activate it with the padlock icon button. By default, new triggers are deactivated and thus will do nothing unless you explicitly activate them. Activated triggers show a green tick in the little blue box on the left side of the trigger name in the trigger tree on the left side of the script editor dialog. There is three ways to save your changes. 1. click on the save icon 2. adding a new trigger 3. clicking on another trigger item. Triggers that have not been saved yet cannot be activated. If you see a bug icon instead of an activation box, there is some error that prevents to activate your trigger. Check the error message above the pattern table.
Example: You want to trigger on the word "pond" in a line such as: "The frog swims in the pond. Plop." All you need to do is add "pond" as a pattern and chose "substring" as a pattern type. Then enter the command you like to send to the game if the trigger matches. For example enter "drink water" into the "send plain text" input box and activate your new trigger. Your new trigger will send the command "drink water" to the game any time it sees the word "pond" somewhere in the game output.
Simple Highlighter Triggers
![]() Note: Beginners should use Mudlets automated highlight triggers in the beginning to get the hang of the different trigger and pattern types quicker. Click on the "highlight trigger" option and pick a foreground and a background color. When the trigger matches it automatically highlights its pattern. This is the most used form of triggers in mudding as it is a quick way of highlighting words that are important to you at the moment. This helps you spot things at a single glance instead of reading the entire text. You don’t have to know anything about scripting, regular expressions etc. to use highlight triggers. Just type in the word you like to be highlighted, select appropriate colors, save the new trigger and activate it.
Note: Beginners should use Mudlets automated highlight triggers in the beginning to get the hang of the different trigger and pattern types quicker. Click on the "highlight trigger" option and pick a foreground and a background color. When the trigger matches it automatically highlights its pattern. This is the most used form of triggers in mudding as it is a quick way of highlighting words that are important to you at the moment. This helps you spot things at a single glance instead of reading the entire text. You don’t have to know anything about scripting, regular expressions etc. to use highlight triggers. Just type in the word you like to be highlighted, select appropriate colors, save the new trigger and activate it.
More advanced users will often want to do custom highlighting from within scripts. This is how it works: If you want to highlight the word "pond" in the above example you have to add the following little Lua script to the script editor on the lower right side of the Script Editor window:
selectString( "pond", 1 )
fg( "red" )
bg( "blue" )
resetFormat()
"multiline / AND" and "OR" Condition Triggers
Multiline, or AND triggers execute their respective command or script only if all conditions in their respective conditions expression list are fulfilled.
OR-Triggers execute when any one of their conditions is true. To make OR-Triggers you simply have to add a few conditions to the conditions list e.g. in our example: "pond", "frog", "Plop". The trigger will now also execute on lines like this: "A frog is green" or "You hear a loud Plop!" because "frog" matched in the first line and "Plop" matched in the second line.
Multiline / AND triggers execute when all of their conditions are true. Taking the previous patterns of "pond", "frog", "Plop" and clicking the 'AND' button will make the trigger not fire on "A frog is green" or "You hear a loud Plop!" anymore, because all 3 patterns don't match. It however would fire on "In a brown pond, the frog said Plop!" because all 3 patterns matched. As you might have noticed, all 3 patterns are on the same line: this means that in a multiline/AND trigger, the next pattern starts matching on the same line to make this work.
To make the engine skip lines in a multiline / AND trigger, use the line spacer pattern: select 'line spacer' as the type and put in a number on the left to make it go to the next X lines, for example 1 will make it go to the next line.
The simplest form of AND-Triggers in Mudlet are Trigger Chains or Filter Chains, whatever you’d like to call it.


Trigger Chains & Filter Chains
"Chains" and "filters" are different trigger group entities in Mudlet and serve completely different ends.
Chains
A chain is defined in Mudlet by making a trigger group and adding a trigger pattern to the group. A group without a pattern is a simple trigger group that serves no other purposes than adding structure to your trigger system in order to organize your triggers better. Such a normal trigger group will always grant access to its children unless it has been explicitly disabled (= all access to itself or any of its children is locked) either manually or by a script.
A trigger group with a defined trigger pattern, however, will behave like a normal trigger and match if the pattern matches. Such a trigger group is called "chain head". A chain head will only grant access to its children if the trigger pattern has matched and the chain has been enabled. Thus, chains can be looked at as a mechanism to automatically enable and disable triggers or groups of triggers when a certain condition has been met i. e. the trigger pattern of the chain head has been matched. (However, technically this is not correct as disabled child triggers will not be invoked if the chain head matches. In other words, in chains you can still have enabled/disabled elements. The idea of a chain can better be described by necessary and sufficient condition - both of which need to be met before a child trigger is being run.)
Adding child triggers to this group will add elements to the trigger chain. These chain elements will only be activated if the chain head has matched before and thus opened the trigger chain. The chain stays open until the "keep chain open for x lines" value has been reached. The default is 0 which means that the chain only stays open for the current line. When access to the chain has been granted all child triggers will be tested against the content of the current line. Consequently, trigger chains are a means to automatically enable/disable trigger groups without the hassle of enabling and disabling trigger groups manually. This has 2 important advantages: Chains are faster than conventional solutions and chains reduce the complexity of your scripts and greatly reduce the usual system bugs that inevitably go along with enable/disable trigger xy function calls as it’s very difficult and error prone to enable and disable your triggers correctly in large complex trigger systems. This is one of the most powerful features in Mudlet and should be used whenever possible.
Let’s look at a practical example for a trigger chain:
My newbie prompt on Achaea looks like this 500h, 500m ex- when I have balance and 500h, 500m e- when I have lost balance. We are going to develop a prompt detection trigger that raises the event gotPrompt and sets the variables myBalance=true or myBalance=false To begin with, we add a new trigger group and add the Perl regex pattern to detect the prompt:
^(\d+)h, (\d+)m
The pattern reads in plain English: At the beginning of a prompt line there are is a number directly followed by the letter h, a comma, a space and another number followed by the letter h. Whenever this pattern matches the trigger will fire and we’ll know that we have a prompt line. We use the 2 numbers that we captured in our pattern to update our health and mana stats.
Detecting balance is more difficult as balance is indicated by the letters ex- on the same line after the prompt and imbalance is indicated by the letters e-. As we have set a pattern in a trigger group (folder), the folder is turned into a trigger chain head. It will now only let data through to its children when its own pattern is matched. In other words, the child triggers of the trigger chain will only receive data on prompt lines. We are going to take advantage of this by adding two simple substring triggers to detect balance and imbalance. The balance trigger pattern is ex- and the imbalance detector pattern is e-.
In the two balance detection triggers we now write myBalance=false and myBalance=true respectively plus a little echo on the screen that shows our current balance status.
We could now add a call deleteLine() to the prompt detection trigger to erase the prompt from the screen if we don’t want to see it as we have computed all relevant information.
Filters
You can turn a trigger chain head into a filter by checking the "only pass matches" option. This changes the content of what is forwarded as trigger text to the children triggers in the chain. Chains forward the content of the current line as trigger text whereas filters forward the matched pattern instead of the current line. In other words, the text of the current line is filtered according to the pattern of the filter. For example: You want to know the exits in the current room. The simplest solution is a simple filter on You see exits to: (.*) Then you simply add triggers to the filter chain such as north, south, west, east etc. The direction triggers will only be called if the filter head has matched.
Imagine the following scenario: You want to collect some berries. You know that the room contains some berries if the room description contains the words "You are inside a forest. There are some strawberries." or "You are inside a forest. There are some blackberries." and there are always only one kind of berry in the room. You make a new substring trigger for this line, but instead of choosing a regular trigger, you chose to add a new trigger group. Now you add You are inside a forest\. There are some (\w+)\. as an Regular Expression to the expression list of the trigger group. When adding conditions to a trigger group, the trigger group turns from an organizational unit into a filter unit, if the "filter" option is checked. From now on this folder is a filter and will only let its matches pass through. In our case this is exactly what we want, because we don’t want to collect all sorts of berries, but we only want 2 particular kinds, namely, strawberries and blackberries, and we know that these berries can only be trusted if they are picked inside a forest as other areas may contain contaminated berries. Now you add two regular triggers to our berry-in-the-forest filter - one containing the condition: strawberries and the other one blackberries. Then we add the commands to pick the particular kind of berry to both triggers (send field). Now what happens is that as soon as a room description reads "You are inside a forest. There are some strawberries/blackberries." the filter will let the kind of berry pass through to our two berry triggers and they will issue commands to pick berries, if there are such berries. However, in any other situation the words "strawberries" and "blackberries" will NOT trigger a pick - only in the above scenario when the filter parent’s condition is met. This is a very nice way to solve complicated problems with a few easy filter chains. This example is trivial, but using filter chains will rapidly show you how formerly complicated things that could only be solved with very complicated regular expressions can be solved easily now with a couple of filter chains.
Multi-Line Triggers and Multi-Condition Triggers
Multi Condition Triggers are the most advanced feature of Mudlets trigger engine. Like trigger chains or filter chains they are a form of AND-Triggers. All conditions in the list must have matched within the specified margin of lines (delta), in order to trigger the script. Normal triggers fire and run the script as soon as one of the conditions in the regex list is met i.e. if one of the regex/string matches match - or the Lua function condition returns true, the trigger script is run. In multiline triggers, however, each single regex/string/Lua function condition in the list has to have matched within the specified margin of lines at least once to trigger the script. The sequence of the conditions is binding. This means that if the 10th regex on the regex list would be matched on the eleventh line after the match of the first line happened, the trigger will NOT run unless the margin of lines is set to 11. If condition #3 is true but currently #2 is waiting to be true, condition #3 is ignored and must be true again after condition #2 has been true. Conditions can also be Lua Functions or plain Lua code that returns a boolean truth value. You can mix all types of conditions to build complex multi-condition triggers that only fire if all conditions are met. This is a very powerful feature as it reduces the amount of scripting to a minimum or even takes away with the need to script formerly complex processes completely. Multicondition triggers are multi-line triggers, i. e. the conditions can all be met in a single line or many lines after the first condition has been fulfilled. This effectively reduces the amount of complexity as you have all the important conditions placed into a single trigger and all the tedious bookkeeping, variable and condition state accounting is being done by Mudlets trigger engine. The result of this is that the amount of manual condition checking via many different trigger scripts and legions of if condition1 == true then check condition2 can be forgotten about. All you have to do is to define the conditions and the final action that is taken if the trigger fires.
![]() Note: to retrieve wildcards in multi-line or multi-condition triggers, use the multimatches[line][match] table instead of matches[].
Note: to retrieve wildcards in multi-line or multi-condition triggers, use the multimatches[line][match] table instead of matches[].

![]() Note: This diagram shows what steps are involved in the process of problem solving with Mudlets trigger engine. The main question is: How do we arrive at a solution to our problem, and how can we simplify the problem as much as possible?
Note: This diagram shows what steps are involved in the process of problem solving with Mudlets trigger engine. The main question is: How do we arrive at a solution to our problem, and how can we simplify the problem as much as possible?
Example: Let’s go back to our pond & frog example. We have explained the difference between AND-triggers and OR-triggers. If you have a room description consisting of 3 lines:
- You see a pond
- You see a frog.
- The frog sits on a stone.
Every single one of these 3 lines will be fed into the trigger engine one after another. If we define an OR-trigger with a condition list consisting of 3 condition patterns:
- condition #1 pattern = pond
- condition #2 pattern = frog
- condition #3 pattern = stone
Whether or not a condition is found to be true also depends on another property, namely the type of the condition. The condition type can be among others:
- substring matching → the condition is true if the condition pattern is a substring of the output line from the game. In other words: If the pattern "pond" is contained in any line of output, the condition is true.
- begin of line matching → the condition is only true if the condition pattern can be found at the beginning of a line from the game.
- Perl regular expression → the condition is true if the Perl regex pattern is matched. You’ll find more information on Perl regex below.
- Lua code that returns a truth value e.g. a call to a function check() that return either true or false depending on the condition
In our example we chose condition type "substring" for all three conditions. Consequently, the trigger will fire the command or script 3 times i. e. the trigger will do on each line it is matched against because in every line at least one condition evaluates to true because the pattern is a substring of the line.
- in line #1 we get: pond = true.
- in line #2 we get frog = true and
- in line #3 two conditions are true i.e. frog=true and stone = true
Because an OR-trigger fires on the first condition that is true and ignores the rest the trigger will only execute 3 times on these 3 lines although 4 conditions are true.
![]() Note: CAUTION: The multi line condition switch must be turned off to get an OR-trigger! If the multi-line condition switch is turned on the trigger becomes an AND trigger which means that the trigger only fires if all conditions are true and fulfilled in the correct sequence. With OR-triggers the sequence is irrelevant.
Note: CAUTION: The multi line condition switch must be turned off to get an OR-trigger! If the multi-line condition switch is turned on the trigger becomes an AND trigger which means that the trigger only fires if all conditions are true and fulfilled in the correct sequence. With OR-triggers the sequence is irrelevant.
To complicate matters, however, you don’t want your trigger to fire 3 commands, because you want to use this room description as a whole to fire your trigger e. g. this pond is the only kind of ponds in the entire world that doesn’t have poisoned water. So you want to make sure that you only drink water from a pond of this kind and from no other pond. Your solution is to use Multi Condition Triggers (MCT). If you check the MCT checkbox this trigger will fire only once from now on - and only if all conditions are met i e. when you can guarantee that you only drink water from a good pond because your drinking trigger is matching on the entire room description despite that this room description my be spread over a number of lines. (NOTE: If you have word wrap turned off in your game chances are that the entire room description will be contained in a single line, but we are trying to keep the examples as easy as possible.)
Sadly, there are many unfriendly people in this world and somebody goes around and poisons your good ponds. Consequently, you would want to examine the frog and find out if it is poisoned before drinking water from the pond. This is difficult because the villain is a mean magician who used illusion spells to make everything look like the good pond. To solve the problem you can now resort to Lua function conditions in the trigger condition list that perform certain check ups to put the current room description into a wider context e. g. check if you have been here before etc. This adds yet another level of complexity to your problem but this is a very powerful means to use the full potential of Mudlets MCTs.
You can combine all forms of conditions with trigger chains, filters and Lua functions. Mudlet gives you relatively easy to use tools that require no programming background. However, these tools can evolve into complex powerful problem solving mechanisms if they are combined with each other thus enabling non-programmer users to solve problems that would need a profound programming background in other gameclients. However, unlocking the full potential of Mudlet requires you do learn some Lua basics. In this manual we’ll try to be as easy on you as we can in this respect, but it’s highly recommended that you dig deeper into Lua after a while. It’s one of the easiest fully fledged scripting languages available, easy to learn and the fastest of them all, and this is why it has been chosen by us. You don’t need to become a programmer to be able to use Mudlet effectively. All you have to know is how to work with variables and how to do if conditions and maybe a few loops. But knowing more won’t harm you and it will make your systems more effective.
Named capturing groups in Perl regex triggers and tempRegexTrigger
Since Mudlet 4.11+ you can use named capturing groups in , so you can access your matches not only by numeric index of your capturing group but also under certain name. It is especially useful when you have multiple patterns with different ordering of capture groups.
Let's assume we want to capture name and class of character, but MUD outputs it two ways.
My name is Dargoth. My class is a warrior.I am a wizard and my name is Delwing.
Instead of creating two different triggers we can create only one containing alternative matching patterns:
^My name is (?<name>\w+)\. My class is a (?<class>\w+)\.^I am a (?<class>\w+)\ and my name is (?<name>\w+)\.
Notice that class and name come in different order, therefore in first case we will have name under matches[2] and in second case under matches[3]. With named capture groups in both cases we will have name available under matches.name and class under matches.class.
Code example to handle named matches above:
  echo("Name: " .. matches.name .. "\n")
  echo("Class: " .. matches.class .. "\n")
To verify whether named groups are available you can use flag mudlet.supports.namedGroups.
Lua Code Conditions & Variable Triggers - Expression Triggers
If you set a trigger type to 'lua function', you can run Lua code inside the trigger engine directly, as a trigger pattern. If the trigger pattern returns true, then the pattern will be considered to have matched, and corresponding trigger code will run.
As an example, lets make a variable trigger: add a new trigger and choose pattern type lua function. Then define this pattern: if health <= 100 then escape() end. If your health is lower than 100, and your escape function with more logic inside it returns true, the pattern will match. Another formulation of the same would be: checkHealth(). For the last formulation to work you have defined a Lua function checkHealth(). Open the script editor, add a new script "health care" and add this code to the new script-script.
function checkHealth()
    if health <= 100 then
        echo( "WARNING: Low health! I have to run away!\n" )
        startEscape()
        return true
    else
        return false
    end
end![]() Note: Mudlet used to only allow the boolean true value as the return value to consider the pattern to have been a match. It has since been improved to allow any value Lua would consider true - but if you see any LFCs making use of and true or false at the end, that'd be why.
Note: Mudlet used to only allow the boolean true value as the return value to consider the pattern to have been a match. It has since been improved to allow any value Lua would consider true - but if you see any LFCs making use of and true or false at the end, that'd be why.
Lua Syntax Primer: Expressions
if A == B then (...)   ----> if A equals B
if A ~= B then (...)   ----> if A *NOT* equals B
if A <= B then (...)   ----> if A is smaller or equal to B
if A >= B then (...)   ----> if A is greater or equal to B
if A < B then (...)    ----> if A is smaller than B
if A > B then (...)    ----> if A is greater than B
The operators and and or behave differently in Lua than in most other programming languages as they are not guaranteed to return a boolean value.[1]
Lua function conditions effectively means that you run the Lua code they represent on every single line that is received from the game, unless the LFCs are part of a multi-condition trigger, in which case the LFCs would only be run when they would be the current test-condition of their respective trigger state. LFCs are implemented in such a way that the trigger engine only calls the compiled byte code, but running as few scripts as possible is always the best idea. LFCs are nice and handy, and for most people the performance aspect will not be relevant at all.
Testing triggers
You can test your triggers with the `echo alias from the command line:
`echo A test line.
`echo One line.$Next line.$Third line.
Alternatively, you can also record a replay and play it - triggers will be matched on it.
Named patterns
You can use named patterns - that is, giving your captures names instead of [2], [3], [4] numbers - by adding ?<variablename> to your capture in Mudlet 4.11+:
-- before:
(\w+) = matches[2]

-- now:
(?<name>\w+) = matches.name or matches["name"]
(?<weapon>\w+) = matches.weapon or matches["weapon"]
This can be particularly handy if you have several patterns in a trigger and the location of matches[n] moves around. Try this out in a demo package.
Named capture groups still will be available under their respective number in matches.
You can programatically check if your Mudlet supports this feature with mudlet.supports.namedPatterns.
Editor
Editor shortcuts
The following shortcuts are available in the Lua code editor:
| Navigation shortcuts | |
|---|---|
| Ctrl+Tab | Focus next section |
| Ctrl+Shift+Tab | Focus previous section |
| Ctrl+S | Save current item (trigger, alias, etc.) |
| Ctrl+Shift+S | Save complete profile |
| Ctrl+1 | Show trigger editor |
| Ctrl+2 | Show aliases editor |
| Ctrl+3 | Show scripts editor |
| Ctrl+4 | Show timers editor |
| Ctrl+5 | Show keys editor |
| Ctrl+6 | Show variables editor |
| Ctrl+7 | Show buttons editor |
| Ctrl+8 | Show error log console |
| Ctrl+9 | Display statistics in main window |
| Ctrl+0 | Open central debug console window |
| Selection shortcuts | |
|---|---|
| Ctrl+A | Select all text |
| Ctrl+Left click | Add cursors |
| Ctrl+Alt+Up | Extend custors up |
| Ctrl+Alt+Down | Extend custors down |
| Esc | Switch to one cursor |
| Ctrl+D | Select words at the cursor |
| Ctrl+L | Select next lines |
| Ctrl+Shift+L | Select previous lines |
| Ctrl+F | Opens the script editor's FIND dialog. |
| F3 | Moves to the next FIND result. |
| Shift+F3 | Moves to the previous FIND result. |
| Editing shortcuts | |
|---|---|
| Ctrl+] | Indent right |
| Ctrl+[ | Indent left |
| Ctrl+Shift+D | Duplicate |
| Ctrl+/ | Toggle selection comment |
| Alt+Backspace | Delete rest of the word left |
| Ctrl+Backspace | |
| Shift+Backspace | |
| Alt+Delete | Delete rest of the word right |
| Ctrl+Delete | |
| Shift+Delete | |
| Ctrl+R | Toggle read-only |
Unicode
Reference our manual page on Encoding for more information on CHARSET negotiation in Mudlet.
Changing encoding
Mudlet is being developed to support displaying text in many languages but how the characters that conveys that language varies between games as does the languages they support. Plain vanilla Telnet actually only supports the 96-characters of ASCII by default, but other language can be supported if the way that they are converted into 8-bit bytes can be agreed upon by the use of what is called encoding - setting Mudlet (and the game server if approriate) to the correct encoding allows the correct display of characters like the Spanish ñ, the Russian я, and all other letters (or more properly grapheme).
Go to Preferences > General to set the encoding:

The list of encodings supported by Mudlet is:
| Encoding | Mudlet version |
|---|---|
| ASCII | 0.0.1 |
| UTF-8 | 3.2.0 |
| ISO 8859-1 | 0.0.1 |
| CP850 | 3.2.0 |
| CP866 | 3.2.0 |
| CP874 | 3.2.0 |
| ISO 8859-10 | 3.2.0 |
| ISO 8859-11 | 3.2.0 |
| ISO 8859-13 | 3.2.0 |
| ISO 8859-14 | 3.2.0 |
| ISO 8859-15 | 3.2.0 |
| ISO 8859-16 | 3.2.0 |
| ISO 8859-2 | 3.2.0 |
| ISO 8859-3 | 3.2.0 |
| ISO 8859-4 | 3.2.0 |
| ISO 8859-5 | 3.2.0 |
| ISO 8859-6 | 3.2.0 |
| ISO 8859-7 | 3.2.0 |
| ISO 8859-8 | 3.2.0 |
| ISO 8859-9 | 3.2.0 |
| KOI8-R | 3.2.0 |
| KOI8-U | 3.2.0 |
| MACINTOSH | 3.2.0 |
| WINDOWS-1250 | 3.2.0 |
| WINDOWS-1251 | 3.2.0 |
| WINDOWS-1252 | 3.2.0 |
| WINDOWS-1253 | 3.2.0 |
| WINDOWS-1254 | 3.2.0 |
| WINDOWS-1255 | 3.2.0 |
| WINDOWS-1256 | 3.2.0 |
| WINDOWS-1257 | 3.2.0 |
| WINDOWS-1258 | 3.2.0 |
Scripting with Unicode
Mudlet uses English in all of its Lua API to enable scripts scripts to be international - so a script written on a computer with German default will work on a computer with English default, for example. This means you can expect all API functions, error messages to be in English, and the number separator is always a period . Mudlet sets os.setlocale("C") by default, see background.
Not all Lua functions beginning with string. will work with Unicode - Mudlet has utf8. equivalents for those. See String functions in Mudlet for a complete list. For example:
print(string.len("слово"))
> 10 -- wrong!
print(utf8.len("слово"))
> 5  -- correct!
Triggering with Unicode
Mudlet's trigger engine fully supports Unicode in all types of patterns, including regex.

Loading external Lua files
Mudlet uses Unicode (utf8) for the trigger engine and Lua subsystem. If you have a file you're loading externally with Lua, make sure it saved in utf8 encoding.
Timer Engine
Mudlet supports four different sorts of timers:
The first can be configured by clicking and will start some code in regular intervals. The others can be used in other scripts you code. All of them are described in more detail below.
Regular GUI Timers
Regular GUI Timers that fire repeatedly in a certain interval specified by the user. To make one, go to the Timers section (1) in Mudlet, click Add (2), select the time periods you'd like the timer to be going off at - save (3) and activate it (4). The timer will go off after your specified interval and then at regular specified intervals after that, until disabled.

You can also enable/disable this timer via scripting with enableTimer() and disableTimer():
enableTimer("Newbie timer") -- enables the timer, so 2s after being enabled, it'll tick - and every 2s after that

disableTimer("Newbie timer") -- disables it, so it won't go off anymore
Temporary Timers
Temporary Timers are timers that go off only once and are the most common type of timer used for scripting purposes. You don't work with them from the Timers section - you just code with them only.
For a basic introduction to temporary timers, read up about them here. Here, we'll continue expanding on what you've learnt so far.
One thing to keep in mind when working with tempTimers is that they are unlike #wait statements you might see in other clients. While #waits are typically cumulative, tempTimers aren't - they go off from the same point in time. Thus if you'd like two timers to go off - one after 3s, and another 1s after the first one - you'd set the second timer to go off at 4s. For example:
tempTimer(3, [[ echo("this is timer #1 going off 3s after being made\n") ]])
tempTimer(4, [[ echo("this is timer #2 going off 4s after being made - and 1s after the first one\n") ]])![]() Note: Temporary timers cannot be accessed from the GUI and are not saved in profiles.
Note: Temporary timers cannot be accessed from the GUI and are not saved in profiles.
Stopping
To stop a temporary timer once you've made it and before before it went off - you use killTimer(). You give killTimer(id) the ID of the timer that you've made - which you get from Mudlet when you make it. Here's an example:
-- get and store the timer ID in the global "greeting_timer_id" variable
greeting_timer_id = tempTimer(2, [[ echo("hello!\n") ]])

-- delete the timer - thus nothing will actually happen!
killTimer(greeting_timer_id)
Refreshing
You can also use killTimer() to "refresh" a timer - the following code example will delete the previous timer if one exists and create the new one, thus making sure you don't get multiple copies of it:
if portal_timer then killTimer(portal_timer) end
portal_timer = tempTimer(2, [[ send("enter portal") ]])
Time remaining
You can use remainingTime() to check how much time remains on a provided Timer.
tid = tempTimer(600, [[echo("\nYour ten minutes are up.\n")]])
echo("\nYou have " .. remainingTime(tid) .. " seconds left, use it wisely... \n")

-- Will produce something like:

You have 599.923 seconds left, use it wisely...

-- Then ten minutes time later:

Your ten minutes are up.
Using variables
To embed a value of a variable in tempTimer code, you might try using this given what you've learnt:
tempTimer(1.4, [[ echo("hello, "..matches[2].."!\n") ]])But that won't work as you'd expect it to - that will try and use the value of matches[2] when the timer goes off - while by then, the variable could have changed! Instead, you take it outside the square [[ ]] brackets - this is correct:
tempTimer(1.4, [[ echo("hello, ]]..matches[2]..[[!\n") ]])

-- or with less brackets:
tempTimer(1.4, function() echo("hello, "..matches[2].."!\n") end)
Nesting
If you'd like, you can also nest tempTimers one inside another - though the first [[]]'s will become [=[ ]=]:
tempTimer(1, [=[
  echo("this is timer #1 reporting, 1s after being made!\n")
  tempTimer(1, [[
    echo("this is timer #2 reporting, 1s after the first one and 2s after the start\n")
  ]])
]=])
If you'd like to nest more of them, you'd increase the amount of ='s on the outside:
tempTimer(1, [==[
  echo("this is timer #1 reporting, 1s after being made!\n")
  tempTimer(1, [=[
    echo("this is timer #2 reporting, 1s after the first one and 2s after the start\n")

    tempTimer(1, [[
      echo("this is timer #2 reporting, 1s after the second one, 2s after the first one, 3s after the start\n")
    ]])
  ]=])
]==])
Closures
Last but not least, you can also use closures with tempTimer - using a slightly different syntax that has advantages. For example, you have access variables in its scope, when it goes off:
local name = matches[2]
tempTimer(2.4, function() echo("hello, "..name.."!\n") end)
Also syntax highlighting will work as expected, because the function will not be given as a string.
![]() Note: In this case, you mustn't use matches[2] directly in the echo() command. It will not work as expected. Instead, bind the it to a new variable like name as seen in the example above.
Note: In this case, you mustn't use matches[2] directly in the echo() command. It will not work as expected. Instead, bind the it to a new variable like name as seen in the example above.
Offset Timers
Offset Timers are child timers of a parent timer and fire a single shot after a specified timeout after their parent fired its respective timeout. This interval is an offset to the interval of its parent timer. To make them, add a regular GUI timer (see above), then create another timer and drag it onto the timer. This will make the timer that is "inside" the timer (the child inside the parent) go off at a certain time after its parent goes off. Offset timers differ visually from regular timers and are represented with a + icon for offset. Offset timers can be turned on and off by the user just like any other timer. For example - a parent timer fires every 30 seconds and by doing so kicks off 3 offset timers with an offset of 5 seconds each. Consequently, the 3 children fire 5 seconds after each time the parent timer fired. To make this happen, make the parent timer tic every 30 seconds, drag 3 timers into it with an offset of 5s on each:

Stopwatches
The stopwatch feature can be used to time how long things take, e.g. long running functions or how long a fight lasts. Stopwatches can be started, stopped and reset just like a regular physical stopwatch. They can also be given a name and made to be persistent, meaning that they can keep running (or timing) when Mudlet has been closed. This gives you the ability to time real-life events. Of course, you can also query how much time has passed and delete a stopwatch no longer required.
Creating and Starting
fightStopWatch = fightStopWatch or createStopWatch() -- create, or re-use a stopwatch, and store the watch variable ID in a global variable to access it from anywhere

-- then you start the stopwatch in some trigger/alias/script with;
startStopWatch(fightStopWatch)
The watch will now be running. Alternatively, you can create and instantly start a stopwatch in one line;
fightStopWatch = fightStopWatch or createStopWatch(true)See also: createStopWatch(), startStopWatch()
Stopping and Resetting
You can stop a stopwatch and retrieve its run time as follows;
-- in a trigger script for example you can write:
fightTime = stopStopWatch(fightStopWatch)
echo("The fight lasted for " .. fightTime .. " seconds.")
Then reset it for the next fight.
resetStopWatch(fightStopWatch)Note that resetting a stopwatch does not stop or start it, it's simply resets the time value to zero.
See also: stopStopWatch(), resetStopWatch()
Deleting a Stopwatch
To delete a stopwatch and free up the variable ID simply;
deleteStopWatch(fightTime)See also: deleteStopWatch()
More Ways to Retrieve Running Time
The time can be retrieved at any point of a started and currently running or stopped stopwatch.
getStopWatchTime- returns the time as a decimal number of seconds with up to three decimal places to give a milli-secondsgetStopWatches- returns a table of the details for each stopwatch in existencegetStopWatchBrokenDownTime- returns a table of times for a given stopwatch; days, hours, minutes, etc...
See also: getStopWatchTime(), getStopWatches(), getStopWatchBrokenDownTime()
Using Named Stopwatches
All variable names can be replaced with a string name. Let's rewrite the above code with named stopwatches instead.
fightStopWatch = fightStopWatch or createStopWatch("Fight Stopwatch", true) -- using the name 'Fight Stopwatch' and starting it automatically

-- some time has passed

stopStopWatch("Fight Stopwatch")
echo("The fight lasted for " .. getStopWatchTime("Fight Stopwatch") .. " seconds.")
resetStopWatch("Fight Stopwatch")
Using Persistence
It is preferable (for technical reasons) to assign a name to a stopwatch that will persist over Mudlet sessions.
fightStopWatch = fightStopWatch or createStopWatch("Fight Stopwatch")
setStopWatchPersistence("Fight Stopwatch") -- enable this stopwatch to persist over Mudlet sessions
display(getStopWatches()) -- will now show that the stopwatch is persistent
See also: setStopWatchPersistence()
Uses and examples
Enable/disable triggers
This'll make use of tempTimer to enable a trigger and disable it after a short period of time:
enableTrigger("Get enemy list")
tempTimer(3, [[disableTrigger("Get enemy list")]])
Running a script after the current triggers
A useful trick to get your code to run right after all of the current triggers (GUI and temporary) ran would be to use a time of 0:
-- in a script, this will run after all scripts were loaded - including the system, wherever in the order it is.
tempTimer(0, function()
  print("this timer is running after all triggers have run")
end)
Have more examples you'd like to see? Please add or request them!
Mapper
Mudlet's mapper is split into two parts for the best compatibility on all games:
- The display of the map itself and functions to modify the map in Mudlet, and
- A very game-specific Lua script to track where you are, and provide aliases for using the mapper, automatic mapping, etc.
If your game does not provide a mapping script for you, then you may not see a map at first.
Fear not! Pre-made mapping scripts for many games are available from Mudlet forums - all topics that have the "mapping script"-prefix on them.
If you still don't find any, or if you want to create your own mapping script, see #Making your own mapping script further down below. Remember, you can always find help in Mudlet forums or Discord, etc.
Generic Mapper Additions may be useful if your MUD display is atypical. Check through the solutions for multi-line exits and how other players have handled these situations.
Visual Map Editor
Maps can be comfortably edited by using the visual map editor or by scripts. The editor behaves like the usual WYSIWYG editors. Select objects with a left click and then right click to open a context menus and do actions on the selected objects.
The mapper starts in "view-only" mode to prevent accidental edits. The editing mode can be toggled in the map's right-click menu.
Object selection
- left click = select element
- left click + drag = sizing group selection box choosing all rooms in the box on the current z-level
- left click + shift + drag = sizing group selection box choosing all rooms in the box on all z-levels
- left click + alt (or the mapper menu move map buttons) = move map
- left click + control = add a room to current group selection or remove it
If multiple rooms are being selected, a room id selection list box is being shown where you can fine tune the current room selection via the usual left click + control or left click + shift. The box disappears if the number of rooms in group selection is zero.
Moving Objects
Move selected objects either by right click and select "move" or with following handy short cut:
- left button down on custom line point + drag = move custom line point
- left button down + drag usually moves the item directly (as a handy shortcut) if only one element has been selected
- or hold left button down + control + drag if multiple rooms have been selected
Maps and Autowalking
Maps are implemented as directed graphs of connected nodes (rooms). Nodes are connected by edges (exits). Nodes are referenced by unique integer IDs. Edges fall into 2 categories: Standard exits with a visual representation on the map (e. g. north, south) and "special exits" without a calculated visual representation on the map e. g. the command "jump cliff" is a special exit that connects to a room without a clear spatial orientation. However, special exits can be visually represented if the user provides custom exit line strips. Standard exits are referenced by their respective node and a directional integer value. Special exits are referenced by their respective nodes and strings that hold the exit commands. Both nodes and individual exits can seperately be locked and thus excluded from speed walk path finding graphs. Path finding uses the fast A* search algorithm. Mudlet choses a path with the fastest travel time (-> room weights) as opposed to the shortest path.
Maps are divided into areas or zones where the area/room relationship is unique, i. e. rooms cannot be in more than 1 area.
![]() Note: Areas help make do with the typical geographical irregularities of game maps where an entire city with hundrets of rooms makes up a single room on a wilderness map. In other words, if you can't make a place look geographically correctly, create (sub) areas to deal with the problem.
Note: Areas help make do with the typical geographical irregularities of game maps where an entire city with hundrets of rooms makes up a single room on a wilderness map. In other words, if you can't make a place look geographically correctly, create (sub) areas to deal with the problem.
There are 2 forms of visual representations of maps. Standard mode shows exits and custom exit lines whereas "grid mode" hides exit details and sizes rooms to form a perfect grid without any empty space in between rooms. Grid maps can be made to look exactly like ASCII color text maps with character symbols to keep the look and feel of the game. Technically, grid maps are a special optimized representation of the typically very large LPC MUD style wilderness maps where every room has 8 direct neighbors in a n*m grid of rooms with relatively few holes. The grid map implementation uses pre image caching and fast gfx hardware render support and can thus render very large grid maps in less than 1ms that would take much longer if the map were to be displayed in regular mode. Changing the zoom level of maps in grid mode can take a significant amount of time if the maps are very large, because the pre cached images of the map need to be recreated at the new zoom level. Areas remember their particular zoom level so this is no hindering issue in actual gameplay.
Any map can be displayed in both modes, though the visual map editor only works in regular mode. To enable area mode, use the setGridMode() function.
Regular mode:

Grid mode:

Areas
Areas are defined by a unique integer number ID and a unique area name. Mudlet builds an internal numerical area ID table on the basis of the rooms that belong to the respective areas. Mudlet keeps a seperate lookup table to retrieve the area name on the basis of the area IDs. This name lookup table is not guaranteed to be correct because it may be imported invalid information if the map has been downloaded by the game server as an xml map description file on the basis of the MMP protocol. [1] However, if the map has been created with Mudlet directly, there will be no such problems as the area name lookup table API is made to enforce uniqueness.
Area Properties
- area map display mode (-> regular map display mode or grid mode)
- area name
Rooms
Rooms are invisible on the map unless the required properties have been set.
Room Properties
- Room object need following required properties in order to be shown on the respective area map:
- unique room ID in form of an integer value
- area ID in form of an integer value (To which area does this room belong - or in other words, which area map displays this room)
- x, y and z coordinates as integer values which relate to its paricular area map coordinate system
- Optional room properties:
- regular exits with or without respective exit locks
- special exits with or without respecitve special exit locks
- room lock
- exit stubs (draw exit directions even though the exit rooms have not yet been defined)
- custom exit lines (user defined line strips of various formats to visualize special exits or redefine regular exit lines)
- searchable room name that can be used for bookmarks, annotations etc.
- room weight (How long does it travel through this node. A high room weight makes it less likely that this room will be chosen for pathfinding e. g. a safe road should have a low weight, whereas a dangerous place should have a high weight
- room color
- room character e. g. the symbol $ to symbolize a bank or H for a hotel.
Advanced map features
Map labels
Maps can be embellished with images and text labels. Map labels can be either used as background (default) or as the top most foreground e. g. for player name location scripts. Labels are defined by position and size according to the map coordinate system and keep their position and size relative to the rest of the map when the map is zoomed or moved. Contrary to rooms which work on the basis of integer (natural numbers) coordinates, labels are described (with respect to both position & size) by real numbers in order to allow for more advanced placement and label sizes within the map coordinate system. Map labels are stored in form of png images directly in the map file and are thus a direct part of the map. As these images are being scaled to fit the label creation size, the image quality will depend on the initial size of the label (the large the better the quality, but the more memory will be used).


(The desert and dragon images used in this example are licensed under the Creative Commons Attribution 2.0 Generic license and can be found here: http://en.wikipedia.org/wiki/File:Ninedragonwallpic1.jpg and http://en.wikipedia.org/wiki/File:Siwa_sand_dunes2009a.jpg)
Custom exit line definitions
The mapper supports user defined visual exit lines on the basis of a sequence of line points in the map coordinate system. Custom lines as well as labels work on real numbers to allow for fine grained placement. User defined lines can be solid, dotted, dashed etc. line types with or without ending arrows. The line color can be freely selected. By default the regular exit color is being used.


The above example shows 3 different types of user defined exit lines, where the orange one on the left has been selected by the user in order to be edited.
Custom exit lines are purely visual tools and have no effect on the pathfinding, but each custom line must be linked to a valid room exit - either standard or special exit.
Map formats
Whenever a mapping feature is added to Mudlet that requires storing something in the map, the map format version needs to be increased - so older Mudlets can know that a map is too new and they can't load it. To this end, every map has a version number embedded inside it, which you can see by going to mapper settings:

You'll also notice that you have the ability to downgrade a map's version for compatibility with older Mudlets. Be careful when you do so though - features available in the new map won't be available in the older map when you downgrade.
| version | Mudlet version | features |
|---|---|---|
| 20 | 3.16.0 | - Improved way that custom exit line data was held internally, to make coding Mudlet mapper's easier and safer (details). Code is in place to support a workaround to work within map formats back to include version 17. |
| 19 | 3.8.0 | - added support for more than one of any grapheme (symbol) for the 2D map room symbol. Code is in place to support a workaround to work within map formats back to including version 17. |
| 18 | 3.0.0 | - keeps player's position when copying to a new profile
- faster map loading |
| 17 | 3.0.0 | - allows use of setAreaUserData(), setMapUserData(), and related functions |
| 16 | 2.1 | - doors (visual effect on the mapper that a locked/closed/open door is there)
- exit weights (in addition to existing room weights) |
Mapper tips
General
- Don't move the room you're currently in, you'll go haywire
- The number when spreading/shrinking room selections it the multiplication factor - 2 is a good number to try
Merging areas
To merge two areas together, see this how-to by Heiko. In short:
- Zoom out really far away on the area you'd like to move, and select everything (the selection affects all z-levels as well).
- Right-click, select move to area, and move them to another area. Your selection will still be selected - do not unselect
- Right-click again, select move to position, and move all of your still selected rooms in the new area so it fits.
Zooming the mapper
You can zoom in/out in the mapper using your (vertical) mousewheel. If you'd like to zoom quicker, hold down Ctrl while doing so!
To set the zoom level via script, use setMapZoom().
It is easy to add your own options to the menu you see when you right-click on your map. To do so, use addMapMenu, addMapEvent, etc.
Mapper favorites
This post here describes how to add a right click menu to your mapper filled with rooms to speedwalk to.
Placing the mapper
Placing the mapper into a corner
Here's a snippet you can use to place the mapper window into a corner and have it automatically come up whenever you open Mudlet. To use this, create a new script (you can make it anywhere) and copy/paste the code into it.
local main = Geyser.Container:new({x=0,y=0,width="100%",height="100%",name="mapper container"})

local mapper = Geyser.Mapper:new({
  name = "mapper",
  x = "70%", y = 0, -- edit here if you want to move it
  width = "30%", height = "50%"
}, main)
Placing the mapper into its own window
It's possible to create the mapper as a map window (similar to clicking the icon) like this:
myMapWidget = Geyser.Mapper:new({embedded=false})This will open a map window with your saved layout (if there is one, otherwise it will dock at the right corner)
To choose the position of the DockWindow at creation, use:
 -- this will create a map window docked at the left corner
myMapWidget = Geyser.Mapper:new({embedded=false, dockPosition="left"})
Possible dockPositions are: left "l", right "r", top "t", bottom "b" and floating "f"
To change the dockPosition after creation, use:
 -- this will change myMapWidget dockPosition to "f" floating
myMapWidget:setDockPosition("f")
Making your own mapping script
Your own mapping script will need to be tailored specifically to your game, depending on how exactly your rooms are shown, how the exits are listed, or if the game maybe sends some of this relevant information via GMCP, etc.
The generic mapper
To ease your work, all new profiles in Mudlet come with a Generic mapper package, which tries to draw a map by guessing most of the information from your game. It knows the most common ways to write an exit, etc. You can find more details by typing "map basics" in Mudlet.
Even if the generic mapper does not 100% grasp your very game details, you could maybe just adjust a few triggers and be done with it. Remember to stop by and ask for help in forums or chat, if you get stuck anywhere.
Some players have collected a list of Generic Mapper Additions on how to modify the generic mapper to better fit their game already.
Starting from scratch
If you'd like to code your own mapping script, see the Mapper API and read on for a short tutorial.
To start off, create a new script that'll be included with your mapping script (can even place it into the script folder for your mapping script), and have it do:
mudlet = mudlet or {}; mudlet.mapper_script = trueThis'll let Mudlet know that a mapping script is installed, so it won't bother you or whoever else installs your script with a warning that one is necessary.
Next, you want to hook into Mudlet's gotoRoom(id) function and the user clicking on a room in the visual map - for that, define your own doSpeedWalk() function. Mudlet will store the directions / special exits commands your script will need to take in the speedWalkDir table, and the room IDs you'll pass through in the speedWalkPath table:
function doSpeedWalk()
  echo("Path we need to take: " .. table.concat(speedWalkDir, ", ") .. "\n")
  echo("Rooms we'll pass through: " .. table.concat(speedWalkPath, ", ") .. "\n")
end
speedWalkPath is especially useful for making sure you're still on the path. Most Mudlet mapping scripts keep track of how many rooms along the path they have visited so far and check upon arrival into a new room to make sure it's still on the path.
That's it! (But see below if you want more.)
From here, you'd want to build a walking script that'll send the commands to walk you along the path, along with aliases for the user to use - see the Mapper API functions and Mudlet mapper events.
Adding rooms
To make your first room, do the following steps:
- create an area with setAreaName(areaID, areaname). You can choose any areaID - if you'd like to use the IDs incrementally, see which is the latest from getAreaTable()
- if you want the Mudlet mapper to generate roomIDs for you, get one with createRoomID(). This is an optional step
- create your room with addRoom(roomID)
- give the room coordinates with setRoomCoordinates(roomID, x, y, z). If you're just starting out, put it at 0,0,0 so the room is at the center of the map
- assign your room to an area with setRoomArea(roomID, areaID)
- and finally, call centerview(roomID) to make the map view refresh and show your new room!
Labelling rooms
Rooms have three attributes which you can show on the map:
- an ID. You can't change it; the ID is shown in the room's box when you check "IDs" in the dialog below the map and you're zoomed in far enough.
- a symbol, also displayed in the room's box. You set it with the setRoomChar Lua function, or via the map's context menu.
- a name, typically sent via GMCP. You add it to the map with setRoomName.
The room name can be displayed along with a room's box. Its position defaults to "centered below the room". It is not visible by default because many maps have rooms that are quite close to each other; showing the names by default would create an ugly visual mess.
If you want to enable room names in your mapper, you need to
- stagger rooms. Four or five units' distance instead of one works best if you want to show every label; less is OK if you only show labels when the user asks you to.
- call setMapUserData("room.ui_showName","1"). The existence of this entry controls whether the "Names" checkbox is shown next to "IDs", below the map. This value is zero if the user has unchecked the "Names" checkbox.
- optionally call setMapUserData("room.ui_nameFont","FontName") to change the names' font. The default is the same monospaced font used for the room IDs and symbols.
- call setRoomUserData(room_id, "room.ui_showName","1") to show a room's label. You might want to add an entry to the map's pop-up menu which toggles this.
If the name is misplaced (collision with another room, label, or whatever), you can modify the room's "room.ui_nameOffset" attribute to move it around. The value of this attribute consists of two floating-point values, separated by a space, which offset the room's label (in units of the room box's size). You might want to bind functions that increase or decrease these values to keys like Shift-Control-Arrow and/or Control-Numpad-2468. A hotkey to toggle a room's label display from "on" to "off" and back (e.g. Control-Numpad-5?) is also a good idea.
You also might default to staggering room names. One possible algorithm: if a new room's X coordinate, divided by your default room distance, is an odd number then position its label with an offset like "0 -1.6", which would place it above the room in question. The optimal value for the Y offset depends on the font.
Changes are displayed only when the map is next redrawn.
Font options are global. Overriding them for a single room can be be implemented if requested.
Working with the mapper API
Whenever working with mapper API, keep in mind of the following things:
- You'll want to call centerview after you do some modifications, to get to have the map render your new changes
Translating directions
Several functions in the mapper API take and return #'s for directions - and to make it easier to work with them, you can define a table that maps directions to those numbers in a script with the following:
exitmap = {
  n = 1,
  north = 1,
  ne = 2,
  northeast = 2,
  nw = 3,
  northwest = 3,
  e = 4,
  east = 4,
  w = 5,
  west = 5,
  s = 6,
  south = 6,
  se = 7,
  southeast = 7,
  sw = 8,
  southwest = 8,
  u = 9,
  up = 9,
  d = 10,
  down = 10,
  ["in"] = 11,
  out = 12,
  [1] = "north",
  [2] = "northeast",
  [3] = "northwest",
  [4] = "east",
  [5] = "west",
  [6] = "south",
  [7] = "southeast",
  [8] = "southwest",
  [9] = "up",
  [10] = "down",
  [11] = "in",
  [12] = "out",
}
Then, using exitmap[input], you'll get a direction number or a direction name. Here's an example that uses it to work out in which directions are the exit stubs available in room 6:
lua local stubs = getExitStubs(6)
for i = 0, #stubs do print(exitmap[stubs[i]]) end
Custom speedwalking and pathfinding
If you'd like to use a custom pathfinding algorithm instead of the built-in one, you can do that:
- Set mudlet.custom_speedwalk = true.
- Your doSpeedWalk script will now see different parameters:
function doSpeedWalk()
  echo("Room we're coming from: " .. speedWalkFrom .. "\n")
  echo("Room you're going to: " .. speedWalkTo .. "\n")
end
The forum topic Wayfinder contains an example package that implements a shortest-path-first algorithm.
Custom room name search function in the generic_mapper
Sometimes the generic_mapper script is not flexible enough to find the room name in your favorite game. You can create a custom function that handle that search instead of the standard one included in the mapper:
- Type in the input area map config custom_name_search true to enable the usage of the custom function.
- Write your own function called mudlet.custom_name_search. The script call it for your:
mudlet.custom_name_search = function (lines)
    -- ...
        local line_count = #lines + 1
        if string.match(cur_line, "   ") then
          line_count = line_count - 1
          room_name = lines[line_count]
          -- map.echo("Name Search: room_nameome:" ..room_name)
        elseif string.find(cur_line,prompt_pattern) then
    -- ...
    return room_name
end
I suggest to start from original name_search function in generic_mapper to avoid common problem.
onVisionFail for generic_mapper - moving through dark rooms
generic_mapper uses a combination of room titles, descriptions and exits to locate your character position in the mapper. Sometimes this information may not be available due to blindness, dark rooms or other affects that may prevent full vision and correct room matching. Using the onVisionFail event and appropriate triggers you can force your character to move to the next room and update the map accordingly even when vision is limited.
generic_mapper comes with two predefined triggers, add or replace these as necessary with the appropriate lines your game sends.

In these examples when the game sends It is pitch black... or It's too dark or It is too dark starting on a newline (^ character) then it will raise the onVisionFail event. When called this event will skip looking to match the room, and simply move the character in the direction they sent prior.
Screenshots
Just a few example maps from different players and games:
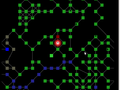
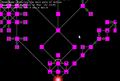
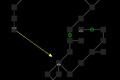

Here is the full image (17160 x 10120 pixel)
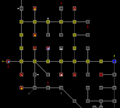


Notes
- ↑ MMP allows for an area ID/area names table to be defined, but Mudlet has no means to verify which definition is the correct one if 2 different area names relate to the same area ID.
Advanced Lua
Lua version
Mudlet uses Lua 5.1.
Lua tables
A good overview of tables is available on Lua's wiki in the TablesTutorial. Nick Gammon has also written a nice overview on how to deal with Lua tables.
How to use multimatches[n][m]
multimatches[n][m] is the complement of matches[n] when matching multi-line triggers. multimatches[n][m] stores its matches by lines, inside each line are the relevant matches to it. The following example can be tested on the game batmud.bat.org:
In the case of a multiline trigger with these 2 Perl regex as conditions:
^You have (\w+) (\w+) (\w+) (\w+)
^You are (\w+).*(\w+).*
The command "score" generates the following output on batMUD:
 You have an almost non-existent ability for avoiding hits.
 You are irreproachably kind.
 You have not completed any quests.
 You are refreshed, hungry, very young and brave.
 Conquer leads the human race.
 Hp:295/295 Sp:132/132 Ep:182/181 Exp:269 >
If you add this script to the trigger:
showMultimatches()The script, i.e. the call to the function showMultimatches() generates this output:
 -------------------------------------------------------
 The table multimatches[n][m] contains:
 -------------------------------------------------------
 regex 1 captured: (multimatches[1][1-n])
           key=1 value=You have not completed any quests
           key=2 value=not
           key=3 value=completed
           key=4 value=any
           key=5 value=quests
 regex 2 captured: (multimatches[2][1-n])
           key=1 value=You are refreshed, hungry, very young and brave
           key=2 value=refreshed
           key=3 value=young
           key=4 value=and
           key=5 value=brave
 -------------------------------------------------------
The function showMultimatches() prints out the content of the table multimatches[n][m]. You can now see what the table multimatches[][] contains in this case. The first trigger condition (=regex 1) got as the first full match "You have not completed any quests". This is stored in multimatches[1][1] as the value of key=1 in the sub-table matches[1] which, in turn, is the value of key=1 of the table multimatches[n][m].
The structure of the table multimatches:
multimatches {
                1 = {
                       matches[1] of regex 1
                       matches[2] of regex 1
                       matches[3] of regex 1
                              ...
                       matches[m] of regex 1 },
                2 = {
                       matches[1] of regex 2
                       matches[2] of regex 2
                             ...
                       matches[m] of regex 2 },
                 ...         ...
                n = {
                       matches[1] of regex n
                       matches[2] of regex n
                             ...
                       matches[m] of regex n }
}
The sub-table matches[n] is the same table matches[n] you get when you have a standard non-multiline trigger. The value of the first key, i. e. matches[1], holds the first complete match of the regex. Subsequent keys hold the respective capture groups. For example: Let regex = "You have (\d+) gold and (\d+) silver" and the text from the game = "You have 5 gold and 7 silver coins in your bag." Then matches[1] contains "You have 5 gold and 7 silver", matches[2] = "5" and matches[3] = "7". In your script you could do:
myGold = myGold + tonumber( matches[2] )
mySilver = mySilver + tonumber( matches[3] )
However, if you’d like to use this script in the context of a multiline trigger, matches[] would not be defined as there are more than one regex. You need to use multimatches[n][m] in multiline triggers. Above script would look like this if above regex would be the first regex in the multiline trigger:
myGold = myGold + tonumber( multimatches[1][2] )
mySilver = mySilver + tonumber( multimatches[1][3] )
What makes multiline triggers really shine is the ability to react to game output that is spread over multiple lines and only fire the action (=run the script) if all conditions have been fulfilled in the specified amount of lines.
Regex in Lua
Lua has its own, fast and lightweight pattern matching built in - see 20.2 – Patterns. Should you need proper regex however, Mudlet has lrexlib available - which works as a drop-in replacement; replace string. with rex. - for example string.gsub to rex.gsub. See manual for documentation.
-- example: strip out trailing .0's from text using a regex
local stripped = rex.gsub("1.0.0", [[(\.0+)+$]], '')
print(stripped)
The lrexlib manual can be hard to read, so the instructions in this section should provide most of what you need.
lrexlib comes preinstalled in Mudlet and it is automatically bounded to the rex variable, as the rex_pcre version. If you want to test your lua code outside Mudlet, you have to install it yourself. The easiest installation method uses luarocks. There are a few flavors that you can specify, but in this section we will focus on the POSIX and PCRE flavors.
luarocks install --local lrexlib-POSIX
luarocks install --local lrexlib-PCRE
After installation, you can use the library:
> local rex = require("rex_posix")If you set the flavor to rex_pcre, your code should work afterwards in Mudlet.
Keep in mind that precomputing a pattern with the new function has the advantage that objects resulted will be garbage collected and that regexes are greedy by default.
Another thing that may surprise some users is that, when escaping, you need to backslashes:
> rex.match("The answer is 42", "(\\d+)")You can also achieve this using long string literal syntax, where you don't need the double escape:
> rex.match("The answer is 42", [[(\d+)]])There are a few functions that you need to know: gsub, count, split, find, match.
count
The count function counts the matches:
> print(rex.count("ab", "."))
2
A single dot here has the same meaning it has in POSIX regexes.
You can also precompute the pattern, using the new function:
> print(rex.count("ab", rex.new"."))
2
Remember that regexes are greedy by default:
> print(rex.count("aaa", ".*"))
1
split
The split function splits a string according to a regex pattern:
> for a in rex.split("aba", "b") do
print(a)
end
a
a
> for a in rex.split("aba", ",") do
print(a)
end
abaBe careful though, because while the split consumes all the characters with the same value, if they are adjacent, you will also have the borders between them resulting in an empty string:
> for a in rex.split("abba", "b") do
print(a)
end
a

a
find
The find function searches for the first match, and returns the offsets where the match starts and ends.
> print(rex.find("aaa", "b"))
nil

> print(rex.find("aba", "b"))
2	2
find also takes an additional parameter, which is the starting position:
> print(rex.find("abab", "b"))
2	2
> print(rex.find("abab", "b", 3))
4	4
A negative starting position will circle back from the end:
> print(rex.find("ababab", "b", -1))
6	6
> print(rex.find("ababab", "b", -3))
4	4
match
The match function works similarly to the find function, but returns the matches instead of the indices:
> print(rex.match("abcdef", "ab"))
ab
> print(rex.match("abcdef", ".*"))
abcdef
> print(rex.match("abcdef", "ab.."))
abcd
> print(rex.match("abcdef", ".*", 3))
cdef
> print(rex.match("abcdef", ".*", -3))
def
gsub
The gsub function replaces the pattern in the string, with the value in the third parameter:
> print(rex.gsub("abcdef", "[abef]+", ""))
cd	2	2
This snippet replaces all the "a", "b", "e" or "f" characters with the empty string, so only "c" and "d" remain.
The fourth parameter determines how many replacements are made:
> print(rex.gsub("abcdef", "[abef]+", "", 1))
cdef	1	1
Because the regex is greedy, the "ab" is a single match, so it gets replaced.
PCRE specific functionality
The case insensitive flag:
> rex = require("rex_pcre")
> flags = rex.flags()
> print(rex.find("ABab", "a", 0, flags.CASELESS))
1	1
Coroutines
Mudlet supports Lua's coroutines starting with 3.2.0, which opens up a whole lot of possibilities for the way you program your scripts. A pretty technical description and a tutorial is available, but for a quick explanation, think of coroutines allowing you to pause and resume running a function. If you're familiar with other clients, it is something like a #wait statement where a script will stop running, except unlike a #wait which auto-resumes the script later, you resume it when it yourself whenever you'd like.
Here's an example - add this code as a new script:
function ritual()
  send("get wood")
  -- think of coroutine.yield as yielding (giving away) control,
  -- so the function will stop here and resume on making fire
  -- when called the next time
  coroutine.yield()
  send("make fire")
  coroutine.yield()
  send("jump around")
  coroutine.yield()
  send("sacrifice goat")
end
Make a ^ritual$ alias - which seems big, but that's just because there's a lot of explanation inside it:
-- create a coroutine that'll be running our ritual function
-- or re-use the one we're already using if there is one
ritualcoroutine = ritualcoroutine or coroutine.create(ritual)

-- run the coroutine until a coroutine.yield() and see
-- if there's any more code to run
local moretocome = coroutine.resume(ritualcoroutine)

-- if there's no more code to run - remove the coroutine,
-- so next time you call the alias - a new one gets made
if not moretocome then
  ritualcoroutine = nil
end
Now try doing the ritual command. You'll see that the send()'s are being sent one at a time, instead of all at once as they would have been without the yields. Cool, huh?
You can also install the demo as a package - paste this into Mudlet:
lua installPackage("http://wiki.mudlet.org/images/3/36/Ritual-coroutine-demo.zip")
Note that if you'll be using coroutines as part of a package you'll give to others, remember about the if mudlet.supportscoroutines then return end bit. Older Mudlets that don't support coroutines might crash, which sucks. Newer ones that do support them are completely fine, however!
Coroutines have many uses: finite state machines, running intensive tasks (yielding every once in a while so Mudlet isn't frozen), and so on.
Introspective facilities
Lua brings a helpful debug.getinfo(function) function, which gets you some information about where a function comes from: whenever it's your own, or one defined by Mudlet (in C++ or Lua). You can also use it to get more information on the Alias## / Trigger## objects you see in the error console:
.png)
If you're working on coding Mudlet itself, use this function to tell where the actual definition of a function is.
Event System
Events in Mudlet allow a paradigm of system-building that is easy to maintain (because if you’d like to restructure something, you’d have to do less work), enables interoperability (making a collection of scripts that work with each other is easier) and enables an event-based way of programming.
The essentials of it are as such: you use Scripts to define which events a function should listen to, and when the event is raised, the said function(s) will be called. Events can also have function parameters with them, which’ll be passed onto the receiving functions.
Registering an event handler via UI
Registering an event handler means that you’ll be telling Mudlet what function it should call for you when an event is raised, so it’s a two step process - you need to tell it both what function you’d like to have called, and on what event it should be called.
To tell it what function should be called, create a new script, and give the script the name of the function you’d like to be called. This is the only time where an items name matters in Mudlet. You can define the function right inside the script as well, if you’d like.
Next, we tell it what event or events this function should be called on - you can add multiple entries. To do that, enter the events name in the Add User Defined Event Handler: field, press enter, and it’ll go into the list - and that is all.
Registering an event from a script
You can also register your event with the registerAnonymousEventHandler(event name, function reference, [one shot]) function inside your scripts:
-- example taken from the God Wars 2 (http://godwars2.org) Mudlet UI - forces the window to keep to a certain size
function keepStaticSize()
  setMainWindowSize(1280,720)
end -- keepStaticSize

registerAnonymousEventHandler("sysWindowResizeEvent", keepStaticSize, false)![]() Note: : registerNamedEventHandler can also be used. Doing so causes Mudlet to handle saving of the IDs for you.
Note: : registerNamedEventHandler can also be used. Doing so causes Mudlet to handle saving of the IDs for you.
![]() Note: Mudlet also uses the event system in-game protocols (like ATCP, GMCP and others).
Note: Mudlet also uses the event system in-game protocols (like ATCP, GMCP and others).
Raising a custom event
To raise an event, you'd use the raiseEvent() function:
raiseEvent(name, [arguments...])It takes an event name as the first argument, and then any amount of arguments after it which will be passed onto the receiving functions.
Example of registering and raising an event
Add a script to each profile you need the event.
-- This is the function that will be called when the event is raised.
-- "event" is set to the event name.
-- "arg" is the argument(s) provided with raiseEvent/raiseGlobalEvent.
-- "profile" - Is the profile name from where the raiseGlobalEvent was triggered from
--             It is 'nil' if raiseEvent() was used.
function onMyEvent(event, arg, profile)
  echo("Event: " .. event .. "\n")
  echo("Arg  : " .. arg .. "\n")
  -- If the event is not raised with raiseGlobalEvent() profile will be 'nil'
  echo("Profile: " .. (profile or "Local") .. "\n")
end

-- Register the event handler.
registerAnonymousEventHandler("my_event", onMyEvent)
To raise the event you can call:
-- Trigger only in the current profile:
raiseEvent("my_event", "Hello world!")

-- Trigger the event in all OTHER profiles:
raiseGlobalEvent("my_event", "Hello World!")
To review, count and extract from an unknown number of arguments received by an event:
function eventArgs(...)
  local args = {...}
  local amount = #args
  local first = args[1]
  echo("Number of arguments: " .. amount)
  echo("\nTable of all arguments: ")
  display(args)
  echo("First argument: " .. first)
  echo("\n\n")
end
Gamepad functionality
![]() Note: will be removed in 4.18 as this is blocking Mudlet updates and is not used by players.
Note: will be removed in 4.18 as this is blocking Mudlet updates and is not used by players.
Gamepad functions are not fully supported with all operating systems and hardware. Windows supports XInput devices like Xbox 360 and Xbox One controllers. DirectInput controllers like a PlayStation 4 controller can be translated to XInput with third party software. Mudlet on Linux can support gamepads but only if you compile it yourself. The automated builds are made using the oldest supported version of Ubuntu, and the Qt5 gamepad module was not available on Ubuntu 18.04 LTS.
Mudlet-raised events
Mudlet itself also creates events for your scripts to hook on. The following events are generated currently:
AdjustableContainerReposition
Raised while a adjustable container is re-positioned.
function repositioningContainer(eventName, containerName, width, height, x, y, mouseAction)
  print(f"{containerName}: {x}x, {y}y, {width}x{height}, using mouse? {mouseAction}")
end

registerAnonymousEventHandler("AdjustableContainerReposition", repositioningContainer)
AdjustableContainerRepositionFinish
Raised when an adjustable container done being re-positioned.
function finishedRepositioning(eventName, containerName, width, height, x, y)
  print(f"{containerName}: {x}x, {y}y, {width}x{height}")
end

registerAnonymousEventHandler("AdjustableContainerRepositionFinish", finishedRepositioning)
channel102Message
Raised when a telnet sub-option 102 message is received (which comprises of two numbers passed in the event). This is of particular use with the Aardwolf MUD who originated this protocol. See this forum topic for more about the Mudlet Aardwolf GUI that makes use of this.
mapModeChangeEvent
Raised when the mapper is switching between "view-only" and "editing" mode of the Visual Map Editor. A value of "editing" or "viewing" will be given as argument to indicate which mode was entered.
mapOpenEvent
Raised when the mapper is opened - either the floating dock or the in-Mudlet widget.
sysAppStyleSheetChange
Raised when setAppStyleSheet is called and a new stylesheet applied to Mudlet.
-- This will respond to a future (as yet unpublished) addition to the Mudlet code that will allow some
-- of a default application style sheet to be supplied with Mudlet to compensate for some text colors
-- that do not show up equally well in both light and dark desktop themes. That, perhaps, might finally
-- allow different colored texts to be uses again for the trigger item types!
function appStyleSheetChangeEvent( event, tag, source )
  if source == "system" then
    colorTable = colorTable or {}
    if tag == "mudlet-dark-theme" then
      colorTable.blue = {64, 64, 255}
      colorTable.green = {0, 255, 0}
    elseif tag == "mudlet-light-theme" then
      colorTable.blue = {0, 0, 255}
      colorTable.green = {64, 255, 64}
    end
  end
endsysBufferShrinkEvent
Raised when the oldest lines are removed from the back of any console or buffer belonging to a profile because it has reached the limit (either the default or that set by setConsoleBufferSize). The two additional arguments within the event are: the name of the console or buffer and the number of lines removed from the beginning of the buffer. This information will be useful for any situation where a line number is being stored as it will need to be decremented by that number of lines in order to continue to refer to the same line (assuming that it is still present - indicated by the number remaining positive) after the oldest ones have been removed.
sysConnectionEvent
Raised when the profile becomes connected to a MUD.
sysCustomHttpDone
Raised whenever a customHTTP() request completes successfully. Arguments with the event are the URL that the request was sent to and the response body (if it's less than 10k characters) and HTTP method.
See also sysCustomHttpError.
sysCustomHttpError
Raised whenever a customHTTP() request fails. Arguments are the error message and the URL that the request was sent to and HTTP method.
See also sysCustomHttpDone.
sysDataSendRequest
Raised right before a command from the send(), sendAll() functions or the command line is sent to the game - useful for keeping track of what your last command was, manipulating input or even denying the command to be sent if necessary with denyCurrentSend().
sysDataSendRequest will send the event name and the command sent (in string form) to the functions registered to it. IE: commandSent in the example below will be "eat hambuger" if the user entered only that into command line and pressed enter, send("eat hamburger"), sendAll("eat humburger", "eat fish") or sendAll("eat fish", "eat humburger")
Note: if you'll be making use of denyCurrentSend(), you really should notify the user that you denied their command - unexperienced ones might conclude that your script or Mudlet is buggy if they don't see visual feedback. Do not mis-use this and use it as keylogger either.
-- cancels all "eat hambuger" commands
function cancelEatHamburger(eventName, commandSent)
  if commandSent == "eat hamburger" then
    denyCurrentSend() --cancels the command sent.
    cecho("<red>Denied! You can't do "..commandSent.." right now.\n")
  end --if commandSent == eat hamburger
end

registerAnonymousEventHandler("sysDataSendRequest", cancelEatHamburger)
If you wanted to control input you could set a bool after a trigger. This is useful if you want alias like control, do not know what text will be entered, but do know a trigger that WILL occur just before the user enters the command.
function controlInput(_, command)
  if changeCMDInput then
    changeCMDInput = false --set this if check to false to it doesn't occur every input
    --Also set the bool check BEFORE any send() functions within a sysDataSendRequest function
    sendAll(command .. "some target", command .. "some other target", true) --Duplicate and unknown command
    denyCurrentSend() --Deny the original command, not the commands sent with sendAll.
  end
end
registerAnonymousEventHandler("sysDataSendRequest", controlInput)
Take note that functions registered under sysDataSendRequest WILL trigger with ALL commands that are sent.
sysDeleteHttpDone
Raised whenever a deleteHTTP() request completes successfully. Arguments with the event are the URL that the request was sent to and the response body (if it's less than 10k characters).
See also sysDeleteHttpError.
sysDeleteHttpError
Raised whenever a deleteHTTP() request fails. Arguments are the error message and the URL that the request was sent to.
See also sysDeleteHttpDone.
sysDisconnectionEvent
Raised when the profile becomes disconnected, either manually or by the game.
If you'd like to automatically reconnect when you get disconnected, make a new Script and add this inside:
registerAnonymousEventHandler("sysDisconnectionEvent", reconnect)sysDownloadDone
Raised when Mudlet is finished downloading a file successfully - the location of the downloaded file is passed as a second argument.
Example - put it into a new script and save it to run:
-- create a function to parse the downloaded webpage and display a result
function downloaded_file(_, filename)
  -- is the file that downloaded ours?
  if not filename:find("achaea-who-count.html", 1, true) then return end

  -- read the contents of the webpage in
  local f, s, webpage = io.open(filename)
  if f then webpage = f:read("*a"); io.close(f) end
  -- delete the file on disk, don't clutter
  os.remove(filename)

  -- parse our downloaded file for the player count
  local pc = webpage:match([[Total: (%d+) players online]])
  display("Achaea has "..tostring(pc).." players on right now.")
end

-- register our function to run on the event that something was downloaded
registerAnonymousEventHandler("sysDownloadDone", downloaded_file)

-- download a list of fake users for a demo
downloadFile(getMudletHomeDir().."/achaea-who-count.html", "https://www.achaea.com/game/who")
You should see a result like this:

sysDownloadError
Raised when downloading a file failed - the second argument contains the error message, the third the local filename that was to be used and the actual URL used (might not be the same as what was given if redirection took place).
- Example
--if a download fails notify the player.
function downloadErrorEventHandler(event, errorFound, localFilename, usedUrl)
    cecho("fuction downloadErrorEventHandler, "..errorFound)
    debugc("fuction downloadErrorEventHandler, "..errorFound) --display to error screen in editor
end --function downloadErrorEventHandler
registerAnonymousEventHandler("sysDownloadError", downloadErrorEventHandler)
sysDownloadFileProgress
Raised while file is being downloaded to indicate progess of download.
The arguments passed areː: event name, url of download, bytes downloaded, total bytes (if available).
- Example
-- will show progress bar while download file and hide it after file download is complete
local progressBar = Geyser.Gauge:new({
  name="downloadProgressBar",
  x="25%", y="10%",
  width="50%", height="5%",
})
progressBar:setFontSize(13)
progressBar:setAlignment("center")
progressBar:hide()


local fileUrl = "https://www.mudlet.org/download/Mudlet-4.10.1-linux-x64.AppImage.tar"
local targetFile = getMudletHomeDir() .. "/Mudlet.tar"
function handleProgress(_, url, bytesDownloaded, totalBytes)
  if url ~= fileUrl then
    return
  end

  progressBar:show()

  if not totalBytes then
    bytesDownloaded = 0
    totalBytes = 1
  end

  progressBar:setValue(bytesDownloaded, totalBytes, math.floor((bytesDownloaded / totalBytes) * 100) .. "%")
end

registerAnonymousEventHandler("sysDownloadFileProgress", handleProgress)

function hideProgressBar()
  tempTimer(3, function() progressBar:hide() end)
end

registerAnonymousEventHandler("sysDownloadDone", hideProgressBar)
registerAnonymousEventHandler("sysDownloadError", hideProgressBar)

downloadFile(targetFile, fileUrl)sysDropEvent
Raised when a file is dropped on the Mudlet main window or a userwindow. The arguments passed areː filepath, suffix, xpos, ypos, and consolename - "main" for the main window and otherwise of the userwindow/miniconsole name.
function onDragAndDrop(_, filepath, suffix, xpos, ypos, consolename)
  print(string.format("Dropped new file into %s: %s (suffix: %s)", consolename, filepath, suffix))
end
registerAnonymousEventHandler("sysDropEvent", onDragAndDrop)
sysDropUrlEvent
Raised when a url is dropped on the Mudlet main window or a userwindow. As an url at the moment Mudlet understands The arguments passed areː url, schema, xpos, ypos, and consolename - "main" for the main window and otherwise of the userwindow/miniconsole name.
function onDragAndDropUrl(_, url, schema, xpos, ypos, consolename)
  print(string.format("Dropped new url into %s: %s (suffix: %s)", consolename, filepath, suffix))
  if schema == "http" or schema == "https" then
    print("\nOh boy... this might be a link to some website")
  end
end
registerAnonymousEventHandler("sysDropUrlEvent", onDragAndDropUrl)
sysExitEvent
Raised when Mudlet is shutting down the profile - a good event to hook onto for saving all of your data.
sysGetHttpDone
Raised whenever a getHTTP() request completes successfully. Arguments with the event are the URL that the request was sent to and the response body (if it's less than 10k characters).
This event is also raised when a post/put/delete request redirects to a GET.
See also sysGetHttpError.
sysGetHttpError
Raised whenever a getHTTP() request fails. Arguments are the error message and the URL that the request was sent to.
See also sysGetHttpDone.
sysInstall
Raised right after a module or package is installed by any means. This can be used to display post-installation information or setup things.
Event handlers receive the name of the installed package or module as additional argument.
![]() Note: Installed modules will raise this event handler each time the synced profile is opened. sysInstallModule and sysInstallPackage are not raised by opening profiles.
Note: Installed modules will raise this event handler each time the synced profile is opened. sysInstallModule and sysInstallPackage are not raised by opening profiles.
function myScriptInstalled(_, name)
  -- stop if what got installed isn't my thing
  if name ~= "my script name here" then return end

  print("Hey, thanks for installing my thing!")
end
registerAnonymousEventHandler("sysInstallPackage", myScriptInstalled)
sysInstallModule
Raised right after a module is installed through the module dialog. This can be used to display post-installation information or setup things.
See also sysLuaInstallModule for when a module is installed via Lua.
Event handlers receive the name of the installed module as well as the file name as additional arguments.
sysInstallPackage
Raised right after a package is installed by any means. This can be used to display post-installation information or setup things.
Event handlers receive the name of the installed package as well as the file name as additional arguments.
sysIrcMessage
Raised when the IRC client receives an IRC message. The sender's name, channel name, and their message are passed as arguments to this event.
Starting with Mudlet 3.3, this event changes slightly to provide more information from IRC network messages. Data such as status codes, command responses, or error messages sent by the IRC Server may be formatted as plain text by the client and posted to lua via this event.
- sender: may be the nick name of an IRC user or the name of the IRC server host, as retrievable by getIrcConnectedHost()
- channel: may not always contain a channel name, but will be the name of the target/recipient of a message or action. In some networks the name may be that of a service (like "Auth" for example)
- Example
function onIrcMessage(_, sender, target, message)
  echo(string.format('(%s) %s says, "%s"\n', target, sender, message))
end

registerAnonymousEventHandler("sysIrcMessage", onIrcMessage)
To send a message, see sendIrc().
sysLabelDeleted
Raised after a label is deleted, with the former label's name as an argument.
sysLoadEvent
Raised after Mudlet is done loading the profile, after all of the scripts, packages, and modules are installed. Note that when it does so, it also compiles and runs all scripts - which could be a good idea to initialize everything at once, but beware - scripts are also run when saved. Hence, hooking only on the sysLoadEvent would prevent multiple re-loads as you’re editing the script.
sysLuaInstallModule
Raised right after a module is installed through the Lua installModule() command. This can be used to display post-installation information or setup things.
Event handlers receive the name of the installed module as well as the file name as additional arguments.
sysLuaUninstallModule
Raised right before a module is removed through the lua uninstallModule command. This can be used to display post-removal information or for cleanup.
Event handlers receive the name of the removed module as additional argument.
sysManualLocationSetEvent
Raised whenever the "set location" command (on the 2D mapper context menu) is used to reposition the current "player room". It provides the room ID of the new room ID that the player has been moved to.
sysMapAreaChanged
Raised whenever the area being viewed in the mapper changes, it returns two additional arguments being the areaID numbers being changed to and the previously viewed area.
sysMapDownloadEvent
Raised whenever an MMP map is downloaded and loaded in.
sysMediaFinished
Raised when media finishes playing. This can be used in a music player for example to start the next song.
Event handlers receive the media file name and the file path as additional arguments.
sysPathChanged
Raised whenever file or directory added through addFileWatch() is modified.
For directories this event is emitted when the directory at a specified path is modified (e.g., when a file is added or deleted) or removed from disk. Note that if there are several changes during a short period of time, some of the changes might not emit this signal. However, the last change in the sequence of changes will always generate this signal.
For files this event is emitted when the file at the specified path is modified, renamed or removed from disk.
- Example
herbs = {}
local herbsPath = getMudletHomeDir() .. "/herbs.lua"
function herbsChangedHandler(_, path)
  if path == herbsPath then
    table.load(herbsPath, herbs)
    removeFileWatch(herbsPath)
  end
end

addFileWatch(herbsPath)
registerAnonymousEventHandler("sysPathChanged", herbsChangedHandler)
sysPostHttpDone
Raised whenever a postHTTP() request completes successfully. Arguments with the event are the URL that the request was sent to and the response body (if it's less than 10k characters).
See also sysPostHttpError.
sysPostHttpError
Raised whenever a postHTTP() request fails. Arguments are the error message and the URL that the request was sent to.
See also sysPostHttpDone.
sysProfileFocusChangeEvent
- Raised whenever a profile becomes or stops being the foreground one when multi-playing, whether multi-view (show all profiles side-by-side) is active or not. The event comes with a second boolean argument which is true if the profile is now the one that has the focus, i.e. will receive keystrokes entered from the keyboard, or false if the focus has just switched from it to another profile.
sysProtocolDisabled
Raised whenever a communications protocol is disabled, with the protocol name passed as an argument. Current values Mudlet will use for this are: GMCP, MDSP, ATCP, MXP, and channel102.
sysProtocolEnabled
Raised whenever a communications protocol is enabled, with the protocol name passed as an argument. Current values Mudlet will use for this are: GMCP, MDSP, ATCP, MXP, and channel102.
function onProtocolEnabled(_, protocol)
  if protocol == "GMCP" then
    print("GMCP enabled! Now we can use GMCP data.")
  end
end
sysPutHttpDone
Raised whenever a putHTTP() request completes successfully. Arguments with the event are the URL that the request was sent to and the response body (if it's less than 10k characters).
See also sysPutHttpError.
sysPutHttpError
Raised whenever a putHTTP() request fails. Arguments are the error message and the URL that the request was sent to.
See also sysPutHttpDone.
sysSoundFinished
This event is obsolete in Mudlet 4.15. Please replace this with sysMediaFinished()
sysSpeedwalkFinished
Raised when a speedwalk finishes, either one started by speedwalk() or the generic mapping script
sysSpeedwalkPaused
Raised when a speedwalk is paused, either via pauseSpeedwalk() or the generic mapping script.
sysSpeedwalkResumed
Raised when a speedwalk is resumed after pausing, whether it's the generic mapping script or the resumeSpeedwalk() function
sysSpeedwalkStarted
Raised when a speedwalk is started, either by the speedwalk() function or the generic mapping script
sysSpeedwalkStopped
Raised when a speedwalk is stopped prematurely by stopSpeedwalk() or the generic mapping script
sysSyncInstallModule
Raised right after a module is installed through the "sync" mechanism. This can be used to display post-installation information or setup things.
Event handlers receive the name of the installed module as well as the file name as additional arguments.
sysSyncUninstallModule
Raised right before a module is removed through the "sync" mechanism. This can be used to display post-removal information or for cleanup.
Event handlers receive the name of the removed module as additional argument.
sysTelnetEvent
Raised whenever an unsupported telnet option is encountered, allowing you to handle it yourself. The arguments that get passed with the event are type, telnet option, and the message.
sysUninstall
Raised right before a module or package is uninstalled by any means. This can be used to display post-removal information or for cleanup.
Event handlers receive the name of the removed package or module as additional argument.
sysUninstallModule
Raised right before a module is removed through the module dialog. This can be used to display post-removal information or for cleanup.
Event handlers receive the name of the removed module as additional argument.
sysUninstallPackage
Raised right before a package is removed by any means. This can be used to display post-removal information or for cleanup.
Event handlers receive the name of the removed package as additional argument.
sysUnzipDone
Raised when a zip file is successfully unzipped using unzipAsync()
Event handlers receive the zip file name and the unzip path as additional arguments.
sysUnzipError
Raised when a zip file fails to unzip using unzipAsync()
Event handlers receive the zip file name and the unzip path as additional arguments.
sysUserWindowResizeEvent
Raised when a userwindow is resized, with the new height and width coordinates and the windowname passed to the event. A common usecase for this event is to move/resize your UI elements according to the new dimensions.
See alsoː sysWindowResizeEvent
Example
This sample code will echo whenever a resize happened with the new dimensions:
function resizeEvent( event, x, y, windowname )
  echo("RESIZE EVENT: event="..event.." x="..x.." y="..y.." windowname="..windowname.."\n")
end
sysWindowMousePressEvent
Raised when a mouse button is pressed down anywhere on the main window (note that a click is composed of a mouse press and mouse release). The button number, the x,y coordinates of the click and the windowname are reported.
![]() Note: Windowname reported in Mudlet 4.9+
Note: Windowname reported in Mudlet 4.9+
See alsoː sysWindowMouseReleaseEvent
Example
function onClickHandler( event, button, x, y, windowname )
  echo("CLICK event:"..event.." button="..button.." x="..x.." y="..y.." windowname="..windowname.."\n")
end
sysWindowMouseReleaseEvent
Raised when a mouse button is released after being pressed down anywhere on the main window (note that a click is composed of a mouse press and mouse release).
See sysWindowMousePressEvent for example use.
sysWindowResizeEvent
Raised when the main window is resized, or when one of the borders is resized, with the new height and width coordinates passed to the event. A common usecase for this event is to move/resize your UI elements according to the new dimensions.
See alsoː sysUserWindowResizeEvent
Example
This sample code will echo whenever a resize happened with the new dimensions:
function resizeEvent( event, x, y )
  echo("RESIZE EVENT: event="..event.." x="..x.." y="..y.."\n")
end
ttsPitchChanged
Raised when text-to-speech function ttsSetPitch(...) has been called.
See also: Manual:Text-to-Speech
ttsRateChanged
Raised when text-to-speech function ttsSetRate(...) has been called.
See also: Manual:Text-to-Speech
ttsSpeechError
Raised when a text-to-speech function encountered an error while changing states (eg. from stopped to playing to pausing). Usually indicated when the operating system TTS engine is not working correctly.
See also: Manual:Text-to-Speech
ttsSpeechPaused
Raised when text-to-speech function ttsPause(...) has been called.
See also: Manual:Text-to-Speech
ttsSpeechQueued
Raised when text-to-speech function ttsQueue(...) has been called.
See also: Manual:Text-to-Speech
ttsSpeechReady
Raised when the text-to-speech engine is ready to beginning processing text.
See also: Manual:Text-to-Speech
ttsSpeechStarted
Raised when text-to-speech functions ttsSpeak(...) or ttsResume(...) have been called.
See also: Manual:Text-to-Speech
ttsVoiceChanged
Raised when text-to-speech functions ttsSetVoiceByIndex(...) or ttsSetVoiceByName(...) have been called.
See also: Manual:Text-to-Speech
ttsVolumeChanged
Raised when text-to-speech function ttsSetVolume(...) has been called.
See also: Manual:Text-to-Speech
Supported Protocols
Mudlet supports CHARSET, GMCP, MSSP, MSP, ATCP, Aardwolfs 102, MSDP, and the MXP Protocol.
CHARSET, MXP, MSSP, MSP, GMCP and 102 are enabled by default, MSDP can be enabled in settings.

GMCP
Generic Mud Communication Protocol, or GMCP, is a protocol for game servers to communicate information with game clients in a separate channel from the one which carries all of the text that makes up the game itself. Enabling the Debug window will show you GMCP events as they are coming in, and to get an idea of what information is currently stored, hit the Statistics button.
When working with GMCP on IRE games, this GMCP reference is a useful tool.
Using GMCP
Receiving GMCP data
To "trigger" on GMCP messages, you'll need to create an event handler - Mudlet will call it for you whenever relevant GMCP data is received.
As an example, create a new script and give it a name of the function you'd like to be called when the relevant GMCP message is received. Then, add the GMCP event you'd like the function to fire on under the registered event handlers left. Lastly, define the function - either in this or any other script - and you'll be done. The GMCP data received will be stored in the corresponding field of the gmcp table, which your function will read from.
Example:

The test_gmcp() function will be called whenever Char.Vitals is received from the game, and it'll echo the latest data on the screen.
Sending GMCP data
Certain modules will only send data when a request is made by your client. In Mudlet, you can make such a request using the command sendGMCP("command"). Read your game's relevant documentation, such as the IRE document on GMCP, for information about specific modules.
- See Also: sendGMCP
Managing GMCP modules
While some GMCP modules are enabled by Mudlet by default when you connect with a GMCP enabled game, others may not be 'standard' modules and are instead specific to the game itself. In order to provide a way to manage GMCP modules without scripts causing modules in use by other scripts to be disabled.
Registering user
While this step is no longer strictly required, you can register your 'user' with gmod using
gmod.registerUser("MyUser")Where MyUser is your plugin/addon/whatever name. However, your user will be automatically registered if you enable or disable any modules using it. Which leads us to...
Enabling modules
Enabling a GMCP module is as easy as:
gmod.enableModule("MyUser", "Module.Name")If MyUser has not been registered previously, then they will be automatically registered when you call this function. An example of a module which would need to be enabled this way is the IRE.Rift module provided by IRE MUDs.
-- add this to a login trigger, or anything that will get done just once per login
gmod.enableModule("<character name>", "IRE.Rift")
Another example would be the Combat module in Lithmeria, which isn't enabled by default:
-- add this to a login trigger, or anything that will get done just once per login
gmod.enableModule("<character name>", "Combat")
Disabling modules
Disabling a GMCP module is just as easy as enabling it:
gmod.disableModule("MyUser", "Module.Name")The main difference being that the module will be turned on as soon as you enable it if it is not already enabled. If you disable it, it will not be disabled with the server until every user of that module has disabled it. This prevents script A from disabling modules that script B may still be using.
Thorough GMCP tutorial
A good GMCP tutorial that walks you through receiving and sending GMCP data is available here - take a read!
MSDP
MSDP (Mud Server Data Protocol) is a protocol for game servers to communicate information with game clients in a separate channel from the one which carries all of the text that makes up the game itself. Mudlet can be configured to use MSDP by clicking on the Settings button (or Options->Preferences in the menu, or <alt>p). The option is on the General tab.
Once MSDP is enabled, you will need to reconnect to the game so that Mudlet can inform the server it is ready to receive MSDP information. Please note that some servers don't both send MSDP and GMCP at the same time, so even if you enable both in Mudlet, the server will choose to send only one of them.
Enabling the Debug window will show you MSDP events as they are coming in, and to get an idea of what information is currently stored, hit the Statistics button. Also see MSDP reference for some of the commands and values your server might support.
Using MSDP
Receiving MSDP data
To "trigger" on MSDP messages, you'll need to create an event handler - Mudlet will call it for you whenever relevant MSDP data is received.
As an example, lets create a script that'll track whenever we move - that is, the room number changes. To begin with, we need to ask the game to be sending us updates whenever we move - so do:
lua sendMSDP("REPORT", "ROOM_VNUM")
in the command-line first to enable reporting of the room number and name. Then, create a new script and give it a name of the function you'd like to be called when the relevant MSDP message is received. Add the MSDP event you'd like the function to fire on under the registered event handlers - in our case, msdp.ROOM_VNUM. Lastly, define the function - either in this or any other script - and you'll be done. The MSDP data received will be stored in the corresponding field of the msdp table, which your function will read from.
Example:

The test_msdp() function will be called whenever ROOM_VNUM is received from the game, and it'll echo the latest data on the screen.
Sending MSDP data
You can use sendMSDP to send information via MSDP back to the game. The first parameter to the function is the MSDP variable, and all the subsequent ones are values. See the MSDP documentation for some examples of data that you can send:
-- ask the server to report your health changes to you. Result will be stored in msdp.HEALTH in Mudlet
sendMSDP("REPORT", "HEALTH")

-- client - IAC SB MSDP MSDP_VAR "SEND" MSDP_VAL "AREA NAME" MSDP_VAL "ROOM NAME" IAC SE in the documentation translates to the following in Mudlet:
sendMSDP("SEND", "AREA NAME", "ROOM NAME")- See Also: sendMSDP
Encoding
More and more game servers are looking beyond ASCII encoding to support extended character sets, like UTF-8 encoding, to meet demand for localization of language and the use of emoji characters.
Encoding in Mudlet
Reference our manual page on Unicode for more information on Unicode updating, scripting and trigger support in Mudlet.
Manual Encoding Updates
Mudlet supports manual selection of a server data encoding. Mudlet users may update the server data encoding for a profile by choosing Settings, General and selecting a server data encoding from the corresponding drop-down menu. The server data encoding defaults to ASCII. When the setting is changed, the selected encoding saves with the user's profile information.
Automated Encoding Updates
Negotiating the CHARSET telnet option provides game servers the capability to automatically request a preferred character set with Mudlet per RFC 2066. Game servers may send a telopt WILL CHARSET (42), Mudlet responds with a DO CHARSET (42), then the game server may send SB CHARSET (42) REQUEST (1) <separator_character> <charset>. Mudlet will respond with SB CHARSET (42) ACCEPTED (2) <charset> if it supports that character set. Mudlet will respond with SB CHARSET (42) REJECTED (3) if it refuses the requested character set(s). When Mudlet accepts a requested character set, it automatically updates the server data encoding viewable in the Settings menu. It is possible to send a list of requested character sets to Mudlet by appending additional "<separator_character> <charset>" byte groups to a SB CHARSET (42) REQUEST (1).
Success example:
| Server | Mudlet |
|---|---|
| IAC WILL CHARSET (42) | IAC DO CHARSET (42) |
| IAC SB CHARSET (42) REQUEST (1) <space> UTF-8 IAC SE | IAC SB CHARSET (42) ACCEPTED (2) UTF-8 IAC SE |
The following is an example of an attempted negotiation where the encoding was not available with Mudlet:
| Server | Mudlet |
|---|---|
| IAC WILL CHARSET (42) | IAC DO CHARSET (42) |
| IAC SB CHARSET (42) REQUEST (1) <space> DEEP-6 IAC SE | IAC SB CHARSET (42) REJECTED (3) IAC SE |
If a Mudlet user does not want to negotiate character set, they may choose the Settings, Special Options menu item in Mudlet and enable "Force CHARSET negotiation off". The following is an example of an attempted negotiation where "Force CHARSET negotiation off" is enabled.
| Server | Mudlet |
|---|---|
| IAC WILL CHARSET (42) | IAC DONT CHARSET (42) |
CHARSET negotiation is available in Mudlet 4.10+.
MSSP
Mud Server Status Protocol, or MSSP, provides a way for game crawlers (i.e. MSSP Mud Crawler) and game listing sites (search for Listings here) to gather detailed information about a game, including dynamic information like boot time and the current amount of online players. It also makes submitting a new game entry very simple on game listing sites. A player or administrator is only required to fill in the hostname and port and other information is gathered from behind the scenes.
MSSP in Mudlet
The MSSP data presented in Mudlet will enable MSSP standard data fields to be made accessible for scripting. Some useful fields include the game name, number of players, uptime, game hostname, game port, codebase, admin contact, Discord invite URL, year created, link to an icon, ip address, primary language, game location, website and several others may be available. It is up to the game in question to populate the data, so don't expect all fields to be filled in.
MSSP is available in Mudlet 4.1+.
Receiving MSSP Data
To receive MSSP data in Mudlet, these conditions must be met:
- The Enable MSSP box in the Settings window of Mudlet must be checked (default on).
- The game must negotiate MSSP with clients like Mudlet at its login screen. Details here.
To see whether your game supports MSSP, after connecting, type lua mssp. If the game does not support MSSP, you will see an empty table mssp = {}. If it does you will see information similar to the example below. The data may be accessed in a similar way to the instructions for GMCP listed above. Typically, MSSP data is only sent once per connection.
mssp = {
  HOSTNAME = "stickmud.com",
  VT100 = "1",
  UPTIME = "1565657220",
  MSDP = "0",
  MCP = "0",
  GMCP = "1",
  PORT = "7680",
  ["MINIMUM AGE"] = "13",
  PUEBLO = "0",
  INTERMUD = "-1",
  SKILLS = "100",
  ["HIRING BUILDERS"] = "0",
  PLAYERS = "6",
  CONTACT = "askstickmud@hotmail.com",
  CODEBASE = "LDMud 3.5.0 (3.5.1)",
  ["HIRING CODERS"] = "0",
  ["PAY FOR PERKS"] = "0",
  LOCATION = "Canada",
  GAMESYSTEM = "Custom",
  MCCP = "0",
  SUBGENRE = "Medieval Fantasy",
  ROOMS = "10000",
  STATUS = "Live",
  FAMILY = "LPMud",
  LEVELS = "150",
  CREATED = "1991",
  ["PAY TO PLAY"] = "0",
  IP = "24.138.28.11",
  MOBILES = "-1",
  GAMEPLAY = "Hack and Slash",
  CLASSES = "8",
  NAME = "StickMUD",
  SSL = "7670", -- legacy key, use TLS now please!
  TLS = "7670",
  ANSI = "1",
  ICON = "https://www.stickmud.com/favicon.ico",
  RACES = "12",
  UTF-8 = "0",
  AREAS = "-1",
  MXP = "0",
  HELPFILES = "-1",
  ["XTERM 256 COLORS"] = "0",
  MSP = "1",
  OBJECTS = "9780",
  WEBSITE = "https://www.stickmud.com",
  GENRE = "Fantasy",
  DISCORD = "https://discord.gg/erBBxt",
  LANGUAGE = "English"
}
MSP
Want to add accessibility and excitement into your game? How about implementing sound and music triggers?
Mud Sound Protocol, or MSP, provides a way for games to send sound and music triggers to clients. Clients have the option to implement a framework where the corresponding triggers play. MSP triggers are sent in one direction to game clients and not to game servers. Sounds may be downloaded manually or automatically if conditions are met.
Games could use telnet option negotiation to signal clients support for MSP (WILL, WONT), and toggling MSP processing on and off (DO, DONT). This is communicated using TELOPT 90, which is reserved (unofficially) for the MSP protocol by our community. Games that do not support telnet option negotiation for MSP should provide a means for their players to toggle this feature on and off.
The latest specification for MSP is located here.
MSP in Mudlet
Mudlet processes MSP sound and music triggers in three ways:
- MSP over OOB - Mudlet is capable of receiving hidden, out-of-band telnet sound and music triggers from game servers via messaging with TELOPT 90.
- MSP for Lua - Mudlet triggers may capture and invoke the receiveMSP function available through the Lua interpreter of Mudlet to process MSP.
- MSP over GMCP - Mudlet may receive GMCP events from game servers sent with the Client.Media package.
Sound or music triggers that contain a media file name will be searched for in the media folder of the corresponding Mudlet profile that matches the host for the game. If the media folder and the file are found by Mudlet, it will be played, given the host's operating system supports playing that type of media file. If the file is not found, Mudlet could initiate a download of the media file when provided a URL to find the file. Alternatively, game administrators may instruct players on other ways to transfer media files by 1) creating a media folder in their game's Mudlet profile and 2) copying files or extracting them from an archive (zip).
MSP is available in Mudlet 4.4+
Receiving MSP Data
Processing of MSP is enabled by default on new game profiles. Control whether the processing is on or off through the Settings menu in Mudlet.
MSP over OOB
Game administrators may send sound and music triggers over the out-of-bounds (hidden) telnet channel encoded with TELOPT 90 after performing telnet negotiation with Mudlet. The advantage to this is that all of the communication is behind the scenes with no additional trigger requirements for the player (see MSP over Lua). Games will send the bytes of out-of-band messages to Mudlet in a format like this:
IAC SB TELOPT_MSP !!SOUND(cow.wav L=2 V=100) IAC SE
![]() Note: Game admins: This option does require a TELOPT 90 WILL message.
Note: Game admins: This option does require a TELOPT 90 WILL message.
MSP for Lua
Check for MSP support with your game and enable any options that allow sound and music triggers to be sent to your screen.
You can download the package from Media:MSP.zip or follow the instructions below.
Create a sound trigger to invoke the Lua interpreter:
| Name | Text | Type | Script |
|---|---|---|---|
| Sound Trigger | ^!!SOUND\((\S+?)(?: (.+))?\)$ | perl regex |
|
Create a music trigger to invoke the Lua interpreter:
| Name | Text | Type | Script |
|---|---|---|---|
| Music Trigger | ^!!MUSIC\((\S+?)(?: (.+))?\)$ | perl regex |
|
![]() Note: Game admins: Best practice is to implement a TELOPT 90 WILL message as a signal to the client that MSP is supported. This is not required.
Note: Game admins: Best practice is to implement a TELOPT 90 WILL message as a signal to the client that MSP is supported. This is not required.
If your game does not negotiate MSP, you can download Media:MSP-Alternate.zip or you can use this script in your trigger instead of receiveMSP for MSP Sound:
deleteLine()
local mspFile = nil
local mspVolume = 100
local mspLength = 1
local mspPriority = 50
local mspType = nil
local mspURL = nil
-- Strip !!SOUND() from the line
local line = matches[1]:sub(9, -2)
-- Break up the line into tokens
local tokens = line:split(" ")
-- Iterate through the tokens to discover MSP values
for index, value in ipairs(tokens) do
  if index == 1 then
    mspFile = value
  elseif value:find("V=", 1, true) == 1 or value:find("v=", 1, true) == 1 then
    mspVolume = tonumber(value:sub(3))
  elseif value:find("L=", 1, true) == 1 or value:find("l=", 1, true) == 1 then
    mspLength = tonumber(value:sub(3))
  elseif value:find("P=", 1, true) == 1 or value:find("p=", 1, true) == 1 then
    mspPriority = tonumber(value:sub(3))
  elseif value:find("T=", 1, true) == 1 or value:find("t=", 1, true) == 1 then
    mspType = value:sub(3)
  elseif value:find("U=", 1, true) == 1 or value:find("u=", 1, true) == 1 then
    mspURL = value:sub(3)
  end
end
if mspFile == "Off" and mspURL == nil then
  stopSounds()
else
  playSoundFile(
    {
      name = mspFile,
      volume = mspVolume,
      loops = mspLength,
      priority = mspPriority,
      tag = mspType,
      url = mspURL,
    }
  )
end
If your game does not negotiate MSP, you can use this script in your trigger instead of receiveMSP for MSP Music:
deleteLine()
local mspFile = nil
local mspVolume = 100
local mspLength = 1
local mspContinue = true
local mspType = nil
local mspURL = nil
-- Strip !!MUSIC() from the line
local line = matches[1]:sub(9, -2)
-- Break up the line into tokens
local tokens = line:split(" ")
-- Iterate through the tokens to discover MSP values
for index, value in ipairs(tokens) do
  if index == 1 then
    mspFile = value
  elseif value:find("V=", 1, true) == 1 or value:find("v=", 1, true) == 1 then
    mspVolume = tonumber(value:sub(3))
  elseif value:find("L=", 1, true) == 1 or value:find("l=", 1, true) == 1 then
    mspLength = tonumber(value:sub(3))
  elseif value:find("C=", 1, true) == 1 or value:find("c=", 1, true) == 1 then
    if tonumber(value:sub(3)) == 0 then
      mspContinue = false
    else
      mspContinue = true
    end
  elseif value:find("T=", 1, true) == 1 or value:find("t=", 1, true) == 1 then
    mspType = value:sub(3)
  elseif value:find("U=", 1, true) == 1 or value:find("u=", 1, true) == 1 then
    mspURL = value:sub(3)
  end
end
if mspFile == "Off" and mspURL == nil then
  stopMusic()
else
  playMusicFile(
    {
      name = mspFile,
      volume = mspVolume,
      loops = mspLength,
      continue = mspContinue,
      tag = mspType,
      url = mspURL,
    }
  )
end
MSP over GMCP
Reference Mudlet's documentation on the MUD Client Media Protocol specification for more information.
![]() Note: Game admins: Do not implement a TELOPT 90 WILL message exchange when exclusively using this option.
Note: Game admins: Do not implement a TELOPT 90 WILL message exchange when exclusively using this option.
MSP Troubleshooting
- Wildcards ? or * within the file name do not trigger automatic sound or music downloads. Ensure the sound was downloaded previously prior to using a wildcard.
- Mudlet < 4.11 would not play the MSP sound if it had unknown elements, Mudlet 4.12+ will ignore the unknown elements and do the best it can to play the sound.
MSP Specification
For more insight into the syntax of sound and music triggers, please reference the specification.
Sound packs
As most games have been around for a long time, they often use Mud Sound Protocol (MSP) to play sounds. We often find that the game administrators have documented a downloadable soundpack on their website, or that a 3rd party has made one. In Mudlet, a profile is created for each game, and you can manually create a media folder inside of it and drop in the media files (sound, music). For games using MSP, you can create simple triggers to play them which are documented above.
ATCP
Mudlet includes support for ATCP. This is primarily available on IRE-based MUDs, but Mudlet's implementation is generic enough such that any it should work on others.
![]() Note: ATCP has been overtaken by GMCP, prefer to use that instead.
Note: ATCP has been overtaken by GMCP, prefer to use that instead.
The latest ATCP data is stored in the atcp table. Whenever new data arrives, the previous is overwritten. An event is also raised for each ATCP message that arrives. To find out the available messages available in the atcp table and the event names, you can use display(atcp).
Note that while the typical message comes in the format of Module.Submodule, ie Char.Vitals or Room.Exits, in Mudlet the dot is removed - so it becomes CharVitals and RoomExits.
- Example
room_number = tonumber(atcp.RoomNum)
echo(room_number)
Triggering on ATCP events
If you’d like to trigger on ATCP messages, then you need to create scripts to attach handlers to the ATCP messages. The ATCP handler names follow the same format as the atcp table - RoomNum, RoomExits, CharVitals and so on.
While the concept of handlers for events is to be explained elsewhere in the manual, the quick rundown is this - place the event name you’d like your script to listen to into the Add User Defined Event Handler: field and press the + button to register it. Next, because scripts in Mudlet can have multiple functions, you need to tell Mudlet which function should it call for you when your handler receives a message. You do that by setting the Script name: to the function name in the script you’d like to be called.
For example, if you’d like to listen to the RoomExits event and have it call the process_exits() function - register RoomExits as the event handler, make the script name be process_exits, and use this in the script:
function process_exits(event, args)
    echo("Called event: " .. event .. "\nWith args: " .. args)
end
Feel free to experiment with this to achieve the desired results. A ATCP demo package is also available on the forums for using event handlers and parsing its messages into Lua datastructures.
Mudlet-specific ATCP
See ATCP Extensions for ATCP extensions that have been added to Mudlet.
Aardwolf’s 102 subchannel
Similar to ATCP, Aardwolf includes a hidden channel of information that you can access in Mudlet. Mudlet deals with it in the same way as with ATCP, so for full usage instructions see the ATCP section. All data is stored in the channel102 table, such that you can do:
display(channel102)... to see all the latest information that has been received. The event to create handlers on is titled channel102Message, and you can use the sendTelnetChannel102(msg) function to send text via the 102 channel back to Aardwolf.
-- Function for detecting AFK status on Aardwolf mud.
function amIafk()
   for k,v in pairs(channel102) do
      if k==100 and v==4 then
         return true
      end
   end
   return false
end
MXP
MXP is based loosely on the HTML and XML standards supported by modern web browsers. It is only "loosely" based upon these standards because games require dynamic, streaming text, rather than the page-oriented view of web browsers. Also, the existing standards are needlessly verbose for use on a game where text efficiency is important.
In addition, there are additional security concerns to worry about with MXP. While support for HTML tags within a line is desired, players on a game can exploit this power and cause problems. Certain HTML functions need to be restricted so that players cannot abuse them. For example, while it might be desirable to allow players to change the font or color of their chat messages, you would not want to allow them to display a large graphics image, or execute script commands on the client of other users. MXP handles this by grouping the various tags and commands into secure and open categories, and preventing the secure tags from being used by players.
Mudlet implements a subset of MXP features - the most popular ones that are actually in use. Mudlet supports MXP links (including send to prompt and open in browser in Mudlet 3.17+), pop-up menus, creation of custom elements, and line modes. As a game admin, you can ask what features are supported with the <SUPPORT> command.
MXP in Mudlet
Just like GMCP, MXP data is available in the mxp. namespace and events are raised. To see all MXP events, turn on Debug mode.

function testmxpsend()
  print("Text for the link is: ".. mxp.send.href)
  print("Commands to do are: ")
  display(mxp.send.actions)
  print("\n")
end

registerAnonymousEventHandler("mxp.send", "testmxpsend")![]() Note: Available in Mudlet 4.8+
Note: Available in Mudlet 4.8+
Receiving MXP Data

Processing of MXP is enabled by default on new game profiles. Control whether the processing is on or off through the Settings menu in Mudlet.
Simple example of receiving MXP Data (Server owners)
<SEND href=\"&text;\"> go north... </SEND>"This creates a clickable link that will enable the player to navigate without typing the directions into Mudlet. MXP sends the data immediately when clicked.
Advanced example of receiving MXP Data (Server owners)
<send href='examine "&name;"|get "&name;"' hint='Right mouse click to act on this item|Get &desc;|Examine &desc;|Look in &desc;' expire=get>\" ATT='name desc'>This creates a clickable link that will 'examine' an item. It also enables a right-click function wherein the player can select to either examine or get the item (in this case &name; is the item and &desc; is the item's description ).
MXP Specification
MXP was originally developed and supported by the Zuggsoft team. For more insight into the syntax, reference the specification. Mudlet has a partial implementation version 1.0 of the MXP spec - to see what is supported, ask Mudlet with the <SUPPORT> tag.
Secure connection (TLS)
To connect to a game securely, tick the 'Secure' box in the profile connection settings:

Note that the game must support a secure (TLS) connection in order for this to work, and this feature is available in Mudlet 3.17+.
If you are a games admin/developer, check out this or this example on how to setup a secure connection to your game, as well as MSSP data in order to let Mudlet know that you do have a secure connection available.
Secure connection prompt
To encourage enhanced data transfer protection and privacy, Mudlet will respond to the detection of the TLS (or SSL legacy) key of MSSP (Mud Server Status Protocol) and prompt a user not on a TLS (Transport Layer Security) connection with a choice to reconnect with the advertised TLS port from MSSP.

If the user selects Yes, Mudlet automatically updates the port with the TLS value gathered from MSSP, check-marks the Secure checkbox on the connection dialog, then reconnects. If the user selects No, Mudlet automatically updates a profile preference so they are not asked again for the current profile, then reconnects. This preference may be controlled on the Settings->Connection menu. This preference is enabled by default.

Adding support for a telnet protocol
In addition to supporting ATCP, GMCP, Aardwolf's 102 and MXP, Mudlet has open telnet support - meaning that for any telnet protocol it doesn't support, it has the tools you can use to build the support for. This does not mean Mudlet supports other protocols "out of the box" - you will either have to get code that adds the support, or you could create it yourself.
The basic tools that you need are addSupportedTelnetOption(), sendSocket() and the sysTelnetEvent.
Create an event handler that goes off on sysTelnetEvent - which is raised whenever an unsupported telnet option is encountered. Your logic handling will start in this event handler. Once you decide what you'd like to send to the game, use sendSocket() to send raw data as-is. Finally, when your logic is done, use addSupportedTelnetOption() to register your telnet option with Mudlet, so it will respond with telnet DO on a query from the game server. See this MSDP snippet for a barebones example.
API philosophy
Adding a support for a new telnet protocol will involve adding the user-facing API. It best for users if it was in the same style as Mudlets handling of other protocols. To see how it's done exactly, check out GMCP, ATCP or Aardwolf 102 examples - but the gist of it is provided below.
Mudlet has a built-in event system, which is used to broadcast messages in an independent way. With it, people can "trigger" on 102, ATCP or GMCP events with Lua functions that get called whenever an event they're interested in is raised. Use the event system to provide your users with a way to react to new protocol data.
Events have names, and optionally, any amount of data with them. For protocol support, Mudlet prefixes the relevant message received name with the protocol name in lowercase. For example, an ATCP Char.Vitals getting updated would raise an event titled "atcp.Char.Vitals". A GMCP Room.Info message would raise a "gmcp.Room.Info" message.
Additionally, Mudlet also allows catch-all event - in case the user wants to use one event handler for a variety of sub-events (it's not uncommon for games to use Main.Sub.Add, Main.Sub.Remove, Main.Sub.List to keep track of a list, for example, while conserving data). To accomplish this, it raises events for every relevant namespace - that is, a Main.Sub.Add event will raise protocol.Main.Sub and protocol.Main.Sub.Add events. While it is entirely possible for one event handler to react to multiple events, this is provided for convenience.
For storing protocol data, Mudlet uses an aptly named global table - gmcp for GMCP data, atcp for ATCP data. Data is stored in the same way it is received and the event is raised for - so a Char.Vitals message's contents will be stored in gmcp.Char.Vitals, a Room.Info's contents in gmcp.Room.Info. If there were was any nested data within the message, it is stored as a table within the proper namespace - ie, a "details" JSON array of a GMCP Room.Info message would be stored in gmcp.Room.Info.details. Use a global table with the protocol name in lowerspace for storing permanent data that your users will read from.
That's it! If you'll need any Mudlet-related help, feel free to post on our forums. Once you're done, package your work for distribution which you can optionally post in the finished scripts section.
What is a Mudlet package
It's a zip file that ends with .mpackage or .zip that contains xml files to import along with any resources a package might have (images, sounds and etc), or simply an .xml file on its own. Packages can be installed / uninstalled via a window in Mudlet.
You'll see packages represented in brown in the script editor everywhere - triggers, aliases, etc. All items of a package have to go into a package folder that they belong in - so the user can know which package do items belong to, and modify the package for their needs (if it didn't have a folder, then you wouldn't be able to 'add' anything to a package).
Where to find Mudlet packages
Check out the Scripts & Packages section on Mudlet forums for an excellent selection of Mudlet packages.
Some Mudlet packages may also be exlusively available on your own game-specific website or forums, so make sure to check out what your game has to offer as well.
What is a Mudlet module
It's the same thing as a Mudlet package - the only difference is how you import it: via the Module manager instead of the Package manager, and what happens after: Mudlet will save the module back to the original file instead of the profile save file. This means the original xml or mpackage (in Mudlet 4.14+) will automatically get updated. Really useful if you're writing Mudlet code to share with others - you won't have to ever manually export it again, Mudlet will do it automatically for you! You can version your modules using Git using this way.
You can also share a module across several profiles and automatically keep it in sync by installing the module in the relevant profiles and ticking the "sync" option in all of them.
If you'd like your module to be loaded before all the scripts in a Mudlet profile, you can do that with the -1 module priority.
How to install a Mudlet package
as a package
Drag and drop the link to the package into Mudlet (4.11+) or the the package file itself (as of 4.8+) and it'll get installed. The package will then get merged into the Mudlet profile and the original file can be deleted.
Alternatively, Toolbox→Package Manager will open the window where you can hit 'Install'.
as a one-liner
In the command line as a package:
lua installPackage("https://<online package location>")
In the command line as a module:
lua installModule("https://<online package location>")
as a module
Use Toolbox→Module Manager to install a module.
from the game
Packages can also be auto-installed from the MUD server via ATCP or GMCP - see ATCP extensions or GMCP extensions for more.
Module best practices
Are you making a Mudlet package? We keep a list of some best practices we've accumulated over the years at Manual:Best_Practices#Package_and_Module_best_practices
There are some decisions you can make that are outside of best practices, but will influence things:
- write all code inside Mudlet, or outside Mudlet in .lua files?
- If you want more contributors you may find it better to use the built in Mudlet editor, as more of the Mudlet userbase is familiar with it.
- If you want the power of a full IDE or dislike XML diffs in your SCM, then use the latter, see muddler, an unofficial tool for Mudlet packages.
Create a Mudlet package with Mudlet Profile Exporter
Mudlet provides an export dialog for saving a subset of a profile's settings and configuration to a file.
Exported settings are saved into a package that can be imported using Package Manager > Install new package.


Package information
Each new package requires a name or use the dropdown menu to update a currently installed package. Select the profile configuration and definitions to be exported using the interface. For simple exports, this information is enough to create a file.
To build a Mudlet package following best practices, use the Package optional details by pressing (optional) add icon, description, and more to define additional metadata and provide information to Mudlet users that choose to import your package.

Package optional details

The optional details allow setting:
- Author information
- An icon, 512x512 recommended
- A description for those interested in learning more, and documenting any features or a short changelog
- A version number
You can use Github-flavoured markdown in the package description to give a nice presentation for the player. For inspiration on creating good quality descriptions, check out packages here and here.
External data, dependencies
If your package requires other Mudlet packages, add them under the Required packages dropdown. For example creating a set of custom triggers for a game to use with generic_mapper.
Packages that reference local files such as in the Including images, sounds, and other files section below will need to declare them in this section, to export them for reuse. Without these files the package may work locally but not on another's computer.
To remove an included asset, select it from the list and use backspace (fn + delete on macOS) to remove it.
NOTE: To remove a dependency that has already been selected and added, use CTRL+Delete (Linux/Windows) or FN+Backspace (MacOS).

Save exported profile
Mudlet will put the exported package on the current user's desktop by default. Use Select export location to pick a different destination.
Export to write the package, Close to exit

Create a Mudlet package by hand
Alternatively, you can create a package by hand - it's zip file that ends with either .mpackage (preferred) or .zip. Include all xml's that you'd like to be installed in the top level folder of the package - that is, don't have them within a folder in the archive - just have them be upfront.
Naming the package
Add a file at the top level of the package (so not inside any folders in the package) called config.lua that has the following line to name your package:
mpackage = "<name of your package>"That's it. If you don't include config.lua, Mudlet will then deduce the package name from the file name.
Including images, sounds, and other files
If you'd like to include other folders or files in the package, you can - they will be copied into getMudletHomeDir().."/"..packagename upon installation, so your scripts can use them. Since Mudlet 3.10 you can include font files (.otf or .ttf) and they will be automatically available for your scripts to use.
For example, if your package is called "sipper" and you have health.png as an image in it, you can place on a label like so:
-- you don't have to worry about \ versus / for file paths - use / everywhere, Lua will make it work on Windows fine

setBackgroundImage("my health label", getMudletHomeDir().."/sipper/health.png")
Install the one-liner package demo above for an example of how to make use of images in packages.
Using .lua files
As of Mudlet 3.6.2 you can require "myfile" to load myfile.lua from the package folder.
As an example, if you have your package sipper, using a custom echo function named sipperecho defined in customFunctions.lua you can
require "sipper.customFunctions"

sipperecho("I work")
Alternatively you can rename customFunctions.lua to init.lua, this will allow you to require "<name of your package>" and
require "sipper"

sipperecho("I work")
What is a screen reader
The term, "Screen reader", refers to a piece of software on a computing device that is capable of examining the screen of the device and relaying that information to someone who is blind or visually impaired through the use of synthetic speech. Screen readers exist on desktops, laptops, mobile devices, and even gaming consoles.
Screen reader agnostic tips
Quick Accessibility Configuration
Mudlet comes with a command that works with every new profile you create. The purpose of this command is to perform certain operations on Mudlet itself, not the MUD you're connected to.
The two commands that are relevant to screen reader users are:
mudlet access onmudlet access reader
Typing in the first command will set a few things up that'll make the experience better for screen reader users, among which is setting Ctrl+Tab as the shortcut to change focus between the input line and the main window.
The second command will install an optional package called Reader which was initially designed to improve the state of accessibility on Mac OSX, but offers some additional features for Windows and Linux as well.
Holding Alt to open the menubar currently does not work. As a workaround, Alt+P opens preferences and Alt+E opens the script editor.
Input line
Sent commands are selected and kept in the input line by default, which is useful for sighted users. To make it easier for screen readers, go to preferences - Input line tab - and Set the following options as indicated:
- "Auto clear the input line after you sent text", should be checked
- "Show the text you sent", should be unchecked
Main Window
To switch between the input line and the main window, please first select a hotkey under the, "Special Options" tab. Your choices are:
TabCTRL+TabF6
Once a hotkey has been selected, it will allow you to review text using the following shortcuts -
| Output review shortcuts | |
|---|---|
| Left, Right, Up, Down | Navigate letter by letter |
| Ctrl+Left, Ctrl+Right | Navigate word by word |
| Shift+Left, Right, Up, Down | Select text letter by letter |
| Ctrl+Shift+Left, Right, Up, Down | Select text word by word |
| Home | Go to the beginning of the line |
| Ctrl+Home | Go to the beginning of the window (first line, first letter) |
| End | Go to the end of the line |
| Ctrl+End | Go to the end of the window (last line, last letter) |
| PageUp | Jump a visual window's height up |
| PageDown | Jump a visual window's height down |
| Ctrl+C | Copy selection |
| Ctrl+Shift+C | Copy selection as HTML |
Special Options
Briefly touched on in the section above, there are a few options in this tab of the preferences dialog designed to aid screen reader users.
Announce incoming text in screen reader
Speaks out text coming from the game using the screen reader, on by default. Turning this option off is relevant to macOS and Linux.
Blank Lines
When the game sends blank lines:
- Show them
- Hide them
- Replace with a space
It may be advantageous to select either of the latter two options, as having blank lines can be problematic on Windows specifically.
Switch To Reviewing Main Window
Switch between input line and main window using:
TabCTRL+TabF6
When a key is selected from this dropdown list, it will toggle between placing focus in the main window so that normal cursor commands can be used to review it as well as selecting text and copying it. Note that this should be configured, as it is set to, "No key", by default. N.B. When the tab key is set, the autotab completion functionality will be lost.
Nested triggers
In Mudlet, triggers can have a parent/child relationship. But for those new to creating triggers, this may not be what you want. At this time, this relationship is not indicated by screen readers. To ensure that you are not creating a child trigger, arrow up to the top of the list. You'll hear the announcement, "Triggers". When you do so, and you click the, "Add Item" button, you are guaranteed to create a trigger that is not grouped under one of your previous ones.
To quickly navigate between the triggers list, trigger name, patterns list, and the code editor, use Ctrl+Tab. It'll cycle between those elements in exactly that order, allowing you to jump around the screen to the most important parts.
Screen Reader and Operating System Specific Information
The pages linked below will serve to detail how to use Mudlet with a screen reader. As Mudlet is a cross-platform client, hints and tips to get the most out of using it will be given for each of the platforms it's available on.
Screen reader tips for game admins
The following are tips that can help MUD owners/administrators make their games more accessible to screen reader users.
Auto-detection
Auto-detection of visually impaired players is frowned upon, as it could lead to 'fingerprinting' certain users without their consent. Instead, the best practice is to provide a command for the players that enables a screenreader-friendly mode instead - see StickMUD as an example.
Sounds
Sounds are a great way of letting a blind or visually impaired user know that something has happened. Especially during fast-paced activities such as combat. They can be as simple as alerts, such as chats or tells, to a full on experience complete with combat sounds, music, and ambiances.
Sounds can either be sent by the server and downloaded to the client, or can be made using triggers by the player. MSP, GMCP, and MSDP can all be used to accomplish this.
Avoid ASCII Art
ASCII art can be a major hindrance to screen reader users. If your MUD has a lot of ASCII art, please consider creating a blind mode, or screen reader mode that can be switched on at any time. Optionally, asking new accounts/characters whether or not they're using a screen reader during character generation and then setting a flag or series of flags to tailor the display is wonderful, because screen reader users do not have to remember a list of options to toggle on and off. ASCII art on the start screen isn't a huge problem, as most often, a blind or visually impaired player will read through it once and then not need to again. The goal here is not to take away anything from sighted players.
Tables
Presenting information in tabular format can be a great way to visualize data for a sighted user, but when a screen reader user tries to read this table, they do not have the ability to walk through the cells. This is because, while screen readers do in fact provide table navigation commands, they require markup which isn't present in plain text. Please consider breaking up the information into lines with commas or colons which will make things much clearer. Tables in MUDs can often appear as streams of indecipherable data.
more tips?
I'd recommend checking out legends of the Jedi as they have done a good effort when it comes to making their mud accessible, just as an example. also you could reach out and talk to us in Mudlet's accessibility channel in discord, we'd be happy to help.
Third party packages
Here are some third party packages which we think are useful for Mudlet.
Mudlet Reader package
This package provides shortcuts for reading output, and fixes some VoiceOver issues regarding queuing things. It can be installed by using the built-in 'mudlet access reader' alias.
Download it here.
Quick Output
This package adds the ability to read the ten most recent lines from the MUD as well as copy a given line to the clipboard. More information can be found here
Channel History
This package provides a virtual buffering system for use in triggers which can be reviewed at any time using easy-to-remember hotkeys. Each message that is stored in a buffer is also assigned a category by the trigger author. Thus, things like public chats, tells, game announcements, etc. can each have a separate category. To learn more about this package, click here.
Scripting with Mudlet
Lua tables can basically be considered multidimensional arrays and dictionaries at the same time. If we have the table matches, matches[2] is the first element, matches[n+1] the n-th element.
 a = "Tom"
 matches[2] = "Betty"
 b = matches[2]
 c = a .. b and e will equal "TomBetty"
To output a table you can use a convenience function - display(mytable), which is built into Mudlet.
Lua interface functions - triggers, timers etc.
How to get data from regex capture groups? Regular expression capture groups (e.g. "(\d+)" ) are passed on to Lua scripts as a Lua table matches. To make use of this information inside Lua scripts, you need to specify the number of the capture group within the regex.
Example: You have (\d+) weapons and they are (?:(\b\w+\W+)+)
This regex contains 3 capture groups, but only the 2 green colored ones contain data as the red capture group is a non-capturing group. Consequently, your Lua script gets passed only 2 instead of 3 capture groups and matches[4] is undefined.
In your Lua script you may write following program in order to print the number and status of your weapons on the screen:
You have (\d+) weapons and they are (?:(\b\w+\W+)+)
 number_of_weapons = matches[2]
 status_of_weapons = matches[3]
 notice = number_of_weapons .. status_of_weapons
 echo( notice )
 send( "put weapons in backpack" )

 -- the following 2 lines color the first capture
 -- group red and the second group blue
 -- see below for details

 selectCaptureGroup( 2 )
 setFgColor( 255,0,0 )

 selectCaptureGroup( 3 )
 setFgColor( 0,0,255 )
The best way is to use selectCaptureGroup( number ) to select the proper capture group and then perform your actions on it e.g. replace(), highlight etc. Note: Both selectCaptureGroup() and matches[n] start with group 1 (which is the whole match. The defined capture groups start with 2).
How to select all occurrences of "Tom" and highlight them?
You add a function like this to a script containing you main function definitions. Note that script items differ from all other "scripts" in triggers, timers, actions etc. because they require you to put your code in proper functions that can be called by your other trigger-scripts, timer-scripts etc. via normal function calls. Trigger-scripts, timer-scripts etc. cannot contain any function definitions because they are automatically generated functions themselves because this makes usage a lot easier.
To come back to our question how to select all occurrences of "Tom" and highlight them:
  function setBgColorAll( word, r, g, b )
    i = 0
    word_count = 1
    while i > -1 do
        i = selectString(word, word_count)
        if i == -1 then
             return
        end
        word_count = word_count +1
        setBgColor( r, g, b )
    end
  end
Then you simply define a substring matching trigger on the word "Tom" and in the trigger script you call above function:
setBgColorAll("Tom", 255,50,50)Since Mudlet 4.11+ it is possible to use name capture groups. You can verify if feature availability by checking mudlet.supports.namedPatterns flag.
Let's say you have multiple patterns that you want to handle with one code.
^My name is (?<name>\w+)\. My class is (?<class>\w+)\.
^I am (?<class\w+)\ and my name is (?<name>\w+)\.
Notice that class and name come in different order, therefore in first case we will have name under matches[2] and in second case under matches[3].
With named capture groups in both cases we will have name available under matches.name and class under matches.class.
Code example to handle named matches above:
  echo("Name: " .. matches.name .. "\n")
  echo("Class: " .. matches.class .. "\n")
Sending commands or printing information messages
To print information messages on the session screen you can use the echo( message ) function, or insertText( text ). Currently, it only takes one string as argument.
To send a command to the MUD, you can use the send( command ) function. In Alias scripts the command that is being sent to the MUD is contained in the variable command that you can change in the context of Alias scripts. Alias take regular expressions, as well. As a result, you can use following regex and script to talk like Yoda: Perl regex:
say (\w+).*(\w*).*(.*)
script:
send( "say " .. matches[4] .." " .. matches[2] .." ".. matches[3] )Note: The variable "command" contains what was entered in the command line or issued via the expandAlias( ) function. If you use expandAlias( command ) inside an alias script the command would be doubled. You have to use send( ) inside an alias script to prevent recursion. This will send the data directly and bypass the alias expansion.
Changing and formatting text from the MUD
When sending commands to the MUD - from now on referred to as output stream - alias scripts find the command that was issued by the user stored in the variable "command".
By manipulating the value, the command can easily be changed before it is being sent to the MUD.
However, things get much more complicated with the data received from the MUD, from now on referred to as input stream. Before triggers can be run on the MUD data, Mudlet has to strip all format codes from the text and store it in data structures associated with the text. Consequently, the text that is being passed on to the trigger processing unit is a small subset of the data received from the MUD. If you want to edit, replace, delete or reformat text from within your trigger scripts you have to keep this in mind if you don’t want to lose all text format information such as colors etc.
As the text is linked with data structures containing the format of the text, the cursor position inside the line is important if data is being changed. You select a word or a sequence of characters from the line and then issue commands to do actions on the selected data.
Replacing the word "Tom" with "Betty" in the line: Jim, Tom and Lucy are learning a new spell. This could be done with following script:
selectString("Tom",1)
replace("Betty")
Things get more complicated if there are two or more occurrences of "Tom" in the line e.g. Jim and Tom like magic. Jim, Tom and Lucy are learning a new spell.
The above example code would select the first occurrence of "Tom" in this line and ignore the second. If you want to work on the the second occurrence of "Tom" you have to specify the occurrence number in the call to select().
selectString( "Tom", 2 )
replace( "Betty" )
This code would change the second "Tom" and leave the first "Tom" alone. The function call
replaceAll( "Betty" )will replace all occurrences of "Tom" with "Betty" in the line if "Tom" has been selected before. replaceAll() is a convenience function defined in LuaGlobal.lua.
Colorization example: You want to change to color of the words "ugly monster" to red on a white background.
You add a new trigger and define the regex: ugly monster In the script you write:
selectString("ugly monster", 1 )
setFgColor(255,0,0)
setBgColor(255,255,255)
resetFormat()
Another means to select text is to select a range of characters by specifying cursor positions. If we have following line: Jim and Tom like magic. Jim, Tom and Lucy are learning a new spell.
selectSection( 28, 3 )This example would select the second Tom. The first argument to selectSection is the cursor position within the line and the second argument is the length of the selection.
selectCaptureGroup( number )This function selects the captureGroup number if you use Perl regular expressions containing capture groups. The first capture group starts with index 1.
Deleting Text - Gagging
deleteLine()This function deletes the current line - or any line where the cursor is currently placed. You can use repeated calls to this function to effectively erase the entire text buffer. If you want to delete or gag certain words only, you can select the text that you want to delete and then replace it with an empty string e.g:
If you get this line form the MUD: "Mary and Tom walk to the diner."
selectString( "Tom", 1 )
replace( "" )
Then the output will be changed to: "Mary and walk to the diner."
Cursor Movement and Cursor Placement
Mudlet allows you to insert text arbitrarily within the buffer - in the previous line, in the previous ten lines, or even the first line that you've ever saw. These are the tools to help you with the job:
moveCursor( windowName, x, y ) This will move the user cursor of window windowName to the absolute (x/y) coordinates in the text.
moveCursor( "main", 20, 3950 ) will move the cursor on the 20th character from the left on line number 3950. To determine the current cursor position you can use getLineNumber() and getColumnNumber() as well as getLastLineNumber() to get the number of the last line in the text buffer. moveCursorEnd("main") will move the cursor of the main display to end of the buffer. This is always a new line of size 1 containing the character \n.
number_of_last_line_in_text = getLineCount() returns the number of the last line of the text in the console buffer. This number will change as soon as a new \n is printed either by the user or when a new line arrives from the MUD. All lines from the MUD are terminated with \n which is called line feed or the new line character. This control character ends the current line and move the cursor to the beginning of the next line, thus creating a new, empty line below the line that contains the \n.
line_number_of_the_current_cursor_position = getLineNumber()
column_number_of_the_current_cursor_position = getColumnNumber()
luaTable_containing_textlines = getLines( absolute_line_number_from, absolute_line_number_to ) this will return a Lua table containing all lines between the absolute positions from and to.
![]() Note: This function uses absolute line numbers, not relative ones like in moveCursor().
Note: This function uses absolute line numbers, not relative ones like in moveCursor().
moveCursor() returns true or false depending on whether the move was possible and done.
Inserting text in the middle of the line
Here's an example where we'll append the text (one) right after the word exit in the line of You see a single exit leading west.

The pattern we used was an exact match for You see a single exit leading west. and the code is:
if moveCursor(string.find(line, "exit")+#("exit")-1, getLineNumber()) then
  insertText("(one)")
end
What happened here:
- we triggered on the desired line using our pattern above
- we used moveCursor() to place the cursor in the desired position within the line. moveCursor() takes both the line number and the position within the line to place our virtual cursor on, so
- we used string.find() to find the position of the word "exit" within the line
- but string.find() returns us the position of the first character of the word we want, while we want to have the text be right after it - so we find out how long our word is with
#("exit"), add that to the number returned by string.find() which gets us the first character + the length of the word - which isn't quite at the end of the word, but the word plus the space (because of string.find() and the first character) - so we substract 1 to move our cursor right at the end of the word - we then use getLineNumber() to get the current line number, so our cursor is placed on the current line, at our desired position
- lastly we finally insert the text with insertText(), which puts the text exactly where our virtual cursor is
Done! You can also use cinsertText() for coloured inserts, and other functions mentioned above and in the API manual to help you do what you'd like.
User defined dockable windows
You may want to use dock windows to display information you gathered in your scripts, or you may want to use them as chat windows etc. Check out Geyser.UserWindow on how to add them!
Dynamic Triggers
triggerID = tempTrigger( substring pattern, code ) creates a fast substring matching trigger
triggerID = tempRegexTrigger( regex, code ) creates a regular expression matching trigger
triggerID = tempBeginOfLineTrigger( begin of line pattern, code ) creates a fast begin of line substring trigger
Scripting howtos
How to convert a string to value?
Say you'd like to capture a number from a trigger, but the capture always ends up being a "string" (or, just text on which you can't do any maths on) even if it's a number. To convert it to a number, you'd want to use the tonumber() function:
myage = tonumber(matches[2])How to highlight my current target?
You can put the following script into your targetting alias:
if id then killTrigger(id) end
id = tempTrigger(target, function() selectString(target, 1) fg("gold") deselect() resetFormat() end)
Where target is your target variable. Note that you have to use the full name, capitalized. If you’d like the script to auto-capitalize for you, you can use this version:
target = target:title()
if id then killTrigger(id) end
id = tempTrigger(target, function() selectString(target, 1) fg("gold") deselect() resetFormat() end)![]() Note: Ensure you're on Mudlet 3.5.0+ so you can put function() in a tempTrigger().
Note: Ensure you're on Mudlet 3.5.0+ so you can put function() in a tempTrigger().
How to format an echo to a miniConsole?
One of the ways you can create multi-line displays in a miniConsole with variable information is with string.format and the use of [[ ]] brackets for text, which allow for multiple line in text:
local WindowWidth, WindowHeight = getMainWindowSize();
createMiniConsole("sys",WindowWidth-650,0,650,300)

local name, age, sex = "Bob", 34, "male"

cecho("sys", string.format([[

  /---------\
      %s
   %dyrs
   sex - %s
  \---------/
]], name, age, sex))
How to play a sound when I receive communication while afk?

For this to work, place the line you'd like to trigger on in the first pattern box and select the appropriate pattern type. Then add return not hasFocus() with the Lua function as the second pattern, enable the AND trigger, and set the line delta to zero. Then just enable play sound, choose your sound and you're set!
How can I make a key that toggles between commands?
To make a key that toggles between two actions, for example - sleep/wake, you can use this as the script:
if not sleeping then
  send("sleep")
  sleeping = true
else
  send("wake")
  sleeping = false
end
How can I make a trigger with a next-line condition?
Here's how you can set it up - replace line1 and line2 with appropriate lines.

Here's the Mudlet XML you can download for this!
How to target self or something else?

Using regex and an 'or' statement allows us to consolidate multiple aliases, or an if statement, into a single more simple alias. When a regex is found it will use it, but if you don't specify one then the alternative will be used. The use of 'or' can be used with any function in Mudlet. In this example, one can type "buff" to buff themself, or "buff ally" to buff their ally instead.
^buff(?: (\w+))?$

send("cast buff on "..(matches[2] or "myself"))
How to delete everything between two lines?
When deleteLine() is called, every following line shifts back in numerical position. Thus if we know where we're starting and how many lines to expect, we can use a for loop to gag everything between line a and b by leaving the cursor in one spot. In the below example, line_a_number is the number of the line you want to start at, and line_b_number is the ending line. To gag x number of lines instead, use line_a_number + x in place of line_b_number.
for i = line_a_number, line_b_number, 1
do
   moveCursor(0, line_a_number)
   selectCurrentLine()
   deleteLine()
end
How to capture foreground line color information?
Here's an example that loops through each character in a line of text and prints the character and its foreground color to a miniconsole if the color has changed from the previous character:
Trigger: ^ (regex)
Code:
miniconsoleContainer =
  miniconsoleContainer or Adjustable.Container:new({name = "miniconsoleContainer"})
myMiniconsole =
  Geyser.MiniConsole:new(
    {
      name = "myMiniconsole",
      x = 0,
      y = 0,
      autoWrap = true,
      color = "black",
      scrollBar = false,
      fontSize = 8,
      width = "100%",
      height = "100%",
    },
    miniconsoleContainer
  )

local index = 0
local line = getCurrentLine()
local linesize = #line
local currentlinenumber = getLineNumber()
local r, g, b = 0, 0, 0
local cr, cg, cb -- last seen colors
while index < linesize do
  index = index + 1
  moveCursor("main", index, currentlinenumber)
  selectString(line:sub(index), 1)
  r, g, b = getFgColor()
  if cr ~= r or cg ~= g or cb ~= b then
    cr, cg, cb = r, g, b
    myMiniconsole:echo(string.format("rgb(%d,%d,%d)%s", r, g, b, line:sub(index, index)))
  else
    myMiniconsole:echo(string.format("%s", line:sub(index, index)))
  end
  line:sub(index, index)
end
myMiniconsole:echo("\n")
How to enter a carriage return / enter command?
Say you'd like to gag the following line, and just continue ...
[ Press Enter to continue ]
Trigger: [ Press Enter to continue ]  (set to exact match)
Code: deleteLine()
      send("\n")
How to repeat commands with #?
Install the following alias, and with it #5 mycommand will get repeated five times.
How to move the command line over?
To move the command line over to the right, create a new script and add the following to it:
setCmdLineStyleSheet("main", [[
  QPlainTextEdit {
    padding-left: 100px; /* change 100 to your number */
    background-color: black; /* change it to your background color */
  }
]])
How to add a background for Mudlets buttons?
You can give Mudlets buttons a background to have them blend in with your UI by doing this:
-- replace the /home/vadi/Pictures/tile.png location below with the one of your picture!
-- you can download the sample tile.png from https://opengameart.org/content/bevouliin-free-game-background-for-game-developers
local backgroundpath = [[/home/vadi/Pictures/tile.png]]
-- Windows:
-- local backgroundpath = [[C:/Users/Vadim/Downloads/Free game background/transparent PNG/tile.png]]

setAppStyleSheet([[
QToolBar {
  border-image: url(]]..backgroundpath..[[);

}

QToolBar QToolButton:!hover {
  color: white;
}
QToolBar QToolButton:hover {
  color: black;
}
]])
Result:

Advanced scripting tips
Do stuff after all triggers/aliases/scripts are run
This little snippet will have your commands be executed right after, depending on the context you run it in, all triggers, aliases or scripts are completed:
tempTimer(0, [[mycode]])How to delete the previous and current lines
This little snippet comes from Iocun:
moveCursor(0,getLineCount()-1)
deleteLine()
moveCursor(0,getLineCount())
deleteLine()
db: Mudlet's database frontend
The DB package is meant to provide easier access to a database, so you don’t have to know SQL or use the luasql module to set and get at your data. However, it does require that the luasql module be compiled and included in Mudlet to function.
Creating a Database
Before you can store anything in a database, you need to create one. You may have as many independent databases as you wish, with each having as many unique tables-- what we will call sheets in this package, so as to avoid confusion with Lua tables - think spreadsheets.
To create a database, you use the db:create() function, passing it the name of your database and a Lua table containing its schema configuration. A schema is a mold for your database - it defines what goes where. Using the spreadsheet example, this would mean that you’d define what goes into each column. A simple example:
db:create("people", {friends={"name", "city", "notes"}, enemies={"name", "city", "notes"}})This will create a database which contains two sheets: one named friends, the other named enemies. Each has three columns, name, city and notes-- and the datatype of each are strings, though the types are very flexible and can be changed basically whenever you would like. It’ll be stored in a file named Database_people.db in your Mudlet config directory on the hard drive should you want to share it.
It’s okay to run this function repeatedly, or to place it at the top-level of a script so that it gets run each time the script is saved: the DB package will not wipe out or clear the existing data in this case.
![]() Note: You may not create a column or field name which begins with an underscore. This is strictly reserved to the db package for special use.
Note: You may not create a column or field name which begins with an underscore. This is strictly reserved to the db package for special use.
![]() Note: Adding new columns to an existing database did not work in Mudlet 2.1 - see db:create() on how to deal with this.
Note: Adding new columns to an existing database did not work in Mudlet 2.1 - see db:create() on how to deal with this.
Adding Data
To add data to your database, you must first obtain a reference (variable) for it. You do that with the db:get_database function, such as:
local mydb = db:get_database("people")The database object contains certain convenience functions (discussed later, but all are preceded with an underscore), but also a reference to every sheet that currently exists within the database. You then use the db:add() function to add data to the specified sheet.
db:add(mydb.friends, {name="Ixokai", city="Magnagora"})If you would like to add multiple rows at once to the same table, you can do that by just passing in multiple tables:
  db:add(mydb.friends,
    {name="Ixokai", city="Magnagora"},
    {name="Vadi", city="New Celest"},
    {name="Heiko", city="Hallifax", notes="The Boss"}
  )
Notice that by default, all columns of every table are considered optional-- if you don’t include it in the add, then it will be set to its default value (which is nil by default)
For those familiar with databases: with the DB package, you don’t have to worry about committing or rolling back any changes, it will commit after each action automatically. If you would like more control than this, see Transactions below.
You also cannot control what is the primary key of any sheets managed with DB, nor do you have to create one. Each row will get a unique integer ID that automatically increments, and this field can be accessed as "_row_id".
Querying
Putting data in isn’t any fun if you can’t get it out. If you want every row from the sheet, you can do:
db:fetch(mydb.friends)But rarely is that actually useful; usually you want to get only select data. For example, you only want to get people from the city of Magnagora. To do that you need to specify what criteria the system should use to determine what to return to you. It looks like this:
db:fetch(mydb.friends, db:eq(mydb.friends.city, "Magnagora"))So the basic command is - db:fetch(_sheet_, _what to filter by_)
The following filter operations are defined:
  db:eq(field, value[, case_insensitive]) -- Defaults to case insensitive, pass true as the last arg to
              reverse this behavior.
  db:not_eq(field, value[, case_insensitive) -- Not Equal To
  db:lt(field, value) -- Less Than
  db:lte(field, value) -- Less Than or  Equal to.
  db:gt(field, value) -- Greater Than
  db:gte(field, value) -- Greater Than or Equal To
  db:is_nil(field) -- If the column is nil
  db:is_not_nil(field) -- If the column is not nil
  db:like(field, pattern) -- A simple matching pattern. An underscore matches any single character,
          and a percent(%) matches zero or more characters. Case insensitive.
  db:not_like(field, pattern) -- As above, except it'll give you everything but what you ask for.
  db:between(field, lower_bound, upper_bound) -- Tests if the field is between the given bounds (numbers only).
  db:not_between(field, lower_bound, upper_bound) -- As above, only... not.
  db:in_(field, table) -- Tests if the field is in the values of the table. NOTE the trailing underscore!
  db:not_in(field, table) -- Tests if the field is NOT in the values of the table *
The db:in_ operator takes a little more explanation. Given a table, it tests if any of the values in the table are in the sheet. For example:
db:in_(mydb.friends.city, {"Magnagora", "New Celest"})It tests if city == "Magnagora" OR city == "New Celest", but with a more concise syntax for longer lists of items.
There are also two logical operators:
  db:AND(operation1, ..., operationN)
  db:OR(operation1, operation2)
You may pass multiple operations to db:fetch in a table array, and they will be joined together with an AND by default. For example:
  db:fetch(mydb.friends,
    {db:eq(mydb.friends.city, "Magnagora"), db:like(mydb.friends.name, "X%")}
  )
This will return every record in the sheet which is in the city of Magnagora, and has a name that starts with an X. Again note that in LIKE patterns, a percent is zero or more characters — this is the same effect as "X.*" in pcre patterns. Similarly, an underscore matches any single characters and so is the same as a dot in pcre.
Passing multiple expressions in an array to db:fetch is just a convenience, as its exactly the same as:
db:fetch(mydb.friends, db:AND(db:eq(mydb.friends.city, "Magnagora"), db:like(mydb.friends.name, "I%")))The db:OR operation only takes two arguments, and will check to see if either of the two is true. You can nest these logical operators as deeply as you need to.
You can also just pass in a string directly to db:fetch, but you have to be very careful as this will be passed straight to the SQL layer. If you don’t know any SQL then you want to avoid this… for example, in SQL there’s a very big difference between double and single quotes. If you don’t know that, then stick to the db functions. But an example is:
db:fetch(mydb.friends, "city == 'Magnagora'")Now, the return value of db:fetch() is always a table array that contains a table dictionary representing the full contents of all matching rows in the sheet. These are standard Lua tables, and you can perform all normal Lua operations on them. For example, to find out how many total items are contained in your results, you can simply do #results. If a request from the friends sheet were to return one row that you stored in the results variable, it would look like this if passed into the display() function:
  table {
  1: table {
    'name': 'Bob',
    'city': 'Magnagora',
    'notes': 'Trademaster of Tailoring'
  }
}
And if you were to echo(#results), it would show 1.
The order of the returned rows from db:fetch is generally the same as the order in which you entered them into the database, but no actual guarantees are made to this. If you care about the order then you can pass one or two optional parameters after the query to db:fetch() to control this.
The first table is an array of fields that indicate the column names to sort by; the second is a flag to switch from the default ascending(smallest to largest) sort, to a descending(largest to smallest) sort. For example:
db:fetch(mydb.friends, db:eq(mydb.friends.city, "Magnagora"), {mydb.friends.city})This will return all your friends in Magnagora, sorted by their name, from smallest to largest. To reverse this, you would simply do:
db:fetch(mydb.friends, db:eq(mydb.friends.city, "Magnagora"), {mydb.friends.city}, true)Including more then one field in the array will indicate that in the case that two rows have the same value, the second field should be used to sort them.
If you would like to return ALL rows from a sheet, but still sort them, you can do that by passing nil into the query portion. For example:
db:fetch(mydb.friends, nil, {mydb.friends.city, mydb.friends.name})This will return every friend you have, sorted first by city and then their name.
Indexes and Types
The sheets we’ve defined thus far are very simple, but you can take more control over the process if you need to. For example, you may assign default values and types to columns, and the DB package will attempt to coerce them as appropriate. To do that, you change your db:create() call as:
db:create("people", {
  friends={"name", "city", "notes"},
  enemies={
    name="",
    city="",
    notes="",
    enemied="",
    kills=0
  }
})
This is almost the same as the original definition, but we’ve defined that our first four fields are strings with a default value of blank, and the new kills field which is an integer that starts off at 0. The only way to set a datatype is to set a default value at this time.
Please note, beneath the DB package is SQLite, and SQLite is very data-type neutral. It doesn’t really care very much if you break those rules and put an integer in a string field or vice-versa, but the DB package will — to a limited degree — attempt to convert as appropriate, especially for the operations that work on numbers.
You may also create both standard and unique indexes. A unique index enforces that a certain criteria can only happen once in the sheet. Now, before you go and make indexes, pause and consider. There is no right or wrong answer when it comes to what to index: it depends on what kind of queries you do regularly. If in doubt, don’t make an index. Indexes will speed up reading data from the sheet, but they will slow down writing data.
To add an index, pass either the _index or _unique keys in the table definition. An example:
db:create("people", {
  friends={"name", "city", "notes"},
  enemies={
    name="",
    city="",
    notes="",
    enemied="",
    kills=0,
    _index = { "city" },
    _unique = { "name" }
  }
})
Now, bear in mind: _index = { "name", "city"} creates two indexes in this sheet. One on the city field, one on the name field. But, _index = { {"name", "city"} } creates one index: on the combination of the two. Compound indexes help speed up queries which frequently scan two fields together, but don’t help if you scan one or the other.
The admonition against making indexes willy-nilly holds double for compound indexes: do it only if you really need to!
Uniqueness
As was specified, the _unique key can be used to create a unique index. This will make it so a table can only have one record which fulfills that index. If you use an index such as _unique = { "name" } then names must be unique in the sheet. You can specify more than one key to be unique; in that case they will be checked in an OR condition.
Now, if you use db:add() to insert a record which would violate the unique constraint, a hard error will be thrown which will stop your script. Sometimes that level of protection is too much, and in that case you can specify how the db layer handles violations.
There are three possible ways in which the layer can handle such violations; the default is to FAIL and error out.
You can also specify that the db layer should IGNORE any commands that would cause the unique constraint to be violated, or the new data should REPLACE the existing row.
For example:
db:add(mydb.enemies, {name="Bob", city="Sacramento"})
db:add(mydb.enemies, {name="Bob", city="San Francisco"})
With the name field being declared to be unique, these two commands can’t succeed normally. The first db:add() will create a record with the name of Bob, and the second would cause the uniqueness of the name field to be violated. With the default behavior (FAIL), the second db:add() call will raise an error and halt the script.
If you want the IGNORE behavior, the second command will not cause any errors and it will simply fail silently. Bob’s city will still be Sacramento.
With the REPLACE behavior, the second command will cause its data to completely overwrite and replace the first record. Bob’s city will now be San Francisco.
A word of caution with REPLACE, given:
db:add(mydb.enemies, {name="Bob", city="Sacramento", notes="This is something."})
db:add(mydb.enemies, {name="Bob", city="San Francisco"})
With the REPLACE behavior, the second record will overwrite the first-- but the second record does not have the notes field set. So Bob will now not have any notes. It doesn’t -just- replace existing fields with new ones, it replaces the entire record.
To specify which behavior the db layer should use, add a _violations key to the table definition:
db:create("people", {
  friends={"name", "city", "notes"},
  enemies={
    name="",
    city="",
    notes="",
    enemied="",
    kills=0,
    _index = { "city" },
    _unique = { "name" },
    _violations = "IGNORE"
  }
})
Note that the _violations behavior is sheet-specific.
Timestamps
In addition to strings and floats, the db module also has basic support for timestamps. In the database itself this is recorded as an integer (seconds since 1970) called an epoch, but you can easily convert them to strings for display, or even time tables to use with Lua’s built-in time support.
The most common use for the Timestamp type is where you want the database to automatically record the current time whenever you insert a new row into a sheet. The following example illustrates that:
local mydb = db:create("combat_log",
  {
    kills = {
      name = "",
      area = "",
      killed = db:Timestamp("CURRENT_TIMESTAMP"),
      _index = { {"name", "killed"} }
    }
  }
)

-- observe that we don't provide the killed field here - DB automatically fills it in for us.
db:add(mydb.kills, {name="Drow", area="Undervault"})

results = db:fetch(mydb.kills)
display(results)
The result of that final display would show you this on a newly created sheet:
table {
  1: table {
    '_row_id': 1
    'area': 'Undervault'
    'name': 'Drow'
    'killed': table {
      '_timestamp': 1264317670
    }
  }
}
As you can see from this output, the killed fields contains a timestamp-- and that timestamp is stored as an epoch value in the GMT timezone. For your convenience, the db.Timestamp type offers three functions to get the value of the timestamp in easy formats. They are as_string, as_number and as_table, and are called on the timestamp value itself.
The as_number function returns the epoch number, and the as_table function returns a time table. The as_string function returns a string representation of the timestamp, with a default format of "%m-%d-%Y %H:%M:%S". You can override this format to anything you would like. Details of what you can do with epoch values, time tables, and what format codes you can use are specified in the Lua manual at: http://www.lua.org/pil/22.1.html for the Lua date/time functions.
A quick example of the usage of these functions is:
results = db:fetch(mydb.kills)
for _, row in ipairs(results) do
  echo("You killed " .. row.name .. " at: " .. (row.killed and row.killed:as_string() or "no time") .."\n")
end
Deleting
The db:delete function is used to delete rows from the sheet. It takes two arguments, the first being the sheet you are deleting and the second a query string built using the same functions used to build db:fetch() queries.
For example, to delete all your enemies in the city of Magnagora, you would do:
db:delete(mydb.enemies, db:eq(mydb.enemies.city, "Magnagora"))Be careful in writing these! You may inadvertantly wipe out huge chunks of your sheets if you don’t have the query parameters set just to what you need them to be. Its advised that you first run a db:fetch() with those parameters to test out the results they return.
As a convenience, you may also pass in a result table that was previously retrieved via db:fetch and it will delete only that record from the table. For example, the following will get all of the enemies in Magnagora, and then delete the first one:
results = db:fetch(mydb.enemies, db:eq(mydb.enemies.city, "Magnagora"))
db:delete(mydb.enemies, db:eq(mydb.enemies._row_id, results[1]._row_id))
That is equivalent to:
db:delete(mydb.enemies, results[1])You can even pass a number directly to db:delete if you know what _row_id you want to purge.
A final note of caution: if you want to delete all the records in a sheet, you can do so by only passing in the table reference. To try to protect you from doing this inadvertently, you must also pass true as the query after:
db:delete(mydb.enemies, true)Updating
If you make a change to a table that you have received via db:fetch(), you can save those changes back to the database by doing:
db:update(mydb.enemies, results[1])A more powerful (and somewhat dangerous, be careful!) function to make changes to the database is db:set, which is capable of making sweeping changes to a column in every row of a sheet. Beware, if you have previously obtained a table from db:fetch, that table will NOT represent this change.
The db:set() function takes two arguments: the field to change, the value to set it to, and the db:fetch() like query to indicate which rows should be affected. If you pass true as the last argument, ALL rows will be changed.
To clear out the notes of all of our friends in Magnagora, we could do:
db:set(mydb.friends.notes, "", db:eq(mydb.friends.notes, "Magnagora"))Be careful in writing these!
Transactions
As was specified earlier, by default the db module commits everything immediately whenever you make a change. For power-users, if you would like to control transactions yourself, the following functions are provided on your database instance:
local mydb = db:get_database("my_database")
mydb:_begin()
mydb:_commit()
mydb:_rollback()
mydb:_end()
Once you issue a mydb._begin() command, autocommit mode will be turned off and stay off until you do a mydb._end(). Thus, if you want to always use transactions explicitly, just put a mydb._begin() right after your db:create() and that database will always be in manual commit mode.
Viewing and editing the database contents
A good tool to view and edit the database contents in raw form is SQlite Sorcerer (free and available for Linux, Windows, Mac).
Debugging raw queries
If you'd like to see the queries that db: is running for you, you can enable debug mode with db.debug_sql = true.
Discord Messages
Can you send messages from Mudlet to Discord? Totally. Here is an example:
function sendToDiscord(data)
  local url = "https://discord.com/api/webhooks/1204151397977821184/Cu8ZQQo9R11AyIt3DxpOEeB8MtVMA6_AEfXoZaYxqEAOu_6hwhtA2cRLIw-VIs7py7p8"
  local headers = {["Content-Type"] = "application/json"}
  local json = yajl.to_string(data)
  postHTTP(json, url, headers)
end

local data = {
  content = "Hello, Discord!",
  embeds = {
    {
      title = "This is an embed",
      url = "https://example.com",
      image = {
        url = "https://example.com/image.jpg"
      }
    }
  }
}

sendToDiscord(data)
Sure enough, after starting this script, you can see a message in Discord:

What you just need to do is create a webhook in a channel. Go to channel settings, then create this:

Here you can find more documentation on which fields Discord allows: https://discord.com/developers/docs/resources/webhook#execute-webhook
All this is one way though. Mudlet won't listen to messages from Discord. For that you'd probably have to make a Discord bot first.
Discord Rich Presence

Discord Rich Presence in Mudlet allows you, the player, to show off the game you're playing and you, the game author, to get your game shown off! Advertise your game for free alongside AAA titles in server player lists :)
To respect the players privacy, this option is disabled by default - enable it by ticking the Discord option for the profile:

Once enabled, a Discord-capable game will show information in your Discord!
To fine-tune the information you'd like to see displayed, go to Settings, Chat tab:

Implementing
As a game author, you have two ways of adding Discord support to your game: via GMCP (easy) or via Lua.
Adding support via GMCP means that your players don't have to install any Lua scripts which is a nicer experience. To do so, implement the Discord over GMCP specification and get in touch to let us know your game implements GMCP.
GMCP
Here's a quick cheatsheet to implement the GMCP spec:
- Create a discord application
- Upload game logo for "rich presence invite image"
- Upload same game logo in "Rich Presence Assets" with the name of
server-icon - Upon receiving "External.Discord.Hello" from the game client, reply with "External.Discord.Info" with
applicationid(see screenshot) and "External.Discord.Status" - Send "External.Discord.Status" whenever you need to send data to the client, and fill it with the values have changed since the last status. Discord has some ideas for filling it in.
- Done. Mudlet will enable the Discord checkbox upon receiving the
applicationidfrom the game at least once.
Lua
An alternative way to add Discord support as a game author is via Lua - all of Discords functionality can be manipulated from it. Create a discord application and set it with setDiscordApplicationID(), then set the set the rest of the options as necessary:

If you're a game player and your game doesn't support Discord, you can still use the functionality to set the detail, status, party and time information as desired.
MUD Client Media Protocol
Client.Media
Want to add accessibility and excitement into your game? How about implementing sound and music via GMCP?
The Client.Media family of GMCP packages provide a way for games to send sound and music events. GMCP media events are sent in one direction: from game server to to game client.
Client.Media in Mudlet
Media files may be downloaded manually or automatically if certain conditions are met.
Mudlet accepts case-insensitive GMCP for the Client.Media namespace (for example, these are all acceptable: "Client.Media.Play", "client.media.play", "cLiEnT.MeDiA.Play").
Enabling Media
When a new profile opens, Mudlet adds to the Core.Supports.Set GMCP package "Client.Media 1" to signal to servers that it supports processing media files via GMCP:
Core.Supports.Set ["Client.Media 1", ...]To process Client.Media GMCP data in Mudlet, these boxes in the Settings window of Mudlet must be checked:
- The "Enable GMCP" box in the Miscellaneous section.
- The "Allow server to download and play media" box in the Game protocols section.
These boxes are checked by default upon the start of a new profile in Mudlet.
Storing Media
Mudlet plays files cached in the "media" folder within a game's profile. To get files into the "media" folder you could perform either of these options:
- Copy media files or extract them from an archive (zip)
- Automatically download them from external resources such as your game's web server on the Internet.
To enable the second option (Internet), use the "url" parameter made available in the "Client.Media.Default", "Client.Media.Load" and "Client.Media.Play" GMCP packages described below.
Loading Media
Send a Client.Media.Default GMCP event to setup the default URL directory to load sound or music files from external resources. This would typically be done once upon player login.
| Required | Key | Value | Purpose |
|---|---|---|---|
| Yes | "url" | <url> |
|
For example, to setup the default URL directory for your game:
Client.Media.Default {
  "url": "https://www.example.com/sounds/"
}
If downloading from external resources, it is recommended to use Client.Media.Default, set this default URL directory once, and let Mudlet download all of your media files automatically from this one resource location. Otherwise, explicitly set the "url" parameter on all of your Client.Media.Load GMCP and Client.Media.Play GMCP events to ensure that files are downloaded from the intended location(s).
Send Client.Media.Load GMCP events to load sound or music files. This could be done when the player logs into your game or at the beginning of a zone that will need the media.
| Required | Key | Value | Purpose |
|---|---|---|---|
| Yes | "name" | <file name> |
|
| Maybe | "url" | <url> |
|
For example, download the sound of a sword swooshing within the "media" folder:
Client.Media.Load {
  "name": "sword1.wav",
  "url": "https://www.example.com/sounds/"
}
Playing Media
Send Client.Media.Play GMCP events to play sound or music files.
| Required | Key | Value | Default | Purpose |
|---|---|---|---|---|
| Yes | "name" | <file name> |
| |
| Maybe | "url" | <url> |
| |
| No | "type" | "sound" or "music" | "sound" |
|
| No | "tag" | <tag> |
| |
| No | "volume" | 1 to 100 | 50 |
|
| No | "fadein" | <msec> |
| |
| No | "fadeout" | <msec> |
| |
| No | "start" | <msec> | 0 |
|
| No | "loops" | -1, or >= 1 | 1 |
|
| No | "priority" | 1 to 100 |
| |
| No | "continue" | true or false | true |
|
| No | "key" | <key> |
|
name
For example, to simply play the sound of a cow mooing already stored in the "media" folder:
Client.Media.Play {
  "name": "cow.wav"
}
Or some lightning stored in a "weather" sub-folder under the "media" folder.
Client.Media.Play {
  "name": "weather/lightning.wav"
}
The "name" parameter may be used for stopping media with the Client.Media.Stop GMCP event.
url
If you maintain your sound files on the Internet and don't set a default URL with Client.Media.Default, or preload them with Client.Media.Load, include the "url" parameter:
Client.Media.Play {
  "name": "cow.wav",
  "url": "https://www.example.com/sounds/"
}
type: sound
Media files default to a "type" of "sound" when the "type" parameter is not specified, such as in the example above. It is good practice to specify the "type" parameter to best keep media organized within your implementation:
Client.Media.Play {
  "name": "cow.wav",
  "type": "sound"
}
The "type" parameter may be used for stopping matching media with the Client.Media.Stop GMCP event.
tag
To play the sound of a sword swooshing and categorized as "combat":
Client.Media.Play {
  "name": "sword1.wav",
  "type": "sound",
  "tag": "combat"
}
The "tag" parameter may be used for stopping matching media with the Client.Media.Stop GMCP event.
type: music
Add background music to your environment through use of the "music" value set upon the "type" parameter:
Client.Media.Play {
  "name": "river.wav",
  "type": "music",
  "tag": "environment"
}
The "type" parameter may be used for stopping matching media with the Client.Media.Stop GMCP event.
volume: 1 to 100
As the character draws nearer to or farther from the environmental feature, consider adjusting the "volume" parameter. Example values, followed by syntax examples:
- Maximum: 100 (recommended to use rarely)
- High: 75
- Default: 50
- Low: 25
- Minimum: 1 (recommended to use rarely)
Client.Media.Play {
  "name": "river.wav",
  "type": "music",
  "tag": "environment",
  "volume": 75
}
Although using the integer type is recommended, Mudlet parses "volume" values of type string ("75") into integers (75) as needed.
fadein
Increase volume from the start of the media [start position, volume one] to the number in milliseconds specified with the "fadein" parameter [position start + milliseconds, volume specified with the "volume" parameter]. Example values, followed by syntax examples:
- 1000 milliseconds (1 second)
- 60000 milliseconds (1 minute)
- 0 milliseconds (no fade in)
Client.Media.Play {
  "name": "monty_python.mp3",
  "type": "music",
  "volume": 100,
  "fadein": 1000
}
+---------------------------+-----------------------+
| Fade in 1000 milliseconds | Normal |
+---------------------------+-----------------------+
Volume 1|........::::::::::iiiiiiiii%%%%%%%%%%%%%%%%%%%%%%%%|Volume 100
+---------------------------+-----------------------+
Although using the integer type is recommended, Mudlet parses "fadein" values of type string ("1000") into integers (1000) as needed.
fadeout
Decrease volume from a position in milliseconds subtracted from the duration of the media [position duration - milliseconds, volume specified with the "volume" parameter] to the end of the media [position duration, volume one]. Example values, followed by syntax examples:
- 1000 milliseconds (1 second)
- 60000 milliseconds (1 minute)
- 0 milliseconds (no fade out)
Client.Media.Play {
  "name": "the_matrix.mp3",
  "type": "music",
  "volume": 50,
  "fadeout": 333
}
+-----------------------+---------------------------+
| Normal | Fade out 333 milliseconds |
+-----------------------+---------------------------+
Volume 50|%%%%%%%%%%%%%%%%%%%%%%%%iiiiiiiii::::::::::........|Volume 1
+-----------------------+---------------------------+
Although using the integer type is recommended, Mudlet parses "fadeout" values of type string ("333") into integers (333) as needed.
start
Start playing a media track at the number of milliseconds specified. Example values, followed by syntax examples:
- 1000 milliseconds (1 second)
- 60000 milliseconds (1 minute)
- 0 milliseconds (start from beginning)
Client.Media.Play {
  "name": "mudlet_beatboxing.mp3",
  "type": "music",
  "volume": 75,
  "start": 1000
}
Although using the integer type is recommended, Mudlet parses "start" values of type string ("100") into integers (100) as needed.
loops: -1, 1 or more
The "loops" parameter controls how many times the sound repeats and defaults to 1 if not specified. A value of -1 will loop the file indefinitely.
Client.Media.Play {
  "name": "clock/hour_bell.wav",
  "type": "sound",
  "loops": 3
}

Client.Media.Play {
  "name": "underdark.mp3",
  "type": "music",
  "tag": "environment",
  "loops": -1
}
Although using the integer type is recommended, Mudlet parses "loops" values of type string ("-1") into integers (-1) as needed.
priority: 1 to 100
The "priority" parameter sets precedence for Client.Media.Play GMCP events that include a "priority" setting. The values for the "priority" parameter range between 1 and 100. Given that two Client.Media.Play GMCP events have the same priority, the media already playing will continue playing. In Mudlet, media without priority set is not included comparisons based on priority.
A common place to find priority implemented is with combat. In the following example, imagine a combat scenario where some sounds of sword thrusts were interrupted by a successful blocking maneuver.
Client.Media.Play {
  "name": "sword1.wav",
  "type": "sound",
  "tag": "combat",
  "loops": 3,
  "priority": 60
}

Client.Media.Play {
  "name": "block1.wav",
  "type": "sound",
  "tag": "combat",
  "priority": 70
}
Although using the integer type is recommended, Mudlet parses "priority" values of type string ("25") into integers (25) as needed.
The "priority" parameter may be used for stopping matching media with the Client.Media.Stop GMCP event.
continue: true or false (for music)
Typically sent with the "type" of "music" is the parameter "continue", which presents the following values:
- true: continues music that is already playing if it is requested again through a new Client.Media.Play GMCP event
- false: restarts music that is already playing if it is requested again through a new Client.Media.Play GMCP event
Client.Media.Play {
  "name": "city.mp3",
  "type": "music",
  "tag": "environment",
  "continue": true
}
If the "continue" parameter is not specified, behavior will default to true for music.
Although using the boolean type is recommended, Mudlet parses "continue" values of type string ("true" and "false") into boolean (true and false) as needed, as not all game drivers support a boolean type.
key
The "key" parameter enables media categorization, similar to the "tag" parameter, however it adds a feature of uniqueness that halts media currently playing with the same key, replacing it with the media that arrived from a new Client.Media.Play GMCP event. This update will only occur if the "name" or "url" associated with the currently playing media does not match the new media, while the key is identical.
In the example below, consider that a player moves from a sewer area to a village. The "key" parameter is used to stop the previously playing sewer.mp3 and start playing village.mp3 within the second Client.Media.Play GMCP event.
Client.Media.Play {
  "name": "sewer.mp3",
  "type": "music",
  "tag": "environment",
  "loops": -1,
  "continue": true,
  "key": "area-music"
}

Client.Media.Play {
  "name": "village.mp3",
  "type": "music",
  "tag": "environment",
  "loops": -1,
  "continue": true,
  "key": "area-music"
}
The "key" parameter may be used for stopping matching media with the Client.Media.Stop GMCP event.
![]() Note: Where music is bound to change, continue or stop as a player enters a new room, consider allowing for a slight pause of 1 heart beat or tick to send the Client.Media.Play or Client.Media.Stop GMCP events. This practice reduces the number of Client.Media.Play GMCP events sent when the player travels through several rooms quickly.
Note: Where music is bound to change, continue or stop as a player enters a new room, consider allowing for a slight pause of 1 heart beat or tick to send the Client.Media.Play or Client.Media.Stop GMCP events. This practice reduces the number of Client.Media.Play GMCP events sent when the player travels through several rooms quickly.
randomization
Wildcards * (asterisk) and ? (question mark) may be used within the name to randomize media file(s) selection.
Given that media files underdark.wav, underdark.mp3 and underdark_dark_elven_moshpit.mp3 were all present in the media/environment directory under the current game profile, the following Client.Media.Play GMCP event would randomly choose one of those files to play using the * wildcard.
Client.Media.Play {
  "name": "underdark*",
  "type": "music",
  "tag": "environment",
  "loops": -1,
  "continue": false
}
If media files sword1.wav, sword2.wav and sword3.wav were all present in the media/combat directory under the current game profile, the following Client.Media.Play GMCP event would randomly choose one of those files to play per each loop using the ? wildcard.
Client.Media.Play {
  "name": "combat/sword?.wav",
  "type": "sound",
  "tag": "combat",
  "loops": 3
}
Stopping Media
Send Client.Media.Stop GMCP events to stop sound or music media.
| Required | Key | Value | Purpose |
|---|---|---|---|
| No | "name" | <file name> |
|
| No | "type" | "sound" or "music" |
|
| No | "tag" | <tag> |
|
| No | "priority" | 1 to 100 |
|
| No | "key" | <key> |
|
all
Send the Client.Media.Stop GMCP event with no parameters to stop all playing media within a given game profile.
Client.Media.Stop {}parameters
Send any combination of the name, type, tag, priority or sound parameters and valid corresponding values to stop playing media that matches all combinations of the parameters.
Stop the rain.
Client.Media.Stop {
  "name": "rain.wav"
}
Stop all media using the "type" of "sound".
Client.Media.Stop {
  "type": "sound"
}
Stop all media categorized with the "tag" of "combat" and that has a "priority" less than or equal to 50.
Client.Media.Stop {
  "tag": "combat",
  "priority": 50
}
Stop all media categorized with the "key" of "area-music".
Client.Media.Stop {
  "key": "area-music"
}
GUI Scripting in Mudlet
Mudlet has extremely powerful GUI capabilities built into it, and with the inclusion of the Geyser and Vyzors layout managers in Mudlet's Lua API it is quicker and easier to get a basic UI created.
Geyser
Geyser is an object oriented framework for creating, updating and organizing GUI elements within Mudlet - it allows you to make your UI easier on Mudlet, and makes it easier for the UI to be compatible with different screen sizes.
Geyser's manual is quite extensive - follow here to read up on it.
UI template
Akaya has created a UI template based on Geyser that can serve as a quick start for customizing the Mudlet interface to your character:

To get started with it, see the forum thread about Geyser UI Template.
Simple Window Manager
Simple Window Manager is a light-weight script designed to provide the GUI object placement and sizing functionality seen in Geyser and Vyzor without any of the extras. Any GUI object, once created normally, can be added to the SWM along with a corner to base its positioning info off of, the distance from that corner, and the size of the object in any combination of pixels and percentages of the screen. SWM does all the behind the scenes work to keep all objects it has been given to manage in their correct places and sizes as the screen changes size. All other interactions with GUI objects are handled using standard functions built into Mudlet.
Simple Window Managers manual, and download, can be found here.
Useful Resources
There are several useful resources you can refer to when creating your GUI.
- Wiki Resources
- Excellent for getting an initial feel of how to use the Geyser layout manager.
- The GUI section of the Lua API manual
- External Resources
- The Geyser Layout Manager subforum on Mudlet's forums.
- A pinned thread on Mudlet's forums for showing what your GUI looks like. Useful for ideas and to see what is possible.
- A forum thread which follows the evolution of the UI provided by God Wars II
Resetting your UI
While scripting your UI, you can reset it completely and have your scripts be loaded from scratch with the resetProfile() function - in the input line, type lua resetProfile().
Best Practices
- The hope is that this page will provide a place to collect a list of Mudlet 'best practices' in an effort to help people keep their Mudlet scripts and packages clean, efficient, and running smoothly. Another way to think of it is a collection of tips and tricks for making Mudlet run its best. They largely fall under these categories.
- Lua best practices
- Since Lua is the scripting language Mudlet makes use of, the majority of the best practices for Lua will apply when writing Mudlet scripts.
- We do not aim to replace the internet as a source of Lua knowledge, but will try to highlight the most beneficial ones
- Potential exceptions will be noted with their entries
- GUI best practices
- keeping your UI looking it best in as many situations as possible
- Mudlet best practices
- Optimizations and items specific to Mudlet's triggers, aliases, API, etc
- Generic mapper best practices
Lua
Use local variables
You should really be using local variables wherever you can. If a variable is only needed for the duration of a function, alias, or trigger, then make it a local every time. If you will need to access it repeatedly in your script, make it local first. Always be asking yourself, "Could I be using a local instead?"
-- bad
function myEcho(msg)
  transformed_msg = "<cyan>(<yellow>Highlighter<cyan>)<reset>" .. msg
  cecho(transformed_msg)
end

-- better
function myEcho(msg)
  local transformed_msg = "<cyan>(<yellow>Highlighter<cyan>)<reset>" .. msg
  cecho(transformed_msg)
end
There are three main reasons for doing so:
- Making things local keeps them from colliding with variables in use by other package developers. You are probably not the first person to use "tbl" for a temporary table name.
- You can make the code easier to both read and write.
self.mc[tabName]is a bit much to type and remember, but if you first dolocal console = self.mc[tabName]then it's obvious you're referring to a console where you use it in future
- It's faster:
- local variables are inherently faster in Lua, as they exist in the virtual machine registers and are a simple index lookup to access, whereas globals reside in a table and are therefore a hash lookup
- this means you can increase the speed of intensive processes just by making functions and variables local before using them.
- For instance, if you are going to cycle through a large table and cecho items from within it, adding
local cecho = cechoabove the loop can improve performance.
- local variables are inherently faster in Lua, as they exist in the virtual machine registers and are a simple index lookup to access, whereas globals reside in a table and are therefore a hash lookup
Conversely, avoid _G when possible
It's not only good practice to use local variables where possible, but you should avoid referencing the global table, _G. The very thing which makes _G useful (being able to reference elements if you don't know their name before hand) is what makes it dangerous, as it can be easy to overwrite things you shouldn't and leave yourself in a broken state. For instance, all it takes is accidentally writing to _G["send"] and suddenly all of your scripts which send commands to the game are broken.
Get into a habit of using a namespace for your scripts instead - see below.
Avoid overwriting your variables accidentally
Often times you need to initialize your tables at the top of your scripts. But if you click on that script again later and back off it will save and overwrite your current data. You can use 'or' to avoid this as shown below.
-- have to make a table before you can add things to it

-- risks overwriting the entire table if I resave the script
demonnic = {}

-- if the variable has already been defined, it is just set back to itself. If it has not, then it's set to a new table
demonnic = demonnic or {}
Ternary statements in Lua (set a variable based on a condition)
Lua does not have a ternary operator as such, but you can construct a statement in such a way it functions as one, allowing for shorter and more readable code. For example:
-- you can rewrite this if statement
if something then
  myVariable = "x"
else
  myVariable = "y"
end

-- as
myVariable = something and "x" or "y"
Group your globals together in a table
Sometimes you have to use globals, to pass values easily between items or make functions and values available to others. Lots of package makers may have a reason to track health and want to be able to pass it easily between triggers and functions without having to make it a parameter for every function they write. Obviously they can't all use the 'health' variable though, especially if one is using percentages and the other direct values. So it's best if you keep the variables for your package grouped together within a table. "Demonnic.health" is a lot less likely to collide than just 'health' There is a forum post with more information.
Declaring functions in tables: myTable:function() vs myTable.function()
Lua does not have as much syntactic sugar as some other languages, but using a : to call a function within a table is one of them. The following declarations are functionally identical
function myTable:coolFunction(parameter)
  self.thing = parameter
end

function myTable.coolFunction(self, parameter)
  self.thing = parameter
end

myTable.coolFunction = function(self, parameter)
  self.thing = parameter
end
And these calls are equivalent
myTable:coolFunction("Test")
myTable.coolFunction(myTable, "Test")
You can use this to make it easier to keep your code self-contained and grouped together. You can combine it with setmetatable() to allow a sort of Object Oriented like programming pattern. Which leads us to
Create objects and 'classes' using metatables and:
Geyser makes extensive use of this pattern and it allows you to create classes and objects within Lua's procedural environment. The chapter in Programming in Lua on Object Oriented Programming does a good job of explaining it.
GUI
Give your Geyser elements unique names
While Geyser will generate a name for you if you do not provide one, if you do provide one it gives you some measure of protection against accidental duplication, as miniconsoles and labels with the same name are reused. Likewise, you should make sure you use names which are unlikely to be used by anyone else. "healthgauge" or "container" are maybe a little generic. Try "my_package_name_health_gauge" or similar. It's more typing up front, but you shouldn't need to type it again and it will help a lot in ensuring your UI behaves as expected.
Use percentages
A lot of your users will be on different resolution monitors, or may not want to have Mudlet covering their entire screen. If you hardcode your sizes as direct pixel values for your Geyser objects, they will not scale as well when the window is resized due to resolution restrictions or user preference. If you're personally working on a 1080p resolution UI but you want it to scale up or down, rather than using "640px" as the width to cover a third of the screen use "33%" for the width, and it will resize to cover a third of the window no matter the size.
Adjustable Containers put the power back in your user's hands
If you use Adjustable.Container for groupings of your UI it allows your users to resize and move them around if they don't like the way you've arranged things. This means more people using your package in the end.
Mudlet
Shield your complicated regular expression triggers with a substring trigger
- Regular expressions are very useful, but are one of the slower trigger types to process for Mudlet. Using a substring trigger gate or a multiline trigger with the substring trigger ahead of the regular expression and a line delta of 0 you can reduce the processing time of your triggers overall by quite a bit. There has been benchmarking done
Avoid expandAlias() where possible
- There's a whole wiki page on this at Functions_vs_expandAlias
feedTriggers is for testing, not production
- the c/d/h/feedTriggers functions are great for testing your triggers without having to make something actually happen in your game. But you should not be using it as a functional part of your system. Much like with expandAlias, you should be calling a function from the trigger and the place you are calling feedTriggers to do the same thing, rather than getting the trigger engine itself involved.
Capture the IDs returned by your temp items and anonymous event handlers
- You can now skip the following by using registerNamedEventHandler or registerNamedTimer instead. The below still holds true if you want to use the anonymous functions directly and is left for that reason.
- One of the more common issues people come into the help channel with is stacking tempTimers and old anonymous event handlers which have been edited not being cleared out and still firing. The solution for these issues is the same. The functions which create temporary or anonymous items in Mudlet return an ID. You need to save this ID to a variable and use it to remove the existing item before reregistering it. So for examples
-- incorrect, can stack timers
tempTimer(0.5, function()
  send("And another one")
end)

-- Ensures the timer only fires once, .5 seconds after the first time it is called
if not myTempTimerID then -- only do something if we haven't already
  myTempTimerID = tempTimer(0.5, function()
    send("Only one")
    myTempTimerID = nil -- unset it so it can fire again
  end)
end

-- Resets the tempTimer each time it is run, so it runs
if myTempTimerID then
  killTimer(myTempTimerID) -- can run killTimer on an already fired timer without causing an issue.
end
myTempTimerID = tempTimer(0.5, function()
  send("Only one")
end)
Package and Module best practices
- This is a list of things we have discovered over the years leads to the best user experience with Mudlet packages. They aren't all necessary, but you will find that the more of them you do, the easier the lives of your users and ultimately yourself.
- built-in auto-updates
- so players stay up to date, which will not be the case with manual updates)
- modular and extendable - use Mudlet modules for this
- so people can disable ones not needed)
- event based - raise events of your own for others to hook into
- so the order of scripts installed in the players profile doesn't matter
- make sure aliases only call functions
- so people can make their own aliases or keybindings to customize as needed without using expandAlias
- don't pollute the global namespace, keep everything in a table
- so you don't bugs from people overwriting it or vice versa)
- touched on above but bears repeating
- undo any UI changes on uninstall: set borders back, hide the UI, etc
- so people have a good experience even if they didn't like the package
- if you're specifying any fonts, package them
- while it might be available on your computer, not guaranteed to be available on every computer
- if you're a game admin, install it automatically via GMCP
- less overhead for players to get a good experience
- if you're a game admin, provide GMCP data for your game
- so people don't have to waste time trying to capture data, and can work with it instead
- don't use \ in paths, use / - even for Windows
- it'll work on Windows - and work on macOS and Linux too
Generic Mapper
- when adding customisation triggers to the generic mapper, add them outside of the
generic_mapperfolder- this is so when the mapper updates, you keep your changes
Here you can find a long list of all possible Lua functions and programming interfaces (API) that Mudlet offers. Due to the integrated Lua, you can also use all regular Lua functions. In the following page, we will explain the usage, expected behavior and examples for the functions added in Mudlet.
Global variables
Mudlet defines several global Lua variables that are accessible from anywhere.
| Built-in Lua Variables | |||||
|---|---|---|---|---|---|
| Variable Name | Description | ||||
command
|
This variable holds the current user command, i.e. unchanged by any aliases or triggers. This is typically used in alias scripts. | ||||
line
|
This variable holds the content of the current line as being processed by the trigger engine. The engine runs all triggers on each line as it arrives from the game. | ||||
matches[n]
|
This Lua table is being used by Mudlet in the context of triggers that use Perl regular expressions.
matches[1] holds the entire match, matches[2] holds the first capture group, matches[n] holds the nth-1 capture group. If the Perl trigger indicated 'match all' (same effect as the Perl /g switch) to evaluate all possible matches of the given regex within the current line, matches[n+1] will hold the second entire match, matches[n+2] the first capture group of the second match and matches[n+m] the m-th capture group of the second match. Since Mudlet 4.11+ it will contain named capturing groups, apart from numeric group matches (named groups count as numeric as well). Each can be access under element with key corresponding to group name.
Eg. if you capture group with name | ||||
multimatches[n][m]
|
This table is being used by Mudlet in the context of multiline triggers that use Perl regular expression. It holds the table matches[n] as described above for each Perl regular expression based condition of the multiline trigger. multimatches[5][4] may hold the 3rd capture group of the 5th regex in the multiline trigger. This way you can examine and process all relevant data within a single script. | ||||
mudlet.translations
|
Contains translations of some common texts (right now, exit directions only) that are helpful to you in Lua scripting, as well as the current language selected for the user interface. - See translateTable() | ||||
mudlet.key
|
Makes your life easier when creating new keybindings via Lua by translating the key name into the number needed - see tempKey(). | ||||
mudlet.keymodifier
|
Same as mudlet.key, but for keyboard modifiers - Ctrl, Alt, etc.
| ||||
mudlet.supports
|
Lists special functionality that the users Mudlet supports - right now, just mudlet.supports.coroutines & mudlet.supports.namedGroups is listed. Use mudlet.supports to conditionally enable functionality as it's available on the users Mudlet.
| ||||
color_table
|
Color definitions used by Geyser, cecho, and many other functions - see showColors(). The profile's color preferences are also accessible under the ansi_ keys.
| ||||
There are other variables that hold the game's MUD-protocol data that are global as well - see Supported Protocols.
Function Categories
Basic Essential Functions: These functions are generic functions used in normal scripting. These deal with mainly everyday things, like sending stuff and echoing to the screen.
Database Functions: A collection of functions for helping deal with the database.
Date/Time Functions: A collection of functions for handling date & time.
File System Functions: A collection of functions for interacting with the file system.
Mapper Functions: A collection of functions that manipulate the mapper and its related features.
Miscellaneous Functions: Miscellaneous functions.
Scripting Object Functions: A collection of arrows that manipulate Mudlets scripting objects - triggers, aliases, and so forth.
Networking Functions: A collection of functions for managing networking.
String Functions: These functions are used to manipulate strings.
Table Functions: These functions are used to manipulate tables. Through them you can add to tables, remove values, check if a value is present in the table, check the size of a table, and more.
Text to Speech Functions: These functions are used to create sound from written words. Check out our Text-To-Speech Manual for more detail on how this all works together.
UI Functions: These functions are used to construct custom user GUIs. They deal mainly with miniconsole/label/gauge creation and manipulation as well as displaying or formatting information on the screen.
Discord Functions: These functions are used to customize the information Mudlet displays in Discord's rich presence interface. For an overview on how all of these functions tie in together, see our Discord scripting overview.
Additionally, more advanced functions are available in the Lua 5.1 manual.
Basic Essentials
These functions are generic functions used in normal scripting. These deal with mainly everyday things, like sending stuff and echoing to the screen.
debugc
- debugc(content)
- Again this will not send anything to anywhere. It will however print not to the main window, but only to the errors view. You need to open that window to see the message.
- See also: Errors View
![]() Note: Do not use this to display information to end-users. It will be hard to find. It is mainly useful for developing/debugging. Does not echo to the debug window
Note: Do not use this to display information to end-users. It will be hard to find. It is mainly useful for developing/debugging. Does not echo to the debug window
debugc(" Trigger successful!")
-- Text will be shown in errors view, not to main window.
display
- display(content)
- This is much like echo, in that is will show text at your screen, not send anything to anywhere. However, it also works with other objects than just text, like a number, table, function, or even many arguments at once. This function is useful to easily take a look at the values of a lua table, for example. If a value is a string of letters, it'll be in quotes, and if it's a number, it won't be quoted.
![]() Note: Do not use this to display information to end-users. It may be hard to read. It is mainly useful for developing/debugging.
Note: Do not use this to display information to end-users. It may be hard to read. It is mainly useful for developing/debugging.
myTable = {} -- create an empty lua table
myTable.foo = "Hello there" -- add a text
myTable.bar = 23 -- add a number
myTable.ubar = function () echo("OK") end -- add more stuff
display( myTable ) -- take a look inside the table
echo
- echo([miniconsoleName or labelName], text)
- This function appends text at the end of the current line.
- Parameters
- miniconsoleName: (optional) the miniconsole to echo to, or:
- labelName: (optional) the label to echo to.
- text: text you'd like to see printed. You can use \n in an echo to insert a new line. If you're echoing this to a label, you can also use styling to color, center, increase/decrease size of text and various other formatting options as listed here.
See also: moveCursor(), insertText(), cecho(), decho(), hecho()
As of Mudlet 4.8+, a single line is capped to 10,000 characters (this is when ~200 at most will fit on one line on your screen).
- Example
-- a miniconsole example

-- first, determine the size of your screen
local windowWidth, windowHeight = getMainWindowSize()

-- create the miniconsole
createMiniConsole("sys", windowWidth-650,0,650,300)
setBackgroundColor("sys",255,69,0,255)
setMiniConsoleFontSize("sys", 8)
-- wrap lines in window "sys" at 40 characters per line - somewhere halfway, as an example
setWindowWrap("sys", 40)

echo("sys","Hello world!\n")
cecho("sys", "<:OrangeRed>This is random spam with the same background\n")
cecho("sys", "<blue:OrangeRed>and this is with a blue foreground. ")
cecho("sys", "<bisque:BlueViolet>Lastly, this is with both a foreground and a background.\n")
-- a label example
-- This example creates a transparent overlay message box to show a big warning message "You are under attack!" in the middle
-- of the screen. Because the background color has a transparency level of 150 (0-255, with 0 being completely transparent
-- and 255 opaque) the background text can still be read through.
local width, height = getMainWindowSize()
createLabel("messageBox",(width/2)-300,(height/2)-100,250,150,1)
resizeWindow("messageBox",500,70)
moveWindow("messageBox", (width/2)-300,(height/2)-100 )
setBackgroundColor("messageBox", 255, 204, 0, 200)
echo("messageBox", [[<p style="font-size:35px"><b><center><font color="red">You are under attack!</font></center></b></p>]])printDebug
- printDebug(msg, [showStackTrace])
- Prints a debug message in green to the error console in the script editor only. Does not echo to the debug window or the main console. Includes stack trace if showStackTrace is included and not nil or false.
- See also
- printError, debugc
![]() Note: This will not be echoed to the main console even if the option to echo Lua errors to the main console is turned on. Does not echo to the debug window. As such you can use it for debugging information without fear it will be shown unless someone goes looking for errors.
Note: This will not be echoed to the main console even if the option to echo Lua errors to the main console is turned on. Does not echo to the debug window. As such you can use it for debugging information without fear it will be shown unless someone goes looking for errors.
- Parameters
- msg:
- string to echo to the error console
- showStackTrace:
- (optional) boolean true if you want to include the stack trace, leave off if you do not.
- Example
-- print a debug message to the error console for troubleshooting purposes, when you don't want to echo the information to the main screen.
-- the only difference between this and debugc is this includes information on the script/alias/trigger/etc and line it was called from, whereas debugc does not.
printDebug("Switching to chaos mode")

-- Want to record that something occurred, and include stacktrace so you can see what path the code was taking, but you don't want to halt execution or have it show up in main screen or in scary red.
printDebug("Something unexpected occurred but we can recover from it. Still, we want to be able to notice and troubleshoot it with extra information.", true)
printError
- printError(msg, [showStackTrace], [haltExecution])
- Prints an error message in red to the error console in the script editor. Can optionally include stacktrace information and halt execution.
- See also
- printDebug, debugc
![]() Note: This WILL be echoed to the main console if the option to echo Lua errors to the main console is turned on. You should not use this for idle debugging information, but actual errors that may put big red error lines in the main window.
Note: This WILL be echoed to the main console if the option to echo Lua errors to the main console is turned on. You should not use this for idle debugging information, but actual errors that may put big red error lines in the main window.
- Parameters
- msg:
- string to echo to the error console
- showStackTrace:
- (optional) true if you want to include the stack trace, leave off if you do not.
- haltExecution:
- (optional) true if you want to halt execution. You must pass a value for showStackTrace in order to halt execution.
- Example
-- print an error message but do not include extra stack information or halt execution.
-- this is similar to debugc except it include more information on the place it was called from
-- and will show up in red and echo to the main console if the option for errors to echo there is selected.
printError("Your maxhp is below your currenthp and our game doesn't allow for that. HAX?!")

-- Something bad happened, for sure, but your script can recover.
-- Make sure this is something important enough it might make it to the main window as a big red error.
-- but we are not halting execution, since we can carry on in some capacity
printError("gmcp values for this thing went missing, will carry on using defaults but you should tell somebody about this.", true)

-- print an error message to the error console for troubleshooting purposes.
-- Prints stack trace for troubleshooting and halts execution (because you cannot continue without the configuration, presumably)
-- similar to using error(msg) but includes the stacktrace information.
printError("Our entire configuration seems to have gone missing!", true, true)
send
- send(command, showOnScreen)
- This sends "command" directly to the network layer, skipping the alias matching. The optional second argument of type boolean (print) determines if the outgoing command is to be echoed on the screen.
See also: sendAll(), speedwalk()
![]() Note: If you want your command to be checked as if it's an alias, use expandAlias() instead - send() will ignore them.
Note: If you want your command to be checked as if it's an alias, use expandAlias() instead - send() will ignore them.
send("Hello Jane") --echos the command on the screen
send("Hello Jane", true) --echos the command on the screen
send("Hello Jane", false) --does not echo the command on the screen

-- use a variable in the send:
send("kick "..target)

-- to send directions:
speedwalk("s;s;w;w;w;w;w;w;w;")

-- to send many things:
sendAll("hi", "open door e", "e", "get item", "sit")![]() Note: The game server can choose not to show commands sent on screen (for example, if you're typing in a password).
Note: The game server can choose not to show commands sent on screen (for example, if you're typing in a password).
Database Functions
These database functions make using a database with Mudlet easier. They are in addition to the LuaSQL sqlite driver that's available directly within Mudlet (also see the LuaSQL manual for comparison).
For a tutorial on how to get started with the database functions, see here.
db:add
- db:add(sheet reference, table1, …, tableN)
- Adds one or more new rows to the specified sheet. If any of these rows would violate a UNIQUE index, a lua error will be thrown and execution will cancel. As such it is advisable that if you use a UNIQUE index, you test those values before you attempt to insert a new row.
- Returns nil plus the error message if the operation failed (so it won't raise a runtime error in Mudlet).
- Example
--Each table is a series of key-value pairs to set the values of the sheet,
--but if any keys do not exist then they will be set to nil or the default value.
db:add(mydb.enemies, {name="Bob Smith", city="San Francisco"})
db:add(mydb.enemies,
     {name="John Smith", city="San Francisco"},
     {name="Jane Smith", city="San Francisco"},
     {name="Richard Clark"})
--As you can see, all fields are optional.

-- example that'll show an error if things went wrong:
local ok, err = db:add(mydb.enemies, {name="Bob Smith", city="San Francisco"})
if not ok then
  debugc(f"Error adding to the database: {err}")
  return
end
db:aggregate
- db:aggregate(field reference, aggregate function, query, distinct)
- Returns the result of calling the specified aggregate function on the field and its sheet. The query is optional.
- The supported aggregate functions are:
- COUNT - Returns the total number of records that are in the sheet or match the query.
- AVG - Returns the average of all the numbers in the specified field.
- MAX - Returns the highest number in the specified field.
- MIN - Returns the lowest number in the specified field.
- TOTAL - Returns the value of adding all the contents of the specified field.
![]() Note: You can supply a boolean true for the distinct argument since Mudlet 3.0 to filter by distinct values.
Note: You can supply a boolean true for the distinct argument since Mudlet 3.0 to filter by distinct values.
- Example
local mydb = db:get_database("my database")
echo(db:aggregate(mydb.enemies.name, "count"))- It can also be used in conjunction with db:like to return a number of results.
- Example
local query = matches[2]
local mydb = db:get_database("itemsdab")
local results = db:aggregate(mydb.itemstats.objname, "count", db:like(mydb.itemstats.objname, "%" .. query .. "%"))
cecho("Found <red>"..results.."<reset> items that match the description.")
db:AND
- db:AND(sub-expression1, …, sub-expressionN)
- Returns a compound database expression that combines all of the simple expressions passed into it; these expressions should be generated with other db: functions such as db:eq, db:like, db:lt and the like.
- This compound expression will only find items in the sheet if all sub-expressions match.
db:between
- db:between(field reference, lower_bound, upper_bound)
- Returns a database expression to test if the field in the sheet is a value between lower_bound and upper_bound. This only really makes sense for numbers and Timestamps.
db:close
- db:close(database name)
- Closes a database connection so it can't be used anymore.
db:create
- db:create(database name, schema table, force)
- Creates and/or modifies an existing database. This function is safe to define at a top-level of a Mudlet script: in fact it is recommended you run this function at a top-level without any kind of guards as it will also open and return a reference to the database. If the named database does not exist it will create it. If the database does exist then it will add any columns or indexes which didn’t exist before to that database. If the database already has all the specified columns and indexes, it will do nothing. If an existing column with at least one non-NULL value is missing from the new schema, it will raise an error by default; the user may force the dropping of the column by setting the force argument to true.
- The database will be called Database_<sanitized database name>.db and will be stored in the Mudlet configuration directory within your profile folder, which you can find with getMudletHomeDir().
![]() Note: Including non alphanumeric characters in your database name will throw an error. Please also keep in mind that windows is case insensitive to file names, so databases named
Note: Including non alphanumeric characters in your database name will throw an error. Please also keep in mind that windows is case insensitive to file names, so databases named CombatLog and combatlog for example, would result in separate databases on Linux while referencing the same database on windows.
- Database tables are called sheets consistently throughout this documentation, to avoid confusion with Lua tables.
- The schema table must be a Lua table array containing table dictionaries that define the structure and layout of each sheet. The starting Lua type will determine the type in the database, i.e. if you want to store text set it to
= ""and if you want to store a number set it to= 0.
- Example
local mydb = db:create("combatLog",
  {
    kills = {
              name = "",
              area = "",
              killed = db:Timestamp("CURRENT_TIMESTAMP"),
              damage = 0,
              _index = { {"name", "area"} }
            },
    enemies = {
                name = "",
                city = "",
                reason = "",
                enemied = db:Timestamp("CURRENT_TIMESTAMP"),
                _index = { "city" },
                _unique = { "name" },
                _violations = "IGNORE"
               }
})- The above will create a database with two sheets; the first is kills and is used to track every successful kill, with both where and when the kill happened. It has one index, a compound index tracking the combination of name and area. The second sheet has two indexes, but one is unique: it isn’t possible to add two items to the enemies sheet with the same name.
- For sheets with unique indexes, you may specify a
_violationskey to indicate how the db layer handle cases where the data is duplicate (unique index is violated). The options you may use are:
- FAIL - the default. A hard error is thrown, cancelling the script.
- IGNORE - The command that would add a record that violates uniqueness just fails silently.
- REPLACE - The old record which matched the unique index is dropped, and the new one is added to replace it.
- Returns a reference of an already existing database. This instance can be used to get references to the sheets (and from there, fields) that are defined within the database. You use these references to construct queries.
- If a database has a sheet named enemies, you can obtain a reference to that sheet by doing:
local mydb = db:get_database("myDatabase")
local enemies_ref = mydb.enemieslocal
local name_ref = mydb.enemies.name![]() Note: db:create() supports adding new columns and indexes to existing databases, but this functionality was broken in Mudlet 2.1 due to the underlying Lua SQL binding used being out of date. When you want to add a new column, you have several options:
Note: db:create() supports adding new columns and indexes to existing databases, but this functionality was broken in Mudlet 2.1 due to the underlying Lua SQL binding used being out of date. When you want to add a new column, you have several options:
- if you are just testing and getting setup, close Mudlet, and delete the Database_<sanitized database name>.db file in your Mudlet folder.
- if you've already gotten a script and have a fair bit of data with it, or users are already using your script and telling them to delete files on an upgrade is unreasonable, you can use direct SQL to add in a new column. WARNING, this is an expert option, and requires knowledge of SQL to accomplish. You must backup your database file before you start coding this in.
  -- at first, update your db:create schema to have the new field.
  -- then, we'll tell the database to create it if it doesn't exist

  -- fetch the data we've got in our sample database
  local test = db:fetch(ndb.db.people)
  -- this requires at least one entry in the database to work
  if next(test) then
    local _,someperson = next(test)

    -- in this example, we want to add an order key. If there is no key, means it doesn't exist yet, so it should be added.
    if someperson.order == nil then
      -- do not do the things you see here elsewhere else. This is a big hack/workaround.
      local conn = db.__conn.namedb
      -- order should be a text field, so note that we specify it's type with TEXT and the default value at the end with ""
      local sql_add = [[ALTER TABLE people ADD COLUMN "order" TEXT NULL DEFAULT ""]]
      conn:execute(sql_add)
      conn:commit()
    end

    -- here is an another example, in one where we need to add a field that is a number
    if someperson.dragon == nil then
      local conn = db.__conn.namedb
      -- observe that we use the REAL type by default instead and a default of 0
      local sql_add = [[ALTER TABLE people ADD COLUMN "dragon" REAL NULL DEFAULT 0]]
      conn:execute(sql_add)
      conn:commit()
    end
  end
See also: Creating a Database
db:delete
- db:delete(sheet reference, query)
- Deletes rows from the specified sheet. The argument for query tries to be intelligent:
- If it is a simple number, it deletes a specific row by _row_id
- If it is a table that contains a _row_id (e.g., a table returned by db:get) it deletes just that record.
- Otherwise, it deletes every record which matches the query pattern which is specified as with b:get.
- If the query is simply true, then it will truncate the entire contents of the sheet.
- Example
enemies = db:fetch(mydb.enemies)
db:delete(mydb.enemies, enemies[1])

db:delete(mydb.enemies, enemies[1]._row_id)
db:delete(mydb.enemies, 5)
db:delete(mydb.enemies, db:eq(mydb.enemies.city, "San Francisco"))
db:delete(mydb.enemies, true)- Those deletion commands will do in order:
- one When passed an actual result table that was obtained from db:fetch, it will delete the record for that table.
- two When passed a number, will delete the record for that _row_id. This example shows getting the row id from a table.
- three As above, but this example just passes in the row id directly.
- four Here, we will delete anything which matches the same kind of query as db:fetch uses-- namely, anyone who is in the city of San Francisco.
- five And finally, we will delete the entire contents of the enemies table.
db:eq
- db:eq(field reference, value)
- Returns a database expression to test if the field in the sheet is equal to the value.
db:exp
- db:exp(string)
- Returns the string as-is to the database.
- Use this function with caution, but it is very useful in some circumstances. One of the most common of such is incrementing an existing field in a db:set() operation, as so:
db:set(mydb.enemies, db:exp("kills + 1"), db:eq(mydb.enemies.name, "Ixokai"))- This will increment the value of the kills field for the row identified by the name Ixokai.
- But there are other uses, as the underlining database layer provides many functions you can call to do certain things. If you want to get a list of all your enemies who have a name longer then 10 characters, you may do:
db:fetch(mydb.enemies, db:exp("length(name) > 10"))- Again, take special care with this, as you are doing SQL syntax directly and the library can’t help you get things right.
db:fetch
- db:fetch(sheet reference, query, order_by, descending)
- Returns a table array containing a table for each matching row in the specified sheet. All arguments but sheet are optional. If query is nil, the entire contents of the sheet will be returned.
- Query is a string which should be built by calling the various db: expression functions, such as db:eq, db:AND, and such. You may pass a SQL WHERE clause here if you wish, but doing so is very dangerous. If you don’t know SQL well, its best to build the expression.
- Query may also be a table array of such expressions, if so they will be AND’d together implicitly.
- The results that are returned are not in any guaranteed order, though they are usually the same order as the records were inserted. If you want to rely on the order in any way, you must pass a value to the order_by field. This must be a table array listing the fields you want to sort by. It can be { mydb.kills.area }, or { mydb.kills.area, mydb.kills.name }
- The results are returned in ascending (smallest to largest) order; to reverse this pass true into the final field.
- Example
db:fetch(mydb.enemies, nil, {mydb.enemies.city, mydb.enemies.name})
db:fetch(mydb.enemies, db:eq(mydb.enemies.city, "San Francisco"))
db:fetch(mydb.kills,
     {db:eq(mydb.kills.area, "Undervault"),
     db:like(mydb.kills.name, "%Drow%")}
)- The first will fetch all of your enemies, sorted first by the city they reside in and then by their name.
- The second will fetch only the enemies which are in San Francisco.
- The third will fetch all the things you’ve killed in Undervault which have Drow in their name.
db:fetch_sql
- db:fetch_sql(sheet reference, sql string)
- Allows to run db:fetch with hand crafted sql statements.
- When you have a large number of objects in your database, you may want an alternative method of accessing them. In this case, you can first obtain a list of the _row_id for the objects that match your query with the following alias:
- Example
local mydb = db:get_database("itemsdab")
local query = matches[2]
local t = {}
res = db:fetch(mydb.itemstats, db:query_by_example(mydb.itemstats, {objname = "%" .. query .. "%"}))
for k, v in pairs(res) do
  print(v._row_id)
  table.insert(t,v._row_id)
end
handoff = table.concat(t, "|")
display(handoff)- Then you can use the following code in a separate alias to query your database using the previously retrieved _row_id.
- Example
local mydb = db:get_database("itemsdab")
local query = matches[2]
display(db:fetch_sql(mydb.itemstats, "select * from itemstats where _row_id ="..query))
--This alias is used to query a database by _row_id
db:gt
- db:gt(field reference, value)
- Returns a database expression to test if the field in the sheet is greater than to the value.
db:get_database
- db:get_database(database_name)
- Returns a reference of an already existing database. This instance can be used to get references to the sheets (and from there, fields) that are defined within the database. You use these references to construct queries. These references do not contain any actual data, they only point to parts of the database structure.
- Example
local mydb = db:get_database("my database")
local enemies_ref = mydb.enemies
local name_ref = mydb.enemies.name
db:gte
- db:gte(field reference, value)
- Returns a database expression to test if the field in the sheet is greater than or equal to the value.
db:in_
- db:in_(field reference, table array)
- Returns a database expression to test if the field in the sheet is one of the values in the table array.
- First, note the trailing underscore carefully! It is required.
- The following example illustrates the use of in_:
local mydb = db:get_database("my database")
local areas = {"Undervault", "Hell", "Purgatory"}

db:fetch(mydb.kills, db:in_(mydb.kills.area, areas))- This will obtain all of your kills which happened in the Undervault, Hell or Purgatory. Every db:in_ expression can be written as a db:OR, but that quite often gets very complex.
db:is_nil
- db:is_nil(field reference)
- Returns a database expression to test if the field in the sheet is nil.
db:is_not_nil
- db:is_not_nil(field reference)
- Returns a database expression to test if the field in the sheet is not nil.
db:like
- db:like(field reference, pattern)
- returns a database expression to test if the field in the sheet matches the specified pattern.
- LIKE patterns are not case-sensitive, and allow two wild cards. The first is an underscore which matches any single one character. The second is a percent symbol which matches zero or more of any character.
- LIKE with "_" is therefore the same as the "." regular expression.
- LIKE with "%" is therefore the same as ".*" regular expression.
db:lt
- db:lt(field reference, value)
- Returns a database expression to test if the field in the sheet is less than the value.
db:lte
- db:lte(field reference, value)
- Returns a database expression to test if the field in the sheet is less than or equal to the value.
db:merge_unique
- db:merge_unique(sheet reference, table array)
- Merges the specified table array into the sheet, modifying any existing rows and adding any that don’t exist.
- This function is a convenience utility that allows you to quickly modify a sheet, changing existing rows and add new ones as appropriate. It ONLY works on sheets which have a unique index, and only when that unique index is only on a single field. For more complex situations you’ll have to do the logic yourself.
- The table array may contain tables that were either returned previously by db:fetch, or new tables that you’ve constructed with the correct fields, or any mix of both. Each table must have a value for the unique key that has been set on this sheet.
- For example, consider this database
local mydb = db:create("peopledb",
     {
          friends = {
               name = "",
               race = "",
               level = 0,
               city = "",
               _index = { "city" },
               _unique = { "name" }
          }
);- Here you have a database with one sheet, which contains your friends, their race, level, and what city they live in. Let’s say you want to fetch everyone who lives in San Francisco, you could do:
local results = db:fetch(mydb.friends, db:eq(mydb.friends.city, "San Francisco"))- The tables in results are static, any changes to them are not saved back to the database. But after a major radioactive cataclysm rendered everyone in San Francisco a mutant, you could make changes to the tables as so:
for _, friend in ipairs(results) do
     friend.race = "Mutant"
end- If you are also now aware of a new arrival in San Francisco, you could add them to that existing table array:
results[#results+1] = {name="Bobette", race="Mutant", city="San Francisco"}- And commit all of these changes back to the database at once with:
db:merge_unique(mydb.friends, results)- The db:merge_unique function will change the city values for all the people who we previously fetched, but then add a new record as well.
db:not_between
- db:not_between(field reference, lower_bound, upper_bound)
- Returns a database expression to test if the field in the sheet is not a value between lower_bound and upper_bound. This only really makes sense for numbers and Timestamps.
db:not_eq
- db:not_eq(field reference, value)
- Returns a database expression to test if the field in the sheet is NOT equal to the value.
db:not_in
- db:not_in(field reference, table array)
- Returns a database expression to test if the field in the sheet is not one of the values in the table array.
- See also: db:in_
db:not_like
- db:not_like(field reference, pattern)
- Returns a database expression to test if the field in the sheet does not match the specified pattern.
- LIKE patterns are not case-sensitive, and allow two wild cards. The first is an underscore which matches any single one character. The second is a percent symbol which matches zero or more of any character.
- LIKE with "_" is therefore the same as the "." regular expression.
- LIKE with "%" is therefore the same as ".*" regular expression.
db:OR
- db:OR(sub-expression1, sub-expression2)
- Returns a compound database expression that combines both of the simple expressions passed into it; these expressions should be generated with other db: functions such as db:eq, db:like, db:lt and the like.
- This compound expression will find any item that matches either the first or the second sub-expression.
db:query_by_example
- db:query_by_example(sheet reference, example table)
- Returns a query for database content matching the given example, which can be used for db:delete, db:fetch and db:set. Different fields of the example are AND connected.
- Field values should be strings and can contain the following values:
- literal strings to search for
- comparison terms prepended with <, >, >=, <=, !=, <> for number and date comparisons
- ranges with :: between lower and upper bound
- different single values combined by || as OR
- strings containing % for a single and _ for multiple wildcard characters
- Example
mydb = db:create("mydb",
{
  sheet = {
  name = "", id = 0, city = "",
  _index = { "name" },
  _unique = { "id" },
  _violations = "FAIL"
  }
})
test_data = {
  {name="Ixokai", city="Magnagora", id=1},
  {name="Vadi", city="New Celest", id=2},
  {name="Heiko", city="Hallifax", id=3},
  {name="Keneanung", city="Hashan", id=4},
  {name="Carmain", city="Mhaldor", id=5},
  {name="Ixokai", city="Hallifax", id=6},
}
db:add(mydb.sheet, unpack(test_data))
res = db:fetch(mydb.sheet, db:query_by_example(mydb.sheet, { name = "Ixokai"}))
display(res)
--[[
Prints
{
  {
    id = 1,
    name = "Ixokai",
    city = "Magnagora"
  },
  {
    id = 6,
    name = "Ixokai",
    city = "Hallifax"
  }
}
--]]
mydb = db:create("mydb",
{
sheet = {
name = "", id = 0, city = "",
_index = { "name" },
_unique = { "id" },
_violations = "FAIL"
}
})
test_data = {
{name="Ixokai", city="Magnagora", id=1},
{name="Vadi", city="New Celest", id=2},
{name="Heiko", city="Hallifax", id=3},
{name="Keneanung", city="Hashan", id=4},
{name="Carmain", city="Mhaldor", id=5},
{name="Ixokai", city="Hallifax", id=6},
}
db:add(mydb.sheet, unpack(test_data))
res = db:fetch(mydb.sheet, db:query_by_example(mydb.sheet, { name = "Ixokai", id = "1"}))
display(res)
--[[
Prints
{
id = 1,
name = "Ixokai",
city = "Magnagora"
}
--]]db:Timestamp
- db:Timestamp(time)
- Returns a table that will be converted to an appropriate time. If the time argument is a table, it will be converted to the current OS time; if it is a number, it will be intrepreted as a Unix epoch time; if it is nil, it will be converted to a SQL NULL; it can also have the value of "CURRENT_TIMESTAMP", which will be converted to the corresponding SQL keyword.
db:Null
- db:Null()
- Returns a table that will be interpreted as the NULL SQL keyword.
db:safe_name
- db:safe_name(string)
- Strips all non-alphanumeric characters from the input string.Mainly used to sanitize database names.
db:set
- db:set(field reference, value, query)
- The db:set function allows you to set a certain field to a certain value across an entire sheet. Meaning, you can change all of the last_read fields in the sheet to a certain value, or possibly only the last_read fields which are in a certain city. The query argument can be any value which is appropriate for db:fetch, even nil which will change the value for the specified column for EVERY row in the sheet.
- For example, consider a situation in which you are tracking how many times you find a certain type of egg during Easter. You start by setting up your database and adding an Eggs sheet, and then adding a record for each type of egg.
- Example
local mydb = db:create("egg database", {eggs = {color = "", last_found = db.Timestamp(false), found = 0}})
        db:add(mydb.eggs,
                {color = "Red"},
                {color = "Blue"},
                {color = "Green"},
                {color = "Yellow"},
                {color = "Black"}
)- Now, you have three columns. One is a string, one a timestamp (that ends up as nil in the database), and one is a number.
- You can then set up a trigger to capture from the game the string, "You pick up a (.*) egg!", and you end up arranging to store the value of that expression in a variable called "myegg".
- To increment how many we found, we will do this:
myegg = "Red" -- We will pretend a trigger set this.
        db:set(mydb.eggs.found, db:exp("found + 1"), db:eq(mydb.eggs.color, myegg))
db:set(mydb.eggs.last_found, db.Timestamp("CURRENT_TIMESTAMP"), db:eq(mydb.eggs.color, myegg))- This will go out and set two fields in the Red egg sheet; the first is the found field, which will increment the value of that field (using the special db:exp function). The second will update the last_found field with the current time.
- Once this contest is over, you may wish to reset this data but keep the database around. To do that, you may use a more broad use of db:set as such:
db:set(mydb.eggs.found, 0)
db:set(mydb.eggs.last_found, nil)
db:update
- db:update(sheet reference, table)
- This function updates a row in the specified sheet, but only accepts a row which has been previously obtained by db:fetch. Its primary purpose is that if you do a db:fetch, then change the value of a field or tow, you can save back that table.
- Example
local mydb = db:get_database("my database")
local bob = db:fetch(mydb.friends, db:eq(mydb.friends.name, "Bob"))[1]
bob.notes = "He's a really awesome guy."
db:update(mydb.friends, bob)- This obtains a database reference, and queries the friends sheet for someone named Bob. As this returns a table array containing only one item, it assigns that one item to the local variable named bob. We then change the notes on Bob, and pass it into db:update() to save the changes back.
db:_sql_convert
- db:_sql_convert(value)
- Converts a data value in Lua to its SQL equivalent; notably it will also escape single-quotes to prevent inadvertent SQL injection. In addition, it will convert Lua tables with a _timestamp key to the appropriate time (possibly CURRENT_TIMESTAMP) and Lua tables with a _isNull key to the NULL SQL keyword.
db:_sql_values
- db:_sql_values(values)
- This quotes values to be passed into an INSERT or UPDATE operation in a SQL list. Meaning, it turns {x="this", y="that", z=1} into ('this', 'that', 1). It is intelligent with data-types; strings are automatically quoted (with internal single quotes escaped), nil turned into NULL, timestamps converted to integers, and such.
Transaction Functions
These functions facilitate use of transactions with a database. This can safely be ignored in most cases, but can provide useful functionality in specific circumstances. Transactions allow batching sets of changes to be accepted or rejected at a later point. Bear in mind that transactions affect an entire database.
db:_begin
- db:_begin()
- This function halts all automatic disk writes for the database. This can be especially helpful when running large or frequent (multiple times a second) database edits through multiple function calls to prevent Mudlet freezing or jittering. Calling this on a database already in a transaction will have no effect, but will not produce an error.
local mydb = db:get_database("my_database")
mydb:_begin()
-- do other things as needed
db:_commit
- db:_commit()
- This function forces the database to save all changes to disk, beginning a new transaction in the process.
local mydb = db:get_database("my_database")
mydb:_begin()
-- do other things as needed
mydb:_commit()
db:_end
- db:_end()
- This function re-enables automatic disk writes for the database. It will not commit changes to disk on its own, nor will it end the current transaction. Using db:_commit() or any database function that writes changes after this will save the transaction to disk. Using db:_begin again before this happens will continue the previous transaction without writing anything to disk.
local mydb = db:get_database("my_database")
mydb:_end()
db:_rollback
- db:_rollback()
- This function will discard all changes that have occurred during the current transaction and begin a new one. Use of this function will not toggle the auto-write state of the database.
local mydb = db:get_database("my_database")
mydb:_begin()
-- do other things as needed
mydb:_rollback()
Date & Time Functions
A collection of functions for handling date & time.
datetime:parse
- datetime:parse(source, format, as_epoch)
- Parses the specified source string, according to the format if given, to return a representation of the date/time. If as_epoch is provided and true, the return value will be a Unix epoch — the number of seconds since 1970. This is a useful format for exchanging date/times with other systems. If as_epoch is false, then a Lua time table will be returned. Details of the time tables are provided in the Lua Manual.
- Supported Format Codes
%b = Abbreviated Month Name
%B = Full Month Name
%d = Day of Month
%H = Hour (24-hour format)
%I = Hour (12-hour format, requires %p as well)
%p = AM or PM
%m = 2-digit month (01-12)
%M = 2-digit minutes (00-59)
%S = 2-digit seconds (00-59)
%y = 2-digit year (00-99), will automatically prepend 20 so 10 becomes 2010 and not 1910.
%Y = 4-digit year.
getEpoch
- seconds = getEpoch()
- This function returns the seconds since Unix epoch with milliseconds.
- Example
getEpoch() -- will show e.g. 1523555867.191getTime
- time = getTime([return as string, [custom time format]])
- "return string" is a boolean value (in Lua anything but false or nil will translate to true). If false, the function will return a table in the following format:
{ 'min': #, 'year': #, 'month': #, 'day': #, 'sec': #, 'hour': #, 'msec': # }
If true, it will return the date and time as a string using a format passed to the "custom time format" arg or if none is supplied the default of "yyyy.MM.dd hh:mm:ss.zzz":
2012.02.18 00:52:52.489
Format expressions:
h               the hour without a leading zero (0 to 23 or 1 to 12 if AM/PM display)
hh              the hour with a leading zero (00 to 23 or 01 to 12 if AM/PM display)
H               the hour without a leading zero (0 to 23, even with AM/PM display)
HH              the hour with a leading zero (00 to 23, even with AM/PM display)
m               the minute without a leading zero (0 to 59)
mm              the minute with a leading zero (00 to 59)
s               the second without a leading zero (0 to 59)
ss              the second with a leading zero (00 to 59)
z               the milliseconds without leading zeroes (0 to 999)
zzz             the milliseconds with leading zeroes (000 to 999)
AP or A         use AM/PM display. AP will be replaced by either "AM" or "PM".
ap or a         use am/pm display. ap will be replaced by either "am" or "pm".

d               the day as number without a leading zero (1 to 31)
dd              the day as number with a leading zero (01 to 31)
ddd             the abbreviated localized day name (e.g. 'Mon' to 'Sun'). Uses QDate::shortDayName().
dddd            the long localized day name (e.g. 'Monday' to 'Qt::Sunday'). Uses QDate::longDayName().
M               the month as number without a leading zero (1-12)
MM              the month as number with a leading zero (01-12)
MMM             the abbreviated localized month name (e.g. 'Jan' to 'Dec'). Uses QDate::shortMonthName().
MMMM            the long localized month name (e.g. 'January' to 'December'). Uses QDate::longMonthName().
yy              the year as two digit number (00-99)
yyyy            the year as four digit number
All other input characters will be ignored. Any sequence of characters that are enclosed in single quotes will be treated as text and not be used as an expression. Two consecutive single quotes ('') are replaced by a single single quote in the output.
- Example
-- Get time as a table
getTime()

-- Get time with default string
getTime(true)

-- Get time without date and milliseconds
getTime(true, "hh:mm:ss")
getTimestamp
- time = getTimestamp([console_name], lineNumber)
- Returns the timestamp string as it’s seen when you enable the timestamps view (blue i button bottom right).
- Example
-- echo the timestamp of the current line in a trigger:
echo(getTimestamp(getLineCount()))
-- insert the timestamp into a "chat" miniconsole
cecho("chat", "<red>"..getTimestamp(getLineCount()))shms
- shms(seconds, bool)
- Converts seconds into hours, minutes and seconds, displaying the result as a table. An optional second argument can be passed to return the result as an echo.
- Example
--Determine the total number of seconds and display:
shms(65535, true)
File System Functions
A collection of functions for interacting with the file system.
io.exists
- io.exists(path)
- Checks to see if a given file or folder exists.
- If it exists, it’ll return the Lua true boolean value, otherwise false.
- See lfs.attributes() for a cross-platform solution.
- Example
-- This example works on Linux only
if io.exists("/home/vadi/Desktop") then
echo("This folder exists!")
else
echo("This folder doesn't exist.")
end
-- This example will work on both Windows and Linux.
if io.exists("/home/vadi/Desktop/file.tx") then
echo("This file exists!")
else
echo("This file doesn't exist.")
endlfs.attributes
- infoTable = lfs.attributes(path)
- Returns a table with detailed information regarding a file or directory, or nil if path is invalid / file or folder does not exist.
- Example
fileInfo = lfs.attributes("/path/to/file_or_directory")
if fileInfo then
if fileInfo.mode == "directory" then
echo("Path points to a directory.")
elseif fileInfo.mode == "file" then
echo("Path points to a file.")
else
echo("Path points to: "..fileInfo.mode)
end
display(fileInfo) -- to see the detailed information
else
echo("The path is invalid (file/directory doesn't exist)")
end
Mapper Functions
These are functions that are to be used with the Mudlet Mapper. The mapper is designed to be generic - it only provides the display and pathway calculations, to be used in Lua scripts that are tailored to the game you're playing. For a collection of pre-made scripts and general mapper talk, visit the mapper section of the forums.
To register a script as a mapping one with Mudlet (so Mudlet knows the profile has one and won't bother the user when they open the map), please do this in your script:
mudlet = mudlet or {}; mudlet.mapper_script = trueaddAreaName
- areaID = addAreaName(areaName)
- Adds a new area name and returns the new (positive) area ID for the new name. If the name already exists, older versions of Mudlet returned -1 though since 3.0 the code will return nil and an error message.
- See also: deleteArea(), addRoom()
- Example
local newId, err = addAreaName("My House")
if newId == nil or newId < 1 or err then
echo("That area name could not be added - error is: ".. err.."\n")
else
cecho("<green>Created new area with the ID of "..newId..".\n")
endaddCustomLine
- addCustomLine(roomID, id_to, direction, style, color, arrow)
- See also: getCustomLines(), removeCustomLine()
- Adds a new/replaces an existing custom exit line to the 2D mapper for the room with the Id given.
- Parameters
- roomID:
- Room ID to attach the custom line to.
- id_to:
- EITHER: a room Id number, of a room on same area who's x and y coordinates are used as the other end of a SINGLE segment custom line (it does NOT imply that is what the exit it represent goes to, just the location of the end of the line);
- OR: a table of sets of THREE (x,y and z) coordinates in that order, x and y can be decimals, z is an integer (and must be present and be the same for all points on the line, though it is irrelevant to what is produced as the line is drawn on the same z-coordinate as the room that the line is attached to!)
- direction: a string to associate the line with a valid exit direction, "n", "ne", "e", "se", "s", "sw", "w", "nw", "up", "down", "in" or "out" or a special exit (before Mudlet 3.17 this was case-sensitive and cardinal directions had to be uppercase).
- style: a string, one of: "solid line", "dot line", "dash line", "dash dot line" or "dash dot dot line" exactly.
- color: a table of three integers between 0 and 255 as the custom line color as the red, green and blue components in that order.
- arrow: a boolean which if true will set the custom line to have an arrow on the end of the last segment.
- Examples
-- create a line from roomid 1 to roomid 2
addCustomLine(1, 2, "N", "dot line", {0, 255, 255}, true)
addCustomLine(1, {{4.5, 5.5, 3}, {4.5, 9.5, 3}, {6.0, 9.5, 3}}, "climb Rope", "dash dot dot line", {128, 128, 0}, false)A bigger example that'll create a new area and the room in it:
local areaid = addAreaName("my first area")
local newroomid = createRoomID()
addRoom(newroomid)
setRoomArea(newroomid, "my first area")
setRoomCoordinates(newroomid, 0, 0, 0)
local otherroomid = createRoomID()
addRoom(otherroomid)
setRoomArea(otherroomid, "my first area")
setRoomCoordinates(otherroomid, 0, 5, 0)
addSpecialExit(newroomid, otherroomid, "climb Rope")
addCustomLine(newroomid, {{4.5, 5.5, 3}, {4.5, 9.5, 3}, {6.0, 9.5, 3}}, "climb Rope", "dash dot dot line", {128, 128, 0}, false)
centerview(newroomid)addMapEvent
- addMapEvent(uniquename, event name, parent, display name, arguments)
- Adds a new entry to an existing mapper right-click entry. You can add one with addMapMenu. If there is no display name, it will default to the unique name (which otherwise isn't shown and is just used to differentiate this entry from others). event name is the Mudlet event that will be called when this is clicked on, and arguments will be passed to the handler function.
- See also: addMapMenu(), removeMapEvent(), getMapEvents()
- Example
addMapEvent("room a", "onFavorite") -- will make a label "room a" on the map menu's right click that calls onFavorite
addMapEvent("room b", "onFavorite", "Favorites", "Special Room!", 12345, "arg1", "arg2", "argn")The last line will make a label "Special Room!" under the "Favorites" menu that upon clicking will raise an event with all the arguments.
addMapMenu("Room type")
addMapEvent("markRoomsAsDeathTrap", "onMapMarkSelectedRooms", "Room type", "Mark selected rooms as Death Trap")
addMapEvent("markRoomsAsOneRoom", "onMapMarkSelectedRooms", "Room type", "Mark selected rooms as single-pass")
function onMapMarkSelectedRooms(event, markRoomType)
local selectedRooms = getMapSelection()["rooms"]
for i, val in ipairs(selectedRooms) do
if markRoomType == "markRoomsAsDeathTrap" then
local r, g, b = unpack(color_table.black)
--death trap
setRoomEnv(val, 300)
--death traps Env
setCustomEnvColor(300, r, g, b, 255)
setRoomChar(val, "☠️")
lockRoom(val, true)
elseif markRoomType == "markRoomsAsOneRoom" then
local r, g, b = unpack(color_table.LightCoral)
--single-pass
setRoomEnv(val, 301)
--one room Env
setCustomEnvColor(301, r, g, b, 255)
setRoomChar(val, "🚹")
end
end
updateMap()
end
registerAnonymousEventHandler("onMapMarkSelectedRooms", "onMapMarkSelectedRooms")This create menu and two submenu options: "Mark selected rooms as Death Trap" and "Mark selected rooms as single-pass"
addMapMenu
- addMapMenu(uniquename, parent, display name)
- Adds a new submenu to the right-click menu that opens when you right-click on the mapper. You can then add more submenus to it, or add entries with addMapEvent().
- See also: addMapEvent(), removeMapEvent(), getMapEvents()
- Example
-- This will create a menu named: Favorites.
addMapMenu("Favorites")
-- This will create a submenu with the unique id 'Favorites123' under 'Favorites' with the display name of 'More Favorites'.
addMapMenu("Favorites1234343", "Favorites", "More Favorites")addRoom
- addRoom(roomID)
- Creates a new room with the given ID, returns true if the room was successfully created.
![]() Note: If you're not using incremental room IDs but room IDs stitched together from other factors or in-game hashes for room IDs - and your room IDs are starting off at 250+million numbers, you need to look into incrementally creating Mudlets room IDs with createRoomID() and associating your room IDs with Mudlets via setRoomIDbyHash() and getRoomIDbyHash(). The reason being is that Mudlet's A* pathfinding implementation from boost cannot deal with extremely large room IDs because the resulting matrices it creates for pathfinding are enormously huge.
Note: If you're not using incremental room IDs but room IDs stitched together from other factors or in-game hashes for room IDs - and your room IDs are starting off at 250+million numbers, you need to look into incrementally creating Mudlets room IDs with createRoomID() and associating your room IDs with Mudlets via setRoomIDbyHash() and getRoomIDbyHash(). The reason being is that Mudlet's A* pathfinding implementation from boost cannot deal with extremely large room IDs because the resulting matrices it creates for pathfinding are enormously huge.
![]() Note: Creating your own mapping script? Check out more information here.
Note: Creating your own mapping script? Check out more information here.
- See also: createRoomID()
- Example
local newroomid = createRoomID()
addRoom(newroomid)addSpecialExit
- addSpecialExit(roomIDFrom, roomIDTo, moveCommand)
- Creates a one-way from one room to another, that will use the given command for going through them.
- See also: clearSpecialExits(), removeSpecialExit(), setExit()
- Example
-- add a one-way special exit going from room 1 to room 2 using the 'pull rope' command
addSpecialExit(1, 2, "pull rope")Example in an alias:
-- sample alias pattern: ^spe (\d+) (.*?)$
-- currentroom is your current room ID in this example
addSpecialExit(currentroom,tonumber(matches[2]), matches[3])
echo("\n SPECIAL EXIT ADDED TO ROOMID:"..matches[2]..", Command:"..matches[3])
centerview(currentroom)auditAreas
- auditAreas()
- Initiates a consistency check on the whole map: All rooms, areas, and their composition. This is also done automatically whenever you first open your map, so probably seldom necessary to do manually. Will output findings to screen and/or logfile for later review.
- See also: saveMap(), removeMapEvent(), getMapEvents()
centerview
- centerview (roomID)
- Centers the map view onto the given room ID. The map must be open to see this take effect. This function can also be used to see the map of an area if you know the number of a room there and the area and room are mapped.
- See also: getPlayerRoom(), updateMap()
clearAreaUserData
- clearAreaUserData(areaID)
- Parameter
- areaID - ID number for area to clear.
- Clears all user data from a given area. Note that this will not touch the room user data.
- See also: setAreaUserData(), getAllAreaUserData(), clearAreaUserDataItem(), clearRoomUserData()
- Example
display(clearAreaUserData(34))
-- I did have data in that area, so it returns:
true
display(clearAreaUserData(34))
-- There is no data NOW, so it returns:
falseclearAreaUserDataItem
- clearAreaUserDataItem(areaID, key)
- Removes the specific key and value from the user data from a given area.
- See also: setAreaUserData(), clearAreaUserData(), clearRoomUserDataItem()
- Example
display(getAllAreaUserData(34))
{
description = [[<area description here>]],
ruler = "Queen Morgase Trakand"
}
display(clearAreaUserDataItem(34,"ruler"))
true
display(getAllAreaUserData(34))
{
description = [[<area description here>]],
}
display(clearAreaUserDataItem(34,"ruler"))
falseclearMapSelection
- clearMapSelection()
- Clears any selected rooms from the map (i.e. they are highlighted in orange).
- Returns true if rooms are successfully cleared, false if nothing selected or cleared.
- See also getMapSelection()
clearMapUserData
- clearMapUserData()
- Clears all user data stored for the map itself. Note that this will not touch the area or room user data.
- See also: setMapUserData(), clearRoomUserData(), clearAreaUserData()
- Example
display(clearMapUserData())
-- I did have user data stored for the map, so it returns:
true
display(clearMapUserData())
-- There is no data NOW, so it returns:
falseclearMapUserDataItem
- clearMapUserDataItem(mapID, key)
- Removes the specific key and value from the user data from the map user data.
- See also: setMapUserData(), clearMapUserData(), clearAreaRoomUserData()
- Example
display(getAllMapUserData())
{
description = [[<map description here>]],
last_modified = "1483228799"
}
display(clearMapUserDataItem("last_modified"))
true
display(getAllMapUserData())
{
description = [[<map description here>]],
}
display(clearMapUserDataItem("last_modified"))
falseclearRoomUserData
- clearRoomUserData(roomID)
- Clears all user data from a given room.
- See also: setRoomUserData(), clearRoomUserDataItem()
![]() Note: Returns a boolean true if any data was removed from the specified room and false if there was nothing to erase since Mudlet 3.0.
Note: Returns a boolean true if any data was removed from the specified room and false if there was nothing to erase since Mudlet 3.0.
- Example
display(clearRoomUserData(3441))
-- I did have data in that room, so it returns:
true
display(clearRoomUserData(3441))
-- There is no data NOW, so it returns:
falseclearRoomUserDataItem
- clearRoomUserDataItem(roomID, key)
- Removes the specific key and value from the user data from a given room.
- Returns a boolean true if data was found against the give key in the user data for the given room and it is removed, will return false if exact key not present in the data. Returns nil if the room for the roomID not found.
- See also: setRoomUserData(), clearRoomUserData(), clearAreaUserDataItem()
- Example
display(getAllRoomUserData(3441))
{
description = [[
From this ledge you can see out across a large cavern to the southwest. The
east side of the cavern is full of stalactites and stalagmites and other
weird rock formations. The west side has a path through it and an exit to the
south. The sound of falling water pervades the cavern seeming to come from
every side. There is a small tunnel to your east and a stalactite within arms
reach to the south. It appears to have grown till it connects with the
stalagmite below it. Something smells... Yuck you are standing in bat guano!]],
doorname_up = "trapdoor"
}
display(clearRoomUserDataItem(3441,"doorname_up"))
true
display(getAllRoomUserData(3441))
{
description = [[
From this ledge you can see out across a large cavern to the southwest. The
east side of the cavern is full of stalactites and stalagmites and other
weird rock formations. The west side has a path through it and an exit to the
south. The sound of falling water pervades the cavern seeming to come from
every side. There is a small tunnel to your east and a stalactite within arms
reach to the south. It appears to have grown till it connects with the
stalagmite below it. Something smells... Yuck you are standing in bat guano!]],
}
display(clearRoomUserDataItem(3441,"doorname_up"))
falseclearSpecialExits
- clearSpecialExits(roomID)
- Removes all special exits from a room.
- See also: addSpecialExit(), removeSpecialExit()
- Example
clearSpecialExits(1337)
if #getSpecialExits(1337) == 0 then -- clearSpecialExits will never fail on a valid room ID, this is an example
echo("All special exits successfully cleared from 1337.\n")
endcloseMapWidget
- closeMapWidget()
- closes (hides) the map window (similar to clicking on the map icon)
- See also: openMapWidget(), moveMapWidget(), resizeMapWidget()
connectExitStub
- connectExitStub(fromID, direction) or connectExitStub(fromID, toID, [direction])
- Connects existing rooms with matching exit stubs. If you only give it a roomID and a direction, it'll work out which room should be linked to it that has an appropriate opposite exit stub and is located in the right direction. You can also just specify from and to room IDs, and it'll smartly use the right direction to link in. Lastly, you can specify all three arguments - fromID, toID and the direction (in that order) if you'd like to be explicit, or use setExit() for the same effect.
- Parameters
- fromID:
- Room ID to set the exit stub in.
- direction:
- You can either specify the direction to link the room in, and/or a specific room ID (see below). Direction can be specified as a number, short direction name ("nw") or long direction name ("northwest").
- toID:
- The room ID to link this room to. If you don't specify it, the mapper will work out which room should be logically linked.
- See also: setExitStub(), getExitStubs()
- Example
-- try and connect all stubs that are in a room
local stubs = getExitStubs(roomID)
if stubs then
for i,v in pairs(stubs) do
connectExitStub(roomID, v)
end
endcreateMapLabel
- labelID = createMapLabel(areaID, text, posX, posY, posZ, fgRed, fgGreen, fgBlue, bgRed, bgGreen, bgBlue[, zoom, fontSize, showOnTop, noScaling, fontName, foregroundTransparency, backgroundTransparency, temporary])
- Creates a text label on the map at given coordinates, with the given background and foreground colors. It can go above or below the rooms, scale with zoom or stay a static size. From Mudlet 4.17.0 an additional parameter (assumed to be false if not given from then) makes the label NOT be saved in the map file which, if the image can be regenerated on future loading from a script can reduce the size of the saved map somewhat. It returns a label ID that you can use later for deleting it.
- The coordinates 0,0 are in the middle of the map, and are in sync with the room coordinates - so using the x,y values of getRoomCoordinates() will place the label near that room.
- See also: getMapLabel(), getMapLabels(), deleteMapLabel, createMapImageLabel()
![]() Note: Some changes were done prior to 4.13 (which exactly? function existed before!) - see corresponding PR and update here!
Note: Some changes were done prior to 4.13 (which exactly? function existed before!) - see corresponding PR and update here!
- Parameters
- areaID:
- Area ID where to put the label.
- text:
- The text to put into the label. To get a multiline text label add a '\n' between the lines.
- posX, posY, posZ:
- Position of the label in (floating point numbers) room coordinates.
- fgRed, fgGreen, fgBlue:
- Foreground color or text color of the label.
- bgRed, bgGreen, bgBlue:
- Background color of the label.
- zoom:
- (optional) Zoom factor of the label if noScaling is false. Higher zoom will give higher resolution of the text and smaller size of the label. Default is 30.0.
- fontSize:
- (optional, but needed if zoom is provided) Size of the font of the text. Default is 50.
- showOnTop:
- (optional) If true the label will be drawn on top of the rooms and if it is false the label will be drawn as a background, defaults to true if not given.
- noScaling:
- (optional) If true the label will have the same size when you zoom in and out in the mapper, If it is false the label will scale when you zoom the mapper, defaults to true if not given.
- fontName:
- (optional) font name to use.
- foregroundTransparency
- (optional) transparency of the text on the label, defaults to 255 (in range of 0 to 255) or fully opaque if not given.
- backgroundTransparency
- (optional) transparency of the label background itself, defaults to 50 (in range of 0 to 255) or significantly transparent if not given.
- temporary
- (optional, from Mudlet version 4.17.0) if true does not save the image that the label makes in map save files, defaults to false if not given, or for prior versions of Mudlet.
- Example
-- the first 50 is some area id, the next three 0,0,0 are coordinates - middle of the area
-- 255,0,0 would be the foreground in RGB, 23,0,0 would be the background RGB
-- zoom is only relevant when when you're using a label of a static size, so we use 0
-- and we use a font size of 20 for our label, which is a small medium compared to the map
local labelid = createMapLabel( 50, "my map label", 0,0,0, 255,0,0, 23,0,0, 0,20)
-- to create a multi line text label we add '\n' between lines
-- the position is placed somewhat to the northeast of the center of the map
-- this label will be scaled as you zoom the map.
local labelid = createMapLabel( 50, "1. Row One\n2. Row 2", .5,5.5,0, 255,0,0, 23,0,0, 30,50, true, false)
local x,y,z = getRoomCoordinates(getPlayerRoom())
createMapLabel(getRoomArea(getPlayerRoom()), "my map label", x,y,z, 255,0,0, 23,0,0, 0,20, false, true, "Ubuntu", 255, 100)createMapImageLabel
- labelID = createMapImageLabel(areaID, filePath, posx, posy, posz, width, height, zoom, showOnTop[, temporary])
- Creates an image label on the map at the given coordinates, with the given dimensions and zoom. You might find the default room and image size correlation to be too big - try reducing the width and height of the image then, while also zooming in the same amount. From Mudlet 4.17.0 an additional parameter (assumed to be false if not given from then) makes the label NOT be saved in the map file which, if the image can be regenerated on future loading from a external file available when the map file is loaded, can avoid expanding the size of the saved map considerably.
- The coordinates 0,0 are in the middle of the map, and are in sync with the room coordinates - so using the x,y values of getRoomCoordinates() will place the label near that room.
- See also: createMapLabel, deleteMapLabel
- Example
-- 138 is our pretend area ID
-- next, inside [[]]'s, is the exact location of our image
-- 0,0,0 are the x,y,z coordinates - so this will place it in the middle of the map
-- 482 is the width of the image - we divide it by 100 to scale it down, and then we'll zoom it by 100 - making the image take up about 4 rooms in width then
-- 555 is the original height of the image
-- 100 is how much we zoom it by, 1 would be no zoom
-- false to make it go below our rooms
-- (from 4.17.0) true to not save the label's image in the map file afterwards
createMapImageLabel(138, [[/home/vadi/Pictures/You only see what shown.png]], 0,0,0, 482/100, 555/100, 100, false, true)createMapper
- createMapper([name of userwindow], x, y, width, height)
- Creates a miniconsole window for the mapper to render in, the with the given dimensions. You can only create one mapper at a time, and it is not currently possible to have a label on or under the mapper - otherwise, clicks won't register.
![]() Note: name of userwindow available in Mudlet 4.6.1+
Note: name of userwindow available in Mudlet 4.6.1+
![]() Note: If this command is not used then clicking on the Main Toolbar's Map button will create a dock-able widget (that can be floated free to anywhere on the Desktop, it can be resized and does not have to even reside on the same monitor should there be multiple screens in your system). Further clicks on the Map button will toggle between showing and hiding the map whether it was created using the createMapper function or as a dock-able widget.
Note: If this command is not used then clicking on the Main Toolbar's Map button will create a dock-able widget (that can be floated free to anywhere on the Desktop, it can be resized and does not have to even reside on the same monitor should there be multiple screens in your system). Further clicks on the Map button will toggle between showing and hiding the map whether it was created using the createMapper function or as a dock-able widget.
- Example
createMapper(0,0,300,300) -- creates a 300x300 mapper in the top-left corner of Mudlet
setBorderLeft(305) -- adds a border so text doesn't underlap the mapper display-- another example:
local main = Geyser.Container:new({x=0,y=0,width="100%",height="100%",name="mapper container"})
local mapper = Geyser.Mapper:new({
name = "mapper",
x = "70%", y = 0, -- edit here if you want to move it
width = "30%", height = "50%"
}, main)createRoomID
- usableId = createRoomID([minimumStartingRoomId])
- Returns the lowest possible room ID you can use for creating a new room. If there are gaps in room IDs your map uses it, this function will go through the gaps first before creating higher IDs.
- Parameters
- minimumStartingRoomId (optional, available in Mudlet 3.0+):
- If provided, specifies a roomID to start searching for an empty one at, instead of 1. Useful if you'd like to ensure certain areas have specific room number ranges, for example. If you you're working with a huge map, provide the last used room ID to this function for an available roomID to be found a lot quicker.
- See also: addRoom()
deleteArea
- deleteArea(areaID or areaName)
- Deletes the given area and all rooms in it. Returns true on success or nil + error message otherwise.
- See also: addAreaName()
- Parameters
- areaID:
- Area ID to delete, or:
- areaName (available in Mudlet 3.0+):
- Area name to delete.
- Example
-- delete by areaID
deleteArea(23)
-- or since Mudlet 3.0, by area name
deleteArea("Big city")deleteMap
- deleteMap()
Deletes the entire map. This may be useful whilst initially setting up a mapper package for a new Game to clear faulty map data generated up to this point.
- See also: loadMap()
- Returns
- true on success or nil and an error message on failure, if successful it will also refresh the map display to show the result - which will be the "blank" screen with a warning message of the form "No rooms in the map - load another one, or start mapping from scratch to begin."
![]() Note: Prior to the introduction of this function, the recommended method to achieve the same result was to use loadMap() with a non-existent file-name, such as "_" however that would also cause an "[ ERROR ]" type message to appear on the profile's main console.
Note: Prior to the introduction of this function, the recommended method to achieve the same result was to use loadMap() with a non-existent file-name, such as "_" however that would also cause an "[ ERROR ]" type message to appear on the profile's main console.
- Example
deleteMap()deleteMapLabel
- deleteMapLabel(areaID, labelID)
- Deletes a map label from a specific area.
- See also: createMapLabel()
- Example
deleteMapLabel(50, 1)deleteRoom
- deleteRoom(roomID)
- Deletes an individual room, and unlinks all exits leading to and from it.
- Example
deleteRoom(335)disableMapInfo
- disableMapInfo(label)
Disable the particular map info - same as toggling off checkbox from select box under mapper.
- Parameters
- label:
- Name under which map info to be disabled was registered.
- See also: registerMapInfo(), enableMapInfo(), killMapInfo()
enableMapInfo
- enableMapInfo(label)
Enable the particular map info - same as toggling on checkbox from select box under mapper.
- Parameters
- label:
- Name under which map info to be enabled was registered.
- See also: registerMapInfo(), disableMapInfo(), killMapInfo()
getAllAreaUserData
- dataTable = getAllAreaUserData(areaID)
- Returns all the user data items stored in the given area ID; will return an empty table if there is no data stored or nil if there is no such area with that ID.
- Example
display(getAllAreaUserData(34))
--might result in:--
{
country = "Andor",
ruler = "Queen Morgase Trakand"
}getAllMapUserData
- dataTable = getAllMapUserData()
- Returns all the user data items stored at the map level; will return an empty table if there is no data stored.
- See also: getMapUserData()
- Example
display(getAllMapUserData())
--might result in:--
{
description = [[This map is about so and so game]],
author = "Bob",
["last updated"] = "December 5, 2020"
}getAllRoomEntrances
- exitsTable = getAllRoomEntrances(roomID)
- Returns an indexed list of normal and special exits leading into this room. In case of two-way exits, this'll report exactly the same rooms as getRoomExits(), but this function has the ability to pick up one-way exits coming into the room as well.
- Example
-- print the list of rooms that have exits leading into room 512
for _, roomid in ipairs(getAllRoomEntrances(512)) do
print(roomid)
end- See also: getRoomExits()
getAllRoomUserData
- dataTable = getAllRoomUserData(roomID)
- Returns all the user data items stored in the given room ID; will return an empty table if there is no data stored or nil if there is no such room with that ID. Can be useful if the user was not the one who put the data in the map in the first place!
- See also
- getRoomUserDataKeys() - for a related command that only returns the data keys.
- Example
display(getAllRoomUserData(3441))
--might result in:--
{
description = [[
From this ledge you can see out across a large cavern to the southwest. The
east side of the cavern is full of stalactites and stalagmites and other
weird rock formations. The west side has a path through it and an exit to the
south. The sound of falling water pervades the cavern seeming to come from
every side. There is a small tunnel to your east and a stalactite within arms
reach to the south. It appears to have grown till it connects with the
stalagmite below it. Something smells... Yuck you are standing in bat guano!]],
doorname_up = "trapdoor"
}getAreaExits
- roomTable = getAreaExits(areaID, showExits)
- Returns a table (indexed or key-value) of the rooms in the given area that have exits leading out to other areas - that is, border rooms.
- See also
- setExit(), getRoomExits()
- Parameters
- areaID:
- Area ID to list the exits for.
- showExits:
- Boolean argument, if true then the exits that lead out to another area will be listed for each room.
- Example
-- list all border rooms for area 44:
getAreaExits(44)
-- returns:
--[[
{
7091,
10659,
11112,
11122,
11133,
11400,
12483,
24012
}
]]
-- list all border rooms for area 44, and the exits within them that go out to other areas:
getAreaExits(44, true)
--[[
{
[12483] = {
north = 27278
},
[11122] = {
["enter grate"] = 14551
},
[11112] = {
["enter grate"] = 14829
},
[24012] = {
north = 22413
},
[11400] = {
south = 10577
},
[11133] = {
["enter grate"] = 15610
},
[7091] = {
down = 4411
},
[10659] = {
["enter grate"] = 15510
}
}
]]getAreaRooms
- getAreaRooms(area id)
- Returns an indexed table with all rooms IDs for a given area ID (room IDs are values), or nil if no such area exists.
- Example
-- using the sample findAreaID() function defined in the getAreaTable() example,
-- we'll define a function that echo's us a nice list of all rooms in an area with their ID
function echoRoomList(areaname)
local id, msg = findAreaID(areaname)
if id then
local roomlist, endresult = getAreaRooms(id), {}
-- obtain a room list for each of the room IDs we got
for _, id in pairs(roomlist) do
endresult[id] = getRoomName(id)
end
-- now display something half-decent looking
cecho(string.format(
"List of all rooms in %s (%d):\n", msg, table.size(endresult)))
for roomid, roomname in pairs(endresult) do
cecho(string.format(
"%6s: %s\n", roomid, roomname))
end
elseif not id and msg then
echo("ID not found; " .. msg)
else
echo("No areas matched the query.")
end
endgetAreaTable
- areaTable = getAreaTable()
- Returns a key(area name)-value(area id) table with all known areas and their IDs.
![]() Note: Some older versions of Mudlet return an area with an empty name and an ID of 0 included in it, you should ignore that.
Note: Some older versions of Mudlet return an area with an empty name and an ID of 0 included in it, you should ignore that.
- See also
- getAreaTableSwap()
- Example
-- example function that returns the area ID for a given area
function findAreaID(areaname)
local list = getAreaTable()
-- iterate over the list of areas, matching them with substring match.
-- if we get match a single area, then return it's ID, otherwise return
-- 'false' and a message that there are than one are matches
local returnid, fullareaname
for area, id in pairs(list) do
if area:find(areaname, 1, true) then
if returnid then return false, "more than one area matches" end
returnid = id; fullareaname = area
end
end
return returnid, fullareaname
end
-- sample use:
local id, msg = findAreaID("blahblah")
if id then
echo("Found a matching ID: " .. id)
elseif not id and msg then
echo("ID not found: " .. msg)
else
echo("No areas matched the query.")
endgetAreaTableSwap
- areaTable = getAreaTableSwap()
- Returns a key(area id)-value(area name) table with all known areas and their IDs. Unlike getAreaTable which won't show you all areas with the same name by different IDs, this function will.
![]() Note: Some older versions of Mudlet return an area with an empty name and an ID of 0 included in it, you should ignore that.
Note: Some older versions of Mudlet return an area with an empty name and an ID of 0 included in it, you should ignore that.
getAreaUserData
- dataValue = getAreaUserData(areaID, key)
- Returns a specific data item stored against the given key for the given area ID number. This is very like the corresponding Room User Data command but intended for per area rather than for per room data (for storage of data relating to the whole map see the corresponding Map User Data commands.)
- Returns the user data value (string) stored at a given room with a given key (string), or a Lua nil and an error message if the key is not present in the Area User Data for the given Area ID. Use setAreaUserData() function for storing the user data.
- See also
- clearAreaUserData(), clearAreaUserDataItem(), getAllAreaUserData(), searchAreaUserData(), setAreaUserData()
- Example
display(getAreaUserData(34, "country"))
-- might produce --
"Andor"getCustomEnvColorTable
- envcolors = getCustomEnvColorTable()
- Returns a table with customized environments, where the key is the environment ID and the value is a indexed table of rgb values.
- See also: setCustomEnvColor()
- Example
{
envid1 = {r, g, b, alpha},
envid2 = {r, g, b, alpha}
}getCustomLines
- lineTable = getCustomLines(roomID)
- See also: addCustomLine(), removeCustomLine()
- Returns a table including all the details of the custom exit lines, if any, for the room with the id given.
- Parameters
- roomID:
- Room ID to return the custom line details of.
- Example
display getCustomLines(1)
{
["climb Rope"] = {
attributes = {
color = {
b = 0,
g = 128,
r = 128
},
style = "dash dot dot line",
arrow = false
},
points = {
{
y = 9.5,
x = 4.5
},
{
y = 9.5,
x = 6
},
[0] = {
y = 5.5,
x = 4.5
}
}
},
N = {
attributes = {
color = {
b = 255,
g = 255,
r = 0
},
style = "dot line",
arrow = true
},
points = {
[0] = {
y = 27,
x = -3
}
}
}
}getCustomLines1
- lineTable = getCustomLines1(roomID)
This is a replacement for getCustomLines(...) that outputs the tables for the coordinates for the points on the custom line in an order and format that can be fed straight back into an addCustomLine(...) call; similarly the color parameters are also reported in the correct format to also be reused in the same manner. This function is intended to make it simpler for scripts to manipulate such lines.
- See also: addCustomLine(), removeCustomLine(), getCustomLines()
- Parameters
- roomID:
- Room ID to return the custom line details of.
- Returns
- a table including all the details of the custom exit lines, if any, for the room with the id given.
- Example
display getCustomLines1(1)
{
["climb Rope"] = {
attributes = {
color = { 128, 128, 0 },
style = "dash dot dot line",
arrow = false
},
points = { { 4.5, 5.5, 3 }, { 4.5, 9.5, 3 }, { 6, 9.5, 3 } }
},
N = {
attributes = {
color = { 0, 255, 255 },
style = "dot line",
arrow = true
},
points = { { -3, 27, 3 } }
}
}getDoors
- doors = getDoors(roomID)
- Returns a key-value table with the cardinal direction as the key and the door value as a number. If there are no doors in a room, it returns an empty table.
- Parameters
- roomID:
- Room ID to check for doors in.
- See also: setDoor()
- Example
-- an example that displays possible doors in room 2334
local doors = getDoors(2334)
if not next(doors) then cecho("\nThere aren't any doors in room 2334.") return end
local door_status = {"open", "closed", "locked"}
for direction, door in pairs(doors) do
cecho("\nThere's a door leading in "..direction.." that is "..door_status[door]..".")
endgetExitStubs
- stubs = getExitStubs(roomid)
- Returns an indexed table (starting at 0) of the direction #'s that have an exit stub marked in them. You can use this information to connect earlier-made exit stubs between rooms when mapping. Returns nil plus error message of called on a non-existent room.
- See also: setExitStub(), connectExitStub(), getExitStubs1()
- Example
-- show the exit stubs in room 6 as numbers
local stubs = getExitStubs(6)
for i = 0, #stubs do print(stubs[i]) end![]() Note: Previously would throw a lua error on non-existent room - now returns nil plus error message (as does other run-time errors) - previously would return just a nil on NO exit stubs but now returns a notification error message as well, to aide disambiguation of the nil value.
Note: Previously would throw a lua error on non-existent room - now returns nil plus error message (as does other run-time errors) - previously would return just a nil on NO exit stubs but now returns a notification error message as well, to aide disambiguation of the nil value.
getExitStubs1
- stubs = getExitStubs1(roomid)
- Returns an indexed table (starting at 1) of the direction #'s that have an exit stub marked in them. You can use this information to connect earlier-made exit stubs between rooms when mapping. As this function starts indexing from 1 as it is default in Lua, you can use ipairs() to iterate over the results.
- See also
- getExitStubs()
- Example
-- show the exit stubs in room 6 as numbers
for k,v in ipairs(getExitStubs1(6)) do print(k,v) endgetExitWeights
- weights = getExitWeights(roomid)
- Returns a key-value table of the exit weights that a room has, with the direction or special exit as a key and the value as the exit weight. If a weight for a direction wasn't yet set, it won't be listed.
- Parameters
- roomid:
- Room ID to view the exit weights in.
- See also: setExitWeight()
getGridMode
- TrueOrFalse = getGridMode(areaID)
- Use this to see, if a specific area has grid/wilderness view mode set. This way, you can also calculate from a script, how many grid areas a map has got in total.
- Parameters
- areaID:
- Area ID (number) to view the grid mode of.
- See also: setGridMode()
- Example
getGridMode(55)
-- will return: false
setGridMode(55, true) -- set area with ID 55 to be in grid mode
getGridMode(55)
-- will return: truegetMapEvents
- mapevents = getMapEvents()
- Returns a list of map events currently registered. Each event is a dictionary with the keys uniquename, parent, event name, display name, and arguments, which correspond to the arguments of addMapEvent().
- See also: addMapMenu(), removeMapEvent(), addMapEvent()
- Example
addMapEvent("room a", "onFavorite") -- will make a label "room a" on the map menu's right click that calls onFavorite
addMapEvent("room b", "onFavorite", "Favorites", "Special Room!", 12345, "arg1", "arg2", "argn")
local mapEvents = getMapEvents()
for _, event in ipairs(mapEvents) do
echo(string.format("MapEvent '%s' is bound to event '%s' with these args: '%s'", event["uniquename"], event["event name"], table.concat(event["arguments"], ",")))
endgetMapLabel
- labelinfo = getMapLabel(areaID, labelID or labelText)
- Returns a key-value table describing that particular label in an area. Keys it contains are the X, Y, Z coordinates, Height and Width, BgColor, FgColor, Pixmap, and the Text it contains. If the label is an image label, then Text will be set to the no text string.
- BgColor and FgColor are tables with r,g,b keys, each holding 0-255 color component value.
- Pixmap is base64 encoded image of label.
![]() Note: BgColor, FgColor, Pixmap are available in Mudlet 4.11+
Note: BgColor, FgColor, Pixmap are available in Mudlet 4.11+
- Parameters
- areaID: areaID from which to retrieve label
- labelID: labelID (getMapLabels return table key) or labelText (exact match)
See also: createMapLabel(), getMapLabels()
- Example
lua getMapLabels(52)
{
"no text",
[0] = "test"
}
lua getMapLabel(52, 0)
{
Y = -2,
X = -8,
Z = 11,
Height = 3.9669418334961,
Text = "test",
Width = 8.6776866912842,
BgColor = {
b = 0,
g = 0,
r = 0
},
FgColor = {
b = 50,
g = 255,
r = 255
},
Pixmap = "iVBORw0KG(...)lFTkSuQmCC" -- base64 encoded png image (shortened for brevity)
}
lua getMapLabel(52, "no text")
{
Y = 8,
X = -15,
Z = 11,
Height = 7.2520666122437,
Text = "no text"
Width = 11.21900844574,
BgColor = {
b = 0,
g = 0,
r = 0
},
FgColor = {
b = 50,
g = 255,
r = 255
},
Pixmap = "iVBORw0KG(...)lFTkSuQmCC" -- base64 encoded png image (shortened for brevity)
}getMapLabels
- arealabels = getMapLabels(areaID)
- Returns an indexed table (that starts indexing from 0) of all of the labels in the area, plus their label text. You can use the label id to deleteMapLabel() it.
- If there are no labels in the area at all, it will return an empty table.
- See also: createMapLabel(), getMapLabel(), deleteMapLabel()
- Example
display(getMapLabels(43))
table {
0: ''
1: 'Waterways'
}
deleteMapLabel(43, 0)
display(getMapLabels(43))
table {
1: 'Waterways'
}getMapMenus
- getMapMenus()
- Returns a table with the available map menus as key-value in the format of
map menu - parent item. If an item is positioned at the menu's top-level, the value will saytop-level. - If you haven't opened a map yet, getMapMenus() will return nil+error message. If you don't have any map labels yet, an empty table
{}is returned.
- See also: addMapMenu(), addMapEvent()
- Example
-- given the following menu structure:
top-level
menu1
menu1.1
action1.1.1
menu1.2
action1.2.1
menu2
getMapMenus() -- will return:
{
menu2 = "top-level",
menu1.2 = "menu1",
menu1.1 = "menu1",
menu1 = "top-level"
}getMapSelection
- getMapSelection()
- Returns a table containing details of the current mouse selection in the 2D mapper.
- Reports on one or more rooms being selected (i.e. they are highlighted in orange).
- The contents of the table will vary depending on what is currently selected. If the selection is of map rooms then there will be keys of center and rooms: the former will indicates the center room (the one with the yellow cross-hairs) if there is more than one room selected or the only room if there is only one selected (there will not be cross-hairs in that case); the latter will contain a list of the one or more rooms.
- Example - several rooms selected
display(getMapSelection())
{
center = 5013,
rooms = {
5011,
5012,
5013,
5014,
5018,
5019,
5020
}
}- Example - one room selected
display(getMapSelection())
{
center = 5013,
rooms = {
5013
}
}- Example - no or something other than a room selected
display(getMapSelection())
{
}getMapUserData
- getMapUserData( key )
- Parameters
- key:
- string used as a key to select the data stored in the map as a whole.
- Returns the user data item (string); will return a nil+error message if there is no data with such a key in the map data.
- See also: getAllMapUserData(), setMapUserData()
- Example
display(getMapUserData("last updated"))
--might result in:--
"December 5, 2020"getMapZoom
- getMapZoom([areaID])
- Gets the current 2D map zoom level. Added in Mudlet 4.17.0 also with the option to get the zoom for an area to be specified even if it is not the one currently being viewed. This change is combined with Mudlet remembering the zoom level last used for each area and with the revision of the setMapZoom() function to also take an areaID to work on instead of the current area being viewed in the map.
- See also: setMapZoom().
- Parameters
- areaID:
- Area ID number to get the 2D zoom for (optional, the function works on the area currently being viewed if this is omitted).
- Returns
- A floating point number on success
- nil and an error message on failure.
- Example
echo("\nCurrent zoom level: " .. getMapZoom() .. "\n")
-- Could be anything from 3 upwards:
Current zoom level: 42.4242
setMapZoom(2.5 + getMapZoom(1), 1) -- zoom out the area with ID 1 by 2.5
true![]() Note: The precise meaning of a particular zoom value may have an underlying meaning however that has not been determined other than that the minimum value is 3.0 and the initial value - and what prior Mudlet versions started each session with - is 20.0.
Note: The precise meaning of a particular zoom value may have an underlying meaning however that has not been determined other than that the minimum value is 3.0 and the initial value - and what prior Mudlet versions started each session with - is 20.0.
getPath
- getPath(roomID from, roomID to)
- Returns a boolean true/false if a path between two room IDs is possible. If it is, the global speedWalkDir table is set to all of the directions that have to be taken to get there, and the global speedWalkPath table is set to all of the roomIDs you'll encounter on the way, and as of 3.0, speedWalkWeight will return all of the room weights. Additionally returns the total cost (all weights added up) of the path after the boolean argument in 3.0.
- See also: translateTable()
- Example
-- check if we can go to room 155 from room 34 - if yes, go to it
if getPath(34,155) then
gotoRoom(155)
else
echo("\nCan't go there!")
endgetPlayerRoom
- getPlayerRoom()
- Returns the current player location as set by centerview().
- See also: centerview
- Example
display("We're currently in " .. getRoomName(getPlayerRoom()))getRoomArea
- getRoomArea(roomID)
- Returns the area ID of a given room ID. To get the area name, you can check the area ID against the data given by getAreaTable() function, or use the getRoomAreaName() function.
![]() Note: If the room ID does not exist, this function will raise an error.
Note: If the room ID does not exist, this function will raise an error.
- Example
display("Area ID of room #100 is: "..getRoomArea(100))
display("Area name for room #100 is: "..getRoomAreaName(getRoomArea(100)))getRoomAreaName
- getRoomAreaName(areaID or areaName)
- Returns the area name for a given area id; or the area id for a given area name.
![]() Note: Despite the name, this function will not return the area name for a given room id (or room name) directly. However, renaming or revising it would break existing scripts.
Note: Despite the name, this function will not return the area name for a given room id (or room name) directly. However, renaming or revising it would break existing scripts.
- Example
echo(string.format("room id #455 is in %s.", getRoomAreaName(getRoomArea(455))))
getRoomChar
- getRoomChar(roomID)
- Returns the single ASCII character that forms the symbol for the given room id.
- Since Mudlet version 3.8 : this facility has been extended:
- Returns the string (UTF-8) that forms the symbol for the given room id; this may have been set with either setRoomChar() or with the symbol (was letter in prior versions) context menu item for rooms in the 2D Map.
getRoomCharColor
- r,g,b = getRoomCharColor(roomID)
- Returns the color of the Room Character as a set of r,g,b color coordinates.
- See also
- setRoomCharColor(), getRoomChar()
- Parameters
- roomID:
- The room ID to get the room character color from
- Returns
- The color as 3 separate numbers, red, green, and blue from 0-255
- Example
-- gets the color of the room character set on room 12345. If no room character is set the default 'color' is 0,0,0
local r,g,b = getRoomCharColor(12345)
decho(f"Room Character for room 12345 is <{r},{g},{b}>this color.<r> It is made up of <{r},0,0>{r} red<r>, <0,{g},0>{g} green<r>, <0,0,{b}> {b} blue<r>.\")getRoomCoordinates
- x,y,z = getRoomCoordinates(roomID)
- Returns the room coordinates of the given room ID.
- Example
local x,y,z = getRoomCoordinates(roomID)
echo("Room Coordinates for "..roomID..":")
echo("\n X:"..x)
echo("\n Y:"..y)
echo("\n Z:"..z)-- A quick function that will find all rooms on the same z-position in an area; this is useful if, say, you want to know what all the same rooms on the same "level" of an area is.
function sortByZ(areaID, zval)
local area = getAreaRooms(areaID)
local t = {}
for _, id in ipairs(area) do
local _, _, z = getRoomCoordinates(id)
if z == zval then
table.insert(t, id)
end
end
return t
endgetRoomEnv
- envID = getRoomEnv(roomID)
- Returns the environment ID of a room. The mapper does not store environment names, so you'd need to keep track of which ID is what name yourself.
- Example
function checkID(id)
echo(string.format("The env ID of room #%d is %d.\n", id, getRoomEnv(id)))
endgetRoomExits
- getRoomExits (roomID)
- Returns the currently known non-special exits for a room in an key-index form: exit = exitroomid.
- See also: getSpecialExits()
- Example
table {
'northwest': 80
'east': 78
}Here's a practical example that queries the rooms around you and searched for one of the water environments (the number would depend on how it was mapped):
local exits = getRoomExits(mycurrentroomid)
for direction,num in pairs(exits) do
local env_num = getRoomEnv(num)
if env_num == 22 or env_num == 20 or env_num == 30 then
print("There's water to the "..direction.."!")
end
endgetRoomHashByID
- getRoomHashByID(roomID)
- Returns a room hash that is associated with a given room ID in the mapper. This is primarily for games that make use of hashes instead of room IDs. It may be used to share map data while not sharing map itself. nil is returned if no room is not found.
- See also: getRoomIDbyHash()
- Example
for id,name in pairs(getRooms()) do
local h = getRoomUserData(id, "herbs")
if h ~= "" then
echo(string.format([[["%s"] = "%s",]], getRoomHashByID(id), h))
echo("\n")
end
endgetRoomIDbyHash
- roomID = getRoomIDbyHash(hash)
- Returns a room ID that is associated with a given hash in the mapper. This is primarily for games that make use of hashes instead of room IDs (like Avalon.de). -1 is returned if no room ID matches the hash.
- See also: getRoomHashByID()
- Example
-- example taken from http://forums.mudlet.org/viewtopic.php?f=13&t=2177
local id = getRoomIDbyHash("5dfe55b0c8d769e865fd85ba63127fbc")
if id == -1 then
id = createRoomID()
setRoomIDbyHash(id, "5dfe55b0c8d769e865fd85ba63127fbc")
addRoom(id)
setRoomCoordinates(id, 0, 0, -1)
endgetRoomName
- getRoomName(roomID)
- Returns the room name for a given room id.
- Example
echo(string.format("The name of the room id #455 is %s.", getRoomName(455))getRooms
- rooms = getRooms()
- Returns the list of all rooms in the map in the whole map in roomid - room name format.
- Example
-- simple, raw viewer for rooms in the world
display(getRooms())
-- iterate over all rooms in code
for id,name in pairs(getRooms()) do
print(id, name)
endgetRoomsByPosition
- roomTable = getRoomsByPosition(areaID, x,y,z)
- Returns an indexed table of all rooms at the given coordinates in the given area, or an empty one if there are none. This function can be useful for checking if a room exists at certain coordinates, or whenever you have rooms overlapping.
![]() Note: The returned table starts indexing from 0 and not the usual lua index of 1, which means that using # to count the size of the returned table will produce erroneous results - use table.size() instead.
Note: The returned table starts indexing from 0 and not the usual lua index of 1, which means that using # to count the size of the returned table will produce erroneous results - use table.size() instead.
- Example
-- sample alias to determine a room nearby, given a relative direction from the current room
local otherroom
if matches[2] == "" then
local w = matches[3]
local ox, oy, oz, x,y,z = getRoomCoordinates(mmp.currentroom)
local has = table.contains
if has({"west", "left", "w", "l"}, w) then
x = (x or ox) - 1; y = (y or oy); z = (z or oz)
elseif has({"east", "right", "e", "r"}, w) then
x = (x or ox) + 1; y = (y or oy); z = (z or oz)
elseif has({"north", "top", "n", "t"}, w) then
x = (x or ox); y = (y or oy) + 1; z = (z or oz)
elseif has({"south", "bottom", "s", "b"}, w) then
x = (x or ox); y = (y or oy) - 1; z = (z or oz)
elseif has({"northwest", "topleft", "nw", "tl"}, w) then
x = (x or ox) - 1; y = (y or oy) + 1; z = (z or oz)
elseif has({"northeast", "topright", "ne", "tr"}, w) then
x = (x or ox) + 1; y = (y or oy) + 1; z = (z or oz)
elseif has({"southeast", "bottomright", "se", "br"}, w) then
x = (x or ox) + 1; y = (y or oy) - 1; z = (z or oz)
elseif has({"southwest", "bottomleft", "sw", "bl"}, w) then
x = (x or ox) - 1; y = (y or oy) - 1; z = (z or oz)
elseif has({"up", "u"}, w) then
x = (x or ox); y = (y or oy); z = (z or oz) + 1
elseif has({"down", "d"}, w) then
x = (x or ox); y = (y or oy); z = (z or oz) - 1
end
local carea = getRoomArea(mmp.currentroom)
if not carea then mmp.echo("Don't know what area are we in.") return end
otherroom = select(2, next(getRoomsByPosition(carea,x,y,z)))
if not otherroom then
mmp.echo("There isn't a room to the "..w.." that I see - try with an exact room id.") return
else
mmp.echo("The room "..w.." of us has an ID of "..otherroom)
endgetRoomUserData
- getRoomUserData(roomID, key)
- Returns the user data value (string) stored at a given room with a given key (string), or "" if none is stored. Use setRoomUserData() function for setting the user data.
- Example
display(getRoomUserData(341, "visitcount"))- getRoomUserData(roomID, key, enableFullErrorReporting)
- Returns the user data value (string) stored at a given room with a given key (string), or, if the boolean value enableFullErrorReporting is true, nil and an error message if the key is not present or the room does not exist; if enableFullErrorReporting is false an empty string is returned but then it is not possible to tell if that particular value is actually stored or not against the given key.
- See also: clearRoomUserData(), clearRoomUserDataItem(), getAllRoomUserData(), getRoomUserDataKeys(), searchRoomUserData(), setRoomUserData()
- Example
local vNum = 341
result, errMsg = getRoomUserData(vNum, "visitcount", true)
if result ~= nil then
display(result)
else
echo("\nNo visitcount data for room: "..vNum.."; reason: "..errMsg.."\n")
endgetRoomUserDataKeys
- getRoomUserDataKeys(roomID)
- Returns all the keys for user data items stored in the given room ID; will return an empty table if there is no data stored or nil if there is no such room with that ID. Can be useful if the user was not the one who put the data in the map in the first place!
- See also: clearRoomUserData(), clearRoomUserDataItem(), getAllRoomUserData(), getRoomUserData(), searchRoomUserData(), setRoomUserData()
- Example
display(getRoomUserDataKeys(3441))
--might result in:--
{
"description",
"doorname_up",
}getRoomWeight
- getRoomWeight(roomID)
- Returns the weight of a room. By default, all new rooms have a weight of 1.
- See also: setRoomWeight()
- Example
display("Original weight of room 541: "..getRoomWeight(541))
setRoomWeight(541, 3)
display("New weight of room 541: "..getRoomWeight(541))getSpecialExits
- exits = getSpecialExits(roomID[, listAllExits])
- Parameters
- roomID:
- Room ID to return the special exits of.
- listAllExits:
- In the case where there is more than one special exit to the same room ID list all of them.
- Returns a roomid table of sub-tables containing name/command and exit lock status, of the special exits in the room. If there are no special exits in the room, the table returned will be empty
- (Since TBA) In the case where there is more than one special exit to the same room ID list all of them.
- Before TBA (likely to be Mudlet version 4.11.0), if more than one special exit goes to the same exit room id then one of those exits is returned at random. Since TBA this will be the best (i.e. lowest-weight) exit that is not locked; should none be unlocked then the lowest locked one will be listed. In case of a tie, one of the tying exits will be picked at random.
- See also: getRoomExits()
- Example
-- There are three special exits from 1337 to the room 42:
-- "climb down ladder" which is locked and has an exit weight of 10
-- "step out window" which is unlocked and has an exit weight of 20
-- "jump out window" which is unlocked and has an exit weight of 990
getSpecialExits(1337)
-- In 4.10.1 and before this could results in:
table {
42 = {"jump out window" = "0"},
666 = {"dive into pit" = "1"}
}
-- OR
table {
42 = {"climb down ladder" = "1"},
666 = {"dive into pit" = "1"}
}
-- OR
table {
42 = {"step out window" = "0"},
666 = {"dive into pit" = "1"}
}
-- From TBA this will return:
table {
42 = {"step out window" = "0"},
666 = {"dive into pit" = "1"}
}
-- From TBA, with the second argument as true, this gives:
getSpecialExits(1337, true)
table {
42 = {"step out window" = "0",
"climb down ladder" = "1",
"jump out window" = "0"},
666 = {"dive into pit" = "1"}
}getSpecialExitsSwap
- getSpecialExitsSwap(roomID)
- Very similar to getSpecialExits() function, but returns the rooms in the command - roomid style.
gotoRoom
- gotoRoom (roomID)
- Speedwalks you to the given room from your current room if it is able and knows the way. You must turn the map on for this to work, else it will return "(mapper): Don't know how to get there from here :(".
In case this isn't working, and you are coding your own mapping script, see here how to implement additional functionality necessary.
hasExitLock
- status = hasExitLock(roomID, direction)
- Returns true or false depending on whenever a given exit leading out from a room is locked. Direction can be specified as a number, short direction name ("nw") or long direction name ("northwest").
- Example
-- check if the east exit of room 1201 is locked
display(hasExitLock(1201, 4))
display(hasExitLock(1201, "e"))
display(hasExitLock(1201, "east"))- See also: lockExit()
hasSpecialExitLock
- hasSpecialExitLock(from roomID, to roomID, moveCommand)
- Returns true or false depending on whenever a given exit leading out from a room is locked. moveCommand is the action to take to get through the gate.
See also: lockSpecialExit()
-- lock a special exit from 17463 to 7814 that uses the 'enter feather' command
lockSpecialExit(17463, 7814, 'enter feather', true)
-- see if it is locked: it will say 'true', it is
display(hasSpecialExitLock(17463, 7814, 'enter feather'))highlightRoom
- highlightRoom( roomID, color1Red, color1Green, color1Blue, color2Red, color2Green, color2Blue, highlightRadius, color1Alpha, color2Alpha)
- Highlights a room with the given color, which will override its environment color. If you use two different colors, then there'll be a shading from the center going outwards that changes into the other color.
- Parameters
- roomID
- ID of the room to be colored.
- color1Red, color1Green, color1Blue
- RGB values of the first color.
- color2Red, color2Green, color2Blue
- RGB values of the second color.
- highlightRadius
- The radius for the highlight circle - if you don't want rooms beside each other to overlap, use 1 as the radius.
- color1Alpha and color2Alpha
- Transparency values from 0 (completely transparent) to 255 (not transparent at all).
- See also: unHighlightRoom()
-- color room #351 red to blue
local r,g,b = unpack(color_table.red)
local br,bg,bb = unpack(color_table.blue)
highlightRoom(351, r,g,b,br,bg,bb, 1, 255, 255)killMapInfo
- killMapInfo(label)
Delete a map info contributor entirely - it will be not available anymore.
- Parameters
- label:
- Name under which map info to be removed was registered.
- See also: registerMapInfo(), enableMapInfo(), disableMapInfo()
loadJsonMap
- loadJsonMap(pathFileName)
- Parameters
- pathFileName a string that is an absolute path and file name to read the data from.
Load the Mudlet map in text (JSON) format. It does take longer than loading usual map file (.dat in binary) so it will show a progress dialog.
- See also: saveJsonMap()
Returns:
- true on success
- nil and an error message on failure.
- Example
loadJsonMap(getMudletHomeDir() .. "/map.json")
trueloadMap
- loadMap(file location)
- Loads the map file from a given location. The map file must be in Mudlet's format - saved with saveMap() or, as of the Mudlet 3.0 may be a MMP XML map conforming to the structure used by I.R.E. for their downloadable maps for their MUD games.
- Returns a boolean for whenever the loading succeeded. Note that the mapper must be open, or this will fail.
- Using no arguments will load the last saved map.
loadMap("/home/user/Desktop/Mudlet Map.dat")![]() Note: A file name ending with
Note: A file name ending with .xml will indicate the XML format.
lockExit
- lockExit(roomID, direction, lockIfTrue)
- Locks a given exit from a room. The destination may remain accessible through other paths, unlike lockRoom. Direction can be specified as a number, short direction name ("nw") or long direction name ("northwest").
- See also: hasExitLock()
- Example
-- lock the east exit of room 1201 so we never path through it
lockExit(1201, 4, true)lockRoom
- lockRoom (roomID, lockIfTrue)
- Locks a given room id from future speed walks (thus the mapper will never path through that room).
- See also: roomLocked()
- Example
lockRoom(1, true) -- locks a room if from being walked through when speedwalking.
lockRoom(1, false) -- unlocks the room, adding it back to possible rooms that can be walked through.lockSpecialExit
- lockSpecialExit (from roomID, to roomID, special exit command, lockIfTrue)
- Locks a given special exit, leading from one specific room to another that uses a certain command from future speed walks (thus the mapper will never path through that special exit).
- See also: hasSpecialExitLock(), lockExit(), lockRoom()
- Example
lockSpecialExit(1,2,'enter gate', true) -- locks the special exit that does 'enter gate' to get from room 1 to room 2
lockSpecialExit(1,2,'enter gate', false) -- unlocks the said exitmoveMapWidget
- moveMapWidget(Xpos, Ypos)
- moves the map window to the given position.
- See also: openMapWidget(), closeMapWidget(), resizeMapWidget()
- Parameters
- Xpos:
- X position of the map window. Measured in pixels, with 0 being the very left. Passed as an integer number.
- Ypos:
- Y position of the map window. Measured in pixels, with 0 being the very top. Passed as an integer number.
openMapWidget
- openMapWidget([dockingArea | Xpos, Ypos, width, height])
means either of these are fine:
- openMapWidget()
- openMapWidget(dockingArea)
- openMapWidget(Xpos, Ypos, width, height)
- opens a map window with given options.
- See also: closeMapWidget(), moveMapWidget(), resizeMapWidget()
- Parameters
![]() Note: If no parameter is given the map window will be opened with the saved layout or at the right docking position (similar to clicking the icon)
Note: If no parameter is given the map window will be opened with the saved layout or at the right docking position (similar to clicking the icon)
- dockingArea:
- If only one parameter is given this parameter will be a string that contains one of the possible docking areas the map window will be created in (f" floating "t" top "b" bottom "r" right and "l" left)
![]() Note: If 4 parameters are given the map window will be created in floating state
Note: If 4 parameters are given the map window will be created in floating state
- Xpos:
- X position of the map window. Measured in pixels, with 0 being the very left. Passed as an integer number.
- Ypos:
- Y position of the map window. Measured in pixels, with 0 being the very left. Passed as an integer number.
- width:
- The width map window, in pixels. Passed as an integer number.
- height:
- The height map window, in pixels. Passed as an integer number.
pauseSpeedwalk
- pauseSpeedwalk()
- Pauses a speedwalk started using speedwalk()
- See also: speedwalk(), stopSpeedwalk(), resumeSpeedwalk()
local ok, err = pauseSpeedwalk()
if not ok then
debugc(f"Error: unable to pause speedwalk because {err}\n")
return
endregisterMapInfo
- registerMapInfo(label, function)
Adds an extra 'map info' to the mapper widget which can be used to display custom information.
- See also: killMapInfo(), enableMapInfo(), disableMapInfo()
![]() Note:
You can register multiple map infos - just give them unique names and toggle whichever ones you need.
Note:
You can register multiple map infos - just give them unique names and toggle whichever ones you need.
- Parameters
- label:
- Name under which map info will be registered and visible in select box under mapper. You can use it later to kill map info, enable it, disable it or overwrite using registerMapInfo() again.
- function:
- Callback function that will be responsible for returning information how to draw map info fragment.
Callback function is called with following arguments:
- roomId - current roomId or currently selected room (when multiple selection is made this is center room)
- selectionSize - how many rooms are selected
- areaId - roomId's areaId
- displayedAreaId - areaId that is currently displayed
Callback needs to return following:
- text - text that will be displayed (when empty, nothing will be displayed, if you want to "reserve" line or lines use not empty value " " or add line breaks "\n")
- isBold (optional) - true/false - determines whether text will be bold
- isItalic (optional) - true/false - determines whether text will be italic
- color r (optional) - color of text red component (0-255)
- color g (optional) - color of text green component (0-255)
- color b (optional) - color of text blue component (0-255)
![]() Note:
Map info is registered in disabled state, you need to enable it through script or by selecting checkbox under mapper.
Note:
Map info is registered in disabled state, you need to enable it through script or by selecting checkbox under mapper.
registerMapInfo("My very own handler!", function(roomId, selectionSize, areaId, displayedArea)
return string.format("RoomId: %d\nNumbers of room selected: %d\nAreaId: %d\nDisplaying area: %d", roomId, selectionSize, areaId, displayedArea),
true, true, 0, 255, 0
end)
enableMapInfo("My very own handler!")Example will display something like that:

Using function arguments is completely optional and you can determine whether and how to display map info completely externally.
registerMapInfo("Alert", function()
if character.hp < 20 then
return "Look out! Your HP is getting low", true, false, unpack(color_table.red) -- will display red, bolded warning whne character.hp is below 20
else
return "" -- will not return anything
end
end)
enableMapInfo("Alert")resumeSpeedwalk
- resumeSpeedwalk()
- Continues a speedwalk paused using pauseSpeedwalk()
- See also: speedwalk(), pauseSpeedwalk(), stopSpeedwalk()
local ok, err = resumeSpeedwalk()
if not ok then
cecho(f"\n<red>Error:<reset> Problem resuming speedwalk: {err}\n")
return
end
cecho("\n<green>Successfully resumed speedwalk!\n")removeCustomLine
- removeCustomLine(roomID, direction)
- Removes the custom exit line that's associated with a specific exit of a room.
- See also: addCustomLine(), getCustomLines()
- Example
-- remove custom exit line that starts in room 315 going north
removeCustomLine(315, "n")removeMapEvent
- removeMapEvent(event name)
- Removes the given menu entry from a mappers right-click menu. You can add custom ones with addMapEvent().
- See also: addMapEvent(), getMapEvents(), removeMapMenu()
- Example
addMapEvent("room a", "onFavorite") -- add one to the general menu
removeMapEvent("room a") -- removes the said menuremoveMapMenu
- removeMapMenu(menu name)
- Removes the given submenu from a mappers right-click menu. You can add custom ones with addMapMenu().
- See also: addMapMenu(), getMapMenus(), removeMapEvent()
- Example
addMapMenu("Test") -- add submenu to the general menu
removeMapMenu("Test") -- removes that same menu againremoveSpecialExit
- removeSpecialExit(roomID, command)
- Removes the special exit which is accessed by command from the room with the given roomID.
- See also: addSpecialExit(), clearSpecialExits()
- Example
addSpecialExit(1, 2, "pull rope") -- add a special exit from room 1 to room 2
removeSpecialExit(1, "pull rope") -- removes the exit againresetRoomArea
- resetRoomArea (roomID)
- Unassigns the room from its given area. While not assigned, its area ID will be -1. Note that since Mudlet 3.0 the "default area" which has the id of -1 may be selectable in the area selection widget on the mapper - although there is also an option to conceal this in the settings.
- See also: setRoomArea(), getRoomArea()
- Example
resetRoomArea(3143)resizeMapWidget
- resizeMapWidget(width, height)
- resizes a map window with given width, height.
- See also: openMapWidget(), closeMapWidget(), moveMapWidget()
- Parameters
- width:
- The width of the map window, in pixels. Passed as an integer number.
- height:
- The height of the map window, in pixels. Passed as an integer number.
roomExists
- roomExists(roomID)
- Returns a boolean true/false depending if the room with that ID exists (is created) or not.
roomLocked
- locked = roomLocked(roomID)
- Returns true or false whenever a given room is locked.
- See also: lockRoom()
- Example
echo(string.format("Is room #4545 locked? %s.", roomLocked(4545) and "Yep" or "Nope"))saveJsonMap
- saveJsonMap([pathFileName])
Saves all the data that is normally held in the Mudlet map (.dat as a binary format) in text (JSON) format. It does take longer to do this, so a progress dialog will be shown indicating the status.
- See also: loadJsonMap()
- Parameters
- pathFileName (optional in Mudlet 4.12+): a string that is an absolute path and file name to save the data into.
- Returns
- true on success
- nil and an error message on failure.
- Example
saveJsonMap(getMudletHomeDir() .. "/map.json")
truesaveMap
- saveMap([location], [version])
- Saves the map to a given location, and returns true on success. The location folder needs to be already created for save to work. You can also save the map in the Mapper settings tab.
- Parameters
- location
- (optional) save the map to the given location if provided, or the default one otherwise.
- version
- (optional) map version as a number to use when saving (Mudlet 3.17+)
- See also: loadMap()
- Example
local savedok = saveMap(getMudletHomeDir().."/my fancy map.dat")
if not savedok then
echo("Couldn't save :(\n")
else
echo("Saved fine!\n")
end
-- save with a particular map version
saveMap(20)searchAreaUserData
- searchAreaUserData(area number | area name[, case-sensitive [, exact-match]])
- Searches Areas' User Data in a manner exactly the same as searchRoomUserData() does in all Rooms' User Data, refer to that command for the specific details except to replace references to rooms and room ID numbers there with areas and areas ID numbers.
searchRoom
- searchRoom (room number | room name[, case-sensitive [, exact-match]])
- Searches for rooms that match (by case-insensitive, substring match) the given room name. It returns a key-value table in form of roomid = roomname, the optional second and third boolean parameters have been available since Mudlet 3.0;
- If no rooms are found, then an empty table is returned.
- If you pass it a number instead of a string as just one argument, it'll act like getRoomName() and return the room name.
- Examples
-- show the behavior when given a room number:
display(searchRoom(3088))
"The North Road South of Taren Ferry"
-- show the behavior when given a string:
-- shows all rooms containing the text in any case:
display(searchRoom("North road"))
{
[3114] = "Bend in North road",
[3115] = "North road",
[3116] = "North Road",
[3117] = "North road",
[3146] = "Bend in the North Road",
[3088] = "The North Road South of Taren Ferry",
[6229] = "Grassy Field By North Road"
}
-- or:
-- display(searchRoom("North road",false))
-- display(searchRoom("North road",false,false))
-- would both also produce those results.
-- shows all rooms containing the text in ONLY the letter-case provided:
display(searchRoom("North road",true,false))
{
[3114] = "Bend in North road",
[3115] = "North road",
[3117] = "North road",
}
-- shows all rooms containing ONLY that text in either letter-case:
lua searchRoom("North road",false,true)
{
[3115] = "North road",
[3116] = "North Road",
[3117] = "North road"
}
-- shows all rooms containing only and exactly the given text:
lua searchRoom("North road",true,true)
{
[3115] = "North road",
[3117] = "North road"
}![]() Note: Technically, with both options (case-sensitive and exact-match) set to true, one could just return a list of numbers as we know precisely what the string will be, but it was kept the same for maximum flexibility in user scripts.
Note: Technically, with both options (case-sensitive and exact-match) set to true, one could just return a list of numbers as we know precisely what the string will be, but it was kept the same for maximum flexibility in user scripts.
searchRoomUserData
- searchRoomUserData([key, [value]])
- A command with three variants that search though all the rooms in sequence (so not as fast as a user built/maintained index system) and find/reports on the room user data stored:
- See also: clearRoomUserData(), clearRoomUserDataItem(), getAllRoomUserData(), getRoomUserData(), getRoomUserDataKeys(), setRoomUserData()
- searchRoomUserData(key, value)
- Reports a (sorted) list of all room ids with user data with the given "value" for the given (case sensitive) "key".
- searchRoomUserData(key)
- Reports a (sorted) list of the unique values from all rooms with user data with the given (case sensitive) "key".
- searchRoomUserData()
- Reports a (sorted) list of the unique keys from all rooms with user data with any (case sensitive) "key", available since Mudlet 3.0. It is possible (though not recommended) to have a room user data item with an empty string "" as a key, this is handled correctly.
- Examples
-- if I had stored the details of "named doors" as part of the room user data --
display(searchRoomUserData("doorname_up"))
--[[ could result in a list:
{
"Eastgate",
"Northgate",
"boulderdoor",
"chamberdoor",
"dirt",
"floorboards",
"floortrap",
"grate",
"irongrate",
"rockwall",
"tomb",
"trap",
"trapdoor"
}]]
-- then taking one of these keys --
display(searchRoomUserData("doorname_up","trapdoor"))
--[[ might result in a list:
{
3441,
6113,
6115,
8890
}
]]setAreaName
- setAreaName(areaID or areaName, newName)
- Names, or renames an existing area to the new name. The area must be created first with addAreaName() and it must be unique.
![]() Note: parameter areaName is available since Mudlet 3.0.
Note: parameter areaName is available since Mudlet 3.0.
- See also: deleteArea(), addAreaName()
- Example
setAreaName(2, "My city")
-- available since Mudlet 3.0
setAreaName("My old city name", "My new city name")setAreaUserData
- setAreaUserData(areaID, key (as a string), value (as a string))
- Stores information about an area under a given key. Similar to Lua's key-value tables, except only strings may be used here. One advantage of using userdata is that it's stored within the map file itself - so sharing the map with someone else will pass on the user data. Returns a lua true value on success. You can have as many keys as you'd like, however a blank key will not be accepted and will produce a lua nil and an error message instead.
- Returns true if successfully set.
- See also: clearAreaUserData(), clearAreaUserDataItem(), getAllAreaUserData(), getAreaUserData(), searchAreaUserData()
- Example
-- can use it to store extra area details...
setAreaUserData(34, "country", "Andor.")
-- or a sound file to play in the background (with a script that checks a room's area when entered)...
setAreaUserData(34, "backgroundSound", "/home/user/mudlet-data/soundFiles/birdsong.mp4")
-- can even store tables in it, using the built-in yajl.to_string function
setAreaUserData(101, "some table", yajl.to_string({ruler = "Queen Morgase Trakand", clan = "Lion Warden"}))
display("The ruler's name is: "..yajl.to_value(getRoomUserData(101, "some table")).ruler)setCustomEnvColor
- setCustomEnvColor(environmentID, r,g,b,a)
- Creates, or overrides an already created custom color definition for a given environment ID. Note that this will not work on the default environment colors - those are adjustable by the user in the preferences. You can however create your own environment and use a custom color definition for it.
- See also: getCustomEnvColorTable(), setRoomEnv()
![]() Note: Numbers 1-16 and 257-272 are reserved by Mudlet. 257-272 are the default colors the user can adjust in mapper settings, so feel free to use them if you'd like - but don't overwrite them with this function.
Note: Numbers 1-16 and 257-272 are reserved by Mudlet. 257-272 are the default colors the user can adjust in mapper settings, so feel free to use them if you'd like - but don't overwrite them with this function.

- Example
setRoomEnv(571, 200) -- change the room's environment ID to something arbitrary, like 200
local r,g,b = unpack(color_table.blue)
setCustomEnvColor(200, r,g,b, 255) -- set the color of environmentID 200 to bluesetDoor
- setDoor(roomID, exitCommand, doorStatus)
- Creates or deletes a door in a room. Doors are purely visual - they don't affect pathfinding. You can use the information to adjust your speedwalking path based on the door information in a room, though.
- Doors CAN be set on stub exits - so that map makers can note if there is an obvious door to somewhere even if they do not (yet) know where it goes, perhaps because they do not yet have the key to open it!
- Returns true if the change could be made, false if the input was valid but ineffective (door status was not changed), and nil with a message string on invalid input (value type errors).
- See also: getDoors()
- Parameters
- roomID:
- Room ID to to create the door in.
- exitCommand:
- The cardinal direction for the door is in - it can be one of the following: n, e, s, w, ne, se, sw, ne. {Plans are afoot to add support for doors on the other normal exits: up, down, in and out, and also on special exits - though more work will be needed for them to be shown in the mapper.} It is important to ONLY use these direction codes as others e.g. "UP" will be accepted - because a special exit could have ANY name/lua script - but it will not be associated with the particular normal exit - recent map auditing code about to go into the code base will REMOVE door and other room exit items for which the appropriate exit (or stub) itself is not present, so in this case, in the absence of a special exit called "UP" that example door will not persist and not show on the normal "up" exit when that is possible later on.
- doorStatus:
- The door status as a number - 0 means no (or remove) door, 1 means open door (will draw a green square on exit), 2 means closed door (yellow square) and 3 means locked door (red square).
- Example
-- make a door on the east exit of room 4234 that is currently open
setDoor(4234, 'e', 1)
-- remove a door from room 923 that points north
setDoor(923, 'n', 0)setExit
- setExit(from roomID, to roomID, direction)
- Creates a one-way exit from one room to another using a standard direction - which can be either one of n, ne, nw, e, w, s, se, sw, u, d, in, out, the long version of a direction, or a number which represents a direction. If there was an exit stub in that direction already, then it will be automatically deleted for you.
- Returns false if the exit creation didn't work.
- See also: addSpecialExit()
- Example
-- alias pattern: ^exit (\d+) (\d+) (\w+)$
-- so exit 1 2 5 will make an exit from room 1 to room 2 via north
if setExit(tonumber(matches[2]), tonumber(matches[3]), matches[4]) then
echo("\nExit set to room:"..matches[3].." from "..matches[2]..", direction:"..string.upper(matches[3]))
else
echo("Failed to set the exit.\n")
endThis function can also delete exits from a room if you use it like so:
setExit(from roomID, -1, direction)- which will delete an outgoing exit in the specified direction from a room.
setExitStub
- setExitStub(roomID, direction, set/unset)
Creates or removes an exit stub from a room in a given directions. You can use exit stubs later on to connect rooms that you're sure of are together. Exit stubs are also shown visually on the map, so the mapper can easily tell which rooms need finishing.
- Parameters
- roomID:
- The room to place an exit stub in, as a number.
- direction:
- The direction the exit stub should lead in - as a short direction name ("nw"), long direction name ("northwest") or a number.
- set/unset:
- A boolean to create or delete the exit stub.
- See also: getExitStubs(), connectExitStub()
- Example
Create an exit stub to the south from room 8:
setExitStub(8, "s", true)How to delete all exit stubs in a room:
for i,v in pairs(getExitStubs(roomID)) do
setExitStub(roomID, v,false)
endsetExitWeight
- setExitWeight(roomID, exitCommand, weight)
- Gives an exit a weight, which makes it less likely to be chosen for pathfinding. All exits have a weight of 0 by default, which you can increase. Exit weights are set one-way on an exit - if you'd like the weight to be applied both ways, set it from the reverse room and direction as well.
- Parameters
- roomID:
- Room ID to to set the weight in.
- exitCommand:
- The direction for the exit is in - it can be one of the following: n, ne, e, se, s, sw, w, nw, up, down, in, out, or, if it's a special exit, the special exit command - note that the strings for normal exits are case-sensitive and must currently be exactly as given here.
- weight:
- Exit weight - by default, all exits have a weight of 0 meaning that the weight of the destination room is use when the route finding code is considering whether to use that exit; setting a value for an exit can increase or decrease the chance of that exit/destination room being used for a route by the route-finding code. For example, if the destination room has very high weight compared to it's neighbors but the exit has a low value then that exit and thus the room is more likely to be used than if the exit was not weighted.
- See also: getExitWeights()
setGridMode
- setGridMode(areaID, true/false)
- Enables grid/wilderness view mode for an area - this will cause the rooms to lose their visible exit connections, like you'd see on compressed ASCII maps, both in 2D and 3D view mode; for the 2D map the custom exit lines will also not be shown if this mode is enabled.
- Returns true if the area exists, otherwise false.
- See also: getGridMode()
- Example
setGridMode(55, true) -- set area with ID 55 to be in grid modesetMapUserData
- setMapUserData(key (as a string), value (as a string))
- Stores information about the map under a given key. Similar to Lua's key-value tables, except only strings may be used here. One advantage of using userdata is that it's stored within the map file itself - so sharing the map with someone else will pass on the user data. You can have as many keys as you'd like.
- Returns true if successfully set.
- See also: clearMapUserData(), clearMapUserDataItem(), getAllMapUserData(), getMapUserData()
- Example
-- store general meta information about the map...
setMapUserData("game_name", "Achaea Mudlet map")
-- or who the author was
setMapUserData("author", "Bob")
-- can even store tables in it, using the built-in yajl.to_string function
setMapUserData("some table", yajl.to_string({game = "mud.com", port = 23}))
display("Available game info in the map: ")
display(yajl.to_value(getMapUserData("some table")))setMapZoom
- setMapZoom(zoom[, areaID])
- Zooms the 2D (only) map to a given zoom level. Larger numbers zooms the map further out. Revised in Mudlet 4.17.0 to allow the zoom for an area to be specified even if it is not the one currently being viewed. This change is combined with Mudlet permanently remembering (it is saved within the map file) the zoom level last used for each area and with the addition of the getMapZoom() function.
- See also: getMapZoom().
- Parameters
- zoom:
- floating point number that is at least 3.0 to set the zoom to.
- areaID:
- (Optional and only since Mudlet 4.17.0) Area ID number to adjust the 2D zoom for (optional, the function works on the area currently being viewed if this is omitted).
- Returns (only since Mudlet 4.17.0)
- true on success
- nil and an error message on failure.
- Example
setMapZoom(10.0) -- zoom to a somewhat acceptable level, a bit big but easily visible connections
true
setMapZoom(2.5 + getMapZoom(1), 1) -- zoom out the area with ID 1 by 2.5
true![]() Note: The precise meaning of a particular zoom value may have an underlying meaning however that has not been determined other than that the minimum value is 3.0 and the initial value - and what prior Mudlet versions started each session with - is 20.0.
Note: The precise meaning of a particular zoom value may have an underlying meaning however that has not been determined other than that the minimum value is 3.0 and the initial value - and what prior Mudlet versions started each session with - is 20.0.
setRoomArea
- setRoomArea(roomID, newAreaID or newAreaName)
- Assigns the given room to a new or different area. If the area is displayed in the mapper this will have the room be visually moved into the area as well.
- See also: resetRoomArea()
setRoomChar
- setRoomChar(roomID, character)
- Originally designed for an area in grid mode, takes a single ASCII character and draws it on the rectangular background of the room in the 2D map.
- Game-related symbols for your map
- toddfast's font - 3000+ scalable vector RPG icons from game-icons.net, as well as a script to download the latest icons and generate a new font.
- Pixel Kitchen's Donjonikon Font - 10x10 fantasy and RPG-related icons.
- Example
setRoomChar(431, "#")
setRoomChar(123, "$")
-- emoji's work fine too, and if you'd like it coloured, set the font to Nojo Emoji in settings
setRoomChar(666, "👿")
-- clear a symbol with a space
setRoomChar(123, " ")- Since Mudlet version 3.8 this feature has been extended:
- This function will now take a short string of any printable characters as a room symbol, and they will be shrunk to fit them all in horizontally but if they become too small that symbol may not be shown if the zoom is such that the room symbol is too small to be legible.
- As "_" is now a valid character an existing symbol may be erased with either a space " " or an empty string "" although neither may be effective in some previous versions of Mudlet.
- Should the rooms be set to be drawn as circles this is now accommodated and the symbol will be resized to fit the reduce drawing area this will cause.
- The range of characters that are available are now dependent on the fonts present in the system and a setting on the "Mapper" tab in the preferences that control whether a specific font is to be used for all symbols (which is best if a font is included as part of a game server package, but has the issue that it may not be displayable if the user does not have that font or chooses a different one) or any font in the user's system may be used (which is the default, but may not display the glyph {the particular representation of a grapheme in a particular font} that the original map creator expected). Should it not be possible to display the wanted symbol in the map because one or more of the required glyphs are not available in either the specified or any font depending on the setting then the replacement character (Unicode code-point U+FFFD '�') will be shown instead. To allow such missing symbols to be handled the "Mapper" tab on the preferences dialogue has an option to display:
- an indicator to show whether the symbol can be made just from the selected font (green tick), from the fonts available in the system (yellow warning triangle) or not at all (red cross)
- all the symbols used on the map and how they will be displayed both only using the selected font and all fonts
- the sequence of code-points used to create the symbol which will be useful when used in conjunction with character selection utilities such as charmap.exe on Windows and gucharmap on unix-like system
- a count of the rooms using the particular symbol
- a list, limited in entries of the first rooms using that symbol
- The font that is chosen to be used as the primary (or only) one for the room symbols is stored in the Mudlet map data so that setting will be included if a binary map is shared to other Mudlet users or profiles on the same system.
- See also: getRoomChar()
setRoomCharColor
- setRoomCharColor(roomId, r, g, b)
- Parameters
- roomID:
- Room ID to to set char color to.
- r:
- Red component of room char color (0-255)
- g:
- Green component of room char color (0-255)
- b:
- Blue component of room char color (0-255)
Sets color for room symbol.
setRoomCharColor(2402, 255, 0, 0)
setRoomCharColor(2403, 0, 255, 0)
setRoomCharColor(2404, 0, 0, 255)- See also: unsetRoomCharColor()
setRoomCoordinates
- setRoomCoordinates(roomID, x, y, z)
- Sets the given room ID to be at the following coordinates visually on the map, where z is the up/down level. These coordinates are define the location of the room within a particular area (so not globally on the overall map).
![]() Note: 0,0,0 is the center of the map.
Note: 0,0,0 is the center of the map.
- Examples
-- alias pattern: ^set rc (-?\d+) (-?\d+) (-?\d+)$
-- this sets the current room to the supplied coordinates
setRoomCoordinates(roomID,x,y,z)
centerview(roomID)- You can make them relative asa well:
-- alias pattern: ^src (\w+)$
local x,y,z = getRoomCoordinates(previousRoomID)
local dir = matches[2]
if dir == "n" then
y = y+1
elseif dir == "ne" then
y = y+1
x = x+1
elseif dir == "e" then
x = x+1
elseif dir == "se" then
y = y-1
x = x+1
elseif dir == "s" then
y = y-1
elseif dir == "sw" then
y = y-1
x = x-1
elseif dir == "w" then
x = x-1
elseif dir == "nw" then
y = y+1
x = x-1
elseif dir == "u" or dir == "up" then
z = z+1
elseif dir == "down" then
z = z-1
end
setRoomCoordinates(roomID,x,y,z)
centerview(roomID)setRoomEnv
- setRoomEnv(roomID, newEnvID)
- Sets the given room to a new environment ID. You don't have to use any functions to create it - can just set it right away.
- See also: setCustomEnvColor()
- Example
setRoomEnv(551, 34) -- set room with the ID of 551 to the environment ID 34setRoomIDbyHash
- setRoomIDbyHash(roomID, hash)
- Sets the hash to be associated with the given roomID. See also getRoomIDbyHash().
- If the room was associated with a different hash, or vice versa, that association will be superseded.
setRoomName
- setRoomName(roomID, newName)
- Renames an existing room to a new name.
- Example
setRoomName(534, "That evil room I shouldn't visit again.")
lockRoom(534, true) -- and lock it just to be safesetRoomUserData
- setRoomUserData(roomID, key (as a string), value (as a string))
- Stores information about a room under a given key. Similar to Lua's key-value tables, except only strings may be used here. One advantage of using userdata is that it's stored within the map file itself - so sharing the map with someone else will pass on the user data. You can have as many keys as you'd like.
- Returns true if successfully set.
- See also: clearRoomUserData(), clearRoomUserDataItem(), getAllRoomUserData(), getRoomUserData(), searchRoomUserData()
- Example
-- can use it to store room descriptions...
setRoomUserData(341, "description", "This is a plain-looking room.")
-- or whenever it's outdoors or not...
setRoomUserData(341, "outdoors", "true")
-- how how many times we visited that room
local visited = getRoomUserData(341, "visitcount")
visited = (tonumber(visited) or 0) + 1
setRoomUserData(341, "visitcount", tostring(visited))
-- can even store tables in it, using the built-in yajl.to_string function
setRoomUserData(341, "some table", yajl.to_string({name = "bub", age = 23}))
display("The denizens name is: "..yajl.to_value(getRoomUserData(341, "some table")).name)setRoomWeight
- setRoomWeight(roomID, weight)
- Sets a weight to the given roomID. By default, all rooms have a weight of 1 - the higher the weight is, the more likely the room is to be avoided for pathfinding. For example, if travelling across water rooms takes more time than land ones - then you'd want to assign a weight to all water rooms, so they'd be avoided if there are possible land pathways.
![]() Note: The minimum allowed room weight is 1.
Note: The minimum allowed room weight is 1.
- To completely avoid a room, make use of lockRoom().
- See also: getRoomWeight()
- Example
setRoomWeight(1532, 3) -- avoid using this room if possible, but don't completely ignore it
speedwalk
- speedwalk(dirString, backwards, delay, show)
- A speedwalking function will work on cardinal+ordinal directions (n, ne, e, etc.) as well as u (for up), d (for down), in and out. It can be called to execute all directions directly after each other, without delay, or with a custom delay, depending on how fast your game allows you to walk. It can also be called with a switch to make the function reverse the whole path and lead you backwards.
- Call the function by doing:
speedwalk("YourDirectionsString", true/false, delaytime, true/false)
- The delaytime parameter will set a delay between each move (set it to 0.5 if you want the script to move every half second, for instance). It is optional: If you don't indicate it, the script will send all direction commands right after each other. (If you want to indicate a delay, you -have- to explicitly indicate true or false for the reverse flag.)
- The show parameter will determine if the commands sent by this function are shown or hidden. It is optional: If you don't give a value, the script will show all commands sent. (If you want to use this option, you -have- to explicitly indicate true or false for the reverse flag, as well as either some number for the delay or nil if you do not want a delay.)
- The "YourDirectionsString" contains your list of directions and steps (e.g.: "2n, 3w, u, 5ne"). Numbers indicate the number of steps you want it to walk in the direction specified after it. The directions must be separated by anything other than a letter that can appear in a direction itself. (I.e. you can separate with a comma, spaces, the letter x, etc. and any such combinations, but you cannot separate by the letter "e", or write two directions right next to each other with nothing in-between, such as "wn". If you write a number before every direction, you don't need any further separator. E.g. it's perfectly acceptable to write "3w1ne2e".) The function is not case-sensitive.
- If your game only has cardinal directions (n,e,s,w and possibly u,d) and you wish to be able to write directions right next to each other like "enu2s3wdu", you'll have to change the pattern slightly. Likewise, if your game has any other directions than n, ne, e, se, s, sw, w, nw, u, d, in, out, the function must be adapted to that.
- Example
speedwalk("16d1se1u")
-- Will walk 16 times down, once southeast, once up. All in immediate succession.
speedwalk("2ne,3e,2n,e")
-- Will walk twice northeast, thrice east, twice north, once east. All in immediate succession.
speedwalk("IN N 3W 2U W", false, 0.5)
-- Will walk in, north, thrice west, twice up, west, with half a second delay between every move.
speedwalk("5sw - 3s - 2n - w", true)
-- Will walk backwards: east, twice south, thrice north, five times northeast. All in immediate succession.
speedwalk("3w, 2ne, w, u", true, 1.25)
-- Will walk backwards: down, east, twice southwest, thrice east, with 1.25 seconds delay between every move.![]() Note: The probably most logical usage of this would be to put it in an alias. For example, have the pattern ^/(.+)$ execute:
Note: The probably most logical usage of this would be to put it in an alias. For example, have the pattern ^/(.+)$ execute: speedwalk(matches[2], false, 0.7)
And have ^//(.+)$ execute: speedwalk(matches[2], true, 0.7)
Or make aliases like: ^banktohome$ to execute speedwalk("2ne,e,ne,e,3u,in", true, 0.5)
![]() Note: The show parameter for this function is available in Mudlet 3.12+
Note: The show parameter for this function is available in Mudlet 3.12+
stopSpeedwalk
- stopSpeedwalk()
- Stops a speedwalk started using speedwalk()
- See also: pauseSpeedwalk(), resumeSpeedwalk(), speedwalk()
local ok, err = stopSpeedwalk()
if not ok then
cecho(f"\n<red>Error:<reset> {err}")
return
end
cecho(f"\n<green>Success:<reset> speedwalk stopped")unHighlightRoom
- unHighlightRoom(roomID)
- Unhighlights a room if it was previously highlighted and restores the rooms original environment color.
- See also: highlightRoom()
- Example
unHighlightRoom(4534)unsetRoomCharColor
- unsetRoomCharColor(roomId)
- Parameters
- roomID:
- Room ID to to unset char color to.
Removes char color setting from room, back to automatic determination based on room background lightness.
unsetRoomCharColor(2031)updateMap
- updateMap()
- Updates the mapper display (redraws it). Use this function if you've edited the map via script and would like the changes to show.
- See also: centerview()
- Example
-- delete a some room
deleteRoom(500)
-- now make the map show that it's gone
updateMap()
Miscellaneous Functions
addFileWatch
- addFileWatch(path)
- Adds file watch on directory or file. Every change in that file (or directory) will raise sysPathChanged event.
- See also: removeFileWatch()
- Example
herbs = {}
local herbsPath = getMudletHomeDir() .. "/herbs.lua"
function herbsChangedHandler(_, path)
if path == herbsPath then
table.load(herbsPath, herbs)
removeFileWatch(herbsPath)
end
end
addFileWatch(herbsPath)
registerAnonymousEventHandler("sysPathChanged", "herbsChangedHandler")addSupportedTelnetOption
- addSupportedTelnetOption(option)
- Adds a telnet option, which when queried by a game server, Mudlet will return DO (253) on. Use this to register the telnet option that you will be adding support for with Mudlet - see additional protocols section for more.
- Example
<event handlers that add support for MSDP... see http://www.mudbytes.net/forum/comment/63920/#c63920 for an example>
-- register with Mudlet that it should not decline the request of MSDP support
local TN_MSDP = 69
addSupportedTelnetOption(TN_MSDP)alert
- alert([seconds])
- alerts the user to something happening - makes Mudlet flash in the Windows window bar, bounce in the macOS dock, or flash on Linux.
- Parameters
- seconds:
- (optional) number of seconds to have the alert for. If not provided, Mudlet will flash until the user opens Mudlet again.
- Example
-- flash indefinitely until Mudlet is open
alert()
-- flash for just 3 seconds
alert(3)cfeedTriggers
- cfeedTriggers(text)
- Like feedTriggers, but you can add color information using color names, similar to cecho.
- Parameters
- text: The string to feed to the trigger engine. Include colors by name as black,red,green,yellow,blue,magenta,cyan,white and light_* versions of same. You can also use a number to get the ansi color corresponding to that number.
- See also: feedTriggers
- Example
cfeedTriggers("<green:red>green on red<r> reset <124:100> foreground of ANSI124 and background of ANSI100<r>\n")closeMudlet
- closeMudlet()
- Closes Mudlet and all profiles immediately.
- See also: saveProfile()
![]() Note: Use with care. This potentially lead to data loss, if "save on close" is not activated and the user didn't save the profile manually as this will NOT ask for confirmation nor will the profile be saved. Also it does not consider if there are other profiles open if multi-playing: they all will be closed!
Note: Use with care. This potentially lead to data loss, if "save on close" is not activated and the user didn't save the profile manually as this will NOT ask for confirmation nor will the profile be saved. Also it does not consider if there are other profiles open if multi-playing: they all will be closed!
- Example
closeMudlet()deleteAllNamedEventHandlers
- deleteAllNamedEventHandlers(userName)
- Deletes all named event handlers for userName and prevents them from firing any more. Information is deleted and cannot be retrieved.
- Parameters
- userName:
- The user name the event handler was registered under.
- Example
deleteAllNamedEventHandlers("Demonnic") -- emergency stop or debugging situation, most likely.deleteNamedEventHandler
- success = deleteNamedEventHandler(userName, handlerName)
- Deletes a named event handler with name handlerName and prevents it from firing any more. Information is deleted and cannot be retrieved.
- Parameters
- userName:
- The user name the event handler was registered under.
- handlerName:
- The name of the handler to stop. Same as used when you called registerNamedEventHandler()
- Returns
- true if successful, false if it didn't exist
- Example
local deleted = deleteNamedEventHandler("Demonnic", "Vitals")
if deleted then
cecho("Vitals deleted forever!!")
else
cecho("Vitals doesn't exist and so could not be deleted.")
enddenyCurrentSend
- denyCurrentSend()
- Cancels a send() or user-entered command, but only if used within a sysDataSendRequest event.
- Example
-- cancels all "eat hambuger" commands
function cancelEatHamburger(event, command)
if command == "eat hamburger" then
denyCurrentSend()
cecho("<red>Denied! Didn't let the command through.\n")
end
end
registerAnonymousEventHandler("sysDataSendRequest", "cancelEatHamburger")dfeedTriggers
- dfeedTriggers(str)
- Like feedTriggers, but you can add color information using <r,g,b>, similar to decho.
- Parameters
- str: The string to feed to the trigger engine. Include color information inside tags like decho.
- See also
- cfeedTriggers, decho
- Example
dfeedTriggers("<0,128,0:128,0,0>green on red<r> reset\n")disableModuleSync
- disableModuleSync(name)
- Stops syncing the given module.
- Parameter
- name: name of the module.
- See also: enableModuleSync(), getModuleSync()
enableModuleSync
- enableModuleSync(name)
- Enables the sync for the given module name - any changes done to it will be saved to disk and if the module is installed in any other profile(s), it'll be updated in them as well on profile save.
- Parameter
- name: name of the module to enable sync on.
- See also: disableModuleSync(), getModuleSync()
expandAlias
- expandAlias(command, [echoBackToBuffer])
- Runs the command as if it was from the command line - so aliases are checked and if none match, it's sent to the game unchanged.
- Parameters
- command
- Text of the command you want to send to the game. Will be checked for aliases.
- echoBackToBuffer
- (optional) If false, the command will not be echoed back in your buffer. Defaults to true if omitted.
![]() Note: Using expandAlias is not recommended anymore as it is not very robust and may lead to problems down the road. The recommendation is to use lua functions instead. See Manual:Functions_vs_expandAlias for details and examples.
Note: Using expandAlias is not recommended anymore as it is not very robust and may lead to problems down the road. The recommendation is to use lua functions instead. See Manual:Functions_vs_expandAlias for details and examples.
![]() Note: If you want to be using the matches table after calling expandAlias, you should save it first, as, e.g. local oldmatches = matches before calling expandAlias, since expandAlias will overwrite it after using it again.
Note: If you want to be using the matches table after calling expandAlias, you should save it first, as, e.g. local oldmatches = matches before calling expandAlias, since expandAlias will overwrite it after using it again.
![]() Note: Since Mudlet 3.17.1 the optional second argument to echo the command on screen will be ineffective whilst the game server has negotiated the telnet ECHO option to provide the echoing of text we send to him.
Note: Since Mudlet 3.17.1 the optional second argument to echo the command on screen will be ineffective whilst the game server has negotiated the telnet ECHO option to provide the echoing of text we send to him.
- Example
expandAlias("t rat")
-- don't echo the command
expandAlias("t rat", false)feedTriggers
- feedTriggers(text[, dataIsUtf8Encoded = true])
- This function will have Mudlet parse the given text as if it came from the game - one great application is trigger testing. The built-in `echo alias provides this functionality as well.
- Parameters
- text:
- string which is sent to the trigger processing system almost as if it came from the game server. This string must be byte encoded in a manner to match the currently selected Server Encoding.
- dataIsUtf8Encoded (available in Mudlet 4.2+):
- Set this to false, if you need pre-Mudlet 4.0 behavior. Most players won't need this.
- (Before Mudlet 4.0 the text had to be encoded directly in whatever encoding the setting in the preferences was set to.
- (Encoding could involve using the Lua string character escaping mechanism of \ and a base 10 number for character codes from \1 up to \255 at maximum)
- Since Mudlet 4.0 it is assumed that the text is UTF-8 encoded. It will then be automatically converted to the currently selected game server encoding.
- Preventing the automatic conversion can be useful to Mudlet developers testing things, or possibly to those who are creating handlers for Telnet protocols within the Lua subsystem, who need to avoid the transcoding of individual protocol bytes, when they might otherwise be seen as extended ASCII characters.)
- Returns (available in Mudlet 4.2+)
- true on success, nil and an error message if the text contains characters that cannot be conveyed by the current Game Server encoding.
![]() Note: It is important to ensure that in Mudlet 4.0.0 and beyond the text data only contains characters that can be encoded in the current Game Server encoding, from 4.2.0 the content is checked that it can successfully be converted from the UTF-8 that the Mudlet Lua subsystem uses internally into that particular encoding and if it cannot the function call will fail and not pass any of the data, this will be significant if the text component contains any characters that are not plain ASCII.
Note: It is important to ensure that in Mudlet 4.0.0 and beyond the text data only contains characters that can be encoded in the current Game Server encoding, from 4.2.0 the content is checked that it can successfully be converted from the UTF-8 that the Mudlet Lua subsystem uses internally into that particular encoding and if it cannot the function call will fail and not pass any of the data, this will be significant if the text component contains any characters that are not plain ASCII.
- Example
-- try using this on the command line
`echo This is a sample line from the game
-- You can use \n to represent a new line - you also want to use it before and after the text you’re testing, like so:
feedTriggers("\nYou sit yourself down.\n")
-- The function also accept ANSI color codes that are used in games. A sample table can be found http://codeworld.wikidot.com/ansicolorcodes
feedTriggers("\nThis is \27[1;32mgreen\27[0;37m, \27[1;31mred\27[0;37m, \27[46mcyan background\27[0;37m," ..
"\27[32;47mwhite background and green foreground\27[0;37m.\n")getCharacterName
- getCharacterName()
- Returns the name entered into the "Character name" field on the Connection Preferences form. Can be used to find out the name that might need to be handled specially in scripts or anything that needs to be personalized to the player. If there is nothing set in that entry will return an empty string.
- See also: getProfileName()
- Example
-- cast glamor on yourself
send("cast 'glamor' " .. getCharacterName())getConfig
- getConfig([option])
- Returns configuration options similar to those that can be set with setConfig. One could use this to decide if a script should notify the user of suggested changes.
See also: setConfig()
- Parameters
- option:
- Particular option to retrieve - see list below for available ones. This may be a string or an array of strings.
| Option | Description | Available in Mudlet |
|---|---|---|
| enableGMCP | Enable GMCP | 4.17 |
| enableMSDP | Enable MSDP | 4.17 |
| enableMSSP | Enable MSSP | 4.17 |
| enableMSP | Enable MSP | 4.17 |
| Option | Description | Available in Mudlet |
|---|---|---|
| inputLineStrictUnixEndings | Workaround option to use strict UNIX line endings for sending commands | 4.17 |
| Option | Description | Available in Mudlet |
|---|---|---|
| fixUnnecessaryLinebreaks | Remove extra linebreaks from output (mostly for IRE servers) | 4.17 |
| Option | Description | Available in Mudlet |
|---|---|---|
| mapRoomSize | Size of rooms on map | 4.17 |
| mapExitSize | Size of exits on map | 4.17 |
| mapRoundRooms | Draw rooms round or square | 4.17 |
| showRoomIdsOnMap | Show room IDs on all rooms | 4.17 |
| show3dMapView | Show map as 3D | 4.17 |
| mapperPanelVisible | Map controls at the bottom | 4.17 |
| mapShowRoomBorders | Draw a thin border for every room | 4.17 |
| Option | Description | Available in Mudlet |
|---|---|---|
| specialForceCompressionOff | Workaround option to disable MCCP compression, in case the game server is not working correctly | 4.17 |
| specialForceGAOff | Workaround option to disable Telnet Go-Ahead, in case the game server is not working correctly | 4.17 |
| specialForceCharsetNegotiationOff | Workaround option to disable automatically setting the correct encoding, in case the game server is not working correctly | 4.17 |
| specialForceMxpNegotiationOff | Workaround option to disable MXP, in case the game server is not working correctly | 4.17 |
| caretShortcut | For visually-impaired players - get the key to switch between input line and main window (can be "none", "tab", "ctrltab", "f6") | 4.17 |
| blankLinesBehaviour | For visually impaired players options for dealing with blank lines (can be "show", "hide", "replacewithspace") | 4.17 |
- Returns
- It returns a table of options or the value of a single option requested. They are only the configuration options, for example "enableGMCP" means that the "Enable GMCP" box is checked and does not mean that it has been negotiated with the server.
- Example
getConfig()
-- Suggest enabling GMCP if it is unchecked
if not getConfig("enableGMCP") then
echo("\nMy script works best with GMCP enabled. You may ")
cechoLink("<red>click here", function() setConfig("enableGMCP",true) echo("GMCP enabled\n") end, "Enable GMCP", true)
echo(" to enable it.\n")
endgetModulePath
- path = getModulePath(module name)
- Returns the location of a module on the disk. If the given name does not correspond to an installed module, it'll return
nil - See also: installModule()
- Example
getModulePath("mudlet-mapper")getModulePriority
- priority = getModulePriority(module name)
- Returns the priority of a module as an integer. This determines the order modules will be loaded in - default is 0. Useful if you have a module that depends on another module being loaded first, for example.
- Modules with priority
-1will be loaded before scripts (Mudlet 4.11+).
- See also: setModulePriority()
- Example
getModulePriority("mudlet-mapper")getModules
- getModules()
- Returns installed modules as table.
- See also: getPackages
- Example
--Check if the module myTabChat is installed and if it isn't install it and enable sync on it
if not table.contains(getModules(),"myTabChat") then
installModule(getMudletHomeDir().."/modules/myTabChat.xml")
enableModuleSync("myTabChat")
endgetModuleInfo
- getModuleInfo(moduleName, [info])
- Returns table with meta information for a package
- Parameters
- moduleName:
- Name of the package
- info:
- (optional) specific info wanted to get, if not given all available meta-info is returned
- See also: getPackageInfo, setModuleInfo
- Example
getModuleInfo("myModule","author")getModuleSync
- getModuleSync(name)
- returns false if module sync is not active, true if it is active and nil if module is not found.
- Parameter
- name: name of the module
- See also: enableModuleSync(), disableModuleSync()
getMudletHomeDir
- getMudletHomeDir()
- Returns the current home directory of the current profile. This can be used to store data, save statistical information, or load resource files from packages.
![]() Note: intentionally uses forward slashes
Note: intentionally uses forward slashes / as separators on Windows since stylesheets require them.
- Example
-- save a table
table.save(getMudletHomeDir().."/myinfo.dat", myinfo)
-- or access package data. The forward slash works even on Windows fine
local path = getMudletHomeDir().."/mypackagename"getMudletInfo
- getMudletInfo()
- Prints debugging information about the Mudlet that you're running - this can come in handy for diagnostics.
Don't use this command in your scripts to find out if certain features are supported in Mudlet - there are better functions available for this.
- Example
getMudletInfo()getMudletVersion
- getMudletVersion(style)
- Returns the current Mudlet version. Note that you shouldn't hardcode against a specific Mudlet version if you'd like to see if a function is present - instead, check for the existence of the function itself. Otherwise, checking for the version can come in handy if you'd like to test for a broken function or so on.
See also: mudletOlderThan()
- Parameters
- style:
- (optional) allows you to choose what you'd like returned. By default, if you don't specify it, a key-value table with all the values will be returned: major version, minor version, revision number and the optional build name.
- Values you can choose
- "string":
- Returns the full Mudlet version as text.
- "table":
- Returns the full Mudlet version as four values (multi-return)
- "major":
- Returns the major version number (the first one).
- "minor":
- Returns the minor version number (the second one).
- "revision":
- Returns the revision version number (the third one).
- "build":
- Returns the build of Mudlet (the ending suffix, if any).
- Example
-- see the full Mudlet version as text:
getMudletVersion("string")
-- returns for example "3.0.0-alpha"
-- check that the major Mudlet version is at least 3:
if getMudletVersion("major") >= 3 then echo("You're running on Mudlet 3+!") end
-- but mudletOlderThan() is much better for this:
if mudletOlderThan(3) then echo("You're running on Mudlet 3+!") end
-- if you'd like to see if a function is available however, test for it explicitly instead:
if setAppStyleSheet then
-- example credit to http://qt-project.org/doc/qt-4.8/stylesheet-examples.html#customizing-qscrollbar
setAppStyleSheet[[
QScrollBar:vertical {
border: 2px solid grey;
background: #32CC99;
width: 15px;
margin: 22px 0 22px 0;
}
QScrollBar::handle:vertical {
background: white;
min-height: 20px;
}
QScrollBar::add-line:vertical {
border: 2px solid grey;
background: #32CC99;
height: 20px;
subcontrol-position: bottom;
subcontrol-origin: margin;
}
QScrollBar::sub-line:vertical {
border: 2px solid grey;
background: #32CC99;
height: 20px;
subcontrol-position: top;
subcontrol-origin: margin;
}
QScrollBar::up-arrow:vertical, QScrollBar::down-arrow:vertical {
border: 2px solid grey;
width: 3px;
height: 3px;
background: white;
}
QScrollBar::add-page:vertical, QScrollBar::sub-page:vertical {
background: none;
}
]]
endgetNewIDManager
- getNewIDManager()
- Returns an IDManager object, for manager your own set of named events and timers isolated from the rest of the profile.
![]() Note: Full IDManager usage can be found at IDManager
Note: Full IDManager usage can be found at IDManager
- Returns
- an IDManager for managing your own named events and timers
- Example
demonnic = demonnic or {}
demonnic.IDManager = getNewIDManager()
local idm = demonnic.IDManager
-- assumes you have defined demonnic.vitalsUpdate and demonnic.balanceChecker as functions
idm:registerEvent("DemonVitals", "gmcp.Char.Vitals", demonnic.vitalsUpdate)
idm:registerTimer("Balance Check", 1, demonnic.balanceChecker)
idm:stopEvent("DemonVitals")getNamedEventHandlers
- handlers = getNamedEventHandlers(userName)
- Returns a list of all userName's named event handlers' names as a table.
- See also
- registerNamedEventHandler()
- Parameters
- userName:
- The user name the event handler was registered under.
- Returns
- a table of handler names. { "DemonVitals", "DemonInv" } for example. {} if none are registered
- Example
local handlers = getNamedEventHandlers()
display(handlers)
-- {}
registerNamedEventHandler("Test1", "testEvent", "testFunction")
registerNamedEventHandler("Test2", "someOtherEvent", myHandlerFunction)
handlers = getNamedEventHandlers()
display(handlers)
-- { "Test1", "Test2" }getOS
- getOS()
- Returns the name of the Operating System (OS). Useful for applying particular scripts only under particular operating systems, such as applying a stylesheet only when the OS is Windows.
- Returned text will be one of these: "windows", "mac", "linux", as well as "cygwin", "hurd", "freebsd", "kfreebsd", "openbsd", "netbsd", "bsd4", "unix" or "unknown" otherwise.
- Additionally returns the version of the OS, and if using Linux, the distribution in use (as of Mudlet 4.12+).
- Example
display(getOS())
if getOS() == "windows" then
echo("\nWindows OS detected.\n")
else
echo("\nDetected Operating system is NOT windows.\n")
end
if mudlet.supports.osVersion then
local os, osversion = getOS()
print(f"Running {os} {osversion}")
endgetPackages
- getPackages()
- Returns installed packages as table.
- See also: getModules
- Example
--Check if the generic_mapper package is installed and if so uninstall it
if table.contains(getPackages(),"generic_mapper") then
uninstallPackage("generic_mapper")
endgetPackageInfo
- getPackageInfo(packageName, [info])
- Returns table with meta information for a package
- Parameters
- packageName:
- Name of the package
- info:
- (optional) specific info wanted to get, if not given all available meta-info is returned
- See also: getModuleInfo, setPackageInfo
- Example
getPackageInfo("myPackage", "version")getProfileName
- getProfileName()
- Returns the name of the profile. Useful when combined with raiseGlobalEvent() to know which profile a global event came from.
- Example
-- if connected to the Achaea profile, will print Achaea to the main console
echo(getProfileName())getCommandSeparator
- getCommandSeparator()
- Returns the command separator in use by the profile.
- Example
-- if your command separator is ;;, the following would send("do thing 1;;do thing 2").
-- This way you can determine what it is set to and use that and share this script with
-- someone who has changed their command separator.
-- Note: This is not really the preferred way to send this, using sendAll("do thing 1", "do thing 2") is,
-- but this illustates the use case.
local s = getCommandSeparator()
expandAlias("do thing 1" .. s .. "do thing 2")getServerEncoding
- getServerEncoding()
- Returns the current server data encoding in use.
- See also: setServerEncoding(), getServerEncodingsList()
- Example
getServerEncoding()getServerEncodingsList
- getServerEncodingsList()
- Returns an indexed list of the server data encodings that Mudlet knows. This is not the list of encodings the servers knows - there's unfortunately no agreed standard for checking that. See encodings in Mudlet for the list of which encodings are available in which Mudlet version.
- See also: setServerEncoding(), getServerEncoding()
- Example
-- check if UTF-8 is available:
if table.contains(getServerEncodingsList(), "UTF-8") then
print("UTF-8 is available!")
endgetWindowsCodepage
- getWindowsCodepage()
- Returns the current codepage of your Windows system.
![]() Note: This function only works on Windows - It is only needed internally in Mudlet to enable Lua to work with non-ASCII usernames (e.g. Iksiński, Jäger) for the purposes of IO. Linux and macOS work fine with with these out of the box.
Note: This function only works on Windows - It is only needed internally in Mudlet to enable Lua to work with non-ASCII usernames (e.g. Iksiński, Jäger) for the purposes of IO. Linux and macOS work fine with with these out of the box.
- Example
print(getWindowsCodepage())hfeedTriggers
- hfeedTriggers(str)
- Like feedTriggers, but you can add color information using #RRGGBB in hex, similar to hecho.
- Parameters
- str: The string to feed to the trigger engine. Include color information in the same manner as hecho.
- See also: dfeedTriggers
- See also: hecho
- Example
hfeedTriggers("#008000,800000green on red#r reset\n")installModule
- installModule(location)
- Installs a Mudlet XML, zip, or mpackage as a module.
- Parameters
- location:
- Exact location of the file install.
- Example
installModule([[C:\Documents and Settings\bub\Desktop\myalias.xml]])installPackage
- installPackage(location or url)
- Installs a Mudlet XML or package. Since Mudlet 4.11+ returns
trueif it worked, orfalse.
- Parameters
- location:
- Exact location of the xml or package to install.
Since Mudlet 4.11+ it is possible to pass download link to a package (must start with http or https and end with .xml, .zip, .mpackage or .trigger)
- See also: uninstallPackage()
- Example
installPackage([[C:\Documents and Settings\bub\Desktop\myalias.xml]])installPackage([[https://github.com/Mudlet/Mudlet/blob/development/src/run-lua-code-v4.xml]])killAnonymousEventHandler
- killAnonymousEventHandler(handler id)
- Disables and removes the given event handler.
- Parameters
- handler id
- ID of the event handler to remove as returned by the registerAnonymousEventHandler function.
- See also: registerAnonymousEventHandler
- Example
-- registers an event handler that prints the first 5 GMCP events and then terminates itself
local counter = 0
local handlerId = registerAnonymousEventHandler("gmcp", function(_, origEvent)
print(origEvent)
counter = counter + 1
if counter == 5 then
killAnonymousEventHandler(handlerId)
end
end)loadMusicFile
- loadMusicFile(settings table) or loadMusicFile(name, [url])
- Loads music files from the Internet or the local file system to the "media" folder of the profile for later use with playMusicFile() and stopMusic(). Although files could be loaded directly at playing time from playMusicFile(), loadMusicFile() provides the advantage of loading files in advance.
| Required | Key | Value | Purpose |
|---|---|---|---|
| Yes | name | <file name> |
|
| Maybe | url | <url> |
|
See also: loadSoundFile(), playMusicFile(), playSoundFile(), stopMusic(), stopSounds(), purgeMediaCache(), Mud Client Media Protocol
- Example
---- Table Parameter Syntax ----
-- Download from the Internet
loadMusicFile({
name = "167124__patricia-mcmillen__rugby-club-in-spain.mp3"
, url = "https://raw.githubusercontent.com/StickMUD/StickMUDSounds/master/sounds/"
})
-- OR download from the profile
loadMusicFile({name = getMudletHomeDir().. "/167124__patricia-mcmillen__rugby-club-in-spain.mp3"})
-- OR download from the local file system
loadMusicFile({name = "C:/Users/Tamarindo/Documents/167124__patricia-mcmillen__rugby-club-in-spain.mp3"})---- Ordered Parameter Syntax of loadMusicFile(name[, url]) ----
-- Download from the Internet
loadMusicFile(
"167124__patricia-mcmillen__rugby-club-in-spain.mp3"
, "https://raw.githubusercontent.com/StickMUD/StickMUDSounds/master/sounds/"
)
-- OR download from the profile
loadMusicFile(getMudletHomeDir().. "/167124__patricia-mcmillen__rugby-club-in-spain.mp3")
-- OR download from the local file system
loadMusicFile("C:/Users/Tamarindo/Documents/167124__patricia-mcmillen__rugby-club-in-spain.mp3")loadSoundFile
- loadSoundFile(settings table) or loadSoundFile(name, [url])
- Loads sound files from the Internet or the local file system to the "media" folder of the profile for later use with playSoundFile() and stopSounds(). Although files could be loaded directly at playing time from playSoundFile(), loadSoundFile() provides the advantage of loading files in advance.
| Required | Key | Value | Purpose |
|---|---|---|---|
| Yes | name | <file name> |
|
| Maybe | url | <url> |
|
See also: loadMusicFile(), playMusicFile(), playSoundFile(), stopMusic(), stopSounds(), purgeMediaCache(), Mud Client Media Protocol
- Example
---- Table Parameter Syntax ----
-- Download from the Internet
loadSoundFile({
name = "cow.wav"
, url = "https://raw.githubusercontent.com/StickMUD/StickMUDSounds/master/sounds/"
})
-- OR download from the profile
loadSoundFile({name = getMudletHomeDir().. "/cow.wav"})
-- OR download from the local file system
loadSoundFile({name = "C:/Users/Tamarindo/Documents/cow.wav"})---- Ordered Parameter Syntax of loadSoundFile(name[,url]) ----
-- Download from the Internet
loadSoundFile("cow.wav", "https://raw.githubusercontent.com/StickMUD/StickMUDSounds/master/sounds/")
-- OR download from the profile
loadSoundFile(getMudletHomeDir().. "/cow.wav")
-- OR download from the local file system
loadSoundFile("C:/Users/Tamarindo/Documents/cow.wav")mudletOlderThan
- mudletOlderThan(major, [minor], [patch])
- Returns true if Mudlet is older than the given version to check. This is useful if you'd like to use a feature that you can't check for easily, such as coroutines support. However, if you'd like to check if a certain function exists, do not use this and use
if mudletfunction then- it'll be much more readable and reliable.
See also: getMudletVersion()
- Parameters
- major:
- Mudlet major version to check. Given a Mudlet version 3.0.1, 3 is the major version, second 0 is the minor version, and third 1 is the patch version.
- minor:
- (optional) minor version to check.
- patch:
- (optional) patch version to check.
- Example
-- stop doing the script of Mudlet is older than 3.2
if mudletOlderThan(3,2) then return end
-- or older than 2.1.3
if mudletOlderThan(2, 1, 3) then return end
-- however, if you'd like to check that a certain function is available, like getMousePosition(), do this instead:
if not getMousePosition then return end
-- if you'd like to check that coroutines are supported, do this instead:
if not mudlet.supportscoroutines then return endopenWebPage
- openWebPage(URL)
- Opens the browser to the given webpage.
- Parameters
- URL:
- Exact URL to open.
- Example
openWebPage("http://google.com")Note: This function can be used to open a local file or file folder as well by using "file:///" and the file path instead of "http://".
- Example
openWebPage("file:///"..getMudletHomeDir().."file.txt")playMusicFile
- playMusicFile(settings table)
- Plays music files from the Internet or the local file system to the "media" folder of the profile for later use with stopMusic().
| Required | Key | Value | Default | Purpose |
|---|---|---|---|---|
| Yes | name | <file name> |
| |
| No | volume | 1 to 100 | 50 |
|
| No | fadein | <msec> |
| |
| No | fadeout | <msec> |
| |
| No | start | <msec> | 0 |
|
| No | loops | -1, or >= 1 | 1 |
|
| No | key | <key> |
| |
| No | tag | <tag> |
| |
| No | continue | true or false | true |
|
| Maybe | url | <url> |
|
See also: loadMusicFile(), loadSoundFile(), playSoundFile(), stopMusic(), stopSounds(), purgeMediaCache(), Mud Client Media Protocol
![]() Note: on Windows and certain files are not playing? Try installing the 3rd party K-lite codec pack.
Note: on Windows and certain files are not playing? Try installing the 3rd party K-lite codec pack.
- Example
---- Table Parameter Syntax ----
-- Play a music file stored in the profile's media directory (i.e. /Users/Tamarindo/mudlet-data/profiles/StickMUD/media)
playMusicFile({
name = "167124__patricia-mcmillen__rugby-club-in-spain.mp3"
})
-- OR copy once from the game's profile, and play a music file stored in the profile's media directory
---- [volume] of 75 (1 to 100)
playMusicFile({
name = getMudletHomeDir().. "/167124__patricia-mcmillen__rugby-club-in-spain.mp3"
, volume = 75
})
-- OR copy once from the local file system, and play a music file stored in the profile's media directory
---- [volume] of 75 (1 to 100)
playMusicFile({
name = "C:/Users/Tamarindo/Documents/167124__patricia-mcmillen__rugby-club-in-spain.mp3"
, volume = 75
})
-- OR download once from the Internet, and play music stored in the profile's media directory
---- [fadein] and increase the volume from 1 at the start position to default volume up until the position of 20 seconds
---- [fadeout] and decrease the volume from default volume to one, 53 seconds from the end of the music
---- [start] 10 seconds after position 0 (fadein scales its volume increase over a shorter duration, too)
---- [key] reference of "rugby" for stopping this unique music later
---- [tag] reference of "ambience" to stop and music later with the same tag
---- [continue] playing this music if another request for the same music comes in (false restarts it)
---- [url] to download once from the Internet if the music does not exist in the profile's media directory
playMusicFile({
name = "167124__patricia-mcmillen__rugby-club-in-spain.mp3"
, volume = nil -- nil lines are optional, no need to use
, fadein = 20000
, fadeout = 53000
, start = 10000
, loops = nil -- nil lines are optional, no need to use
, key = "rugby"
, tag = "ambience"
, continue = true
, url = "https://raw.githubusercontent.com/StickMUD/StickMUDSounds/master/sounds/"
})---- Ordered Parameter Syntax of playMusicFile(name[,volume][,fadein][,fadeout][,loops][,key][,tag][,continue][,url]) ----
-- Play a music file stored in the profile's media directory (i.e. /Users/Tamarindo/mudlet-data/profiles/StickMUD/media)
playMusicFile(
"167124__patricia-mcmillen__rugby-club-in-spain.mp3" -- name
)
-- OR copy once from the game's profile, and play a music file stored in the profile's media directory
---- [volume] of 75 (1 to 100)
playMusicFile(
getMudletHomeDir().. "/167124__patricia-mcmillen__rugby-club-in-spain.mp3" -- name
, 75 -- volume
)
-- OR copy once from the local file system, and play a music file stored in the profile's media directory
---- [volume] of 75 (1 to 100)
playMusicFile(
"C:/Users/Tamarindo/Documents/167124__patricia-mcmillen__rugby-club-in-spain.mp3" -- name
, 75 -- volume
)
-- OR download once from the Internet, and play music stored in the profile's media directory
---- [fadein] and increase the volume from 1 at the start position to default volume up until the position of 20 seconds
---- [fadeout] and decrease the volume from default volume to one, 53 seconds from the end of the music
---- [start] 10 seconds after position 0 (fadein scales its volume increase over a shorter duration, too)
---- [key] reference of "rugby" for stopping this unique music later
---- [tag] reference of "ambience" to stop and music later with the same tag
---- [continue] playing this music if another request for the same music comes in (false restarts it)
---- [url] to download once from the Internet if the music does not exist in the profile's media directory
playMusicFile(
"167124__patricia-mcmillen__rugby-club-in-spain.mp3" -- name
, nil -- volume
, 20000 -- fadein
, 53000 -- fadeout
, 10000 -- start
, nil -- loops
, "rugby" -- key
, "ambience" -- tag
, true -- continue
, "https://raw.githubusercontent.com/StickMUD/StickMUDSounds/master/sounds/" -- url
)playSoundFile
- playSoundFile(settings table)
- Plays sound files from the Internet or the local file system to the "media" folder of the profile for later use with stopSounds().
| Required | Key | Value | Default | Purpose |
|---|---|---|---|---|
| Yes | name | <file name> |
| |
| No | volume | 1 to 100 | 50 |
|
| No | fadein | <msec> |
| |
| No | fadeout | <msec> |
| |
| No | start | <msec> | 0 |
|
| No | loops | -1, or >= 1 | 1 |
|
| No | key | <key> |
| |
| No | tag | <tag> |
| |
| No | priority | 1 to 100 |
| |
| Maybe | url | <url> |
|
See also: loadMusicFile(), loadSoundFile(), playMusicFile(), stopMusic(), stopSounds(), purgeMediaCache(), Mud Client Media Protocol
![]() Note: on Windows and certain files are not playing? Try installing the 3rd party K-lite codec pack.
Note: on Windows and certain files are not playing? Try installing the 3rd party K-lite codec pack.
- Example
---- Table Parameter Syntax ----
-- Play a sound file stored in the profile's media directory (i.e. /Users/Tamarindo/mudlet-data/profiles/StickMUD/media)
playSoundFile({
name = "cow.wav"
})
-- OR copy once from the game's profile, and play a sound file stored in the profile's media directory
---- [volume] of 75 (1 to 100)
playSoundFile({
name = getMudletHomeDir().. "/cow.wav"
, volume = 75
})
-- OR copy once from the local file system, and play a sound file stored in the profile's media directory
---- [volume] of 75 (1 to 100)
playSoundFile({
name = "C:/Users/Tamarindo/Documents/cow.wav"
, volume = 75
})
-- OR download once from the Internet, and play a sound stored in the profile's media directory
---- [volume] of 75
---- [loops] of 2 (-1 for indefinite repeats, 1+ for finite repeats)
---- [key] reference of "cow" for stopping this unique sound later
---- [tag] reference of "animals" to stop a group of sounds later with the same tag
---- [priority] of 25 (1 to 100, 50 default, a sound with a higher priority would stop this one)
---- [url] to download once from the Internet if the sound does not exist in the profile's media directory
playSoundFile({
name = "cow.wav"
, volume = 75
, fadein = nil -- nil lines are optional, no need to use
, fadeout = nil -- nil lines are optional, no need to use
, start = nil -- nil lines are optional, no need to use
, loops = 2
, key = "cow"
, tag = "animals"
, priority = 25
, url = "https://raw.githubusercontent.com/StickMUD/StickMUDSounds/master/sounds/"
})---- Ordered Parameter Syntax of playSoundFile(name[,volume][,fadein][,fadeout][,loops][,key][,tag][,priority][,url]) ----
-- Play a sound file stored in the profile's media directory (i.e. /Users/Tamarindo/mudlet-data/profiles/StickMUD/media)
playSoundFile(
"cow.wav" -- name
)
-- OR copy once from the game's profile, and play a sound file stored in the profile's media directory
---- [volume] of 75 (1 to 100)
playSoundFile(
getMudletHomeDir().. "/cow.wav" -- name
, 75 -- volume
)
-- OR copy once from the local file system, and play a sound file stored in the profile's media directory
---- [volume] of 75 (1 to 100)
playSoundFile(
"C:/Users/Tamarindo/Documents/cow.wav" -- name
, 75 -- volume
)
-- OR download once from the Internet, and play a sound stored in the profile's media directory
---- [volume] of 75
---- [loops] of 2 (-1 for indefinite repeats, 1+ for finite repeats)
---- [key] reference of "cow" for stopping this unique sound later
---- [tag] reference of "animals" to stop a group of sounds later with the same tag
---- [priority] of 25 (1 to 100, 50 default, a sound with a higher priority would stop this one)
---- [url] to download once from the Internet if the sound does not exist in the profile's media directory
playSoundFile(
"cow.wav" -- name
, 75 -- volume
, nil -- fadein
, nil -- fadeout
, nil -- start
, 2 -- loops
, "cow" -- key
, "animals" -- tag
, 25 -- priority
, "https://raw.githubusercontent.com/StickMUD/StickMUDSounds/master/sounds/" -- url
)purgeMediaCache
- purgeMediaCache()
- Purge all media file stored in the media cache within a given Mudlet profile (media used with MCMP and MSP protocols). As game developers update the media files on their games, this enables the media folder inside the profile to be cleared so that the media files could be refreshed to the latest update(s).
- Guidance
- Instruct a player to type lua purgeMediaCache() on the command line, or
- Distribute a trigger, button or other scriptable feature for the given profile to call purgeMediaCache()
- See also: Supported Protocols MSP, Scripting MCMP
receiveMSP
- receiveMSP(command)
- Receives a well-formed Mud Sound Protocol (MSP) message to be processed by the Mudlet client. Reference the Supported Protocols MSP manual for more information on about what can be sent and example triggers.
- See also: Supported Protocols MSP
- Example
--Play a cow.wav media file stored in the media folder of the current profile. The sound would play twice at a normal volume.
receiveMSP("!!SOUND(cow.wav L=2 V=50)")
--Stop any SOUND media files playing stored in the media folder of the current profile.
receiveMSP("!!SOUND(Off)")
--Play a city.mp3 media file stored in the media folder of the current profile. The music would play once at a low volume.
--The music would continue playing if it was triggered earlier by another room, perhaps in the same area.
receiveMSP([[!!MUSIC(city.mp3 L=1 V=25 C=1)]])
--Stop any MUSIC media files playing stored in the media folder of the current profile.
receiveMSP("!!MUSIC(Off)")registerAnonymousEventHandler
- registerAnonymousEventHandler(event name, functionReference, [one shot])
- Registers a function to an event handler, not requiring you to set one up via script. See here for a list of Mudlet-raised events. The function may be refered to either by name as a string containing a global function name, or with the lua function object itself.
- The optional
one shotparameter allows you to automatically kill an event handler after it is done by giving a true value. If the event you waited for did not occur yet, returntruefrom the function to keep it registered.
- The function returns an ID that can be used in killAnonymousEventHandler() to unregister the handler again.
- If you use an asterisk ("*") as the event name, your code will capture all events. Useful for debugging, or integration with external programs.
![]() Note: The ability to refer lua functions directly, the
Note: The ability to refer lua functions directly, the one shot parameter and the returned ID are features of Mudlet 3.5 and above.
![]() Note: The "*" all-events capture was added in Mudlet 4.10.
Note: The "*" all-events capture was added in Mudlet 4.10.
- Example
-- example taken from the God Wars 2 (http://godwars2.org) Mudlet UI - forces the window to keep to a certain size
function keepStaticSize()
setMainWindowSize(1280,720)
end -- keepStaticSize
if keepStaticSizeEventHandlerID then killAnonymousEventHandler(keepStaticSizeEventHandlerID) end -- clean up any already registered handlers for this function
keepStatisSizeEventHandlerID = registerAnonymousEventHandler("sysWindowResizeEvent", "keepStaticSize") -- register the event handler and save the ID for later killing-- simple inventory tracker for GMCP enabled games. This version does not leak any of the methods
-- or tables into the global namespace. If you want to access it, you should export the inventory
-- table via an own namespace.
local inventory = {}
local function inventoryAdd()
if gmcp.Char.Items.Add.location == "inv" then
inventory[#inventory + 1] = table.deepcopy(gmcp.Char.Items.Add.item)
end
end
if inventoryAddHandlerID then killAnonymousEventHandler(inventoryAddHandlerID) end -- clean up any already registered handlers for this function
inventoryAddHandlerID = registerAnonymousEventHandler("gmcp.Char.Items.Add", inventoryAdd) -- register the event handler and save the ID for later killing
local function inventoryList()
if gmcp.Char.Items.List.location == "inv" then
inventory = table.deepcopy(gmcp.Char.Items.List.items)
end
end
if inventoryListHandlerID then killAnonymousEventHandler(inventoryListHandlerID) end -- clean up any already registered handlers for this function
inventoryListHandlerID = registerAnonymousEventHandler("gmcp.Char.Items.List", inventoryList) -- register the event handler and save the ID for later killing
local function inventoryUpdate()
if gmcp.Char.Items.Remove.location == "inv" then
local found
local updatedItem = gmcp.Char.Items.Update.item
for index, item in ipairs(inventory) do
if item.id == updatedItem.id then
found = index
break
end
end
if found then
inventory[found] = table.deepcopy(updatedItem)
end
end
end
if inventoryUpdateHandlerID then killAnonymousEventHandler(inventoryUpdateHandlerID) end -- clean up any already registered handlers for this function
inventoryUpdateHandlerID = registerAnonymousEventHandler("gmcp.Char.Items.Update", inventoryUpdate)
local function inventoryRemove()
if gmcp.Char.Items.Remove.location == "inv" then
local found
local removedItem = gmcp.Char.Items.Remove.item
for index, item in ipairs(inventory) do
if item.id == removedItem.id then
found = index
break
end
end
if found then
table.remove(inventory, found)
end
end
end
if inventoryRemoveHandlerID then killAnonymousEventHandler(inventoryRemoveHandlerID) end -- clean up any already registered handlers for this function
inventoryRemoveHandlerID = registerAnonymousEventHandler("gmcp.Char.Items.Remove", inventoryRemove)-- downloads a package from the internet and kills itself after it is installed.
local saveto = getMudletHomeDir().."/dark-theme-mudlet.zip"
local url = "http://www.mudlet.org/wp-content/files/dark-theme-mudlet.zip"
if myPackageInstallHandler then killAnonymousEventHandler(myPackageInstallHandler) end
myPackageInstallHandler = registerAnonymousEventHandler(
"sysDownloadDone",
function(_, filename)
if filename ~= saveto then
return true -- keep the event handler since this was not our file
end
installPackage(saveto)
os.remove(b)
end,
true
)
downloadFile(saveto, url)
cecho("<white>Downloading <green>"..url.."<white> to <green>"..saveto.."\n")registerNamedEventHandler
- success = registerNamedEventHandler(userName, handlerName, eventName, functionReference, [oneShot])
- Registers a named event handler with name handlerName. Named event handlers are protected from duplication and can be stopped and resumed, unlike anonymous event handlers. A separate list is kept per userName
- See also
- registerAnonymousEventHandler(), stopNamedEventHandler(), resumeNamedEventHandler(), deleteNamedEventHandler(), registerNamedTimer()
- Parameters
- userName:
- The user name the event handler was registered under.
- handlerName:
- The name of the handler. Used to reference the handler in other functions and prevent duplicates. Recommended you use descriptive names, "hp" is likely to collide with something else, "DemonVitals" less so.
- eventName:
- The name of the event the handler responds to. See here for a list of Mudlet-raised events.
- functionReference:
- The function reference to run when the event comes in. Can be the name of a function, "handlerFuncion", or the lua function itself.
- oneShot:
- (optional) if true, the event handler will only fire once when the event is raised. If you need to extend a one shot event handler for "one more check" you can have the handler return true, and it will keep firing until the function does not return true.
- Returns
- true if successful, otherwise errors.
- Example
-- register a named event handler. Will call demonVitalsHandler(eventName, ...) when gmcp.Char.Vitals is raised.
local ok = registerNamedEventHandler("Demonnic", "DemonVitals", "gmcp.Char.Vitals", "demonVitalsHandler")
if ok then
cecho("Vitals handler switched to demonVitalsHandler")
end
-- something changes later, and we want to handle vitals with another function, demonBlackoutHandler()
-- note we do not use "" around demonBlackoutHandler but instead pass the function itself. Both work.
-- using the same handlerName ("DemonVitals") means it will automatically unregister the old handler
-- and reregister it using the new information.
local ok = registerNamedEventHandler("Demonnic", "DemonVitals", "gmcp.Char.Vitals", demonBlackoutHandler)
if ok then
cecho("Vitals handler switched to demonBlackoutHandler")
end
-- Now you want to check your inventory, but you only want to do it once, so you pass the optional oneShot as true
local function handleInv()
local list = gmcp.Char.Items.List
if list.location ~= "inventory" then
return true -- if list.location is, say "room" then we need to keep responding until it's "inventory"
end
display(list.items) -- you would probably store values and update displays or something, but here I'll just show the data as it comes in
end
-- you can ignore the response from registerNamedEventHandler if you want, it's always going to be true
-- unless there is an error, in which case it throws the error and halts execution anyway. The return is
-- in part for feedback when using the lua alias or other REPL window.
registerNamedEventHandler("Demonnic", "DemonInvCheck", "gmcp.Char.Items.List", handleInv, true)reloadModule
- reloadModule(module name)
- Reload a module (by uninstalling and reinstalling).
- See also: installModule(), uninstallModule()
- Example
reloadModule("3k-mapper")
removeFileWatch
- removeFileWatch(path)
- Remove file watch on directory or file. Every change in that file will no longer raise sysPathChanged event.
- See also: addFileWatch()
- Example
herbs = {}
local herbsPath = getMudletHomeDir() .. "/herbs.lua"
function herbsChangedHandler(_, path)
if path == herbsPath then
table.load(herbsPath, herbs)
removeFileWatch(herbsPath)
end
end
addFileWatch(herbsPath)
registerAnonymousEventHandler("sysPathChanged", "herbsChangedHandler")resetProfile
- resetProfile()
- Reloads your entire Mudlet profile - as if you've just opened it. All UI elements will be cleared, so this useful when you're coding your UI.
- Example
resetProfile()The function used to require input from the game to work, but as of Mudlet 3.20 that is no longer the case.
![]() Note: Don't put resetProfile() in the a script-item in the script editor as the script will be reloaded by resetProfile() as well better use
Note: Don't put resetProfile() in the a script-item in the script editor as the script will be reloaded by resetProfile() as well better use
lua resetProfile()in your commandline or make an Alias containing resetProfile().
resumeNamedEventHandler
- success = resumeNamedEventHandler(userName, handlerName)
- Resumes a named event handler with name handlerName and causes it to start firing once more.
- Parameters
- userName:
- The user name the event handler was registered under.
- handlerName:
- The name of the handler to resume. Same as used when you called registerNamedEventHandler()
- Returns
- true if successful, false if it didn't exist.
- Example
local resumed = resumeNamedEventHandler("Demonnic", "DemonVitals")
if resumed then
cecho("DemonVitals resumed!")
else
cecho("DemonVitals doesn't exist, cannot resume it")
endsaveProfile
- saveProfile(location)
- Saves the current Mudlet profile to disk, which is equivalent to pressing the "Save Profile" button.
- Parameters
- location:
- (optional) folder to save the profile to. If not given, the profile will go into the default location.
- Example
saveProfile()
-- save to the desktop on Windows:
saveProfile([[C:\Users\yourusername\Desktop]])sendSocket
- sendSocket(data)
- Sends given binary data as-is to the game. You can use this to implement support for a new telnet protocol, simultronics login or etcetera.
- Example
TN_IAC = 255
TN_WILL = 251
TN_DO = 253
TN_SB = 250
TN_SE = 240
TN_MSDP = 69
MSDP_VAL = 1
MSDP_VAR = 2
sendSocket( string.char( TN_IAC, TN_DO, TN_MSDP ) ) -- sends IAC DO MSDP
--sends: IAC SB MSDP MSDP_VAR "LIST" MSDP_VAL "COMMANDS" IAC SE
local msg = string.char( TN_IAC, TN_SB, TN_MSDP, MSDP_VAR ) .. " LIST " ..string.char( MSDP_VAL ) .. " COMMANDS " .. string.char( TN_IAC, TN_SE )
sendSocket( msg )![]() Note: Remember that should it be necessary to send the byte value of 255 as a data byte and not as the Telnet IAC value it is required to repeat it for Telnet to ignore it and not treat it as the latter.
Note: Remember that should it be necessary to send the byte value of 255 as a data byte and not as the Telnet IAC value it is required to repeat it for Telnet to ignore it and not treat it as the latter.
setConfig
- setConfig(option, value)
- Sets a Mudlet option to a certain value. This comes in handy for scripts that want to customise Mudlet settings to their preferences - for example, setting up mapper room and exit size to one that works for a certain map, or enabling MSDP for a certain game. For transparency reasons, the Debug window (when open) will show which options were modified by scripts.
- To set many options at once, pass in a table of options. More options will be added over time / per request.
- See also
- enableMapInfo(), disableMapInfo()
- Parameters
- option:
- Particular option to change - see list below for available ones.
- value:
- Value to set - can be a boolean, number, or text depending on the option.
| Option | Default | Description | Available in Mudlet |
|---|---|---|---|
| enableGMCP | true | Enable GMCP (Reconnect after changing) | 4.16 |
| enableMSDP | false | Enable MSDP (Reconnect after changing) | 4.16 |
| enableMSSP | true | Enable MSSP (Reconnect after changing) | 4.16 |
| enableMSP | true | Enable MSP (Reconnect after changing) | 4.16 |
| compactInputLine | false | Hide search, timestamp, other buttons and labels bottom-right of input line | 4.17 |
| Option | Default | Description | Available in Mudlet |
|---|---|---|---|
| inputLineStrictUnixEndings | false | Workaround option to use strict UNIX line endings for sending commands | 4.16 |
| Option | Default | Description | Available in Mudlet |
|---|---|---|---|
| fixUnnecessaryLinebreaks | false | Remove extra linebreaks from output (mostly for IRE servers) | 4.16 |
| Option | Default | Description | Available in Mudlet |
|---|---|---|---|
| mapRoomSize | 5 | Size of rooms on map (a good value is 5) | 4.16 |
| mapExitSize | 10 | Size of exits on map (a good value is 10) | 4.16 |
| mapRoundRooms | false | Draw rooms round or square | 4.16 |
| showRoomIdsOnMap | false | Show room IDs on all rooms (if zoom permits) | 4.16 |
| showMapInfo | - | Map overlay text ('Full', 'Short', or any custom made. Map can show multiple at once) | 4.16 |
| hideMapInfo | - | Map overlay text ('Full', 'Short', or any custom made. Hide each info separately to hide all) | 4.16 |
| show3dMapView | false | Show map as 3D | 4.16 |
| mapperPanelVisible | true | Map controls at the bottom | 4.16 |
| mapShowRoomBorders | true | Draw a thin border for every room | 4.16 |
| Option | Default | Description | Available in Mudlet |
|---|---|---|---|
| specialForceCompressionOff | false | Workaround option to disable MCCP compression, in case the game server is not working correctly | 4.16 |
| specialForceGAOff | false | Workaround option to disable Telnet Go-Ahead, in case the game server is not working correctly | 4.16 |
| specialForceCharsetNegotiationOff | false | Workaround option to disable automatically setting the correct encoding, in case the game server is not working correctly | 4.16 |
| specialForceMxpNegotiationOff | false | Workaround option to disable MXP, in case the game server is not working correctly | 4.16 |
| caretShortcut | "none" | For visually-impaired players - set the key to switch between input line and main window (can be "none", "tab", "ctrltab", "f6") | 4.17 |
| blankLinesBehaviour | "show" | For visually impaired players options for dealing with blank lines (can be "show", "hide", "replacewithspace") | 4.17 |
- Returns
- true if successful, or nil+msg if the option doesn't exist. Setting mapper options requires the mapper being open first.
- Example
setConfig("mapRoomSize", 5)
setConfig({mapRoomSize = 6, mapExitSize = 12})setMergeTables
- setMergeTables(module)
- Makes Mudlet merge the table of the given GMCP or MSDP module instead of overwriting the data. This is useful if the game sends only partial updates which need combining for the full data. By default "Char.Status" is the only merged module.
- Parameters
- module:
- Name(s) of the GMCP or MSDP module(s) that should be merged as a string - this will add it to the existing list.
- Example
setMergeTables("Char.Skills", "Char.Vitals")setModuleInfo
- setModuleInfo(moduleName, info, value)
- Sets a specific meta info value for a module
- Parameters
- moduleName:
- Name of the module
- info:
- specific info to set (for example "version")
- value:
- specific value to set (for example "1.0")
- See also: getModuleInfo, getPackageInfo
- Example
setModuleInfo("myModule", "version", "1.0")setModulePriority
- setModulePriority(moduleName, priority)
- Sets the module priority on a given module as a number - the module priority determines the order modules are loaded in, which can be helpful if you have ones dependent on each other. This can also be set from the module manager window.
- Modules with priority
-1will be loaded before scripts (Mudlet 4.11+).
- See also: getModulePriority()
setModulePriority("mudlet-mapper", 1)setPackageInfo
- setPackageInfo(packageName, info, value)
- Sets a specific meta info value for a package
- Parameters
- packageName:
- Name of the module
- info:
- specific info to set (for example "version")
- value:
- specific value to set (for example "1.0")
- See also: getPackageInfo, setModuleInfo
- Example
setPackageInfo("myPackage", "title", "This is my test package")setServerEncoding
- setServerEncoding(encoding)
- Makes Mudlet use the specified encoding for communicating with the game.
- Parameters
- encoding:
- Encoding to use.
- See also: getServerEncodingsList(), getServerEncoding()
- Example
-- use UTF-8 if Mudlet knows it. Unfortunately there's no way to check if the game's server knows it too.
if table.contains(getServerEncodingsList(), "UTF-8") then
setServerEncoding("UTF-8")
endshowNotification
- showNotification(title, [content], [expiryTimeInSeconds])
- Shows a native (system) notification.
![]() Note: This might not work on all systems, this depends on the system.
Note: This might not work on all systems, this depends on the system.
- Parameters
- title - plain text notification title
- content - optional argument, plain text notification content, if omitted title argument will be used as content as well
- expiryTimeInSeconds - optional argument, sets expiration time in seconds for notification, very often ignored by OS
showNotification("Notification title", "Notification content", 5)spawn
- spawn(readFunction, processToSpawn[, ...arguments])
- Spawns a process and opens a communicatable link with it - read function is the function you'd like to use for reading output from the process, and t is a table containing functions specific to this connection - send(data), true/false = isRunning(), and close().
- This allows you to setup RPC communication with another process.
- Examples
-- simple example on a program that quits right away, but prints whatever it gets using the 'display' function
local f = spawn(display, "ls")
display(f.isRunning())
f.close()local f = spawn(display, "ls", "-la")
display(f.isRunning())
f.close()startLogging
- startLogging(state)
- Control logging of the main console text as text or HTML (as specified by the "Save log files in HTML format instead of plain text" setting on the "General" tab of the "Profile preferences" or "Settings" dialog). Despite being called startLogging it can also stop the process and correctly close the file being created. The file will have an extension of type ".txt" or ".html" as appropriate and the name will be in the form of a date/time "yyyy-MM-dd#hh-mm-ss" using the time/date of when logging started. Note that this control parallels the corresponding icon in the "bottom buttons" for the profile and that button can also start and stop the same logging process and will reflect the state as well.
- Parameters
- state:
- Required: logging state. Passed as a boolean
- Returns (4 values)
- successful (bool)
- true if the logging state actually changed; if, for instance, logging was already active and true was supplied then no change in logging state actually occurred and nil will be returned (and logging will continue).
- message (string)
- A displayable message given one of four messages depending on the current and previous logging states, this will include the file name except for the case when logging was not taking place and the supplied argument was also false.
- fileName (string)
- The log will be/is being written to the path/file name returned.
- code (number)
- A value indicating the response to the system to this instruction:
* 0 = logging has just stopped * 1 = logging has just started * -1 = logging was already in progress so no change in logging state * -2 = logging was already not in progress so no change in logging state
- Example
-- start logging
local success, message, filename, code = startLogging(true)
if code == 1 or code == -1 then print(f"Started logging to {filename}") end
-- stop logging
startLogging(false)stopAllNamedEventHandlers
- stopAllNamedEventHandlers(userName)
- Stops all named event handlers and prevents them from firing any more. Information is retained and handlers can be resumed.
- Parameter
- userName:
- The user name the event handler was registered under.
- Example
stopAllNamedEventHandlers() -- emergency stop situation, most likely.stopMusic
- stopMusic(settings table)
- Stop all music (no filter), or music that meets a combination of filters (name, key, and tag) intended to be paired with playMusicFile().
| Required | Key | Value | Purpose |
|---|---|---|---|
| No | name | <file name> |
|
| No | key | <key> |
|
| No | tag | <tag> |
|
See also: loadMusicFile(), loadSoundFile(), playMusicFile(), playSoundFile(), stopSounds(), purgeMediaCache(), Mud Client Media Protocol
- Example
---- Table Parameter Syntax ----
-- Stop all playing music files for this profile associated with the API
stopMusic()
-- Stop playing the rugby mp3 by name
stopMusic({name = "167124__patricia-mcmillen__rugby-club-in-spain.mp3"})
-- Stop playing the unique sound identified as "rugby"
stopMusic({
name = nil -- nil lines are optional, no need to use
, key = "rugby" -- key
, tag = nil -- nil lines are optional, no need to use
})---- Ordered Parameter Syntax of stopMusic([name][,key][,tag]) ----
-- Stop all playing music files for this profile associated with the API
stopMusic()
-- Stop playing the rugby mp3 by name
stopMusic("167124__patricia-mcmillen__rugby-club-in-spain.mp3")
-- Stop playing the unique sound identified as "rugby"
stopMusic(
nil -- name
, "rugby" -- key
, nil -- tag
)stopNamedEventHandler
- success = stopNamedEventHandler(userName, handlerName)
- Stops a named event handler with name handlerName and prevents it from firing any more. Information is stored so it can be resumed later if desired.
- Parameters
- userName:
- The user name the event handler was registered under.
- handlerName:
- The name of the handler to stop. Same as used when you called registerNamedEventHandler()
- Returns
- true if successful, false if it didn't exist or was already stopped
- Example
local stopped = stopNamedEventHandler("DemonVitals")
if stopped then
cecho("DemonVitals stopped!")
else
cecho("DemonVitals doesn't exist or already stopped; either way it won't fire any more.")
endstopSounds
- stopSounds(settings table)
- Stop all sounds (no filter), or sounds that meets a combination of filters (name, key, tag, and priority) intended to be paired with playSoundFile().
| Required | Key | Value | Purpose |
|---|---|---|---|
| No | name | <file name> |
|
| No | key | <key> |
|
| No | tag | <tag> |
|
| No | priority | 1 to 100 |
|
See also: loadMusicFile(), loadSoundFile(), playMusicFile(), playSoundFile(), stopMusic(), purgeMediaCache(), Mud Client Media Protocol
- Example
---- Table Parameter Syntax ----
-- Stop all playing sound files for this profile associated with the API
stopSounds()
-- Stop playing the cow sound
stopSounds({name = "cow.wav"})
-- Stop playing any sounds tagged as "animals" with a priority less than or equal to 50
---- This would not stop sounds tagged as "animals" greater than priority 50. This is an "AND" and not an "OR".
stopSounds({
name = nil -- nil lines are optional, no need to use
, key = nil -- nil lines are optional, no need to use
, tag = "animals"
, priority = 50
})---- Ordered Parameter Syntax of stopSounds([name][,key][,tag][,priority]) ----
-- Stop all playing sound files for this profile associated with the API
stopSounds()
-- Stop playing the cow sound
stopSounds("cow.wav")
-- Stop playing any sounds tagged as "animals" with a priority less than or equal to 50
---- This would not stop sounds tagged as "animals" greater than priority 50. This is an "AND" and not an "OR".
stopSounds(
nil -- name
, nil -- key
, "animals" -- tag
, 50 -- priority
)timeframe
- timeframe(vname, true_time, nil_time, ...)
- A utility function that helps you change and track variable states without using a lot of tempTimers.
- Parameters
- vname:
- A string or function to use as the variable placeholder.
- true_time:
- Time before setting the variable to true. Can be a number or a table in the format:
{time, value}
- nil_time:
- (optional) Number of seconds until
vnameis set back to nil. Leaving it undefined will leave it at whatever it was set to last. Can be a number of a table in the format:{time, value}
- ...:
- (optional) Further list of times and values to set the variable to, in the following format:
{time, value}
- Example
-- sets the global 'limiter' variable to true immediately (see the 0) and back to nil in one second (that's the 1).
timeframe("limiter", 0, 1)
-- An angry variable 'giant' immediately set to "fee", followed every second after by "fi", "fo", and "fum" before being reset to nil at four seconds.
timeframe("giant", {0, "fee"}, 4, {1, "fi"}, {2, "fo"}, {3, "fum"})
-- sets the local 'width' variable to true immediately and back to nil in one second.
local width
timeframe(function(value) width = value end, 0, 1)translateTable
- translateTable(directions, [languagecode])
- Given a table of directions (such as
speedWalkDir), translates directions to another language for you. Right now, it can only translate it into the language of Mudlet's user interface - but let us know if you need more.
- Parameters
- directions:
- An indexed table of directions (eg.
{"sw", "w", "nw", "s"}).
- languagecode:
- (optional) Language code (eg
ru_RUorit_IT) - by default,mudlet.translations.interfacelanguageis used.
- Example
-- get the path from room 2 to room 5 and translate directions
if getPath(2, 5) then
speedWalkDir = translateTable(speedWalkDir)
print("Translated directions:")
display(speedWalkDir)uninstallModule
- uninstallModule(name)
- Uninstalls a Mudlet module with the given name.
- See also: installModule(), Event: sysLuaUninstallModule
- Example
uninstallModule("myalias")uninstallPackage
- uninstallPackage(name)
- Uninstalls a Mudlet package with the given name.
- See also: installPackage()
- Example
uninstallPackage("myalias")unzipAsync
- unzipAsync(path, location)
- Unzips the zip file at path, extracting the contents to the location provided. Returns true if it is able to start unzipping, or nil+message if it cannot.
Raises the sysUnzipDone event with the zip file location and location unzipped to as arguments if unzipping is successful, and sysUnzipError with the same arguments if it is not.
Do not use the unzip() function as it is synchronous and will impact Mudlet's performance (ie, freeze Mudlet while unzipping).
- Example
function handleUnzipEvents(event, ...)
local args = {...}
local zipName = args[1]
local unzipLocation = args[2]
if event == "sysUnzipDone" then
cecho(string.format("<green>Unzip successful! Unzipped %s to %s\n", zipName, unzipLocation))
elseif event == "sysUnzipError" then
cecho(string.format("<firebrick>Unzip failed! Tried to unzip %s to %s\n", zipName, unzipLocation))
end
end
if unzipSuccessHandler then killAnonymousEventHandler(unzipSuccessHandler) end
if unzipFailureHandler then killAnonymousEventHandler(unzipFailureHandler) end
unzipSuccessHandler = registerAnonymousEventHandler("sysUnzipDone", "handleUnzipEvents")
unzipFailureHandler = registerAnonymousEventHandler("sysUnzipError", "handleUnzipEvents")
--use the path to your zip file for this, not mine
local zipFileLocation = "/home/demonnic/Downloads/Junkyard_Orc.zip"
--directory to unzip to, it does not need to exist but you do need to be able to create it
local unzipLocation = "/home/demonnic/Downloads/Junkyard_Orcs"
unzipAsync(zipFileLocation, unzipLocation) -- this will work
unzipAsync(zipFileLocation .. "s", unzipLocation) --demonstrate error, will happen first because unzipping takes timeyajl.to_string
- yajl.to_string(data)
- Encodes a Lua table into JSON data and returns it as a string. This function is very efficient - if you need to encode into JSON, use this.
- Example
-- on IRE MUD games, you can send a GMCP request to request the skills in a particular skillset. Here's an example:
sendGMCP("Char.Skills.Get "..yajl.to_string{group = "combat"})
-- you can also use it to convert a Lua table into a string, so you can, for example, store it as room's userdata
local toserialize = yajl.to_string(continents)
setRoomUserData(1, "areaContinents", toserialize)
yajl.to_value
- yajl.to_value(data)
- Decodes JSON data (as a string) into a Lua table. This function is very efficient - if you need to dencode into JSON, use this.
- Example
-- given the serialization example above with yajl.to_string, you can deserialize room userdata back into a table
local tmp = getRoomUserData(1, "areaContinents")
if tmp == "" then return end
local continents = yajl.to_value(tmp)
display(continents)
Mudlet Object Functions
Collection of functions to manipulate Mudlet's scripting objects - triggers, aliases, and so forth.
addCmdLineSuggestion
- addCmdLineSuggestion([name], suggestion)
- Add suggestion for tab completion for specified command line.
- For example, start typing he and hit TAB until help appears in command line.
- Non-word characters are skipped (this is the reason why they can't be added at start of suggestion), therefore it's also possible to type: /he and hit TAB.
- Parameters
- name: optional command line name, if skipped main command line will be used
- suggestion - suggestion as a single word to add to tab completion (only the following are allowed: 0-9A-Za-z_)
Example:
addCmdLineSuggestion("help")
local suggestions = {"Pneumonoultramicroscopicsilicovolcanoconiosis", "supercalifragilisticexpialidocious", "serendipitous"}
for _, suggestion in ipairs(suggestions) do
addCmdLineSuggestion(suggestion)
endadjustStopWatch
- adjustStopWatch(watchID/watchName, amount)
- Adjusts the elapsed time on the stopwatch forward or backwards by the amount of time. It will work even on stopwatches that are not running, and thus can be used to preset a newly created stopwatch with a negative amount so that it runs down from a negative time towards zero at the preset time.
- Parameters
- watchID (number) / watchName (string): The stopwatch ID you get with createStopWatch() or the name given to that function or later set with setStopWatchName().
- amount (decimal number): An amount in seconds to adjust the stopwatch by, positive amounts increase the recorded elapsed time.
- Returns
- true on success if the stopwatch was found and thus adjusted, or nil and an error message if not.
- Example
-- demo of a persistent stopWatch used to real time a mission
-- called with a positive number of seconds it will start a "missionStopWatch"
-- unless there already is one in which case it will instead report on
-- the deadline. use 'stopStopWatch("missionStopWatch")' when the mission
-- is done and 'deleteStopWatch("missionStopWatch")' when the existing mission
-- is to be disposed of. Until then repeated use of 'mission(interval)' will
-- just give updates...
function mission(time)
local missionTimeTable = missionTimeTable or {}
if createStopWatch("missionStopWatch") then
adjustStopWatch("missionStopWatch", -tonumber(time))
setStopWatchPersistence("missionStopWatch", true)
missionTimeTable = getStopWatchBrokenDownTime("missionStopWatch")
echo(string.format("Get cracking, you have %02i:%02i:%02i hg:m:s left.\n", missionTimeTable.hours, missionTimeTable.minutes, missionTimeTable.seconds))
startStopWatch("missionStopWatch")
else
-- it already exists, so instead report what is/was the time on it
--[=[ We know that the stop watch exists - we just need to find the ID
so we can get the running detail which is only available from the getStopWatches()
table and that is indexed by ID]=]
for k,v in pairs(getStopWatches()) do
if v.name == "missionStopWatch" then
missionTimeTable = v
end
end
if missionTimeTable.isRunning then
if missionTimeTable.elapsedTime.negative then
echo(string.format("Better hurry up, the clock is ticking on an existing mission and you only have %02i:%02i:%02i h:m:s left.\n", missionTimeTable.elapsedTime.hours, missionTimeTable.elapsedTime.minutes, missionTimeTable.elapsedTime.seconds))
else
echo(string.format("Bad news, you are past the deadline on an existing mission by %02i:%02i:%02i h:m:s !\n", missionTimeTable.elapsedTime.hours, missionTimeTable.elapsedTime.minutes, missionTimeTable.elapsedTime.seconds))
end
else
if missionTimeTable.elapsedTime.negative then
echo(string.format("Well done! You have already completed a mission %02i:%02i:%02i h:m:s before the deadline ...\n", missionTimeTable.elapsedTime.hours, missionTimeTable.elapsedTime.minutes, missionTimeTable.elapsedTime.seconds))
else
echo(string.format("Uh oh! You failed to meet the deadline on an existing mission by %02i:%02i:%02i h:m:s !\n", missionTimeTable.elapsedTime.hours, missionTimeTable.elapsedTime.minutes, missionTimeTable.elapsedTime.seconds))
end
end
end
end
-- in use:
lua mission(60*60)
Get cracking, you have 01:00:00 h:m:s left.
lua mission(60*60)
Better hurry up, the clock is ticking on an existing mission and you only have 00:59:52 h:m:s left.appendScript
- appendScript(scriptName, luaCode, [occurrence])
- Appends Lua code to the script "scriptName". If no occurrence given it sets the code of the first found script.
- See also: permScript(), enableScript(), disableScript(), getScript(), setScript()
- Returns
- a unique id number for that script.
- Parameters
- scriptName: name of the script
- luaCode: scripts luaCode to append
- occurence: (optional) the occurrence of the script in case you have many with the same name
- Example
-- an example of appending the script lua code to the first occurrence of "testscript"
appendScript("testscript", [[echo("This is a test\n")]], 1)appendCmdLine
- appendCmdLine([name], text)
- Appends text to the main input line.
- See also: printCmdLine(), clearCmdLine()
- Parameters
- name: (optional) name of the command line. If not given, the text will be appended to the main commandline.
- text: text to append
- Example
-- adds the text "55 backpacks" to whatever is currently in the input line
appendCmdLine("55 backpacks")
-- makes a link, that when clicked, will add "55 backpacks" to the input line
echoLink("press me", "appendCmdLine'55 backpack'", "Press me!")clearCmdLine
- clearCmdLine([name])
- Clears the input line of any text that's been entered.
- See also: printCmdLine()
- Parameters
- name: (optional) name of the command line. If not given, the main commandline's text will be cleared.
- Example
-- don't be evil with this!
clearCmdLine()clearCmdLineSuggestions
- clearCmdLineSuggestions([name])
- Clears all suggestions for command line.
- See also: addCmdLineSuggestion(), removeCmdLineSuggestion()
- Parameter
- name: (optional) name of the command line. If not given the main commandline's suggestions will be cleared.
clearCmdLineSuggestions()createStopWatch
- createStopWatch([name], [start immediately])
- createStopWatch([start immediately])
Before Mudlet 4.4.0:
- createStopWatch()
- This function creates a stopwatch, a high resolution time measurement tool. Stopwatches can be started, stopped, reset, asked how much time has passed since the stop watch has been started and, following an update for Mudlet 4.4.0: be adjusted, given a name and be made persistent between sessions (so can time real-life things). Prior to 4.4.0 the function took no parameters and the stopwatch would start automatically when it was created.
- Parameters
- start immediately (bool) used to override the behaviour prior to Mudlet 4.4.0 so that if it is the only argument then a false value will cause the stopwatch to be created but be in a stopped state, however if a name parameter is provided then this behaviour is assumed and then a true value is required should it be desired for the stopwatch to be started on creation. This difference between the cases with and without a name argument is to allow for older scripts to continue to work with 4.4.0 or later versions of Mudlet without change, yet to allow for more functionality - such as presetting a time when the stopwatch is created but not to start it counting down until some time afterwards - to be performed as well with a named stopwatch.
- name (string) a unique text to use to identify the stopwatch.
- Returns
- the ID (number) of a stopwatch; or, from 4.4.0: a nil + error message if the name has already been used.
- See also: startStopWatch(), stopStopWatch(), resetStopWatch(), getStopWatchTime() or, from 4.4.0: adjustStopWatch(), deleteStopWatch(), getStopWatches(), getStopWatchBrokenDownTime(), setStopWatchName(), setStopWatchPersistence()
- Example
- (Prior to Mudlet 4.4.0) in a global script you can create all stop watches that you need in your system and store the respective stopWatch-IDs in global variables:
fightStopWatch = fightStopWatch or createStopWatch() -- create, or re-use a stopwatch, and store the watchID in a global variable to access it from anywhere
-- then you can start the stop watch in some trigger/alias/script with:
startStopWatch(fightStopWatch)
-- to stop the watch and measure its time in e.g. a trigger script you can write:
fightTime = stopStopWatch(fightStopWatch)
echo("The fight lasted for " .. fightTime .. " seconds.")
resetStopWatch(fightStopWatch)- (From Mudlet 4.4.0) in a global script you can create all stop watches that you need in your system with unique names:
createStopWatch("fightStopWatch") -- creates the stopwatch or returns nil+msg if it already exists
-- then you can start the stop watch (if it is not already started) in some trigger/alias/script with:
startStopWatch("fightStopWatch")
-- to stop the watch and measure its time in e.g. a trigger script you can write:
fightTime = stopStopWatch("fightStopWatch")
echo("The fight lasted for " .. fightTime .. " seconds.")
resetStopWatch("fightStopWatch")- You can also measure the elapsed time without having to stop the stop watch (equivalent to getting a lap-time) with getStopWatchTime().
![]() Note: it's best to re-use stopwatch IDs if you can for Mudlet prior to 4.4.0 as they cannot be deleted, so creating more and more would use more memory. From 4.4.0 the revised internal design has been changed such that there are no internal timers created for each stopwatch - instead either a timestamp or a fixed elapsed time record is used depending on whether the stopwatches is running or stopped so that there are no "moving parts" in the later design and less resources are used - and they can be removed if no longer required.
Note: it's best to re-use stopwatch IDs if you can for Mudlet prior to 4.4.0 as they cannot be deleted, so creating more and more would use more memory. From 4.4.0 the revised internal design has been changed such that there are no internal timers created for each stopwatch - instead either a timestamp or a fixed elapsed time record is used depending on whether the stopwatches is running or stopped so that there are no "moving parts" in the later design and less resources are used - and they can be removed if no longer required.
deleteAllNamedTimers
- deleteAllNamedTimers(userName)
- Deletes all named timers and prevents them from firing any more. Information is deleted and cannot be retrieved.
- See also
- registerNamedTimer(), stopNamedTimer()
- Parameters
- userName:
- The user name the event handler was registered under.
- Example
deleteAllNamedTimers("Demonnic") -- emergency stop or debugging situation, most likely.deleteNamedTimer
- success = deleteNamedTimer(userName, handlerName)
- Deletes a named timer with name handlerName and prevents it from firing any more. Information is deleted and cannot be retrieved.
- See also
- registerNamedTimer(), stopNamedTimer()
- Parameters
- userName:
- The user name the event handler was registered under.
- handlerName:
- The name of the handler to stop. Same as used when you called registerNamedTimer()
- Returns
- true if successful, false if it didn't exist
- Example
local deleted = deleteNamedTimer("Demonnic", "DemonVitals")
if deleted then
cecho("DemonVitals deleted forever!!")
else
cecho("DemonVitals doesn't exist and so could not be deleted.")
enddeleteStopWatch
- deleteStopWatch(watchID/watchName)
- This function removes an existing stopwatch, whether it only exists for this session or is set to be otherwise saved between sessions by using setStopWatchPersistence() with a true argument.
- Parameters
- watchID (number) / watchName (string): The stopwatch ID you get with createStopWatch() or the name given to that function or later set with setStopWatchName().
- Returns
- true if the stopwatch was found and thus deleted, or nil and an error message if not - obviously using it twice with the same argument will fail the second time unless another one with the same name or ID was recreated before the second use. Note that an empty string as a name will find the lowest ID numbered unnamed stopwatch and that will then find the next lowest ID number of unnamed ones until there are none left, if used repetitively!
lua MyStopWatch = createStopWatch("stopwatch_mine")
true
lua display(MyStopWatch)
4
lua deleteStopWatch(MyStopWatch)
true
lua deleteStopWatch(MyStopWatch)
nil
"stopwatch with id 4 not found"
lua deleteStopWatch("stopwatch_mine")
nil
"stopwatch with name "stopwatch_mine" not found"- See also: createStopWatch(),
![]() Note: Stopwatches that are not set to be persistent will be deleted automatically at the end of a session (or if resetProfile() is called).
Note: Stopwatches that are not set to be persistent will be deleted automatically at the end of a session (or if resetProfile() is called).
removeCmdLineSuggestion
- removeCmdLineSuggestion([name], suggestion)
- Remove a suggestion for tab completion for specified command line.
- See also: addCmdLineSuggestion(), clearCmdLineSuggestions()
- Parameters
- name: optional command line name, if skipped main command line will be used
- suggestion - text to add to tab completion, non words characters at start and end of word should not be used (all characters except: `0-9A-Za-z_`)
Example:
removeCmdLineSuggestion("help")disableAlias
- disableAlias(name)
- Disables/deactivates the alias by its name. If several aliases have this name, they'll all be disabled. If you disable an alias group, all the aliases inside the group will be disabled as well.
- See also: enableAlias(), disableTrigger(), disableTimer(), disableKey(), disableScript().
- Parameters
- name:
- The name of the alias. Passed as a string.
- Examples
--Disables the alias called 'my alias'
disableAlias("my alias")disableKey
- disableKey(name)
- Disables key a key (macro) or a key group. When you disable a key group, all keys within the group will be implicitly disabled as well.
- See also: enableKey()
- Parameters
- name:
- The name of the key or group to identify what you'd like to disable.
- Examples
-- you could set multiple keys on the F1 key and swap their use as you wish by disabling and enabling them
disableKey("attack macro")
disableKey("jump macro")
enableKey("greet macro")disableScript
- disableScript(name)
- Disables a script that was previously enabled. Note that disabling a script only stops it from running in the future - it won't "undo" anything the script has made, such as labels on the screen.
- See also: permScript(), appendScript(), enableScript(), getScript(), setScript()
- Parameters
- name: name of the script.
- Example
--Disables the script called 'my script'
disableScript("my script")disableTimer
- disableTimer(name)
- Disables a timer from running it’s script when it fires - so the timer cycles will still be happening, just no action on them. If you’d like to permanently delete it, use killTrigger instead.
- See also: enableTimer(), disableTrigger(), disableAlias(), disableKey(), disableScript().
- Parameters
- name:
- Expects the timer ID that was returned by tempTimer on creation of the timer or the name of the timer in case of a GUI timer.
- Example
--Disables the timer called 'my timer'
disableTimer("my timer")disableTrigger
- disableTrigger(name)
- Disables a permanent (one in the trigger editor) or a temporary trigger. When you disable a group, all triggers inside the group are disabled as well
- See also: enableTrigger(), disableAlias(), disableTimer(), disableKey(), disableScript().
- Parameters
- name:
- Expects the trigger ID that was returned by tempTrigger or other temp*Trigger variants, or the name of the trigger in case of a GUI trigger.
- Example
-- Disables the trigger called 'my trigger'
disableTrigger("my trigger")enableAlias
- enableAlias(name)
- Enables/activates the alias by it’s name. If several aliases have this name, they’ll all be enabled.
- See also: disableAlias()
- Parameters
- name:
- Expects the alias ID that was returned by tempAlias on creation of the alias or the name of the alias in case of a GUI alias.
- Example
--Enables the alias called 'my alias'
enableAlias("my alias")enableKey
- enableKey(name)
- Enables a key (macro) or a group of keys (and thus all keys within it that aren't explicitly deactivated).
- Parameters
- name:
- The name of the group that identifies the key.
-- you could use this to disable one key set for the numpad and activate another
disableKey("fighting keys")
enableKey("walking keys")![]() Note:' From Version 3.10 returns true if one or more keys or groups of keys were found that matched the name given or false if not; prior to then it returns true if there were any keys - whether they matched the name or not!
Note:' From Version 3.10 returns true if one or more keys or groups of keys were found that matched the name given or false if not; prior to then it returns true if there were any keys - whether they matched the name or not!
enableScript
- enableScript(name)
- Enables / activates a script that was previously disabled.
- See also: permScript(), appendScript(), disableScript(), getScript(), setScript()
- Parameters
- name: name of the script.
-- enable the script called 'my script' that you created in Mudlet's script section
enableScript("my script")enableTimer
- enableTimer(name)
- Enables or activates a timer that was previously disabled.
- Parameters
- name:
- Expects the timer ID that was returned by tempTimer on creation of the timer or the name of the timer in case of a GUI timer.
-- enable the timer called 'my timer' that you created in Mudlets timers section
enableTimer("my timer")-- or disable & enable a tempTimer you've made
timerID = tempTimer(10, [[echo("hi!")]])
-- it won't go off now
disableTimer(timerID)
-- it will continue going off again
enableTimer(timerID)enableTrigger
- enableTrigger(name)
- Enables or activates a trigger that was previously disabled.
- Parameters
- name:
- Expects the trigger ID that was returned by tempTrigger or by any other temp*Trigger variants, or the name of the trigger in case of a GUI trigger.
-- enable the trigger called 'my trigger' that you created in Mudlets triggers section
enableTrigger("my trigger")-- or disable & enable a tempTrigger you've made
triggerID = tempTrigger("some text that will match in a line", [[echo("hi!")]])
-- it won't go off now when a line with matching text comes by
disableTrigger(triggerID)
-- and now it will continue going off again
enableTrigger(triggerID)exists
- exists(name/IDnumber, type)
- Returns the number of things with the given name or number of the given type - and 0 if none are present. Beware that all numbers are true in Lua, including zero.
- Parameters
- name:
- The name (as a string) or, from Mudlet 4.17.0, the ID number of a single item, (which will be that returned by a temp* or perm* function to create such an item to identify the item).
- type:
- The type can be 'alias', 'button' (Mudlet 4.10+), 'trigger', 'timer', 'keybind' (Mudlet 3.2+), or 'script' (Mudlet 3.17+).
- See also: isActive(...)
- Example
echo("I have " .. exists("my trigger", "trigger") .. " triggers called 'my trigger'!")- You can also use this alias to avoid creating duplicate things, for example:
-- this code doesn't check if an alias already exists and will keep creating new aliases
permAlias("Attack", "General", "^aa$", [[send ("kick rat")]])
-- while this code will make sure that such an alias doesn't exist first
-- we do == 0 instead of 'not exists' because 0 is considered true in Lua
if exists("Attack", "alias") == 0 then
permAlias("Attack", "General", "^aa$", [[send ("kick rat")]])
end- Especially helpful when working with permTimer:
if not exists("My animation timer", "timer") then
vdragtimer = permTimer("My animation timer", "", .016, onVDragTimer) -- 60fps timer!
end
enableTimer("My animation timer")![]() Note: A positive ID number will return either a 1 or 0 value and not a lua boolean true or false as might otherwise be expected, this is for constancy with the way the function behaves for a name.
Note: A positive ID number will return either a 1 or 0 value and not a lua boolean true or false as might otherwise be expected, this is for constancy with the way the function behaves for a name.
getButtonState
- getButtonState([ButtonNameOrID])
- This function can be used within checkbox button scripts (2-state buttons) to determine the current state of the checkbox.
- See also: setButtonState().
![]() Note: Function can be used in any Mudlet script outside of a button's own script with parameter ButtonNameOrID available from Mudlet version 4.13.0+
Note: Function can be used in any Mudlet script outside of a button's own script with parameter ButtonNameOrID available from Mudlet version 4.13.0+
- Parameters
- ButtonNameOrID:
- a numerical ID or string name to identify the checkbox button.
- Returns
- 2 if the button has "checked" state, or 1 if the button is not checked. (or a nil and an error message if ButtonNameOrID did not identify a check-able button)
- Example
-- check from within the script of a check-able button:
local checked = getButtonState()
if checked == 1 then
hideExits()
else
showExits()
end-- check from anywhere in another Lua script of the same profile (available from Mudlet 4.13.0)
local checked, errMsg = getButtonState("Sleep")
if checked then
shouldBeMounted = shouldBeMounted or false
sendAll("wake", "stand")
if shouldBeMounted then
send("mount horse")
end
else
-- Global used to record if we were on a horse before our nap:
shouldBeMounted = mounted or false
if shouldBeMounted then
send("dismount")
end
sendAll("sit", "sleep")
endgetCmdLine
- getCmdLine([name])
- Returns the current content of the given command line.
- See also: printCmdLine()
- Parameters
- name: (optional) name of the command line. If not given, it returns the text of the main commandline.
- Example
-- replaces whatever is currently in the input line by "55 backpacks"
printCmdLine("55 backpacks")
--prints the text "55 backpacks" to the main console
echo(getCmdLine())getConsoleBufferSize
- local lineLimit, sizeOfBatchDeletion = getConsoleBufferSize([consoleName])
- Returns, on success, the maximum number of lines a buffer (main window or a miniconsole) can hold and how many will be removed at a time when that limit is exceeded; returns a nil and an error message on failure.
- See also: setConsoleBufferSize()
- Parameters
- consoleName:
- (optional) The name of the window. If omitted, uses the main console.
- Example
-- sets the main window's size and how many lines will be deleted
-- when it gets to that size to be as small as possible:
setConsoleBufferSize("main", 1, 1)
true
-- find out what the numbers are:
local lineLimit, sizeOfBatchDeletion = getConsoleBufferSize()
echo("\nWhen the main console gets to " .. lineLimit .. " lines long, the first " .. sizeOfBatchDeletion .. " lines will be removed.\n")
When the main console gets to 100 lines long, the first 1 lines will be removed.getNamedTimers
- timers = getNamedTimers(userName)
- Returns a list of all the named timers' names as a table.
- See also
- registerNamedTimer()
- Parameters
- userName:
- The user name the event handler was registered under.
- Returns
- a table of handler names. { "DemonVitals", "DemonInv" } for example. {} if none are registered
- Example
local timers = getNamedTimers("Demonnic")
display(timers)
-- {}
registerNamedTimer("Test1", "testEvent", "testFunction")
registerNamedTimer("Test2", "someOtherEvent", myHandlerFunction)
timers = getNamedTimers("Demonnic")
display(timers)
-- { "Test1", "Test2" }getProfileStats
- getProfileStats()
- Returns a table with profile statistics for how many triggers, patterns within them, aliases, keys, timers, and scripts the profile has. Similar to the Statistics button in the script editor, accessible to Lua scripting.
- Example
-- show all stats
display(getProfileStats())
-- check how many active triggers there are
activetriggers = getProfileStats().triggers.active
cecho(f"<PaleGreen>We have <SlateGrey>{activetriggers}<PaleGreen> active triggers!\n")
-- triggers can have many patterns, so let's check that as well
patterns = getProfileStats().triggers.patterns.active
triggers = getProfileStats().triggers.active
cecho(f"<PaleGreen>We have <SlateGrey>{patterns}<PaleGreen> active patterns within <SlateGrey>{triggers}<PaleGreen> triggers!\n")getStopWatches
- table = getStopWatches()
- Returns a table of the details for each stopwatch in existence, the keys are the watch IDs but since there can be gaps in the ID number allocated for the stopwatches it will be necessary to use the pairs(...) rather than the ipairs(...) method to iterate through all of them in for loops!
- Each stopwatch's details will list the following items: name (string), isRunning (boolean), isPersistent (boolean), elapsedTime (table). The last of these contains the same data as is returned by the results table from the getStopWatchBrokenDownTime() function - namely days (positive integer), hours (integer, 0 to 23), minutes (integer, 0 to 59), second (integer, 0 to 59), milliSeconds (integer, 0 to 999), negative (boolean) with an additional decimalSeconds (number of seconds, with a decimal portion for the milli-seconds and possibly a negative sign, representing the whole elapsed time recorded on the stopwatch) - as would also be returned by the getStopWatchTime() function.
- Example
-- on the command line:
lua getStopWatches()
-- could return something like:
{
{
isPersistent = true,
elapsedTime = {
minutes = 15,
seconds = 2,
negative = false,
milliSeconds = 66,
hours = 0,
days = 18,
decimalSeconds = 1556102.066
},
name = "Playing time",
isRunning = true
},
{
isPersistent = true,
elapsedTime = {
minutes = 47,
seconds = 1,
negative = true,
milliSeconds = 657,
hours = 23,
days = 2,
decimalSeconds = -258421.657
},
name = "TMC Vote",
isRunning = true
},
{
isPersistent = false,
elapsedTime = {
minutes = 26,
seconds = 36,
negative = false,
milliSeconds = 899,
hours = 3,
days = 0,
decimalSeconds = 12396.899
},
name = "",
isRunning = false
},
[5] = {
isPersistent = false,
elapsedTime = {
minutes = 0,
seconds = 38,
negative = false,
milliSeconds = 763,
hours = 0,
days = 0,
decimalSeconds = 38.763
},
name = "",
isRunning = true
}
}getStopWatchTime
- time = getStopWatchTime(watchID [or watchName from Mudlet 4.4.0])
- Returns the time as a decimal number of seconds with up to three decimal places to give a milli-seconds (thousandths of a second) resolution.
- Please note that, prior to 4.4.0 it was not possible to retrieve the elapsed time after the stopwatch had been stopped, retrieving the time was not possible as the returned value then was an indeterminate, meaningless time; from the 4.4.0 release, however, the elapsed value can be retrieved at any time, even if the stopwatch has not been started since creation or modified with the adjustStopWatch() function introduced in that release.
- See also: createStopWatch(), startStopWatch(), stopStopWatch(), deleteStopWatch(), getStopWatches(), getStopWatchBrokenDownTime().
- Returns a number
- Parameters
- watchID
- The ID number of the watch.
- Example
-- an example of showing the time left on the stopwatch
teststopwatch = teststopwatch or createStopWatch()
startStopWatch(teststopwatch)
echo("Time on stopwatch: "..getStopWatchTime(teststopwatch))
tempTimer(1, [[echo("Time on stopwatch: "..getStopWatchTime(teststopwatch))]])
tempTimer(2, [[echo("Time on stopwatch: "..getStopWatchTime(teststopwatch))]])
stopStopWatch(teststopwatch)getStopWatchBrokenDownTime
- brokenDownTimeTable = getStopWatchBrokenDownTime(watchID or watchName)
- Returns the current stopwatch time, whether the stopwatch is running or is stopped, as a table, broken down into:
- "days" (integer)
- "hours" (integer, 0 to 23)
- "minutes" (integer, 0 to 59)
- "seconds" (integer, 0 to 59)
- "milliSeconds" (integer, 0 to 999)
- "negative" (boolean, true if value is less than zero)
- See also: startStopWatch(), stopStopWatch(), deleteStopWatch(), getStopWatches(), getStopWatchTime().
- Parameters
- watchID / watchName
- The ID number or the name of the watch.
- Example
--an example, showing the presetting of a stopwatch.
--This will fail if the stopwatch with the given name
-- already exists, but then we can use the existing one:
local watchId = createStopWatch("TopMudSiteVoteStopWatch")
if watchId ~= nil then
-- so we have just created the stopwatch, we want it
-- to be saved for future sessions:
setStopWatchPersistence("TopMudSiteVoteStopWatch", true)
-- and set it to count down the 12 hours until we can
-- revote:
adjustStopWatch("TopMudSiteVoteStopWatch", -60*60*12)
-- and start it running
startStopWatch("TopMudSiteVoteStopWatch")
openWebPage("http://www.topmudsites.com/vote-wotmud.html")
end
--[[ now I can check when it is time to vote again, even when
I stop the session and restart later by running the following
from a perm timer - perhaps on a 15 minute interval. Note that
when loaded in a new session the Id it gets is unlikely to be
the same as that when it was created - but that is not a
problem as the name is preserved and, if the timer is running
when the profile is saved at the end of the session then the
elapsed time will continue to increase to reflect the real-life
passage of time:]]
local voteTimeTable = getStopWatchBrokenDownTime("TopMudSiteVoteStopWatch")
if voteTimeTable["negative"] then
if voteTimeTable["hours"] == 0 and voteTimeTable["minutes"] < 30 then
echo("Voting for WotMUD on Top Mud Site in " .. voteTimeTable["minutes"] .. " minutes...")
end
else
echo("Oooh, it is " .. voteTimeTable["days"] .. " days, " .. voteTimeTable["hours"] .. " hours and " .. voteTimeTable["minutes"] .. " minutes past the time to Vote on Top Mud Site - doing it now!")
openWebPage("http://www.topmudsites.com/vote-wotmud.html")
resetStopWatch("TopMudSiteVoteStopWatch")
adjustStopWatch("TopMudSiteVoteStopWatch", -60*60*12)
endgetScript
- getScript(scriptName, [occurrence])
- Returns the script with the given name. If you have more than one script with the same name, specify the occurrence to pick a different one. Returns -1 if the script doesn't exist.
- See also: permScript(), enableScript(), disableScript(), setScript(), appendScript()
- Parameters
- scriptName: name of the script.
- occurrence: (optional) occurence of the script in case you have many with the same name.
- Example
-- show the "New script" on screen
print(getScript("New script"))
-- an example of returning the script Lua code from the second occurrence of "testscript"
test_script_code = getScript("testscript", 2)invokeFileDialog
- invokeFileDialog(fileOrFolder, dialogTitle)
- Opens a file chooser dialog, allowing the user to select a file or a folder visually. The function returns the selected path or "" if there was none chosen.
- Parameters
- fileOrFolder: true for file selection, false for folder selection.
- dialogTitle: what to say in the window title.
- Examples
function whereisit()
local path = invokeFileDialog(false, "Where should we save the file? Select a folder and click Open")
if path == "" then return nil else return path end
endisActive
- isActive(name/IDnumber, type)
- You can use this function to check if something, or somethings, are active.
- Returns the number of active things - and 0 if none are active. Beware that all numbers are true in Lua, including zero.
- Parameters
- name:
- The name (as a string) or, from Mudlet 4.17.0, the ID number of a single item, (which will be that returned by a temp* function to create such an item to identify the item).
- type:
- The type can be 'alias', 'button' (Mudlet 4.10+), 'trigger', 'timer', 'keybind' (Mudlet 3.2+), or 'script' (Mudlet 3.17+).
- See also: exists(...)
- Example
echo("I have " .. isActive("my trigger", "trigger") .. " currently active trigger(s) called 'my trigger'!")
-- Can also be used to check if a specific item is enabled or not.
if isActive("spellname", "trigger" > 0 then
-- the spellname trigger is active
else
-- it is not active
end![]() Note: A positive ID number that does not exist will still return a 0 value, this is for constancy with the way the function behaves for a name that does not refer to any item either. If necessary the existence of an item should be confirmed with exists(...) first.
Note: A positive ID number that does not exist will still return a 0 value, this is for constancy with the way the function behaves for a name that does not refer to any item either. If necessary the existence of an item should be confirmed with exists(...) first.
isPrompt
- isPrompt()
- Returns true or false depending on if the line at the cursor position is a prompt. This infallible feature is available for games that supply GA events (to check if yours is one, look to bottom-right of the main window - if it doesn’t say <No GA>, then it supplies them).
- Example use could be as a Lua function, making closing gates on a prompt real easy.
- Example
-- make a trigger pattern with 'Lua function', and this will trigger on every prompt!
-- note that this is deprecated as we now have the prompt trigger type which does the same thing
-- the function can still be useful for detecting if you're running code on a prompt for other reasons
-- but you should be using a prompt trigger for this rather than a Lua function trigger.
return isPrompt()killAlias
- killAlias(aliasID)
- Deletes a temporary alias with the given ID.
- Parameters
- aliasID:
- The id returned by tempAlias to identify the alias.
-- deletes the alias with ID 5
killAlias(5)killKey
- killKey(name)
- Deletes a keybinding with the given name. If several keybindings have this name, they'll all be deleted.
- Parameters
- name:
- The name or the id returned by tempKey to identify the key.
-- make a temp key
local keyid = tempKey(mudlet.key.F8, [[echo("hi!")]])
-- delete the said temp key
killKey(keyid)killTimer
- killTimer(id)
- Deletes a tempTimer.
![]() Note: Non-temporary timers that you have set up in the GUI or by using permTimer cannot be deleted with this function. Use disableTimer() and enableTimer() to turn them on or off.
Note: Non-temporary timers that you have set up in the GUI or by using permTimer cannot be deleted with this function. Use disableTimer() and enableTimer() to turn them on or off.
- Parameters
- id: the ID returned by tempTimer.
- Returns true on success and false if the timer id doesn’t exist anymore (timer has already fired) or the timer is not a temp timer.
- Example
-- create the timer and remember the timer ID
timerID = tempTimer(10, [[echo("hello!")]])
-- delete the timer
killTimer(timerID)
-- reset the reference to it
timerID = nilkillTrigger
- killTrigger(id)
- Deletes a tempTrigger, or a trigger made with one of the temp<type>Trigger() functions.
![]() Note: When used in out of trigger contexts, the triggers are disabled and deleted upon the next line received from the game - so if you are testing trigger deletion within an alias, the 'statistics' window will be reporting trigger counts that are disabled and pending removal, and thus are no cause for concern.
Note: When used in out of trigger contexts, the triggers are disabled and deleted upon the next line received from the game - so if you are testing trigger deletion within an alias, the 'statistics' window will be reporting trigger counts that are disabled and pending removal, and thus are no cause for concern.
- Parameters
- id:
- The ID returned by a temp<type>Trigger to identify the item. ID is a string and not a number.
- Returns true on success and false if the trigger id doesn’t exist anymore (trigger has already fired) or the trigger is not a temp trigger.
![]() Note: As of Mudlet version 4.16.0, triggers created with tempComplexRegexTrigger can only be killed using the name string specified during creation.
Note: As of Mudlet version 4.16.0, triggers created with tempComplexRegexTrigger can only be killed using the name string specified during creation.
permAlias
- permAlias(name, parent, regex, lua code)
- Creates a persistent alias that stays after Mudlet is restarted and shows up in the Script Editor.
- Parameters
- name:
- The name you’d like the alias to have.
- parent:
- The name of the group, or another alias you want the trigger to go in - however if such a group/alias doesn’t exist, it won’t do anything. Use "" to make it not go into any groups.
- regex:
- The pattern that you’d like the alias to use.
- lua code:
- The script the alias will do when it matches.
- Example
-- creates an alias called "new alias" in a group called "my group"
permAlias("new alias", "my group", "^test$", [[echo ("say it works! This alias will show up in the script editor too.")]])![]() Note: Mudlet by design allows duplicate names - so calling permAlias with the same name will keep creating new aliases. You can check if an alias already exists with the exists function.
Note: Mudlet by design allows duplicate names - so calling permAlias with the same name will keep creating new aliases. You can check if an alias already exists with the exists function.
permGroup
- permGroup(name, itemtype, [parent])
- Creates a new group of a given type. This group will persist through Mudlet restarts.
- Parameters
- name:
- The name of the new group item you want to create.
- itemtype :
- The type of the item, can be one of the following:
- trigger
- alias
- timer
- script (available in Mudlet 4.7+)
- key (available in Mudlet 4.11+)
- parent (available in Mudlet 3.1+):
- (optional) Name of existing item which the new item will be created as a child of. If none is given, item will be at the root level (not nested in any other groups)
- Example
--create a new trigger group
permGroup("Combat triggers", "trigger")
--create a new alias group only if one doesn't exist already
if exists("Defensive aliases", "alias") == 0 then
permGroup("Defensive aliases", "alias")
endpermPromptTrigger
- permPromptTrigger(name, parent, lua code)
- Creates a persistent trigger for the in-game prompt that stays after Mudlet is restarted and shows up in the Script Editor.
![]() Note: If the trigger is not working, check that the N: bottom-right has a number. This feature requires telnet Go-Ahead (GA) or End-of-Record (EOR) to be enabled in your game. Available in Mudlet 3.6+
Note: If the trigger is not working, check that the N: bottom-right has a number. This feature requires telnet Go-Ahead (GA) or End-of-Record (EOR) to be enabled in your game. Available in Mudlet 3.6+
- Parameters
- name is the name you’d like the trigger to have.
- parent is the name of the group, or another trigger you want the trigger to go in - however if such a group/trigger doesn’t exist, it won’t do anything. Use "" to make it not go into any groups.
- lua code is the script the trigger will do when it matches.
- Example
permPromptTrigger("echo on prompt", "", [[echo("hey! this thing is working!\n")]])
permRegexTrigger
- permRegexTrigger(name, parent, pattern table, lua code)
- Creates a persistent trigger with one or more regex patterns that stays after Mudlet is restarted and shows up in the Script Editor.
- Parameters
- name is the name you’d like the trigger to have.
- parent is the name of the group, or another trigger you want the trigger to go in - however if such a group/trigger doesn’t exist, it won’t do anything. Use "" to make it not go into any groups.
- pattern table is a table of patterns that you’d like the trigger to use - it can be one or many.
- lua code is the script the trigger will do when it matches.
- Example
-- Create a regex trigger that will match on the prompt to record your status
permRegexTrigger("Prompt", "", {"^(\d+)h, (\d+)m"}, [[health = tonumber(matches[2]); mana = tonumber(matches[3])]])![]() Note: Mudlet by design allows duplicate names - so calling permRegexTrigger with the same name will keep creating new triggers. You can check if a trigger already exists with the exists() function.
Note: Mudlet by design allows duplicate names - so calling permRegexTrigger with the same name will keep creating new triggers. You can check if a trigger already exists with the exists() function.
permBeginOfLineStringTrigger
- permBeginOfLineStringTrigger(name, parent, pattern table, lua code)
- Creates a persistent trigger that stays after Mudlet is restarted and shows up in the Script Editor. The trigger will go off whenever one of the regex patterns it's provided with matches. The function returns the trigger ID for subsequent enableTrigger(), disableTrigger() and killTrigger() calls.
- Parameters
- name is the name you’d like the trigger to have.
- parent is the name of the group, or another trigger you want the trigger to go in - however if such a group/trigger doesn’t exist, it won’t do anything. Use "" to make it not go into any groups.
- pattern table is a table of patterns that you’d like the trigger to use - it can be one or many.
- lua code is the script the trigger will do when it matches.
- Examples
-- Create a trigger that will match on anything that starts with "You sit" and do "stand".
-- It will not go into any groups, so it'll be on the top.
permBeginOfLineStringTrigger("Stand up", "", {"You sit"}, [[send ("stand")]])
-- Another example - lets put our trigger into a "General" folder and give it several patterns.
permBeginOfLineStringTrigger("Stand up", "General", {"You sit", "You fall", "You are knocked over by"}, [[send ("stand")]])![]() Note: Mudlet by design allows duplicate names - so calling permBeginOfLineStringTrigger with the same name will keep creating new triggers. You can check if a trigger already exists with the exists() function.
Note: Mudlet by design allows duplicate names - so calling permBeginOfLineStringTrigger with the same name will keep creating new triggers. You can check if a trigger already exists with the exists() function.
permSubstringTrigger
- permSubstringTrigger( name, parent, pattern table, lua code )
- Creates a persistent trigger with one or more substring patterns that stays after Mudlet is restarted and shows up in the Script Editor.
- Parameters
- name is the name you’d like the trigger to have.
- parent is the name of the group, or another trigger you want the trigger to go in - however if such a group/trigger doesn’t exist, it won’t do anything. Use "" to make it not go into any groups.
- pattern table is a table of patterns that you’d like the trigger to use - it can be one or many.
- lua code is the script the trigger will do when it matches.
- Example
-- Create a trigger to highlight the word "pixie" for us
permSubstringTrigger("Highlight stuff", "General", {"pixie"},
[[selectString(line, 1) bg("yellow") resetFormat()]])
-- Or another trigger to highlight several different things
permSubstringTrigger("Highlight stuff", "General", {"pixie", "cat", "dog", "rabbit"},
[[selectString(line, 1) fg ("blue") bg("yellow") resetFormat()]])![]() Note: Mudlet by design allows duplicate names - so calling permSubstringTrigger with the same name will keep creating new triggers. You can check if a trigger already exists with the exists() function.
Note: Mudlet by design allows duplicate names - so calling permSubstringTrigger with the same name will keep creating new triggers. You can check if a trigger already exists with the exists() function.
permScript
- permScript(name, parent, lua code)
- Creates a new script in the Script Editor that stays after Mudlet is restarted.
- Parameters
- name: name of the script.
- parent: name of the script group you want the script to go in.
- lua code: is the code with string you are putting in your script.
- Returns
- a unique id number for that script.
- See also: enableScript(), exists(), appendScript(), disableScript(), getScript(), setScript()
- Example
-- create a script in the "first script group" group
permScript("my script", "first script group", [[send ("my script that's in my first script group fired!")]])
-- create a script that's not in any group; just at the top
permScript("my script", "", [[send ("my script that's in my first script group fired!")]])
-- enable Script - a script element is disabled at creation
enableScript("my script")![]() Note: The script is called once but NOT active after creation, it will need to be enabled by enableScript().
Note: The script is called once but NOT active after creation, it will need to be enabled by enableScript().
![]() Note: Mudlet by design allows duplicate names - so calling permScript with the same name will keep creating new script elements. You can check if a script already exists with the exists() function.
Note: Mudlet by design allows duplicate names - so calling permScript with the same name will keep creating new script elements. You can check if a script already exists with the exists() function.
![]() Note: If the lua code parameter is an empty string, then the function will create a script group instead.
Note: If the lua code parameter is an empty string, then the function will create a script group instead.
permTimer
- permTimer(name, parent, seconds, lua code)
- Creates a persistent timer that stays after Mudlet is restarted and shows up in the Script Editor.
- Parameters
- name
- name of the timer.
- parent
- name of the timer group you want the timer to go in.
- seconds
- a floating point number specifying a delay in seconds after which the timer will do the lua code (stored as the timer's "script") you give it as a string.
- lua code is the code with string you are doing this to.
- Returns
- a unique id number for that timer.
- Example
-- create a timer in the "first timer group" group
permTimer("my timer", "first timer group", 4.5, [[send ("my timer that's in my first timer group fired!")]])
-- create a timer that's not in any group; just at the top
permTimer("my timer", "", 4.5, [[send ("my timer that's in my first timer group fired!")]])
-- enable timer - they start off disabled until you're ready
enableTimer("my timer")![]() Note: The timer is NOT active after creation, it will need to be enabled by a call to enableTimer() before it starts.
Note: The timer is NOT active after creation, it will need to be enabled by a call to enableTimer() before it starts.
![]() Note: Mudlet by design allows duplicate names - so calling permTimer with the same name will keep creating new timers. You can check if a timer already exists with the exists() function.
Note: Mudlet by design allows duplicate names - so calling permTimer with the same name will keep creating new timers. You can check if a timer already exists with the exists() function.
permKey
- permKey(name, parent, [modifier], key code, lua code)
- Creates a persistent key that stays after Mudlet is restarted and shows up in the Script Editor.
- Parameters
- name
- name of the key.
- parent
- name of the timer group you want the timer to go in or "" for the top level.
- modifier
- (optional) modifier to use - can be one of mudlet.keymodifier.Control, mudlet.keymodifier.Alt, mudlet.keymodifier.Shift, mudlet.keymodifier.Meta, mudlet.keymodifier.Keypad, or mudlet.keymodifier.GroupSwitch or the default value of mudlet.keymodifier.None which is used if the argument is omitted. To use multiple modifiers, add them together: (mudlet.keymodifier.Shift + mudlet.keymodifier.Control)
- key code
- actual key to use - one of the values available in mudlet.key, e.g. mudlet.key.Escape, mudlet.key.Tab, mudlet.key.F1, mudlet.key.A, and so on. The list is a bit long to list out in full so it is available here.
- set to -1 if you want to create a key folder instead.
- lua code'
- code you would like the key to run.
- Returns
- a unique id number for that key.
- Example
-- create a key at the top level for F8
permKey("my key", "", mudlet.key.F8, [[echo("hey this thing actually works!\n")]])
-- or Ctrl+F8
permKey("my key", "", mudlet.keymodifier.Control, mudlet.key.F8, [[echo("hey this thing actually works!\n")]])
-- Ctrl+Shift+W
permKey("jump keybinding", "", mudlet.keymodifier.Control + mudlet.keymodifier.Shift, mudlet.key.W, [[send("jump")]])![]() Note: Mudlet by design allows duplicate names - so calling permKey with the same name will keep creating new keys. You can check if a key already exists with the exists() function. The key will be created even if the lua code does not compile correctly - but this will be apparent as it will be seen in the Editor.
Note: Mudlet by design allows duplicate names - so calling permKey with the same name will keep creating new keys. You can check if a key already exists with the exists() function. The key will be created even if the lua code does not compile correctly - but this will be apparent as it will be seen in the Editor.
printCmdLine
- printCmdLine([name], text)
- Replaces the current text in the input line, and sets it to the given text.
- See also: clearCmdLine(), appendCmdLine()
- Parameters
- name: (optional) name of the command line. If not given, main commandline's text will be set.
- text: text to set
printCmdLine("say I'd like to buy ")raiseEvent
- raiseEvent(event_name, arg-1, … arg-n)
- Raises the event event_name. The event system will call the main function (the one that is called exactly like the script name) of all such scripts in this profile that have registered event handlers. If an event is raised, but no event handler scripts have been registered with the event system, the event is ignored and nothing happens. This is convenient as you can raise events in your triggers, timers, scripts etc. without having to care if the actual event handling has been implemented yet - or more specifically how it is implemented. Your triggers raise an event to tell the system that they have detected a certain condition to be true or that a certain event has happened. How - and if - the system is going to respond to this event is up to the system and your trigger scripts don’t have to care about such details. For small systems it will be more convenient to use regular function calls instead of events, however, the more complicated your system will get, the more important events will become because they help reduce complexity very much.
- The corresponding event handlers that listen to the events raised with raiseEvent() need to use the script name as function name and take the correct number of arguments.
- See also: raiseGlobalEvent
![]() Note: possible arguments can be string, number, boolean, table, function, or nil.
Note: possible arguments can be string, number, boolean, table, function, or nil.
- Example
- raiseEvent("fight") a correct event handler function would be: myScript( event_name ). In this example raiseEvent uses minimal arguments, name the event name. There can only be one event handler function per script, but a script can still handle multiple events as the first argument is always the event name - so you can call your own special handlers for individual events. The reason behind this is that you should rather use many individual scripts instead of one huge script that has all your function code etc. Scripts can be organized very well in trees and thus help reduce complexity on large systems.
Where the number of arguments that your event may receive is not fixed you can use ... as the last argument in the function declaration to handle any number of arguments. For example:
-- try this function out with "lua myscripthandler(1,2,3,4)"
function myscripthandler(a, b, ...)
print("Arguments a and b are: ", a,b)
-- save the rest of the arguments into a table
local otherarguments = {...}
print("Rest of the arguments are:")
display(otherarguments)
-- access specific otherarguments:
print("First and second otherarguments are: ", otherarguments[1], otherarguments[2])
endraiseGlobalEvent
- raiseGlobalEvent(event_name, arg-1, … arg-n)
- Like raiseEvent() this raises the event "event_name", but this event is sent to all other opened profiles instead. The profiles receive the event in circular alphabetical order (if profile "C" raised this event and we have profiles "A", "C", and "E", the order is "E" -> "A", but if "E" raised the event the order would be "A" -> "C"); execution control is handed to the receiving profiles so that means that long running events may lock up the profile that raised the event.
- The sending profile's name is automatically appended as the last argument to the event.
![]() Note: possible arguments can be string, number, boolean, or nil, but not table or function.
Note: possible arguments can be string, number, boolean, or nil, but not table or function.
- Example
-- from profile called "My game" this raises an event "my event" with additional arguments 1, 2, 3, "My game" to all profiles except the original one
raiseGlobalEvent("my event", 1, 2, 3)
-- want the current profile to receive it as well? Use raiseEvent
raiseEvent("my event", 1, 2, 3)-- example of calling functions in one profile from another:
-- profile B:
control = control or {}
function control.updateStatus()
disableTrigger("test triggers")
print("disabling triggers worked!")
end
-- this handles calling the right function in the control table
function control.marshaller(_, callfunction)
if control[callfunction] then control[callfunction]()
else
cecho("<red>Asked to call an unknown function: "..callfunction)
end
end
registerAnonymousEventHandler("sysSendAllProfiles", "control.marshaller")
-- profile A:
raiseGlobalEvent("sysSendAllProfiles", "updateStatus")
raiseGlobalEvent("sysSendAllProfiles", "invalidfunction")Tip: you might want to add the profile name to your plain raiseEvent() arguments. This'll help you tell which profile your event came from similar to raiseGlobalEvent().
registerNamedTimer
- success = registerNamedTimer(userName, timerName, time, functionReference, [repeating])
- Registers a named timer with name timerName. Named timers are protected from duplication and can be stopped and resumed, unlike normal tempTimers. A separate list is kept for each userName, to enforce name spacing and avoid collisions
- See also
- tempTimer(), stopNamedTimer(), resumeNamedTimer(), deleteNamedTimer(), registerNamedEventHandler()
- Parameters
- userName:
- The user name the event handler was registered under.
- timerName:
- The name of the handler. Used to reference the handler in other functions and prevent duplicates. Recommended you use descriptive names, "hp" is likely to collide with something else, "DemonVitals" less so.
- time:
- The amount of time in seconds to wait before firing.
- functionReference:
- The function reference to run when the event comes in. Can be the name of a function, "handlerFunction", or the lua function itself.
- repeating:
- (optional) if true, the timer continue to fire until the stop it using stopNamedTimer()
- Returns
- true if successful, otherwise errors.
- Example
-- establish a named timer called "Check balance" which runs balanceChecker() after 1 second
-- it is started automatically when registered, and fires only once despite being run twice
-- you wouldn't do this intentionally, but illustrates the duplicate protection
registerNamedTimer("Demonnic", "Check Balance", 1, balanceChecker)
registerNamedTimer("Demonnic", "Check Balance", 1, balanceChecker)
-- then the next time you want to make/use the same timer, you can shortcut it with
resumeNamedTimer("Demonnic", "Check Balance")remainingTime
- remainingTime(timer id number or name)
- Returns the remaining time in floating point form in seconds (if it is active) for the timer (temporary or permanent) with the id number or the (first) one found with the name.
- If the timer is inactive or has expired or is not found it will return a nil and an error message. It, theoretically could also return 0 if the timer is overdue, i.e. it has expired but the internal code has not yet been run but that has not been seen in during testing. Permanent offset timers will only show as active during the period when they are running after their parent has expired and started them.
- Example
tid = tempTimer(600, [[echo("\nYour ten minutes are up.\n")]])
echo("\nYou have " .. remainingTime(tid) .. " seconds left, use it wisely... \n")
-- Will produce something like:
You have 599.923 seconds left, use it wisely...
-- Then ten minutes time later:
Your ten minutes are up.resetProfileIcon
- resetProfileIcon()
- Resets the profile's icon in the connection screen to default.
See also: setProfileIcon().
- Example
resetProfileIcon()resetStopWatch
- resetStopWatch(watchID)
- This function resets the time to 0:0:0.0, but does not stop or start the stop watch. You can stop it with stopStopWatch or start it with startStopWatch → createStopWatch
resumeNamedTimer
- success = resumeNamedTimer(userName, handlerName)
- Resumes a named timer with name handlerName and causes it to fire again. One time unless it was registered as repeating.
- See also
- registerNamedTimer(), stopNamedTimer()
- Parameter
- userName:
- The user name the event handler was registered under.s
- handlerName:
- The name of the handler to resume. Same as used when you called registerNamedTimer()
- Returns
- true if successful, false if it didn't exist. If the timer is waiting to fire it will be restarted at 0.
- Example
local resumed = resumeNamedTimer("Demonnic", "DemonVitals")
if resumed then
cecho("DemonVitals resumed!")
else
cecho("DemonVitals doesn't exist, so cannot resume it.")
endsetButtonState
- setButtonState(ButtonNameOrID, checked)
- Sets the state of a check-able ("push-down") type button from any Mudlet item's script - but does not cause the script or one of the commands associated with that button to be run/sent.
- See also: getButtonState().
- Parameters
- ButtonNameOrID:
- The name of the button as a string or a unique ID (positive) integer number {for a name only one matching one will be affected - it will be the same one that the matching getButtonState() reports upon}.
- checked:
- boolean value that indicated whether the state required is down (true) or up (false).
- Returns
- A boolean value indicating true if the visible state was actually changed, i.e. had any effect. This function will return a nil and a suitable error message if the identifying name or ID was not found or was not a check-able (push-down) button item (i.e. was a non-checkable button or a menu or a toolbar instead).
- Example
-- inside, for example, an initialization script for a GUI package:
setButtonState("Sleep", false)
setButtonState("Sit", false)
-- these are going to be used as "radio" buttons where setting one
-- of them will unset all the others, they will each need something
-- similar in their own scripts to unset all the others in the set
-- and also something to prevent them from being unset by clicking
-- on themselves:
setButtonState("Wimpy", true)
setButtonState("Defensive", false)
setButtonState("Normal", false)
setButtonState("Brave", false)
if character.type == "Warrior" then
-- Only one type has this mode - and it can only be reset by
-- something dying (though that could be us!)
setButtonState("Beserk!!!", false)
endsetConsoleBufferSize
- setConsoleBufferSize([consoleName], linesLimit, sizeOfBatchDeletion)
- Sets the maximum number of lines a buffer (main window or a miniconsole) can hold. Default is 10,000.
- Returns nothing on success (up to Mudlet 4.16) or true (from Mudlet 4.17); nil and an error message on failure.
- Parameters
- consoleName:
- (optional) The name of the window. If omitted, uses the main console.
- linesLimit:
- Sets the amount of lines the buffer should have.
![]() Note: Mudlet performs extremely efficiently with even huge numbers, but there is of course a limit to your computer's memory. As of Mudlet 4.7+, this amount will be capped to that limit on macOS and Linux (on Windows, it's capped lower as Mudlet on Windows is 32bit).
Note: Mudlet performs extremely efficiently with even huge numbers, but there is of course a limit to your computer's memory. As of Mudlet 4.7+, this amount will be capped to that limit on macOS and Linux (on Windows, it's capped lower as Mudlet on Windows is 32bit).
- sizeOfBatchDeletion:
- Specifies how many lines should Mudlet delete at once when you go over the limit - it does it in bulk because it's efficient to do so.
- Example
-- sets the main windows size to 1 million lines maximum - which is more than enough!
setConsoleBufferSize("main", 1000000, 1000)setProfileIcon
- setProfileIcon(iconPath)
- Set a custom icon for this profile in the connection screen.
- Returns true if successful, or nil+error message if not.
- See also: resetProfileIcon().
- Parameters
- iconPath:
- Full location of the icon - can be .png or .jpg with ideal dimensions of 120x30.
- Example
-- set a custom icon that is located in an installed package called "mypackage"
setProfileIcon(getMudletHomeDir().."/mypackage/icon.png")setScript
- setScript(scriptName, luaCode, [occurrence])
- Sets the script's Lua code, replacing existing code. If you have many scripts with the same name, use the 'occurrence' parameter to choose between them.
- If you'd like to add code instead of replacing it, have a look at appendScript().
- Returns -1 if the script isn't found - to create a script, use permScript().
- See also: permScript(), enableScript(), disableScript(), getScript(), appendScript()
- Returns
- a unique id number for that script.
- Parameters
- scriptName: name of the script to change the code.
- luaCode: new Lua code to set.
- occurrence: The position of the script. Optional, defaults to 1 (first).
- Example
-- make sure a script named "testscript" exists first, then do:
setScript("testscript", [[echo("This is a test\n")]], 1)setStopWatchName
- setStopWatchName(watchID/currentStopWatchName, newStopWatchName)
- Parameters
- watchID (number) / currentStopWatchName (string): The stopwatch ID you get from createStopWatch() or the name supplied to that function at that time, or previously applied with this function.
- newStopWatchName (string): The name to use for this stopwatch from now on.
- Returns
- true on success, nil and an error message if no matching stopwatch is found.
![]() Note: Either currentStopWatchName or newStopWatchName may be empty strings: if the first of these is so then the lowest ID numbered stopwatch without a name is chosen; if the second is so then an existing name is removed from the chosen stopwatch.
Note: Either currentStopWatchName or newStopWatchName may be empty strings: if the first of these is so then the lowest ID numbered stopwatch without a name is chosen; if the second is so then an existing name is removed from the chosen stopwatch.
setStopWatchPersistence
- setStopWatchPersistence(watchID/watchName, state)
- Parameters
- watchID (number) / watchName (string): The stopwatch ID you get from createStopWatch() or the name supplied to that function or applied later with setStopWatchName()
- state (boolean): if true the stopWatch will be saved.
- Returns
- true on success, nil and an error message if no matching stopwatch is found.
- Sets or resets the flag so that the stopwatch is saved between sessions or after a resetProfile() call. If set then, if stopped the elapsed time recorded will be unchanged when the stopwatch is reloaded in the next session; if running the elapsed time will continue to increment and it will include the time that the profile was not loaded, therefore it can be used to measure events in real-time, outside of the profile!
![]() Note: When a persistent stopwatch is reloaded in a later session (or after a use of resetProfile()) the stopwatch may not be allocated the same ID number as before - therefore it is advisable to assign any persistent stopwatches a name, either when it is created or before the session is ended.
Note: When a persistent stopwatch is reloaded in a later session (or after a use of resetProfile()) the stopwatch may not be allocated the same ID number as before - therefore it is advisable to assign any persistent stopwatches a name, either when it is created or before the session is ended.
setTriggerStayOpen
- setTriggerStayOpen(name, number of lines)
- Sets for how many more lines a trigger script should fire or a chain should stay open after the trigger has matched - so this allows you to extend or shorten the fire length of a trigger. The main use of this function is to close a chain when a certain condition has been met.
- Parameters
- name: The name of the trigger which has a fire length set (and which opens the chain).
- number of lines: 0 to close the chain, or a positive number to keep the chain open that much longer.
- Examples
-- if you have a trigger that opens a chain (has some fire length) and you'd like it to be closed
-- on the next prompt, you could make a prompt trigger inside the chain with a script of:
setTriggerStayOpen("Parent trigger name", 0)
-- to close it on the prompt!startStopWatch
- startStopWatch(watchName or watchID, [resetAndRestart])
- Stopwatches can be stopped (with stopStopWatch()) and then re-started any number of times. To ensure backwards compatibility, if the stopwatch is identified by a numeric argument then, unless a second argument of false is supplied as well this function will also reset the stopwatch to zero and restart it - whether it is running or not; otherwise only a stopped watch can be started and only a started watch may be stopped. Trying to repeat either will produce a nil and an error message instead; also the recorded time is no longer reset so that they can now be used to record a total of isolated periods of time like a real stopwatch.
- See also: createStopWatch(), stopStopWatch()
- Parameters
- watchID/watchName: The stopwatch ID you get with createStopWatch(), or from 4.4.0 the name assigned with that function or setStopWatchName().
- resetAndRestart: Boolean flag needed (as false) to make the function from 4.4.0, when supplied with a numeric watch ID, to not reset the stopwatch and only start a previously stopped stopwatch. This behavior is automatic when a string watch name is used to identify the stopwatch but differs from how the function behaved prior to that version.
- Returns
- true on success, nil and an error message if no matching stopwatch is found or if it cannot be started (because the later style behavior was indicated and it was already running).
- Examples
-- this is a common pattern for re-using stopwatches prior to 4.4.0 and starting them:
watch = watch or createStopWatch()
startStopWatch(watch)- After 4.4.0 the above code will work the same as it does not provide a second argument to the startStopWatch() function - if a false was used there it would be necessary to call stopStopWatch(...) and then resetStopWatch(...) before using startStopWatch(...) to re-use the stopwatch if the ID form is used, this is thus not quite the same behavior but it is more consistent with the model of how a real stopwatch would act.
stopAllNamedTimers
- stopAllNamedTimers(userName)
- Stops all named timers for userName and prevents them from firing any more. Information is retained and timers can be resumed.
- Example
stopAllNamedTimers("Demonnic") -- emergency stop situation, most likely.stopNamedTimer
- success = stopNamedTimer(userName, handlerName)
- Stops a named timer with name handlerName and prevents it from firing any more. Information is stored so it can be resumed later if desired.
- See also
- registerNamedTimer(), resumeNamedTimer()
- Parameters
- userName:
- The user name the event handler was registered under.
- handlerName:
- The name of the handler to stop. Same as used when you called registerNamedTimer()
- Returns
- true if successful, false if it didn't exist or was already stopped
- Example
local stopped = stopNamedTimer("Demonnic", "DemonVitals")
if stopped then
cecho("DemonVitals stopped!")
else
cecho("DemonVitals doesn't exist or already stopped; either way it won't fire any more.")
endstopStopWatch
- stopStopWatch(watchID or watchName)
- "Stops" (though see the note below) the stop watch and returns (only the first time it is called after the stopwatch has been set running with startStopWatch()) the elapsed time as a number of seconds, with a decimal portion give a resolution in milliseconds (thousandths of a second). You can also retrieve the current time without stopping the stopwatch with getStopWatchTime(), getBrokenDownStopWatchTime().
- See also: createStopWatch()
- Parameters
- watchID: The stopwatch ID you get with createStopWatch() or from Mudlet 4.4.0 the name given to that function or later set with setStopWatchName().
- Returns
- the elapsed time as a floating-point number of seconds - it may be negative if the time was previously adjusted/preset to a negative amount (with adjustStopWatch()) and that period has not yet elapsed.
- Examples
-- this is a common pattern for re-using stopwatches and starting them:
watch = watch or createStopWatch()
startStopWatch(watch)
-- do some long-running code here ...
print("The code took: "..stopStopWatch(watch).."s to run.")tempAnsiColorTrigger
- tempAnsiColorTrigger(foregroundColor[, backgroundColor], code[, expireAfter])
- This is an alternative to tempColorTrigger() which supports the full set of 256 ANSI color codes directly and makes a color trigger that triggers on the specified foreground and background color. The function returns the trigger ID for subsequent enableTrigger(), disableTrigger() and killTrigger() calls. The trigger is temporary in the sense that it won't stay when you close Mudlet, and it will go off multiple times until you disable or destroy it. You can also make it be temporary and self-delete after a number of matches with the expireAfter parameter.
- Parameters
- foregroundColor: The foreground color you'd like to trigger on.
- backgroundColor: The background color you'd like to trigger on.
- code to do: The code to do when the trigger runs - wrap it in [[ ]], or give it a Lua function.
- expireAfter: Delete trigger after a specified number of matches. You can make a trigger match not count towards expiration by returning true after it fires.
BackgroundColor and/or expireAfter may be omitted.
- Color codes (note that the values greater than or equal to zero are the actual number codes that ANSI and the game server uses for the 8/16/256 color modes)
- Special codes (may be extended in the future):
- -2 = default text color (what is used after an ANSI SGR 0 m code that resets the foreground and background colors to those set in the preferences)
- -1 = ignore (only one of the foreground or background codes can have this value - otherwise it would not be a color trigger!)
- Special codes (may be extended in the future):
- ANSI 8-color set:
- 0 = (dark) black
- 1 = (dark) red
- 2 = (dark) green
- 3 = (dark) yellow
- 4 = (dark) blue
- 5 = (dark) magenta
- 6 = (dark) cyan
- 7 = (dark) white {a.k.a. light gray}
- ANSI 8-color set:
- Additional colors in 16-color set:
- 8 = light black {a.k.a. dark gray}
- 9 = light red
- 10 = light green
- 11 = light yellow
- 12 = light blue
- 13 = light magenta
- 14 = light cyan
- 15 = light white
- Additional colors in 16-color set:
- 6 x 6 x 6 RGB (216) colors, shown as a 3x2-digit hex code
- 16 = #000000
- 17 = #000033
- 18 = #000066
- ...
- 229 = #FFFF99
- 230 = #FFFFCC
- 231 = #FFFFFF
- 6 x 6 x 6 RGB (216) colors, shown as a 3x2-digit hex code
- 24 gray-scale, also show as a 3x2-digit hex code
- 232 = #000000
- 233 = #0A0A0A
- 234 = #151515
- ...
- 253 = #E9E9E9
- 254 = #F4F4F4
- 255 = #FFFFFF
- 24 gray-scale, also show as a 3x2-digit hex code
- Examples
-- This script will re-highlight all text in a light cyan foreground color on any background with a red foreground color
-- until another foreground color in the current line is being met. temporary color triggers do not offer match_all
-- or filter options like the GUI color triggers because this is rarely necessary for scripting.
-- A common usage for temporary color triggers is to schedule actions on the basis of forthcoming text colors in a particular context.
tempAnsiColorTrigger(14, -1, [[selectString(matches[1],1) fg("red")]])
-- or:
tempAnsiColorTrigger(14, -1, function()
selectString(matches[1], 1)
fg("red")
end)
-- match the trigger only 4 times
tempColorTrigger(14, -1, [[selectString(matches[1],1) fg("red")]], 4)tempAlias
- aliasID = tempAlias(regex, code to do)
- Creates a temporary alias - temporary in the sense that it won't be saved when Mudlet restarts (unless you re-create it). The alias will go off as many times as it matches, it is not a one-shot alias. The function returns an ID for subsequent enableAlias(), disableAlias() and killAlias() calls.
- Parameters
- regex: Alias pattern in regex.
- code to do: The code to do when the alias fires - wrap it in [[ ]].
- Examples
myaliasID = tempAlias("^hi$", [[send ("hi") echo ("we said hi!")]])
-- you can also delete the alias later with:
killAlias(myaliasID)
-- tempAlias also accepts functions (and thus closures) - which can be an easier way to embed variables and make the code for an alias look less messy:
local variable = matches[2]
tempAlias("^hi$", function () send("hello, " .. variable) end)tempBeginOfLineTrigger
- tempBeginOfLineTrigger(part of line, code, expireAfter)
- Creates a trigger that will go off whenever the part of line it's provided with matches the line right from the start (doesn't matter what the line ends with). The trigger is temporary in the sense that it won't stay when you close Mudlet, and it will go off multiple times until you disable or destroy it. You can also make it be temporary and self-delete after a number of matches with the expireAfter parameter. The function returns the trigger ID for subsequent enableTrigger(), disableTrigger() and killTrigger() calls.
- Parameters
- part of line: start of the line that you'd like to match. This can also be regex.
- code to do: code to do when the trigger runs - wrap it in [[ ]], or give it a Lua function (since Mudlet 3.5.0).
- expireAfter: Delete trigger after a specified number of matches (since Mudlet 3.11). You can make a trigger match not count towards expiration by returning true after it fires.
- Examples
mytriggerID = tempBeginOfLineTrigger("Hello", [[echo("We matched!")]])
--[[ now this trigger will match on any of these lines:
Hello
Hello!
Hello, Bob!
but not on:
Oh, Hello
Oh, Hello!
]]
-- or as a function:
mytriggerID = tempBeginOfLineTrigger("Hello", function() echo("We matched!") end)-- you can make the trigger match only a certain amount of times as well, 5 in this example:
tempBeginOfLineTrigger("This is the start of the line", function() echo("We matched!") end, 5)
-- if you want a trigger match not to count towards expiration, return true. In this example it'll match 5 times unless the line is "Start of line and this is the end."
tempBeginOfLineTrigger("Start of line",
function()
if line == "Start of line and this is the end." then
return true
else
return false
end
end, 5)tempButton
- tempButton(toolbar name, button text, orientation)
- Creates a temporary button. Temporary means, it will disappear when Mudlet is closed.
- Parameters
- toolbar name: The name of the toolbar to place the button into.
- button text: The text to display on the button.
- orientation: a number 0 or 1 where 0 means horizontal orientation for the button and 1 means vertical orientation for the button. This becomes important when you want to have more than one button in the same toolbar.
- Example
-- makes a temporary toolbar with two buttons at the top of the main Mudlet window
lua tempButtonToolbar("topToolbar", 0, 0)
lua tempButton("topToolbar", "leftButton", 0)
lua tempButton("topToolbar", "rightButton", 0)![]() Note: This function is not that useful as there is no function yet to assign a Lua script or command to such a temporary button - though it may have some use to flag a status indication!
Note: This function is not that useful as there is no function yet to assign a Lua script or command to such a temporary button - though it may have some use to flag a status indication!
tempButtonToolbar
- tempButtonToolbar(name, location, orientation)
- Creates a temporary button toolbar. Temporary means, it will disappear when Mudlet is closed.
- Parameters
- name: The name of the toolbar.
- location: a number from 0 to 3, where 0 means "at the top of the screen", 1 means "left side", 2 means "right side" and 3 means "in a window of its own" which can be dragged and attached to the main Mudlet window if needed.
- orientation: a number 0 or 1, where 0 means horizontal orientation for the toolbar and 1 means vertical orientation for the toolbar. This becomes important when you want to have more than one toolbar in the same location of the window.
- Example
-- makes a temporary toolbar with two buttons at the top of the main Mudlet window
lua tempButtonToolbar("topToolbar", 0, 0)
lua tempButton("topToolbar", "leftButton", 0)
lua tempButton("topToolbar", "rightButton", 0)tempColorTrigger
- tempColorTrigger(foregroundColor, backgroundColor, code, expireAfter)
- Makes a color trigger that triggers on the specified foreground and background color. Both colors need to be supplied in form of these simplified ANSI 16 color mode codes. The function returns the trigger ID for subsequent enableTrigger(), disableTrigger() and killTrigger() calls. The trigger is temporary in the sense that it won't stay when you close Mudlet, and it will go off multiple times until you disable or destroy it. You can also make it be temporary and self-delete after a number of matches with the expireAfter parameter.
See also: tempAnsiColorTrigger
- Parameters
- foregroundColor: The foreground color you'd like to trigger on (for ANSI colors, see tempAnsiColorTrigger).
- backgroundColor: The background color you'd like to trigger on (same as above).
- code to do: The code to do when the trigger runs - wrap it in
[[and]], or give it a Lua function, ie.function() <your code here> end(since Mudlet 3.5.0). - expireAfter: Delete trigger after a specified number of matches (since Mudlet 3.11). You can make a trigger match not count towards expiration by returning true after it fires.
- Color codes
0 = default text color
1 = light black
2 = dark black
3 = light red
4 = dark red
5 = light green
6 = dark green
7 = light yellow
8 = dark yellow
9 = light blue
10 = dark blue
11 = light magenta
12 = dark magenta
13 = light cyan
14 = dark cyan
15 = light white
16 = dark white- Examples
-- This script will re-highlight all text in blue foreground colors on a black background with a red foreground color
-- on a blue background color until another color in the current line is being met. temporary color triggers do not
-- offer match_all or filter options like the GUI color triggers because this is rarely necessary for scripting.
-- A common usage for temporary color triggers is to schedule actions on the basis of forthcoming text colors in a particular context.
tempColorTrigger(9, 2, [[selectString(matches[1],1) fg("red") bg("blue")]])
-- or:
tempColorTrigger(9, 2, function()
selectString(matches[1], 1)
fg("red")
bg("blue")
end)
-- match the trigger only 4 times
tempColorTrigger(9, 2, [[selectString(matches[1],1) fg("red") bg("blue")]], 4)tempComplexRegexTrigger
- tempComplexRegexTrigger(name, regex, code, multiline, fg color, bg color, filter, match all, highlight fg color, highlight bg color, play sound file, fire length, line delta, expireAfter)
- Allows you to create a temporary trigger in Mudlet, using any of the UI-available options. The trigger is temporary in the sense that it won't stay when you close Mudlet, and it will go off multiple times until you disable or destroy it. You can also make it be temporary and self-delete after a number of matches with the expireAfter parameter.
- Returns the trigger ID or nil and an error message (on error).
- Parameters
- name - The name you call this trigger. You can use this with killTrigger().
- regex - The regular expression you want to match.
- code - Code to do when the trigger runs. You need to wrap it in [[ ]], or give a Lua function (since Mudlet 3.5.0).
- multiline - Set this to 1, if you use multiple regex (see note below), and you need the trigger to fire only if all regex have been matched within the specified line delta. Then all captures will be saved in multimatches instead of matches. If this option is set to 0, the trigger will fire when any regex has been matched.
- fg color - The foreground color you'd like to trigger on - Not currently implemented.
- bg color - The background color you'd like to trigger on - Not currently implemented.
- filter - Do you want only the filtered content (=capture groups) to be passed on to child triggers? Otherwise also the initial line.
- match all - Set to 1, if you want the trigger to match all possible occurrences of the regex in the line. When set to 0, the trigger will stop after the first successful match.
- highlight fg color - The foreground color you'd like your match to be highlighted in. e.g.
"yellow","#ff0"or"#ffff00" - highlight bg color - The background color you'd like your match to be highlighted in. e.g.
"red","#f00"or"#ff0000" - play sound file - Set to the name of the sound file you want to play upon firing the trigger. e.g.
"C:/windows/media/chord.wav" - fire length - Number of lines within which all condition must be true to fire the trigger.
- line delta - Keep firing the script for x more lines, after the trigger or chain has matched.
- expireAfter - Delete trigger after a specified number of matches (since Mudlet 3.11). You can make a trigger match not count towards expiration by returning true after it fires.
![]() Note: Set the options starting at multiline to 0, if you don't want to use those options. Otherwise enter 1 to activate or the value you want to use.
Note: Set the options starting at multiline to 0, if you don't want to use those options. Otherwise enter 1 to activate or the value you want to use.
![]() Note: If you want to use the color option, you need to provide both fg and bg together. - Not currently implemented.
Note: If you want to use the color option, you need to provide both fg and bg together. - Not currently implemented.
- Examples
-- This trigger will be activated on any new line received.
triggerNumber = tempComplexRegexTrigger("anyText", "^(.*)$", [[echo("Text received!")]], 0, 0, 0, 0, 0, 0, 0, 0, 0, 0, nil)
-- This trigger will match two different regex patterns:
tempComplexRegexTrigger("multiTrigger", "first regex pattern", [[]], 1, 0, 0, 0, 0, 0, 0, 0, 0, 0, nil)
tempComplexRegexTrigger("multiTrigger", "second regex pattern", [[echo("Trigger matched!")]], 1, 0, 0, 0, 0, 0, 0, 0, 0, 0, nil)![]() Note: For making a multiline trigger like in the second example, you need to use the same trigger name and options, providing the new pattern to add. Note that only the last script given will be set, any others ignored.
Note: For making a multiline trigger like in the second example, you need to use the same trigger name and options, providing the new pattern to add. Note that only the last script given will be set, any others ignored.
tempExactMatchTrigger
- tempExactMatchTrigger(exact line, code, expireAfter)
- Creates a trigger that will go off whenever the line from the game matches the provided line exactly (ends the same, starts the same, and looks the same). You don't need to use any of the regex symbols here (^ and $). The function returns the trigger ID for subsequent enableTrigger(), disableTrigger() and killTrigger() calls. The trigger is temporary in the sense that it won't stay when you close Mudlet, and it will go off multiple times until you disable or destroy it. You can also make it be temporary and self-delete after a number of matches with the expireAfter parameter.
- Parameters
- exact line: exact line you'd like to match.
- code: code to do when the trigger runs - wrap it in [[ ]], or give it a Lua function (since Mudlet 3.5.0).
- expireAfter: Delete trigger after a specified number of matches (since Mudlet 3.11). You can make a trigger match not count towards expiration by returning true after it fires.
- Examples
mytriggerID = tempExactMatchTrigger("You have recovered balance on all limbs.", [[echo("We matched!")]])
-- as a function:
mytriggerID = tempExactMatchTrigger("You have recovered balance on all limbs.", function() echo("We matched!") end)
-- expire after 4 matches:
tempExactMatchTrigger("You have recovered balance on all limbs.", function() echo("Got balance back!\n") end, 4)
-- you can also avoid expiration by returning true:
tempExactMatchTrigger("You have recovered balance on all limbs.", function() echo("Got balance back!\n") return true end, 4)tempKey
- tempKey([modifier], key code, lua code)
- Creates a keybinding. This keybinding isn't temporary in the sense that it'll go off only once (it'll go off as often as you use it), but rather it won't be saved when Mudlet is closed.
- modifier
- (optional) modifier to use - can be one of mudlet.keymodifier.Control, mudlet.keymodifier.Alt, mudlet.keymodifier.Shift, mudlet.keymodifier.Meta, mudlet.keymodifier.Keypad, or mudlet.keymodifier.GroupSwitch or the default value of mudlet.keymodifier.None which is used if the argument is omitted. To use multiple modifiers, add them together: (mudlet.keymodifier.Shift + mudlet.keymodifier.Control)
- key code
- actual key to use - one of the values available in mudlet.key, e.g. mudlet.key.Escape, mudlet.key.Tab, mudlet.key.F1, mudlet.key.A, and so on. The list is a bit long to list out in full so it is available here.
- lua code'
- code you'd like the key to run - wrap it in [[ ]].
- Returns
- a unique id number for that key.
- Examples
keyID = tempKey(mudlet.key.F8, [[echo("hi")]])
anotherKeyID = tempKey(mudlet.keymodifier.Control, mudlet.key.F8, [[echo("hello")]])
-- bind Ctrl+Shift+W:
tempKey(mudlet.keymodifier.Control + mudlet.keymodifier.Shift, mudlet.key.W, [[send("jump")]])
-- delete it if you don't like it anymore
killKey(keyID)
-- tempKey also accepts functions (and thus closures) - which can be an easier way to embed variables and make the code for tempKeys look less messy:
tempKey(mudlet.key.F8, function() echo("Hi\n") end)tempLineTrigger
- tempLineTrigger(from, howMany, code)
- Temporary trigger that will fire on n consecutive lines following the current line. This is useful to parse output that is known to arrive in a certain line margin or to delete unwanted output from the game - the trigger does not require any patterns to match on. The function returns the trigger ID for subsequent enableTrigger(), disableTrigger() and killTrigger() calls. The trigger is temporary in the sense that it won't stay when you close Mudlet, and it will go off multiple times until you disable or destroy it. You can also make it be temporary and self-delete after a number of matches with the expireAfter parameter.
- Parameters
- from: from which line after this one should the trigger activate - 1 will activate right on the next line.
- howMany: how many lines to run for after the trigger has activated.
- code: code to do when the trigger runs - wrap it in [[ ]], or give it a Lua function (since Mudlet 3.5.0).
- Example
-- Will fire 3 times with the next line from the game
tempLineTrigger(1, 3, function() print(" trigger matched!") end)
-- Will fire 5 lines after the current line and fire twice on 2 consecutive lines
tempLineTrigger(5, 2, function() print(" trigger matched!") end, 7)tempPromptTrigger
- tempPromptTrigger(code, expireAfter)
- Temporary trigger that will match on the games prompt. The function returns the trigger ID for subsequent enableTrigger(), disableTrigger() and killTrigger() calls. The trigger is temporary in the sense that it won't stay when you close Mudlet, and it will go off multiple times until you disable or destroy it. You can also make it be temporary and self-delete after a number of matches with the expireAfter parameter.
![]() Note: If the trigger is not working, check that the N: bottom-right has a number. This feature requires telnet Go-Ahead to be enabled in the game.
Note: If the trigger is not working, check that the N: bottom-right has a number. This feature requires telnet Go-Ahead to be enabled in the game.
- Parameters
- code:
- code to do when the trigger runs - wrap it in [[ ]], or give it a Lua function.
- expireAfter: (available in Mudlet 3.11+)
- Delete trigger after a specified number of matches. You can make a trigger match not count towards expiration by returning true after it fires.
- Example
tempPromptTrigger(function()
echo("hello! this is a prompt!")
end)
-- match only 2 times:
tempPromptTrigger(function()
echo("hello! this is a prompt!")
end, 2)
-- match only 2 times, unless the prompt is "55 health."
tempPromptTrigger(function()
if line == "55 health." then return true end
end, 2)tempRegexTrigger
- tempRegexTrigger(regex, code, expireAfter)
- Creates a temporary regex trigger that executes the code whenever it matches. The function returns the trigger ID for subsequent enableTrigger(), disableTrigger() and killTrigger() calls. The trigger is temporary in the sense that it won't stay when you close Mudlet, and it will go off multiple times until you disable or destroy it. You can also make it be temporary and self-delete after a number of matches with the expireAfter parameter.
- Parameters
- regex: regular expression that lines will be matched on.
- code: code to do when the trigger runs - wrap it in [[ ]], or give it a Lua function (since Mudlet 3.5.0).
- expireAfter: Delete trigger after a specified number of matches (since Mudlet 3.11). You can make a trigger match not count towards expiration by returning true after it fires.
- Examples
-- create a non-duplicate trigger that matches on any line and calls a function
html5log = html5log or {}
if html5log.trig then killTrigger(html5log.trig) end
html5log.trig = tempRegexTrigger("^", [[html5log.recordline()]])
-- or a simpler variant:
html5log.trig = tempRegexTrigger("^", html5log.recordline)
-- only match 3 times:
tempRegexTrigger("^You prick (.+) twice in rapid succession with", function() echo("Hit "..matches[2].."!\n") end, 3)
-- since Mudlet 4.11+ you can use named capturing groups
tempRegexTrigger("^You see (?<material>\\w+) axe inside chest\\.", function() echo("\nAxe is " .. matches.material) end)tempTimer
- tempTimer(time, code to do[, repeating])
- Creates a temporary one-shot timer and returns the timer ID, which you can use with enableTimer(), disableTimer() and killTimer() functions. You can use 2.3 seconds or 0.45 etc. After it has fired, the timer will be deactivated and destroyed, so it will only go off once. Here is a more detailed introduction to tempTimer.
- Parameters
- time: The time in seconds for which to set the timer for - you can use decimals here for precision. The timer will go off x given seconds after you make it.
- code to do: The code to do when the timer is up - wrap it in [[ ]], or provide a Lua function.
- repeating: (optional) if true, keep firing the timer over and over until you kill it (available in Mudlet 4.0+).
- Examples
-- wait half a second and then run the command
tempTimer(0.5, function() send("kill monster") end)
-- echo between 1 and 5 seconds after creation
tempTimer(math.random(1, 5), function() echo("hi!") end)
-- or an another example - two ways to 'embed' variable in a code for later:
local name = matches[2]
tempTimer(2, [[send("hello, ]]..name..[[ !")]])
-- or:
tempTimer(2, function()
send("hello, "..name)
end)
-- create a looping timer
timerid = tempTimer(1, function() display("hello!") end, true)
-- later when you'd like to stop it:
killTimer(timerid)![]() Note: Double brackets, e.g: [[ ]] can be used to quote strings in Lua. The difference to the usual `" " quote syntax is that `[[ ]] also accepts the character ". Consequently, you don’t have to escape the " character in the above script. The other advantage is that it can be used as a multiline quote, so your script can span several lines.
Note: Double brackets, e.g: [[ ]] can be used to quote strings in Lua. The difference to the usual `" " quote syntax is that `[[ ]] also accepts the character ". Consequently, you don’t have to escape the " character in the above script. The other advantage is that it can be used as a multiline quote, so your script can span several lines.
![]() Note: Lua code that you provide as an argument is compiled from a string value when the timer fires. This means that if you want to pass any parameters by value e.g. you want to make a function call that uses the value of your variable myGold as a parameter you have to do things like this:
Note: Lua code that you provide as an argument is compiled from a string value when the timer fires. This means that if you want to pass any parameters by value e.g. you want to make a function call that uses the value of your variable myGold as a parameter you have to do things like this:
tempTimer( 3.8, [[echo("at the time of the tempTimer call I had ]] .. myGold .. [[ gold.")]] )
-- tempTimer also accepts functions (and thus closures) - which can be an easier way to embed variables and make the code for timers look less messy:
local variable = matches[2]
tempTimer(3, function () send("hello, " .. variable) end)tempTrigger
- tempTrigger(substring, code, expireAfter)
- Creates a substring trigger that executes the code whenever it matches. The function returns the trigger ID for subsequent enableTrigger(), disableTrigger() and killTrigger() calls. The trigger is temporary in the sense that it won't stay when you close Mudlet, and it will go off multiple times until you disable or destroy it. You can also make it be temporary and self-delete after a number of matches with the expireAfter parameter.
- Parameters
- substring: The substring to look for - this means a part of the line. If your provided text matches anywhere within the line from the game, the trigger will go off.
- code: The code to do when the trigger runs - wrap it in [[ ]], or give it a Lua function (since Mudlet 3.5)
- expireAfter: Delete trigger after a specified number of matches (since Mudlet 3.11). You can make a trigger match not count towards expiration by returning true after it fires.
Example:
-- this example will highlight the contents of the "target" variable.
-- it will also delete the previous trigger it made when you call it again, so you're only ever highlighting one name
if id then killTrigger(id) end
id = tempTrigger(target, [[selectString("]] .. target .. [[", 1) fg("gold") resetFormat()]])
-- you can also write the same line as:
id = tempTrigger(target, function() selectString(target, 1) fg("gold") resetFormat() end)
-- or like so if you have a highlightTarget() function somewhere
id = tempTrigger(target, highlightTarget)-- a simpler trigger to replace "hi" with "bye" whenever you see it
tempTrigger("hi", [[selectString("hi", 1) replace("bye")]])-- this trigger will go off only 2 times
tempTrigger("hi", function() selectString("hi", 1) replace("bye") end, 2)-- table to store our trigger IDs in
nameIDs = nameIDs or {}
-- delete any existing triggers we've already got
for _, id in ipairs(nameIDs) do killTrigger(id) end
-- create new ones, avoiding lots of ]] [[ to embed the name
for _, name in ipairs{"Alice", "Ashley", "Aaron"} do
nameIDs[#nameIDs+1] = tempTrigger(name, function() print(" Found "..name.."!") end)
end- Additional Notes
tempTriggers begin matching on the same line they're created on.
If your code deletes and recreates the tempTrigger, or if you send a matching command again, it's possible to get into an infinite loop.
Make use of the expireAfter parameter, disableTrigger(), or killTrigger() to prevent a loop from forming.
Networking Functions
A collection of functions for managing networking.
connectToServer
- connectToServer(host, port, [save])
- Connects to a given game.
- Parameters
- host:
- Server domain or IP address.
- port:
- Servers port.
- save:
- (optional, boolean) if provided, saves the new connection parameters in the profile so they'll be used next time you open it.
![]() Note: save is available in Mudlet 3.2+.
Note: save is available in Mudlet 3.2+.
- Example
connectToServer("midnightsun2.org", 3000)
-- save to disk so these parameters are used next time when opening the profile
connectToServer("midnightsun2.org", 3000, true)disconnect
- disconnect()
- Disconnects you from the game right away. Note that this will not properly log you out of the game - use an ingame command for that. Such commands vary, but typically QUIT will work.
- See also: reconnect()
- Example
disconnect()downloadFile
- downloadFile(saveto, url)
- Downloads the resource at the given url into the saveto location on disk. This does not pause the script until the file is downloaded - instead, it lets it continue right away and downloads in the background. When a download is finished, the sysDownloadDone event is raised (with the saveto location as the argument), or when a download fails, the sysDownloadError event is raised with the reason for failure. You may call downloadFile multiple times and have multiple downloads going on at once - but they aren’t guaranteed to be downloaded in the same order that you started them in.
- See also: getHTTP(), postHTTP(), putHTTP(), deleteHTTP()

![]() Note: Since Mudlet 3.0, https downloads are supported and the actual url that was used for the download is returned - useful in case of redirects.
Note: Since Mudlet 3.0, https downloads are supported and the actual url that was used for the download is returned - useful in case of redirects.
- Example
-- just download a file and save it in our profile folder
local saveto = getMudletHomeDir().."/dark-theme-mudlet.zip"
local url = "http://www.mudlet.org/wp-content/files/dark-theme-mudlet.zip"
downloadFile(saveto, url)
cecho("<white>Downloading <green>"..url.."<white> to <green>"..saveto.."\n")
A more advanced example that downloads a webpage, reads it, and prints a result from it:
-- create a function to parse the downloaded webpage and display a result
function downloaded_file(_, filename)
-- is the file that downloaded ours?
if not filename:find("achaea-who-count.html", 1, true) then return end
-- read the contents of the webpage in
local f, s, webpage = io.open(filename)
if f then webpage = f:read("*a"); io.close(f) end
-- delete the file on disk, don't clutter
os.remove(filename)
-- parse our downloaded file for the player count
local pc = webpage:match([[Total: (%d+) players online]])
display("Achaea has "..tostring(pc).." players on right now.")
end
-- register our function to run on the event that something was downloaded
registerAnonymousEventHandler("sysDownloadDone", "downloaded_file")
-- download a list of fake users for a demo
downloadFile(getMudletHomeDir().."/achaea-who-count.html", "https://www.achaea.com/game/who")Result should look like this:
.
getConnectionInfo
- getConnectionInfo()
- Returns the server address and port that you're currently connected to, and (in Mudlet 4.12+)
trueorfalseindicating if you're currently connected to a game. - See also: connectToServer()
- Example
local host, port, connected = getConnectionInfo()
cecho(string.format("<light_grey>Playing on <forest_green>%s:%s<light_grey>, currently connected? <forest_green>%s\n", host, port, tostring(connected)))-- echo the new connection parameters whenever we connect to a different host with connectToServer()
function echoInfo()
local host, port = getConnectionInfo()
cecho(string.format("<light_grey>Now connected to <forest_green>%s:%s\n", host, port))
end
registerAnonymousEventHandler("sysConnectionEvent", "echoInfo")getIrcChannels
- getIrcChannels()
- Returns a list of channels the IRC client is joined to as a lua table. If the client is not yet started the value returned is loaded from disk and represents channels the client will auto-join when started.
- See also: setIrcChannels()
- Example
display(getIrcChannels())
-- Prints: {"#mudlet", "#lua"}getIrcConnectedHost
- getIrcConnectedHost()
- Returns true+host where host is a string containing the host name of the IRC server, as given to the client by the server while starting the IRC connection. If the client has not yet started or finished connecting this will return false and an empty string.
- This function can be particularly useful for testing if the IRC client has connected to a server prior to sending data, and it will not auto-start the IRC client.
- The hostname value this function returns can be used to test if sysIrcMessage events are sent from the server or a user on the network.
- Example
local status, hostname = getIrcConnectedHost()
if status == true then
-- do something with connected IRC, send IRC commands, store 'hostname' elsewhere.
-- if sysIrcMessage sender = hostname from above, message is likely a status, command response, or an error from the Server.
else
-- print a status, change connection settings, or just continue waiting to send IRC data.
endgetIrcNick
- getIrcNick()
- Returns a string containing the IRC client nickname. If the client is not yet started, your default nickname is loaded from IRC client configuration.
- See also: setIrcNick()
- Example
local nick = getIrcNick()
echo(nick)
-- Prints: "Sheldor"getIrcServer
- getIrcServer()
- Returns the IRC client server name and port as a string and a number respectively. If the client is not yet started your default server is loaded from IRC client configuration.
- See also: setIrcServer()
- Example
local server, port = getIrcServer()
echo("server: "..server..", port: "..port.."\n")getNetworkLatency
- getNetworkLatency()
- Returns the last measured response time between the sent command and the server reply in seconds - e.g. 0.058 (=58 milliseconds lag) or 0.309 (=309 milliseconds). This is the N: number you see bottom-right of Mudlet.
Also known as server lag.
- Example
Need example
openUrl
- openUrl (url)
- Opens the default OS browser for the given URL.
- Example
openUrl("http://google.com")
openUrl("www.mudlet.org")reconnect
- reconnect()
- Force-reconnects (so if you're connected, it'll disconnect) you to the game.
- Example
-- you could trigger this on a log out message to reconnect, if you'd like
reconnect()restartIrc
- restartIrc()
- Restarts the IRC client connection, reloading configurations from disk before reconnecting the IRC client.
sendAll
- sendAll(list of things to send, [echo back or not])
- sends multiple things to the game. If you'd like the commands not to be shown, include false at the end.
- See also: send()
- Example
-- instead of using many send() calls, you can use one sendAll
sendAll("outr paint", "outr canvas", "paint canvas")
-- can also have the commands not be echoed
sendAll("hi", "bye", false)sendATCP
- sendATCP(message, what)
- Need description
- See also: ATCP Protocol, ATCP Extensions, Achaea Telnet Client Protocol specification, Description by forum user KaVir (2013), Description by forum user Iocun (2009)
- Parameters
- message:
- The message that you want to send.
- what:
- Need description
- Example
Need example
sendGMCP
- sendGMCP(command)
- Sends a GMCP message to the server. The IRE document on GMCP has information about what can be sent, and what tables it will use, etcetera.
- Note that this function is rarely used in practice. For most GMCP modules, the messages are automatically sent by the server when a relevant event happens in the game. For example, LOOKing in your room prompts the server to send the room description and contents, as well as the GMCP message gmcp.Room. A call to sendGMCP would not be required in this case.
- When playing an IRE game, a call to
send(" ")afterwards is necessary due to a bug in the game with compression (MCCP) is enabled.
- See also: GMCP Scripting for Discord status
- Example
--This would send "Core.KeepAlive" to the server, which resets the timeout
sendGMCP("Core.KeepAlive")
--This would send a request for the server to send an update to the gmcp.Char.Skills.Groups table.
sendGMCP("Char.Skills.Get {}")
--This would send a request for the server to send a list of the skills in the
--vision group to the gmcp.Char.Skills.List table.
sendGMCP("Char.Skills.Get " .. yajl.to_string{group = "vision"})
--And finally, this would send a request for the server to send the info for
--hide in the woodlore group to the gmcp.Char.Skills.Info table
sendGMCP("Char.Skills.Get " .. yajl.to_string{group="MWP", name="block"})sendIrc
- sendIrc(target, message)
- Sends a message to an IRC channel or person. Returns true+status if message could be sent or was successfully processed by the client, or nil+error if the client is not ready for sending, and false+status if the client filtered the message or failed to send it for some reason. If the IRC client hasn't started yet, this function will initiate the IRC client and begin a connection.
To receive an IRC message, check out the sysIrcMessage event.
![]() Note: Since Mudlet 3.3, auto-opens the IRC window and returns the success status.
Note: Since Mudlet 3.3, auto-opens the IRC window and returns the success status.
- Parameters
- target:
- nick or channel name and if omitted will default to the first available channel in the list of joined channels.
- message:
- The message to send, may contain IRC client commands which start with
/and can use all commands which are available through the client window.
- Example
-- this would send "hello from Mudlet!" to the channel #mudlet on freenode.net
sendIrc("#mudlet", "hello from Mudlet!")
-- this would send "identify password" in a private message to Nickserv on freenode.net
sendIrc("Nickserv", "identify password")
-- use an in-built IRC command
sendIrc("#mudlet", "/topic")![]() Note: The following IRC commands are available since Mudlet 3.3:
Note: The following IRC commands are available since Mudlet 3.3:
- /ACTION <target> <message...>
- /ADMIN (<server>)
- /AWAY (<reason...>)
- /CLEAR (<buffer>) -- Clears the text log for the given buffer name. Uses the current active buffer if none are given.
- /CLOSE (<buffer>) -- Closes the buffer and removes it from the Buffer list. Uses the current active buffer if none are given.
- /HELP (<command>) -- Displays some help information about a given command or lists all available commands.
- /INFO (<server>)
- /INVITE <user> (<#channel>)
- /JOIN <#channel> (<key>)
- /KICK (<#channel>) <user> (<reason...>)
- /KNOCK <#channel> (<message...>)
- /LIST (<channels>) (<server>)
- /ME [target] <message...>
- /MODE (<channel/user>) (<mode>) (<arg>)
- /MOTD (<server>)
- /MSG <target> <message...> -- Sends a message to target, can be used to send Private messages.
- /NAMES (<#channel>)
- /NICK <nick>
- /NOTICE <#channel/user> <message...>
- /PART (<#channel>) (<message...>)
- /PING (<user>)
- /RECONNECT -- Issues a Quit command to the IRC Server and closes the IRC connection then reconnects to the IRC server. The same as calling ircRestart() in Lua.
- /QUIT (<message...>)
- /QUOTE <command> (<parameters...>)
- /STATS <query> (<server>)
- /TIME (<user>)
- /TOPIC (<#channel>) (<topic...>)
- /TRACE (<target>)
- /USERS (<server>)
- /VERSION (<user>)
- /WHO <mask>
- /WHOIS <user>
- /WHOWAS <user>
![]() Note: The following IRC commands are available since Mudlet 3.15:
Note: The following IRC commands are available since Mudlet 3.15:
- /MSGLIMIT <limit> (<buffer>) -- Sets the limit for messages to keep in the IRC client message buffers and saves this setting. If a specific buffer/channel name is given the limit is not saved and applies to the given buffer until the application is closed or the limit is changed again. For this reason, global settings should be applied first, before settings for specific channels/PM buffers.
sendMSDP
- sendMSDP(variable[, value][, value...])
- Sends a MSDP message to the server.
- Parameters
- variable:
- The variable, in MSDP terms, that you want to request from the server.
- value:
- The variables value that you want to request. You can request more than one value at a time.
- Example
-- ask for a list of commands, lists, and reportable variables that the server supports
sendMSDP("LIST", "COMMANDS", "LISTS", "REPORTABLE_VARIABLES")
-- ask the server to start keeping you up to date on your health
sendMSDP("REPORT", "HEALTH")
-- or on your health and location
sendMSDP("REPORT", "HEALTH", "ROOM_VNUM", "ROOM_NAME")sendTelnetChannel102
- sendTelnetChannel102(msg)
- Sends a message via the 102 subchannel back to the game (that's used in Aardwolf). The msg is in a two byte format; see the link below to the Aardwolf Wiki for how that works.
- Example
-- turn prompt flags on:
sendTelnetChannel102("\52\1")
-- turn prompt flags off:
sendTelnetChannel102("\52\2")To see the list of options that Aardwolf supports go to: Using Telnet negotiation to control MUD client interaction.
setIrcChannels
- setIrcChannels(channels)
- Saves the given channels to disk as the new IRC client channel auto-join configuration. This value is not applied to the current active IRC client until it is restarted with restartIrc()
- See also: getIrcChannels(), restartIrc()
- Parameters
- channels:
- A table containing strings which are valid channel names. Any channels in the list which aren't valid are removed from the list.
- Example
setIrcChannels( {"#mudlet", "#lua", "irc"} )
-- Only the first two will be accepted, as "irc" is not a valid channel name.setIrcNick
- setIrcNick(nickname)
- Saves the given nickname to disk as the new IRC client configuration. This value is not applied to the current active IRC client until it is restarted with restartIrc()
- See also: getIrcNick(), restartIrc()
- Parameters
- nickname:
- A string with your new desired name in IRC.
- Example
setIrcNick( "Sheldor" )setIrcServer
- setIrcServer(hostname, port[, secure])
- Saves the given server's address to disk as the new IRC client connection configuration. These values are not applied to the current active IRC client until it is restarted with restartIrc()
- See also: getIrcServer(), restartIrc()
- Parameters
- hostname:
- A string containing the hostname of the IRC server.
- port:
- (optional) A number indicating the port of the IRC server. Defaults to 6667, if not provided.
- secure:
- (optional) Boolean, true if server uses Transport Layer Security. Defaults to false.
- Example
setIrcServer("irc.libera.chat", 6667)getHTTP
- getHTTP(url, headersTable)
- Sends an HTTP GET request to the given URL. Raises sysGetHttpDone on success or sysGetHttpError on failure.
- See also: downloadFile().

- Parameters
- url:
- Location to send the request to.
- headersTable:
- (optional) table of headers to send with your request.
- Examples
function onHttpGetDone(_, url, body)
cecho(string.format("<white>url: <dark_green>%s<white>, body: <dark_green>%s", url, body))
end
registerAnonymousEventHandler("sysGetHttpDone", onHttpGetDone)
getHTTP("https://httpbin.org/info")
getHTTP("https://httpbin.org/are_you_awesome", {["X-am-I-awesome"] = "yep I am"})-- Status requests typically use GET requests
local url = "http://postman-echo.com/status"
local header = {["Content-Type"] = "application/json"}
-- first we create something to handle the success, and tell us what we got
registerAnonymousEventHandler('sysGetHttpDone', function(event, rurl, response)
if rurl == url then display(r) else return true end -- this will show us the response body, or if it's not the right url, then do not delete the handler
end, true) -- this sets it to delete itself after it fires
-- then we create something to handle the error message, and tell us what went wrong
registerAnonymousEventHandler('sysGetHttpError', function(event, response, rurl)
if rurl == url then display(r) else return true end -- this will show us the response body, or if it's not the right url, then do not delete the handler
end, true) -- this sets it to delete itself after it fires
-- Lastly, we make the request:
getHTTP(url, header)
-- Pop this into an alias and try it yourself!postHTTP
- postHTTP(dataToSend, url, headersTable, file)
- Sends an HTTP POST request to the given URL, either as text or with a specific file you'd like to upload. Raises sysPostHttpDone on success or sysPostHttpError on failure.
- See also: downloadFile(), getHTTP(), putHTTP(), deleteHTTP().
- Parameters
- dataToSend:
- Text to send in the request (unless you provide a file to upload).
- url:
- Location to send the request to.
- headersTable:
- (optional) table of headers to send with your request.
- file:
- (optional) file to upload as part of the POST request. If provided, this will replace 'dataToSend'.
- If you use a scripting language (ex. PHP) to handle this post, remember that the file is sent as raw data. Expecially no field name is provided, dispite it works in common html post.
- Examples
function onHttpPostDone(_, url, body)
cecho(string.format("<white>url: <dark_green>%s<white>, body: <dark_green>%s", url, body))
end
registerAnonymousEventHandler("sysPostHttpDone", onHttpPostDone)
postHTTP("why hello there!", "https://httpbin.org/post")
postHTTP("this us a request with custom headers", "https://httpbin.org/post", {["X-am-I-awesome"] = "yep I am"})
postHTTP(nil, "https://httpbin.org/post", {}, "<fill in file location to upload here, maybe get from invokeDialog>")-- This will create a JSON message body. Many modern REST APIs expect a JSON body.
local url = "http://postman-echo.com/post"
local data = {message = "I am the banana", user = "admin"}
local header = {["Content-Type"] = "application/json"}
-- first we create something to handle the success, and tell us what we got
registerAnonymousEventHandler('sysPostHttpDone', function(event, rurl, response)
if rurl == url then display(response) else return true end -- this will show us the response body, or if it's not the right url, then do not delete the handler
end, true) -- this sets it to delete itself after it fires
-- then we create something to handle the error message, and tell us what went wrong
registerAnonymousEventHandler('sysPostHttpError', function(event, response, rurl)
if rurl == url then display(response) else return true end -- this will show us the response body, or if it's not the right url, then do not delete the handler
end, true) -- this sets it to delete itself after it fires
-- Lastly, we make the request:
postHTTP(yajl.to_string(data), url, header) -- yajl.to_string converts our Lua table into a JSON-like string so the server can understand it
-- Pop this into an alias and try it yourself!- HTTP Basic Authentication Example
If your HTTP endpoint requires authentication to post data, HTTP Basic Authentication is a common method for doing so. There are two ways to do so.
OPTION 1: URL encoding: Many HTTP servers allow you to enter a HTTP Basic Authentication username and password at the beginning of the URL itself, in format: https://username:password@domain.com/path/to/endpoint
OPTION 2: Authorization Header: Some HTTP servers may require you to put your Basic Authentication into the 'Authorization' HTTP header value.
This requires encoding the username:password into base64. For example, if your username is 'user' and your password is '12345', you'd need to run the string "user:12345" through a base64 encoder, which would result in the string: dXNlcjoxMjM0NQ==
Then, you'd need to set the HTTP header 'Authorization' field value to indicate it is using Basic auth and inserting the base64 string as: ['Authorization'] = "Basic dXNlcjoxMjM0NQ=="
As you're encoding your username and password, you probably want to do this encoding locally for security reasons. You also probably want to only use https:// and not http:// when sending usernames and passwords over the internet.
In the HTTP Basic Authentication example below, there is an inline base64Encode() function included:
function base64Encode(data)
-- Lua 5.1+ base64 v3.0 (c) 2009 by Alex Kloss <alexthkloss@web.de>
-- licensed under the terms of the LGPL2
local b = 'ABCDEFGHIJKLMNOPQRSTUVWXYZabcdefghijklmnopqrstuvwxyz0123456789+/'
return ((data:gsub('.', function(x)
local r,b='',x:byte()
for i=8,1,-1 do r=r..(b%2^i-b%2^(i-1)>0 and '1' or '0') end
return r;
end)..'0000'):gsub('%d%d%d?%d?%d?%d?', function(x)
if (#x < 6) then return '' end
local c=0
for i=1,6 do c=c+(x:sub(i,i)=='1' and 2^(6-i) or 0) end
return b:sub(c+1,c+1)
end)..({ '', '==', '=' })[#data%3+1])
end
-- Example: base64Encode("user:12345") -> dXNlcjoxMjM0NQ==
function postJSON(url,dataTable,headerTable)
-- This will create a JSON message body. Many modern REST APIs expect a JSON body.
local data = dataTable or {text = "hello world"}
local header = headerTable or {["Content-Type"] = "application/json"}
-- first we create something to handle the success, and tell us what we got
registerAnonymousEventHandler('sysPostHttpDone', function(event, rurl, response)
if rurl == url then sL("HTTP response success"); echo(response) else return true end -- this will show us the response body, or if it's not the right url, then do not delete the handler
end, true) -- this sets it to delete itself after it fires
-- then we create something to handle the error message, and tell us what went wrong
registerAnonymousEventHandler('sysPostHttpError', function(event, response, rurl)
if rurl == url then sL("HTTP response error",3); echo(response) else return true end -- this will show us the response body, or if it's not the right url, then do not delete the handler
end, true) -- this sets it to delete itself after it fires
-- Lastly, we make the request:
postHTTP(yajl.to_string(data), url, header) -- yajl.to_string converts our Lua table into a JSON-like string so the server can understand it
end
data = {
message = "I am the banana",
user = "admin"
}
header = {
["Content-Type"] = "application/json",
["Authorization"] = "Basic " .. base64Encode("user:12345")
}
postJSON("http://postman-echo.com/post",data,header)- URL Encoding vs JSON encoding
Some HTTP endpoints may not support JSON encoding, and instead may require URL encoding. Here's an example function to convert your lua data table into a URL encoded string::
-- Example: URLEncodeTable({message="hello",person="world"}) -> "message=hello&person=world"
function URLEncodeTable(Args)
-- From: https://help.interfaceware.com/code/details/urlcode-lua
----------------------------------------------------------------------------
-- URL-encode the elements of a table creating a string to be used in a
-- URL for passing data/parameters to another script
-- @param args Table where to extract the pairs (name=value).
-- @return String with the resulting encoding.
----------------------------------------------------------------------------
--
local ipairs, next, pairs, tonumber, type = ipairs, next, pairs, tonumber, type
local string = string
local table = table
--helper functions:
----------------------------------------------------------------------------
-- Decode an URL-encoded string (see RFC 2396)
----------------------------------------------------------------------------
local unescape = function (str)
str = string.gsub (str, "+", " ")
str = string.gsub (str, "%%(%x%x)", function(h) return string.char(tonumber(h,16)) end)
return str
end
----------------------------------------------------------------------------
-- URL-encode a string (see RFC 2396)
----------------------------------------------------------------------------
local escape = function (str)
str = string.gsub (str, "([^0-9a-zA-Z !'()*._~-])", -- locale independent
function (c) return string.format ("%%%02X", string.byte(c)) end)
str = string.gsub (str, " ", "+")
return str
end
----------------------------------------------------------------------------
-- Insert a (name=value) pair into table [[args]]
-- @param args Table to receive the result.
-- @param name Key for the table.
-- @param value Value for the key.
-- Multi-valued names will be represented as tables with numerical indexes
-- (in the order they came).
----------------------------------------------------------------------------
local insertfield = function (args, name, value)
if not args[name] then
args[name] = value
else
local t = type (args[name])
if t == "string" then
args[name] = {args[name],value,}
elseif t == "table" then
table.insert (args[name], value)
else
error ("CGILua fatal error (invalid args table)!")
end
end
end
-- end helper functions
if Args == nil or next(Args) == nil then -- no args or empty args?
return ""
end
local strp = ""
for key, vals in pairs(Args) do
if type(vals) ~= "table" then
vals = {vals}
end
for i,val in ipairs(vals) do
strp = strp.."&"..key.."="..escape(val)
end
end
-- remove first &
return string.sub(strp,2)
endputHTTP
- putHTTP(dataToSend, url, [headersTable], [file])
- Sends an HTTP PUT request to the given URL, either as text or with a specific file you'd like to upload. Raises sysPutHttpDone on success or sysPutHttpError on failure.
- See also: downloadFile(), getHTTP(), postHTTP(), deleteHTTP().

- Parameters
- dataToSend:
- Text to send in the request (unless you provide a file to upload).
- url:
- Location to send the request to.
- headersTable:
- (optional) table of headers to send with your request.
- file:
- (optional) file to upload as part of the PUT request. If provided, this will replace 'dataToSend'.
- Example
function onHttpPutDone(_, url, body)
cecho(string.format("<white>url: <dark_green>%s<white>, body: <dark_green>%s", url, body))
end
registerAnonymousEventHandler("sysPutHttpDone", onHttpPutDone)
putHTTP("this us a request with custom headers", "https://httpbin.org/put", {["X-am-I-awesome"] = "yep I am"})
putHTTP("https://httpbin.org/put", "<fill in file location to upload here>")deleteHTTP
- deleteHTTP(url, headersTable)
- Sends an HTTP DELETE request to the given URL. Raises sysDeleteHttpDone on success or sysDeleteHttpError on failure.
- See also: downloadFile(), getHTTP(), postHTTP(), putHTTP().
- Parameters
- url:
- Location to send the request to.
- headersTable:
- (optional) table of headers to send with your request.
- Example
function onHttpDeleteDone(_, url, body)
cecho(string.format("<white>url: <dark_green>%s<white>, body: <dark_green>%s", url, body))
end
registerAnonymousEventHandler("sysDeleteHttpDone", onHttpDeleteDone)
deleteHTTP("https://httpbin.org/delete")
deleteHTTP("https://httpbin.org/delete", {["X-am-I-awesome"] = "yep I am"})customHTTP
- customHTTP(method, url, headersTable)
- Sends an custom method request to the given URL. Raises sysCustomHttpDone on success or sysCustomHttpError on failure.
- See also: downloadFile(), getHTTP(), postHTTP(), putHTTP(), deleteHTTP().
- Parameters
- method:
- Http method to use (eg. PATCH, HEAD etc.)
- dataToSend:
- Text to send in the request (unless you provide a file to upload).
- url:
- Location to send the request to.
- headersTable:
- (optional) table of headers to send with your request.
- file:
- (optional) file to upload as part of the PUT request. If provided, this will replace 'dataToSend'.
- Example
function onCustomHttpDone(_, url, body, method)
cecho(string.format("<white>url: <dark_green>%s<white>, body: <dark_green>%s<white>, method: <dark_green>%s", url, body, method))
end
registerAnonymousEventHandler("sysCustomHttpDone", sysCustomHttpDone)
customHTTP("PATCH", "this us a request with custom headers", "https://httpbin.org/put", {["X-am-I-awesome"] = "yep I am"})
customHTTP("PATCH", "https://httpbin.org/put", "<fill in file location to upload here>")
String Functions
A collection of functions used to manipulate strings.
addWordToDictionary
- addWordToDictionary(word)
- Adds the given word to the custom profile or shared dictionary (whichever is selected in preferences).
- Returns true on success (the word was actually added to the dictionary by this call) and nil+msg on error - including if the word was already there - this is so that if you have other scripts that you wish to run when a word was added you can make their execution conditional on success here.
- See also: removeWordFromDictionary()
- Parameters
- word: custom word to add to the dictionary.
- Example
addWordToDictionary("Darkwind")
addWordToDictionary("黑暗的风")
addWordToDictionary("норм")- Example - function making use of return value
function rememberPlayerName(name)
if addWordToDictionary(name) then
echo("Added '" .. name .. "' to dictionary...\n")
end
endcecho2string
- plainText = cecho2string(formattedText)
- Strips the text formatting from the string passed in, leaving behind only the text.
- See also
- ansi2string(), hecho2string()
- Parameters
- formattedText:
- The string you want to strip the formatting codes from
- Returns
- The string with the formatting codes stripped out.
- Example
local exampleString = "<red>Formatted <b>string</b>"
local plainText = cecho2string(exampleString)
-- "Formatted string"decho2string
- plainText = decho2string(formattedText)
- Strips the text formatting from the string passed in, leaving behind only the text.
- See also
- ansi2string(), cecho2string()
- Parameters
- formattedText:
- The string you want to strip the formatting codes from
- Returns
- The string with the formatting codes stripped out.
- Example
local exampleString = "<255,0,0>Formatted <b>string</b>"
local plainText = decho2string(exampleString)
-- "Formatted string"f
- formattedString = f(str)
- Allows you to combine variables and functions into text (string interpolation) using
{}.
- Parameters
- str:
- The string to perform interpolation against.
![]() Note: Using f is slower than using concatenation with the '..' operator by a fair bit, due to the way it has to gather scope for supporting local variables. For aliases or single calls this isn't so bad, but if you're looping a large table and building a string then f's slowness will really start to show and bring performance down.
Note: Using f is slower than using concatenation with the '..' operator by a fair bit, due to the way it has to gather scope for supporting local variables. For aliases or single calls this isn't so bad, but if you're looping a large table and building a string then f's slowness will really start to show and bring performance down.
- Example
-- old way:
cecho("\nHello, "..matches[2]..", how is it going?")
-- new way:
cecho(f("\nHello {matches[2]}, how is it going?"))testResult = "successful"
-- old way:
echo("The test was "..testResult.."\n")
-- with f:
echo(f("The test was {testResult}\n"))
-- echoes "The test was successful\n"
local testResult = "a failure"
echo(f("The test was {testResult}\n"))
-- echoes "The test was a failure\n" as it sees the local scope over global.-- You can also execute simple expressions
echo(f("2 + 2 = {2 + 2}\n"))
-- echoes "2 + 2 = 4\n"
-- Or more complicated ones
local function testFunc(item)
return item:title()
end
echo(f("You should properly capitalize names, such as {testFunc('marilyn')}\n"))
-- echoes "You should properly capitalize names, such as Marilyn\n"
echo(f("You should properly capitalize names, such as {string.title('robert')}\n")
-- same thing, but uses string.title directly and Robert instead of Marilyn
Caution!
When using within closures, might not resolve variables correctly if they go out of a scope when closure is called.
function formatter2000()
local upvalue = "2000"
local formatter = function()
echo(f("Let's evaluate: {upvalue}\n"))
end
formatter() -- here evaulation inside f function will work
return formatter
end
formatter2000()() -- here evaluation inside f function will return nil
-- result
-- Let's evaluate: 2000
-- Let's evaulate: nilYou can work around this by doing the following
function formatter2000()
local upvalue = "2000"
local formatter = function()
local upvalue = upvalue -- this keeps upvalue in scope for the function later
echo(f("Let's evaluate: {upvalue}\n"))
end
formatter() -- here evaulation inside f function will work
return formatter
end
formatter2000()() -- here evaluation inside f function will return 2000 once again
-- result
-- Let's evaluate: 2000
-- Let's evaulate: 2000getDictionaryWordList
- getDictionaryWordList()
- Returns the profile or shared custom dictionary word list (whichever is selected in preferences) - that is, words added via right-click "add word to dictionary" or addWordToDictionary().
- Returns an indexed table of words.
- Example
display(getDictionaryWordList())hecho2string
- plainText = hecho2string(formattedText)
- Strips the text formatting from the string passed in, leaving behind only the text.
- See also
- ansi2string(), decho2string()
- Parameters
- formattedText:
- The string you want to strip the formatting codes from
- Returns
- The string with the formatting codes stripped out.
- Example
local exampleString = "#ff0000Formatted #bstring#/b"
local plainText = cecho2string(exampleString)
-- "Formatted string"removeWordFromDictionary
- removeWordFromDictionary(word)
- Removed the given word to the custom profile or shared dictionary (whichever is selected in preferences).
- Returns true on success (if the word was present and removed by this call) and nil+msg on error.
- See also: addWordToDictionary()
- Parameters
- word: custom word to remove from the dictionary.
- Example
removeWordFromDictionary("Darkwind")
removeWordFromDictionary("黑暗的风")
removeWordFromDictionary("норм")spellCheckWord
- spellCheckWord(word, [customDictionary])
- Spellchecks the given word against the custom or the system dictionary.
- Returns true if the word is spelled correctly or false if it's not, and nil+msg on error.
- Parameters
- word: word to spellcheck.
- customDictionary (optional): dictionary to use. If true, the profile or shared dictionary will be used (depending on your settings). If omitted or false, the system dictionary (the language you have selected in settings) will be used.
- Example
-- spellcheck against the language dictionary
if spellCheckWord("run") then
echo("'run' is spelled ok!\n")
end
-- spellcheck against the custom 'add word to dictionary'
if spellCheckWord("Darkwind", true) then
echo("'Darkwind' is spelled OK!\n")
endspellSuggestWord
- spellSuggestWord(word, [customDictionary])
- Suggests similar words for the given word.
- Returns a table of suggestions or nil+msg on error.
- See also: spellCheckWord()
- Parameters
- word: word to give suggestions on.
- customDictionary (optional): dictionary to use. If true, the profile or shared dictionary will be used (depending on your settings). If omitted or false, the system dictionary (the language you have selected in settings) will be used.
- Example
display(spellSuggestWord("Darkwind"))string.byte, utf8.byte
- string.byte(string [, i [, j]]) or utf8.byte(string [, i [, j]])
- mystring:byte([, i [, j]])
- Returns the internal numerical codes of the characters
s[i], s[i+1], ···, s[j]. The default value foriis1; the default value forjisi. - Note that numerical codes are not necessarily portable across platforms.
- string.byte() works with English text only, use utf8.byte() for the international version.
- See also: string.char, utf8.char
- Example
-- the following call will return the ASCII values of "A", "B" and "C"
a, b, c = string.byte("ABC", 1, 3)
echo(a .. " - " .. b .. " - " .. c) -- shows "65 - 66 - 67"
-- same for the international version but with the Unicode values
a, b, c = utf8.byte("дом", 1, 3)
echo(a .. " - " .. b .. " - " .. c) -- shows "1076 - 1086 - 1084"string.char, utf8.char
- string.char(···) or utf8.char(···)
- Receives zero or more integers. Returns a string with length equal to the number of arguments, in which each character has the internal numerical code equal to its corresponding argument.
- Note that numerical codes are not necessarily portable across platforms.
- string.char() works with English text only, use utf8.char() for the international version.
- See also: string.byte, utf8.byte
- Example
-- the following call will return the string "ABC" corresponding to the ASCII values 65, 66, 67
mystring = string.char(65, 66, 67)
-- same for the infernational version which will return text "дом" for the Unicode values 1076, 1086, 1084
mystring = utf8.char(1076,1086,1084)
print(mystring)string.cut
- string.cut(string, maxLen)
- Cuts string to the specified maximum length.
- Returns the modified string.
- Parameters
- string:
- The text you wish to cut. Passed as a string.
- maxLen:
- The maximum length you wish the string to be. Passed as an integer number.
See also: utf8.remove()
- Example
--The following call will return 'abc' and store it in myString
myString = string.cut("abcde", 3)
--You can easily pad string to certain length. Example below will print 'abcde ' e.g. pad/cut string to 10 characters.
local s = "abcde"
s = string.cut(s .. " ", 10) -- append 10 spaces
echo("'" .. s .. "'")string.dump
- string.dump()
Converts a function into a binary string. You can use the loadstring() function later to get the function back.
- string.dump() works with both English and non-English text fine.
- Example
testString = string.dump(function() echo("this is a string") end)
--The following should then echo "this is a string"
loadstring(testString)()string.enclose
- string.enclose(string)
- Wraps a string with [[ ]]
- Returns the altered string.
- Parameters
- String:
- The string to enclose. Passed as a string.
- Example
--This will echo '[[Oh noes!]]' to the main window
echo("'" .. string.enclose("Oh noes!") .. "'")string.ends
- string.ends(String, Suffix)
- Test if string is ending with specified suffix.
- Returns true or false.
- See also: string.starts
- Parameters
- String:
- The string to test. Passed as a string.
- Suffix:
- The suffix to test for. Passed as a string.
- Example
--This will test if the incoming line ends with "in bed" and if not will add it to the end.
if not string.ends(line, "in bed") then
echo("in bed\n")
endstring.find, utf8.find
- string.find(text, pattern [, init [, plain]]) or utf8.find
- Looks for the first match of pattern in the string text. If it finds a match, then find returns the indices of text where this occurrence starts and ends; otherwise, it returns nil. A third, optional numerical argument init specifies where to start the search; its default value is 1 and can be negative. A value of true as a fourth, optional argument plain turns off the pattern matching facilities, so the function does a plain "find substring" operation, with no characters in pattern being considered "magic". Note that if plain is given, then init must be given as well.
If the pattern has captures, then in a successful match the captured values are also returned, after the two indices.
- string.find() works with English text only, use utf8.find() for the international version.
- Example
-- check if the word appears in a variable
if string.find(matches[2], "rabbit") then
echo("Found a rabbit!\n")
end
-- the following example will print: "3, 4"
local start, stop = string.find("This is a test.", "is")
if start then
print(start .. ", " .. stop)
end
-- note that here "is" is being found at the end of the word "This", rather than the expected second word
-- to make it match the word on its own, prefix %f[%a] and suffix %f[%A]
if string.find("This is a test", "%f[%a]is%f[%A]") then
echo("This 'is' is the actual stand-alone word\n")
end- Return value:
- nil or start and stop position of the first matched text, followed by any captured text.
string.findPattern
- string.findPattern(text, pattern)
- Return first matching substring or nil.
- Parameters
- text:
- The text you are searching the pattern for.
- pattern:
- The pattern you are trying to find in the text.
- Example
Following example will print: "I did find: Troll" string.
local match = string.findPattern("Troll is here!", "Troll")
if match then
echo("I did find: " .. match)
end- This example will find substring regardless of case.
local match = string.findPattern("Troll is here!", string.genNocasePattern("troll"))
if match then
echo("I did find: " .. match)
end- Return value:
- nil or first matching substring
See also: string.genNocasePattern()
string.format
- string.format(formatstring,...)
- Returns a formatted version of its variable number of arguments following the description given in its first argument (which must be a string). The format string follows the same rules as the printf family of standard C functions. The only differences are that the options/modifiers *, l, L, n, p, and h are not supported and that there is an extra option, q. The q option formats a string in a form suitable to be safely read back by the Lua interpreter: the string is written between double quotes, and all double quotes, newlines, embedded zeros, and backslashes in the string are correctly escaped when written. For instance, the call
string.format('%q', 'a string with "quotes" and \n new line')will produce the string:
"a string with \"quotes\" and \
new line"The options c, d, E, e, f, g, G, i, o, u, X, and x all expect a number as argument, whereas q and s expect a string.
This function does not accept string values containing embedded zeros, except as arguments to the q option.
string.format() works fine with both English and non-English text.
- Example
some_data = "MudletUser1"
-- pad data 20 characters wide to the left
display(string.format("%20s", some_data))
-- result: " MudletUser1"
-- pad same data but instead to the the right
display(string.format("%-20s", some_data))
-- result: "MudletUser1 "
-- pad but first truncate data to 6 characters
display(string.format("%20s", string.sub(some_data, 1, 6)))
-- result: " Mudlet"string.genNocasePattern
- string.genNocasePattern(template)
- Generate case insensitive search pattern from string.
- Parameters
- template: The original string to be used as the base.
- Example
echo(string.genNocasePattern("123abc"))
-- result: "123[aA][bB][cC]"string.gfind
- string.gfind()
- This is an old version of what is now string.gmatch. Use string.gmatch instead.
- Example
Need example
string.gmatch, utf8.gmatch
- string.gmatch(text, pattern) or utf8.gmatch
- Returns an iterator function that, each time it is called, returns the next captures from pattern over string text. If pattern specifies no captures, then the whole match is produced in each call.
As an example, the following loop
s = "hello world from Lua"
for w in string.gmatch(s, "%a+") do
print(w)
endwill iterate over all the words from string s, printing one per line. The next example collects all pairs key=value from the given string into a table:
t = {}
s = "from=world, to=Lua"
for k, v in string.gmatch(s, "(%w+)=(%w+)") do
t[k] = v
endFor this function, a '^' at the start of a pattern does not work as an anchor, as this would prevent the iteration.
- string.gmatch() works with English text only, use utf8.gmatch() for the international version.
- Example
Need example
string.gsub, utf8.gsub
- string.gsub(text, pattern, repl [, n]) or utf8.gsub
- Returns a copy of text in which all (or the first n, if given) occurrences of the pattern have been replaced by a replacement string specified by repl, which can be a string, a table, or a function. gsub also returns, as its second value, the total number of matches that occurred.
- If repl is a string, then its value is used for replacement. The character % works as an escape character: any sequence in repl of the form %n, with n between 1 and 9, stands for the value of the n-th captured substring (see below). The sequence %0 stands for the whole match. The sequence %% stands for a single %.
- If repl is a table, then the table is queried for every match, using the first capture as the key; if the pattern specifies no captures, then the whole match is used as the key.
- If repl is a function, then this function is called every time a match occurs, with all captured substrings passed as arguments, in order; if the pattern specifies no captures, then the whole match is passed as a sole argument.
- If the value returned by the table query or by the function call is a string or a number, then it is used as the replacement string; otherwise, if it is false or nil, then there is no replacement (that is, the original match is kept in the string).
- string.gsub() works with English text only, use utf8.gsub() for the international version.
- Example
x = string.gsub("hello world", "(%w+)", "%1 %1")
--> x="hello hello world world"
x = string.gsub("hello world", "%w+", "%0 %0", 1)
--> x="hello hello world"
x = string.gsub("hello world from Lua", "(%w+)%s*(%w+)", "%2 %1")
--> x="world hello Lua from"
x = string.gsub("home = $HOME, user = $USER", "%$(%w+)", os.getenv)
--> x="home = /home/roberto, user = roberto"
x = string.gsub("4+5 = $return 4+5$", "%$(.-)%$", function (s)
return loadstring(s)()
end)
--> x="4+5 = 9"
local t = {name="lua", version="5.1"}
x = string.gsub("$name-$version.tar.gz", "%$(%w+)", t)
--> x="lua-5.1.tar.gz"string.len, utf8.len
- string.len(string) or utf8.len(string)
- mystring:len()
- Receives a string and returns its length. The empty string "" has length 0. Embedded zeros are counted, so "a\000bc\000" has length 5.
- string.len() works with English text only, use utf8.len() for the international version.
- Parameters
- string:
- The string (text) you want to find the length of.
- Example
-- prints 5 for the 5 letters in our word
print(string.len("hello"))
-- international version
print(utf8.len("слово"))string.lower, utf8.lower
- string.lower(string) or utf8.lower(string)
- mystring:lower()
- Receives a string and returns a copy of this string with all uppercase letters changed to lowercase. All other characters are left unchanged. The definition of what an uppercase letter is depends on the current locale.
- string.lower() works with English text only, use utf8.lower() for the international version.
- See also: string.upper, utf8.upper
- Example
-- prints an all-lowercase version
print(string.lower("No way! This is AWESOME!"))
-- international version
print(utf8.lower("Класс! Ето ОТЛИЧНО!"))string.match, utf8.match
- string.match(text, pattern [, init]) or utf8.match()
- Looks for the first match of pattern in the string text. If it finds one, then match returns the captures from the pattern; otherwise it returns nil. If pattern specifies no captures, then the whole match is returned. A third, optional numerical argument init specifies where to start the search; its default value is 1 and can be negative.
- string.match() works with English text only, use utf8.match() for the international version.
- Example
Need example
string.patternEscape, utf8.patternEscape
- escapedString = string.patternEscape(str) or escapedString = utf8.patternEscape(str)
- Returns a version of str with all Lua pattern characters escaped to ensure string.match/find/etc look for the original str.
- See also
- string.trim(), string.genNocasePattern()
- Parameters
- str:
- The string to escape lua pattern characters in.
- Returns
- The string with all special Lua pattern characters escaped.
- Example
-- searching for a url inside of a string.
local helpString = [[
This feature can be accessed by going to https://some-url.com/athing.html?param=value and
retrieving the result!
]]
local url = "https://some-url.com/"
display(helpString:find(url))
-- nil
display(helpString:find(string.patternEscape(url)))
-- 42
-- 62
display(url:patternEscape())
-- "https://some%-url%.com/"string.rep
- string.rep(String, n)
- mystring:rep(n)
- Returns a string that is the concatenation of
ncopies of the stringString. - string.rep() works with both English and non-English text fine.
- Example
-- repeat * 10 times
display(string.rep("*", 10))
-- results in:
**********
-- do the same thing, but this time calling from a variable
s = "*"
display(s:rep(10))
-- results in:
**********string.reverse, utf8.reverse
- string.reverse(string) or utf8.reverse(string)
- mystring:reverse()
- Returns a string that is the string
stringreversed. - string.reverse() works with English text only, use utf8.reverse() for the international version.
- Parameters
- string:
- The string to reverse. Passed as a string.
- Example
mystring = "Hello from Lua"
echo(mystring:reverse()) -- displays 'auL morf olleH'
-- international version.
mystring = "Привет от Луа!"
echo(utf8.reverse(mystring)) -- displays '!ауЛ то тевирП', which probably looks the same to youstring.split
- string.split(string, delimiter)
- myString:split(delimiter)
- Splits a string into a table by the given delimiter. Can be called against a string (or variable holding a string) using the second form above.
- Returns a table containing the split sections of the string.
- Parameters
- string:
- The string to split. Parameter is not needed if using second form of the syntax above. Passed as a string.
- delimiter:
- The delimiter to use when splitting the string. Passed as a string, and allows for Lua pattern types. Use % to escape here (and %% to escape a stand-alone %).
![]() Note: as of Mudlet 4.7+, delimiter will default to " " if not provided.
Note: as of Mudlet 4.7+, delimiter will default to " " if not provided.
![]() Note: as of Mudlet 4.7+, using "" (empty string) for the delimiter will return the string as a table of characters. IE string.split("This","") will return as {"T", "h", "i", "s"}. Prior to 4.7 using empty string as the delimiter would error after hanging temporarily.
Note: as of Mudlet 4.7+, using "" (empty string) for the delimiter will return the string as a table of characters. IE string.split("This","") will return as {"T", "h", "i", "s"}. Prior to 4.7 using empty string as the delimiter would error after hanging temporarily.
- Example
-- This will split the string by ", " delimiter and print the resulting table to the main window.
names = "Alice, Bob, Peter"
name_table = string.split(names, ", ")
display(name_table)
--The alternate method
names = "Alice, Bob, Peter"
name_table = names:split(", ")
display(name_table)- Either method above will print out:
- table {
- 1: 'Alice'
- 2: 'Bob'
- 3: 'Peter'
- }
string.starts
- string.starts(string, prefix)
- Test if string is starting with specified prefix.
- Returns true or false
- See also: string.ends
- Parameters
- string:
- The string to test. Passed as a string.
- prefix:
- The prefix to test for. Passed as a string.
- Example
--The following will see if the line begins with "You" and if so will print a statement at the end of the line
if string.starts(line, "You") then
echo("====oh you====\n")
endstring.sub, utf8.sub
- string.sub(text, i [, j]) or utf8.sub()
- Returns the substring of text that starts at i and continues until j; i and j can be negative. If j is absent, then it is assumed to be equal to -1 (which is the same as the string length). In particular, the call string.sub(text,1,j) returns a prefix of text with length j, and string.sub(text, -i) returns a suffix of text with length i.
- string.sub() works with English text only, use utf8.sub() for the international version.
- Example
Need example
string.title
- string.title(string)
- mystring:title()
- Capitalizes the first character in a string.
- Returns the altered string.
- Parameters
- string:
- The string to modify. Not needed if you use the second form of the syntax above.
- Example
--Variable testname is now Anna.
testname = string.title("anna")
--Example will set test to "Bob".
test = "bob"
test = test:title()string.trim
- string.trim(string)
- Trims string, removing all 'extra' white space at the beginning and end of the text.
- Returns the altered string.
- Parameters
- string:
- The string to trim. Passed as a string.
- Example
--This will print 'Troll is here!', without the extra spaces.
local str = string.trim(" Troll is here! ")
echo("'" .. str .. "'")string.upper, utf8.upper
- string.upper(string) or utf8.upper(string)
- mystring:upper()
- Receives a string and returns a copy of this string with all lowercase letters changed to uppercase. All other characters are left unchanged. The definition of what a lowercase letter is depends on the current locale.
- string.upper() works with English text only, use utf8.upper() for the international version.
- See also: string.lower, utf8.lower
- Parameters
- string:
- The string you want to change to uppercase
- Example
-- displays 'RUN BOB RUN'
print(string.upper("run bob run"))
-- displays 'ДАВАЙ ДАВАЙ!'
print(utf8.upper("давай давай!"))utf8.charpos
- utf8.charpos(string[[, charpos], offset])
- Converts UTF-8 position to byte offset, returns the character position and code point. If only offset is given, returns byte offset of this UTF-8 char index. If charpos and offset is given, a new charpos will be calculated by adding/subtracting UTF-8 char offset to current charpos. In all cases, it return a new char position, and code point (a number) at this position.
- Parameters
- string:
- The input string to work on.
- charpos:
- (optional) character position to work on.
- offset:
- (optional) offset (as a number) to work on.
utf8.escape
- utf8.escape(string)
- Escape a string to UTF-8 format string. It support several escape formats:
%ddd - which ddd is a decimal number at any length:
change Unicode code point to UTF-8 format.
%{ddd} - same as %nnn but has bracket around. %uddd - same as %ddd, u stands Unicode %u{ddd} - same as %{ddd} %xhhh - hexadigit version of %ddd %x{hhh} same as %xhhh. %? - '?' stands for any other character: escape this character.
- Parameters
- string:
- The string you want to escape
- Example
local u = utf8.escape
print(u"%123%u123%{123}%u{123}%xABC%x{ABC}")
print(u"%%123%?%d%%u")utf8.fold
- utf8.fold(string)
- Returns the lowercase version of the string for use in case-insensitive comparisons. If string is a number, it's treated as a code point and the converted code point is returned (as a number).
- Parameters
- string:
- The string to lowercase.
- Example
print(utf8.fold("ПРИВЕТ")) -- 'привет'
print(utf8.fold("Привет")) -- 'привет'utf8.insert
- utf8.insert(string[, idx], substring)
- Inserts the substring into the given string. If idx is given, inserts substring before the character at this index, otherwise the substring will append onto the end of string. idx can be negative.
- Parameters
- string:
- The input string to work on.
- idx:
- (optional) character position to insert the string at.
- substring:
- text to insert into the substring.
- Example
-- inserts letter я before the 2nd letter and prints 'мясо'
print(utf8.insert("мсо", 2, "я"))utf8.ncasecmp
- utf8.ncasecmp(a, b)
- Compares a and b without case. Return -1 means a < b, 0 means a == b and 1 means a > b.
- Parameters
- a:
- String to compare.
- b:
- String to compare against.
utf8.next
- utf8.next(string[, charpos[, offset]])
- Iterates though the UTF-8 string.
- Parameters
- string:
- The input string to work on.
- charpos:
- (optional) character position to work on.
- offset:
- (optional) offset (as a number) to work on.
- Example
-- prints location and code point of every letter
for pos, code in utf8.next, "тут есть текст" do
print(pos, code)
endutf8.remove
- utf8.remove(string[, start[, stop]])
- Removes characters from the given string. Deletes characters from the given start to the end of the string. If stop is given, deletes characters from start to stop (including start and stop). start and stop can be negative.
- Parameters
- string:
- The input string to work on.
- start:
- position to start deleting characters from.
- stop:
- (optional) posititon to stop deleting characters at.
- Example
-- delete everything from the 3rd character including the character itself
print(utf8.remove("мясо", 3)) -- 'мя'
-- delete the last character, use negative to count backwards
print(utf8.remove("мясо", -1)) -- 'мяс'
-- delete everything from the 2nd to the 4th character
print(utf8.remove("вкусное", 2,4)) -- 'вное'utf8.title
- utf8.title(string)
- Returns the uppercase version of the string for use in case-insensitive comparisons. If string is a number, it's treated as a code point and the converted code point is returned (as a number).
- Parameters
- string:
- The string to uppercase.
- Example
print(utf8.title("привет")) -- 'ПРИВЕТ'
print(utf8.title("Привет")) -- 'ПРИВЕТ'utf8.width
- utf8.width(string[, ambi_is_double[, default_width]])
- Calculate the widths of the given string. If the string is a code point, return the width of this code point.
- Parameters
- string:
- The input string to work on.
- ambi_is_double:
- (optional) if provided, the ambiguous width character's width is 2, otherwise it's 1.
- default_width:
- (optional) if provided, this will be the width of unprintable character, used display a non-character mark for these characters.
utf8.widthindex
- utf8.widthindex(string, location[, ambi_is_double[, default_width]])
- Returns the character index at the location in the given string as well as the offset and the width. This is a reverse operation of utf8.width().
- Parameters
- string:
- The input string to work on.
- location:
- location to get the width of.
- ambi_is_double:
- (optional) if provided, the ambiguous width character's width is 2, otherwise it's 1.
- default_width:
- (optional) if provided, this will be the width of unprintable character, used display a non-character mark for these characters.
Table Functions
These functions are used to manipulate tables. Through them you can add to tables, remove values, check if a value is present in the table, check the size of a table, and more.
spairs
- spairs(tbl, sortFunction)
- Returns an iterator similar to pairs(tbl) but sorts the keys before iterating through them.
- Parameters
- tbl:
- The table to iterate over
- sortFunction:
- The function to use for determining what order to iterate the items in the table. Defaults to alphanumeric sorting by key. Similar to table.sort. See example for more info.
- Example
local tbl = { Tom = 40, Mary = 50, Joe = 23 }
-- This iterates, sorting based on the key (which is the name in this case)
for name, thingies in spairs(tbl) do
echo(string.format("%s has %d thingies\n", name, thingies))
end
--[[
Joe has 23 thingies
Mary has 50 thingies
Tom has 40 thingies
--]]
-- The function used below sorts based on the value.
for name, thingies in spairs(tbl, function(t,a,b) return t[a] < t[b] end) do --iterate from lowest value to highest
echo(string.format("%s has %d thingies\n", name, thingies))
end
--[[
Joe has 23 thingies
Tom has 40 thingies
Mary has 50 thingies
--]]
-- This function can be used to sort a group of Geyser gauges based on their value (what percentage of the gauge is filled)
local gaugeSort = function(t,a,b)
local avalue = t[a].value or 100 -- treat non-gauges as though they are full gauges. If you know for -sure- the table only has gauges the 'or 100' is not needed.
local bvalue = t[b].value or 100
return avalue < bvalue
end
for _,gauge in spairs(tblOfGauges, gaugeSort) do
-- do what you want with the gauges. First one will be the least full, then the next least full, until the last which will be the most full.
-- If you replace the < with a > it will go from most full to least full instead.
endtable.collect
- table.collect(tbl, func)
- Returns a table that is every key-value pair from tbl for which func(key,value) returns true
- Parameters
- tbl:
- The table to collect items from
- func:
- the function to use for testing if an item should be collected or not
- Example
local vitals = { hp = 3482, maxhp = 5000, mana = 3785, maxmana = 5000 }
local pullHpKeys = function(key, value)
if string.match(key, "hp") then return true end
end
local hp_values = table.collect(vitals, pullHpKeys)
display(hp_values)This prints the following:
{
hp = 3482,
maxhp = 5000
}
- Returns
- A table containing all the key/value pairs from tbl that cause func(key,value) to return true
table.complement
- table.complement (set1, set2)
- Returns a table that is the relative complement of the first table with respect to the second table. Returns a complement of key/value pairs.
- Parameters
- table1:
- table2:
- Example
local t1 = {key = 1,1,2,3}
local t2 = {key = 2,1,1,1}
local comp = table.complement(t1,t2)
display(comp)This prints the following:
key = 1, [2] = 2, [3] = 3
- Returns
- A table containing all the key/value pairs from table1 that do not match the key/value pairs from table2.
table.concat
- table.concat(table, delimiter, startingindex, endingindex)
- Joins a table into a string. Each item must be something which can be transformed into a string.
- Returns the joined string.
- See also: string.split
- Parameters
- table:
- The table to concatenate into a string. Passed as a table.
- delimiter:
- Optional string to use to separate each element in the joined string. Passed as a string.
- startingindex:
- Optional parameter to specify which index to begin the joining at. Passed as an integer.
- endingindex:
- Optional parameter to specify the last index to join. Passed as an integer.
- Examples
--This shows a basic concat with none of the optional arguments
testTable = {1,2,"hi","blah",}
testString = table.concat(testTable)
--testString would be equal to "12hiblah"
--This example shows the concat using the optional delimiter
testString = table.concat(testTable, ", ")
--testString would be equal to "1, 2, hi, blah"
--This example shows the concat using the delimiter and the optional starting index
testString = table.concat(testTable, ", ", 2)
--testString would be equal to "2, hi, blah"
--And finally, one which uses all of the arguments
testString = table.concat(testTable, ", ", 2, 3)
--testString would be equal to "2, hi"table.contains
- table.contains (t, value)
- Determines if a table contains a value as a key or as a value (recursive as of Mudlet 4.8+).
- Returns true or false
- See also
- table.index_of
![]() Note: This tests for the 'value' parameter as either a key or value in the table. That means this will return true: table.contains({"Bob"}, 1)
Note: This tests for the 'value' parameter as either a key or value in the table. That means this will return true: table.contains({"Bob"}, 1)
- Parameters
- t:
- The table in which you are checking for the presence of the item as key or value..
- value:
- The value you are checking for within the table.
- Example
local test_table = {"value1", "value2", "value3", "value4", "value5", "value6", "value7"}
if table.contains(test_table, "value1") then
print("Got value 1!")
else
print("Don't have it. Sorry!")
end
-- if the table has just a few values, you can skip making a local, named table:
if table.contains({"Anna", "Alanna", "Hanna"}, "Anna") then
print("Have 'Anna' in the list!")
else
print("Don't have the name. Sorry!")
end
-- don't forget, it will return true if the item is a key in the table as well
display(table.contains({"bob"}, 1) -- displays true, as 1 is the key/index for "bob"
-- If you really only want to check values, try table.index_of, which returns the key a value is found at, or nil if it is not found.table.deepcopy
- table.deepcopy (table)
- Returns a complete copy of the table.
- Parameters
- table:
- The table which you'd like to get a copy of.
- Example
local test_table = { "value1", "value2", "value3", "value4" }
-- by just doing:
local newtable = test_table
-- you're linking newtable to test_table. Any change in test_table will be reflected in newtable.
-- however, by doing:
local newtable = table.deepcopy(test_table)
-- the two tables are completely separate now.table.intersection
- table.intersection (set1, set2)
- Returns a table that is the relative intersection of the first table with respect to the second table. Returns a intersection of key/value pairs.
- Parameters
- table1:
- table2:
- Example
local t1 = {key = 1,1,2,3}
local t2 = {key = 1,1,1,1}
local intersect = table.intersection(t1,t2)
display(intersect)This prints the following:
key = 1, 1
- Returns
- A table containing all the key/value pairs from table1 that match the key/value pairs from table2.
table.insert
- table.insert(table, [pos,] value)
- Inserts element value at position pos in table, shifting up other elements to open space, if necessary. The default value for pos is n+1, where n is the length of the table, so that a call table.insert(t,x) inserts x at the end of table t.
- See also: table.remove
- Parameters
- table:
- The table in which you are inserting the value
- pos:
- Optional argument, determining where the value will be inserted.
- value:
- The variable that you are inserting into the table. Can be a regular variable, or even a table or function*.
- Examples
--it will insert whats inside the variable of matches[2] into at the end of table of 'test_db_name'.
table.insert(test_db_name, matches[2])
--it will insert other thing at the first position of this table.
table.insert(test_db_name, 1, "jgcampbell300")
--[=[
This results:
test_db_name = {
"jgcampbell300",
"SlySven"
}
]=]table.index_of
- table.index_of(table, value)
Returns the index (location) of an item in an indexed table, or nil if it's not found. Think of it as a table.find function (although it is called table.index_of).
- Parameters
- table:
- The table in which you are inserting the value
- value:
- The variable that you are searching for in the table.
- Examples
-- will return 1, because 'hi' is the first item in the list
table.index_of({"hi", "bye", "greetings"}, "hi")
-- will return 3, because 'greetings' is third in the list
table.index_of({"hi", "bye", "greetings"}, "greetings")
-- you can also use this in combination with table.remove(), which requires the location of the item to delete
local words = {"hi", "bye", "greetings"}
table.remove(words, table.index_of(words, "greetings"))
-- however that won't work if the word isn't present, table.remove(mytable, nil (from table.index_of)) will give an error
-- so if you're unsure, confirm with table.contains first
local words = {"hi", "bye", "greetings"}
if table.contains(words, "greetings") then
table.remove(words, table.index_of(words, "greetings"))
endtable.is_empty
- table.is_empty(table)
- Check if a table is devoid of any values.
- Parameters
- table:
- The table you are checking for values.
table.keys
- table.keys(table)
- return a table that is the collection of the keys in use by the table passed in
- Parameters
- table:
- The table you are collecting keys from.
- Example
local testTable = {
name = "thing",
type = "test",
malfunction = "major"
}
local keys = table.keys(testTable)
-- key is now a table { "name", "type", "malfunction" } but the order cannot be guaranteed
-- as pairs() does not iterate in a guaranteed order. If you want the keys in alphabetical
-- run table.sort(keys) and keys == { "malfunction", "name", "type" }table.load
- table.load(location, table)
- Load a table from an external file into mudlet.
- See also: table.save
Tip: you can load a table from anywhere on your computer, but it's preferable to have them consolidated somewhere connected to Mudlet, such as the current profile.
- Parameters
- location:
- Where you are loading the table from. Can be anywhere on your computer.
- table:
- The table that you are loading into - it must exist already.
- Example:
-- This will load the table mytable from the lua file mytable present in your Mudlet Home Directory.
mytable = mytable or {}
if io.exists(getMudletHomeDir().."/mytable.lua") then
table.load(getMudletHomeDir().."/mytable.lua", mytable) -- using / is OK on Windows too.
endtable.matches
- table.matches(tbl, pattern, [pattern2], [pattern_n], [check_keys])
- Returns a table of key-value pairs from tbl which match one of the supplied patterns when checked via string.match. This function is not recursive - nested tables within tbl will not be checked, only the top-level.
- Parameters
- tbl:
- the table you want to check over using string.match
- pattern:
- the pattern you want to use to check each key-value pair. You may specify multiple patterns, separated by commas
- check_keys:
- boolean argument, set to true if you want to include a key-value pair if the key or value string.matches. If you do not set this, only the value will be checked
- Example
local items = { this = "that", hp = 400, [4] = "toast", something = "else", more = "keypairs" }
local matches = table.matches(items, "%d")
-- here matches will be { hp = 400 }
local matches = table.matches(items, "%d", "that", true)
-- here matches will be { hp = 400, this = "that", [4] = "toast" }table.maxn
- table.maxn(table)
- Returns the largest positive numerical index of the given table, or zero if the table has no positive numerical indices. (To do its job this function does a linear traversal of the whole table.)
table.n_collect
- table.n_collect(tbl, func(value))
- returns a table which contains every unique value from tbl for which func(value) returns true. Ignores keys. Table returned is ipairs iterable.
- Parameters
- tbl:
- the table you want to collect values from
- func(value):
- the function to check each value against
- Example
local items = {
this = "that",
other = "thing",
otter = "potato",
honey = "bee"
}
local beginsWithTH = function(value)
if string.match(value, "^th") then return true end
end
local nmatches = table.n_collect(items, beginsWithTH)
-- nmatches will be { "that", "thing" }
-- the order will not necessarily be preservedtable.n_filter
- table.n_filter(table, function(element[, index[, table]]))
- Returns a new table with all elements that pass the test implemented by the provided function. If no elements pass the test, an empty table will be returned.
- Parameters
- table: the table you wish to filter values out of.
- function: the function to test each element of the array. Return true to keep the element, false otherwise. It accepts three arguments:
- element: The current element being processed in the table.
- index: (optional) The index of the current element being processed in the table.
- table: (optional) The table n_filter was called upon.
- Examples
Filter out small values:
local function isBigEnough(value) return value >= 10 end
local filtered = table.n_filter({12, 5, 8, 130, 44}, isBigEnough)
-- filtered: {12, 130, 44}Filter out invalid entries:
local invalidEntries = 0
local entries = {
{ id = 15 }, { id = -1 }, { id = 0 }, { id = 3 },
{ id = 12.2 }, { }, { id = nil }, { id = false },
{ id = 'not a number' }
}
local function isNumber(t) return t and type(t) == 'number' end
local function filterByID(item)
if isNumber(item.id) and item.id ~= 0 then
return true
end
invalidEntries = invalidEntries + 1
return false
end
local entriesByID = table.n_filter(entries, filterByID)
-- invalidEntries: 5
-- entriesByID: { { id = 15 }, { id = -1 }, { id = 3 }, { id = 12.2 } }Filter out content based on search criteria:
local fruits = {'apple', 'banana', 'grapes', 'mango', 'orange'}
local function filterItems(t, query)
return table.n_filter(t, function(item)
return item:lower():find(query:lower())
end)
end
filterItems(fruits, 'ap') -- {'apple', 'grapes'}
filterItems(fruits, 'an') -- {'banana', 'mango', 'orange'}table.n_flatten
- table.n_flatten(table)
- Returns a new table with the sub-table elements concatenated into it.
- Parameters
- table: A table of nested sub-tables you wish to flatten.
- Example
local t1 = {1, 2, {3, 4}};
local t2 = {1, 2, {3, 4, {5, 6}}};
local t3 = {1, 2, {3, 4, {5, 6, {7, 8, {9, 10}}}}};
table.n_flatten(t1) -- {1, 2, 3, 4}
table.n_flatten(t2) -- {1, 2, 3, 4, 5, 6}
table.n_flatten(t3) -- {1, 2, 3, 4, 5, 6, 7, 8, 9, 10}table.n_matches
- table.n_matches(tbl, pattern, [pattern2], [patternN])
- Returns a table of unique values within tbl which one of the supplied patterns matches using string.match
- Parameters
- tbl:
- The table you want to search for values
- pattern:
- The pattern you want to check each value with, using string.match. You can supply multiple patterns, separated by commas
- Example
local items = { this = "that", [4] = "other", hp = 500, mana = 40 }
local matches = table.n_matches(items, "%a")
-- matches will be { "that", "other" }
-- order is not preserved/guaranteedtable.n_union
- table.n_union (table1, table2)
- Returns a numerically indexed table that is the union of the provided tables (that is - merges two indexed lists together). This is a union of unique values. The order and keys of the input tables are not preserved.
- Parameters
- table1: the first table as an indexed list.
- table2: the second table as an indexed list.
- Example
display(table.n_union({"bob", "mary"}, {"august", "justinian"}))
{
"bob",
"mary",
"august",
"justinian"
}table.n_complement
- table.n_complement (set1, set2)
- Returns a table that is the relative complement of the first numerically indexed table with respect to the second numerically indexed table. Returns a numerically indexed complement of values.
- Parameters
- table1:
- table2:
- Example
local t1 = {1,2,3,4,5,6}
local t2 = {2,4,6}
local comp = table.n_complement(t1,t2)
display(comp)This prints the following:
1, 3, 5
- Returns
- A table containing all the values from table1 that do not match the values from table2.
table.n_intersection
- table.n_intersection (...)
- Returns a numerically indexed table that is the intersection of the provided tables. This is an intersection of unique values. The order and keys of the input tables are not preserved
- Example
local t1 = {1,2,3,4,5,6}
local t2 = {2,4,6}
local intersect = table.n_intersection(t1,t2)
display(intersect)This prints the following:
2, 4, 6
- Returns
- A table containing the values that are found in every one of the tables.
table.pickle
- table.pickle( t, file, tables, lookup )
- Internal function used by table.save() for serializing data.
table.remove
- table.remove(table, value_position)
- Remove a value from an indexed table, by the values position in the table.
- See also: table.insert
- Parameters
- table
- The indexed table you are removing the value from.
- value_position
- The indexed number for the value you are removing.
- Example
testTable = { "hi", "bye", "cry", "why" }
table.remove(testTable, 1) -- will remove hi from the table
-- new testTable after the remove
testTable = { "bye", "cry", "why" }
-- original position of hi was 1, after the remove, position 1 has become bye
-- any values under the removed value are moved up, 5 becomes 4, 4 becomes 3, etc![]() Note: To remove a value from a key-value table, it's best to simply change the value to nil.
Note: To remove a value from a key-value table, it's best to simply change the value to nil.
testTable = { test = "testing", go = "boom", frown = "glow" }
table.remove(testTable, "test") -- this will error
testTable.test = nil -- won't error
testTable["test"] = nil -- won't errortable.save
- table.save(location, table)
- Save a table into an external file in location.
- See also: table.load
- Parameters
- location:
- Where you want the table file to be saved. Can be anywhere on your computer.
- table:
- The table that you are saving to the file.
- Example:
-- Saves the table mytable to the lua file mytable in your Mudlet Home Directory
table.save(getMudletHomeDir().."/mytable.lua", mytable)table.sort
- table.sort(Table [, comp])
- Sorts table elements in a given order, in-place, from
Table[1]toTable[n], wherenis the length of the table.
- If
compis given, then it must be a function that receives two table elements, and returns true when the first is less than the second (so that notcomp(a[i+1],a[i])will be true after the sort). Ifcompis not given, then the standard Lua operator<is used instead.
- The sort algorithm is not stable; that is, elements considered equal by the given order may have their relative positions changed by the sort.
- See https://www.lua.org/pil/19.3.html for more info
table.size
- table.size (t)
- Returns the size of a key-value table (this function has to iterate through all of the table to count all elements).
- Returns a number.
- Parameters
- t:
- The table you are checking the size of.
![]() Note:
For index based tables you can get the size with the # operator:
This is the standard Lua way of getting the size of index tables i.e. ipairs() type of tables with numerical indices.
To get the size of tables that use user defined keys instead of automatic indices (pairs() type) you need to use the function table.size() referenced above.
Note:
For index based tables you can get the size with the # operator:
This is the standard Lua way of getting the size of index tables i.e. ipairs() type of tables with numerical indices.
To get the size of tables that use user defined keys instead of automatic indices (pairs() type) you need to use the function table.size() referenced above.
local test_table = { "value1", "value2", "value3", "value4" }
myTableSize = #test_table
-- This would return 4.
local myTable = { 1 = "hello", "key2" = "bye", "key3" = "time to go" }
table.size(myTable)
-- This would return 3.table.unpickle
- table.unpickle( t, tables, tcopy, pickled )
- Internal function used by table.load() for deserialization.
table.update
- table.update(table1, table2)
- Returns a table in which key/value pairs from table2 are added to table1, and any keys present in both tables are assigned the value from table2, so that the resulting table is table1 updated with information from table2.
- Example
display(table.update({a = 1, b = 2, c = 3}, {b = 4, d = 5}))
{
a = 1,
b = 4,
c = 3,
d = 5
}
-- to just set a table to new values, assign it directly:
mytable = {key1 = "newvalue"}table.union
- table.union(...)
- Returns a table that is the union of the provided tables. This is a union of key/value pairs. If two or more tables contain different values associated with the same key, that key in the returned table will contain a subtable containing all relevant values. See table.n_union() for a union of values. Note that the resulting table may not be reliably traversable with ipairs() due to the fact that it preserves keys. If there is a gap in numerical indices, ipairs() will cease traversal.
- Examples
tableA = {
[1] = 123,
[2] = 456,
["test"] = "test",
}
---
tableB = {
[1] = 23,
[3] = 7,
["test2"] = function() return true end,
}
---
tableC = {
[5] = "c",
}
---
table.union(tableA, tableB, tableC)
-- will return the following:
{
[1] = {
123,
23,
},
[2] = 456,
[3] = 7,
[5] = "c",
["test"] = "test",
["test2"] = function() return true end,
}
Text to Speech Functions
These functions can make Mudlet talk for you (audible sound from written words). Check out the Text-To-Speech Manual for more detail on how this all works together.
Several Mudlet events are available functionality as well:
- ttsSpeechStarted
- ttsSpeechReady
- ttsSpeechQueued
- ttsSpeechPaused
- ttsSpeechError
- ttsPitchChanged
- ttsRateChanged
- ttsVoiceChanged
- ttsVolumeChanged
ttsClearQueue
- ttsClearQueue([index])
- This function will help, if you have already queued a few lines of text to speak, and now want to remove some or all of them.
- Returns false if an invalid index is given.
- See also: ttsGetQueue, ttsQueue
- Parameters
- index:
- (optional) number. The text at this index position of the queue will be removed. If no number is given, the whole queue is cleared.
- Example
-- queue five words and then remove some, "one, two, four" will be actually said
ttsQueue("One")
ttsQueue("Two")
ttsQueue("Three")
ttsQueue("Four")
ttsQueue("Five")
ttsClearQueue(2)
ttsClearQueue(3)
-- clear the whole queue entirely
ttsClearQueue()ttsGetCurrentLine
- ttsGetCurrentLine()
- If you want to analyse if or what is currently said, this function is for you.
- Returns the text being spoken, or false if not speaking.
- Example
ttsQueue("One")
ttsQueue("Two")
ttsQueue("Three")
ttsQueue("Four")
ttsQueue("Five")
-- print the line currently spoken 1s and 3s after which will be "two" and "five"
tempTimer(1, function()
echo("Speaking: ".. ttsGetCurrentLine().."\n")
end)
tempTimer(3, function()
echo("Speaking: ".. ttsGetCurrentLine().."\n")
end)ttsGetCurrentVoice
- ttsGetCurrentVoice()
- If you have multiple voices available on your system, you may want to check which one is currently in use.
- Returns the name of the voice used for speaking.
See also: ttsGetVoices
- Example
-- for example returns "Microsoft Zira Desktop" on Windows (US locale)
display(ttsGetCurrentVoice())ttsGetPitch
- ttsGetPitch()
- If you want to analyse the pitch or tone of your current speech.
- Returns the current pitch as a number between 1 (high) and -1 (deep).
See also: ttsSetPitch
- Example
local pitch = ttsGetPitch()
echo(pitch)ttsGetQueue
- ttsGetQueue([index])
- This function can be used to show your current queue of texts, or any single text thereof.
- Returns a single text or a table of texts, or false. See index parameter for details.
See also: ttsQueue
- Parameters
- index
- (optional) number. The text at this index position of the queue will be returned. If no index is given, the whole queue will be returned. If the given index does not exist, the function returns false.
- Example
ttsQueue("We begin with some text")
ttsQueue("And we continue it without interruption")
display(ttsGetQueue())
-- will show the queued texts as follows
-- (first line ignored because it's being spoken and is not in queue):
-- {
-- "And we continue it without interruption"
-- }ttsGetRate
- ttsGetRate()
- If you want to analyse the rate or speed of your current speech.
- Returns the current rate as a number between 1 (fast) and -1 (slow).
See also: ttsSetRate
- Example
local rate = ttsGetRate()
echo(rate)ttsGetState
- ttsGetState()
- With this function you can find the current state of the speech engine.
- Returns one of: ttsSpeechReady, ttsSpeechPaused, ttsSpeechStarted, ttsSpeechError, ttsUnknownState.
See also: ttsSpeak, ttsPause, ttsResume, ttsQueue
- Example
ttsQueue("We begin with some text")
ttsQueue("And we continue it without interruption")
echo(ttsGetState())
-- ttsSpeechStartedttsGetVoices
- ttsGetVoices()
- Lists all voices available to your current operating system and language settings. Currently uses the default system locale.
- Returns a table of names.
See also: ttsGetCurrentVoice, ttsSetVoiceByName, ttsSetVoiceByIndex
- Example
display(ttsGetVoices())
-- for example returns the following on Windows (US locale)
-- {
-- "Microsoft Zira Desktop"
-- }ttsGetVolume
- ttsGetVolume()
- If you want to analyse the volume of your current speech.
- Returns the current volume as a number between 1 (loud) and 0 (quiet).
See also: ttsSetVolume
- Example
local volume = ttsGetVolume()
echo(volume)ttsPause
- ttsPause()
- Pauses the speech which is currently spoken, if any. Engines on different OS's (Windows/macOS/Linux) behave differently - pause may not work at all, it may take several seconds before it takes effect, or it may pause instantly. Some engines will look for a break that they can later resume from, such as a sentence end.
- Example
-- set some text to be spoken, pause it 2s later, and unpause 4s later
ttsSpeak("Sir David Frederick Attenborough is an English broadcaster and naturalist. He is best known for writing and presenting, in conjunction with the BBC Natural History Unit, the nine natural history documentary series that form the Life collection, which form a comprehensive survey of animal and plant life on Earth. Source: Wikipedia")
tempTimer(2, function() ttsPause() end)
tempTimer(2, function() ttsResume() end)ttsQueue
- ttsQueue(text to queue, [index])
- This function will add the given text to your speech queue. Text from the queue will be spoken one after the other. This is opposed to ttsSpeak which will interrupt any spoken text immediately. The queue can be reviewed and modified, while their content has not been spoken.
See also: ttsGetQueue, ttsPause, ttsResume, ttsClearQueue, ttsGetState, ttsSpeak
- Parameters
- text to queue:
- Any written text which you would like to hear spoken to you. You can write literal text, or put in string variables, maybe taken from triggers or aliases, etc.
- index
- (optional) number. The text will be inserted to the queue at this index position. If no index is provided, the text will be added to the end of the queue.
- Example
ttsQueue("We begin with some text")
ttsQueue("And we continue it without interruption")
display(ttsGetQueue())
-- will show the queued texts as follows
-- (first line ignored because it's being spoken and is not in queue):
-- {
-- "And we continue it without interruption"
-- }ttsResume
- ttsResume()
- Resumes the speech which was previously spoken, if any has been paused.
- Example
-- set some text to be spoken, pause it 2s later, and unpause 4s later
ttsSpeak("Sir David Frederick Attenborough is an English broadcaster and naturalist. He is best known for writing and presenting, in conjunction with the BBC Natural History Unit, the nine natural history documentary series that form the Life collection, which form a comprehensive survey of animal and plant life on Earth. Source: Wikipedia")
tempTimer(2, function() ttsPause() end)
tempTimer(4, function() ttsResume() end)ttsSpeak
- ttsSpeak(text to speak)
- This will speak the given text immediately with the currently selected voice. Any currently spoken text will be interrupted (use the speech queue to queue a voice instead).
See also: ttsQueue
- Parameters
- text to speak:
- Any written text which you would like to hear spoken to you. You can write literal text, or put in string variables, maybe taken from triggers or aliases, etc.
- Example
ttsSpeak("Hello World!")
-- if 'target' is your target variable, you can also do this:
ttsSpeak("Hello "..target)ttsSetPitch
- ttsSetPitch(pitch)
- Sets the pitch or tone of speech playback.
- Parameters
- pitch:
- Number. Should be between 1 and -1, will be limited otherwise.
- Example
-- talk deeply first, after 2 seconds talk highly, after 4 seconds normally again
ttsSetPitch(-1)
ttsQueue("Deep voice")
tempTimer(2, function()
ttsSetPitch(1)
ttsQueue("High voice")
end)
tempTimer(4, function()
ttsSetPitch(0)
ttsQueue("Normal voice")
end)ttsSetRate
- ttsSetRate(rate)
- Sets the rate or speed of speech playback. On macOS and Windows, adjusting the system rate adjusts this value automatically.
- Parameters
- rate:
- Number. Should be between 1 and -1, will be limited otherwise.
- Example
-- talk slowly first, after 2 seconds talk quickly, after 4 seconds normally again
ttsSetRate(-1)
ttsQueue("Slow voice")
tempTimer(2, function ()
ttsSetRate(1)
ttsQueue("Quick voice")
end)
tempTimer(4, function ()
ttsSetRate(0)
ttsQueue("Normal voice")
end)ttsSetVolume
- ttsSetVolume(volume)
- Sets the volume of speech playback. On macOS, adjusting the system rate adjusts this value automatically.
- Parameters
- volume:
- Number. Should be between 1 and 0, will be limited otherwise.
- Example
-- talk quietly first, after 2 seconds talk a bit louder, after 4 seconds normally again
ttsSetVolume(0.2)
ttsSpeak("Quiet voice")
tempTimer(2, function ()
ttsSetVolume(0.5)
ttsSpeak("Low voice")
end)
tempTimer(4, function ()
ttsSetVolume(1)
ttsSpeak("Normal voice")
end)ttsSetVoiceByIndex
- ttsSetVoiceByIndex(index)
- If you have multiple voices available, you can switch them with this function by giving their index position as seen in the table you receive from ttsGetVoices(). If you know their name, you can also use ttsSetVoiceByName. On macOS and Windows, adjusting the system voice adjusts this value automatically.
- Returns true, if the setting was successful, errors otherwise.
See also: ttsGetVoices
- Parameters
- index:
- Number. The voice from this index position of the ttsGetVoices table will be set.
- Example
display(ttsGetVoices())
ttsSetVoiceByIndex(1)ttsSetVoiceByName
- ttsSetVoiceByName(name)
- If you have multiple voices available, and know their name already, you can switch them with this function. On macOS and Windows, adjusting the system voice adjusts this value automatically.
- Returns true, if the setting was successful, false otherwise.
See also: ttsGetVoices
- Parameters
- name:
- Text. The voice with this exact name will be set.
- Example
display(ttsGetVoices())
ttsSetVoiceByName("Microsoft Zira Desktop") -- example voice on WindowsttsSkip
- ttsSkip()
- Skips the current line of text.
- Example
ttsQueue("We hold these truths to be self-evident")
ttsQueue("that all species are created different but equal")
ttsQueue("that they are endowed with certain unalienable rights")
tempTimer(2, function () ttsSkip() end)
UI Functions
All functions that help you construct custom GUIs. They deal mainly with miniconsole/label/gauge creation and manipulation as well as displaying or formatting information on the screen.
addCommandLineMenuEvent
- addCommandLineMenuEvent([window,] label, eventName)
Adds item to right click menu associated with command line.
- See also
- removeCommandLineMenuEvent()
- Parameters
- window:
- Window that command line belongs to. Optional, will default to "main" (main window console)
- label:
- Label of item
- eventName:
- Event name that will be fired when clicked.
- Returns
- Returns true if the mouse event was added successfully.
- Example
addCommandLineMenuEvent("My very own special paste from clipboard", "pasteFromClipboardWithoutLineBreaks" )
registerAnonymousEventHandler("pasteFromClipboardWithoutLineBreaks", function()
local text = string.gsub(getClipboardText(), "[\r|\n]", "")
appendCmdLine(text)
end)addMouseEvent
- addMouseEvent(uniqueName, eventName, [displayName, tooltipText])
- Registers a new context menu option when right-clicked on a console window. Will return true if the event was added successfully, otherwise nil+message will be returned. If the displayName isn't set, uniqueName will be used for the menu label. eventName should be a Mudlet event that will handle the click data that includes event, unique name, window name, selection upper left column and row and selection bottom right column and row in that order. This is intended to be used with available cursor functions for any selection or processing needs.
- See also
- getMouseEvents(), moveCursor()
- Parameters
- uniqueName:
- A unique identifier for the mouse event.
- eventName:
- Name of the Mudlet event that will handle the data.
- displayName:
- (optional) Label text for the mouse context menu. If not set, the label defaults to uniqueName.
- tooltipText:
- (optional) Tooltip text when mouse is hovered on the option. If not set, no tooltip will be visible.
- Returns
- Returns true if the mouse event was added successfully.
- Example
-- An example showing implementing a hecho-friendly copy option:
addMouseEvent("hecho copy", "onMouseCopyExample")
function rgbToHex(r,g,b)
local rgb = (r * 0x10000) + (g * 0x100) + b
return string.format("#%x", rgb)
end
function onMouseCopyExample(event, menu, window, startCol, startRow, endCol, endRow)
-- Check whether there's an actual selection
if startCol == endCol and startRow == endRow then return end
local parsed = ""
local lastColor = nil
-- Loop through each symbol within the range
for l = startRow, endRow do
local cStart = l == startRow and startCol or 0
moveCursor(window, cStart, l)
local cEnd = l == endRow and endCol or #getCurrentLine() - 1
for c = cStart, cEnd do
selectSection(window, c, 1)
local symbol = getSelection(window) or ""
-- Convert the foreground color to a hex format, suitable for hecho
local color = rgbToHex(getFgColor(window))
-- Don't repeat the color if previous one was the same
if color == lastColor then
parsed = parsed .. symbol
else
lastColor = color
parsed = parsed .. color .. symbol
end
end
if l ~= endRow then parsed = parsed .. "\n" end
end
setClipboardText(parsed)
end
registerAnonymousEventHandler("onMouseCopyExample", "onMouseCopyExample")ansi2decho
- ansi2decho(text, default_colour)
- Converts ANSI colour sequences in
textto colour tags that can be processed by the decho() function. - See also: decho()
![]() Note: ANSI bold is available since Mudlet 3.7.1+.
Note: ANSI bold is available since Mudlet 3.7.1+.
![]() Note: underline, italics, overline, and strikethrough supported since Mudlet 4.15+
Note: underline, italics, overline, and strikethrough supported since Mudlet 4.15+
- Parameters
- text:
- String that contains ANSI colour sequences that should be replaced.
- default_colour:
- Optional - ANSI default colour code (used when handling orphan bold tags).
- Return values
- string text:
- The decho-valid converted text.
- string colour:
- The ANSI code for the last used colour in the substitution (useful if you want to colour subsequent lines according to this colour).
- Example
local replaced = ansi2decho('\27[0;1;36;40mYou say in a baritone voice, "Test."\27[0;37;40m')
-- 'replaced' should now contain <r><0,255,255:0,0,0>You say in a baritone voice, "Test."<r><192,192,192:0,0,0>
decho(replaced)Or show a complete colourful squirrel! It's a lotta code to do all the colours, so click the Expand button on the right to show it:
decho(ansi2decho([[
�[38;5;95m▄�[48;5;95;38;5;130m▄▄▄�[38;5;95m█�[49m▀�[0m �[0m
╭───────────────────────╮ �[38;5;95m▄▄�[0m �[38;5;95m▄�[48;5;95;38;5;130m▄▄�[48;5;130m█�[38;5;137m▄�[48;5;137;38;5;95m▄�[49m▀�[0m �[0m
│ │ �[48;5;95;38;5;95m█�[48;5;137;38;5;137m██�[48;5;95m▄�[49;38;5;95m▄▄▄�[48;5;95;38;5;137m▄▄▄�[49;38;5;95m▄▄�[48;5;95;38;5;130m▄�[48;5;130m███�[38;5;137m▄�[48;5;137m█�[48;5;95;38;5;95m█�[0m �[0m
│ Encrypt everything! │ �[38;5;95m▄�[48;5;187;38;5;16m▄�[48;5;16;38;5;187m▄�[38;5;16m█�[48;5;137;38;5;137m███�[38;5;187m▄�[38;5;16m▄▄�[38;5;137m██�[48;5;95;38;5;95m█�[48;5;130;38;5;130m█████�[48;5;137;38;5;137m██�[48;5;95;38;5;95m█�[0m �[0m
│ ├──── �[38;5;95m▄�[48;5;95;38;5;137m▄�[48;5;16m▄▄▄�[48;5;137m███�[48;5;16;38;5;16m█�[48;5;187m▄�[48;5;16m█�[48;5;137;38;5;137m█�[48;5;95;38;5;95m█�[48;5;130;38;5;130m██████�[48;5;137;38;5;137m███�[48;5;95;38;5;95m█�[0m �[0m
╰───────────────────────╯ �[48;5;95;38;5;95m█�[48;5;137;38;5;137m██�[48;5;16m▄�[38;5;16m█�[38;5;137m▄�[48;5;137m██████�[48;5;95;38;5;95m█�[48;5;130;38;5;130m██████�[48;5;137;38;5;137m████�[48;5;95m▄�[49;38;5;95m▄�[0m �[0m
�[38;5;95m▀�[48;5;137m▄�[38;5;137m███████�[38;5;95m▄�[49m▀�[0m �[48;5;95;38;5;95m█�[48;5;130;38;5;130m██████�[48;5;137;38;5;137m████�[48;5;95m▄�[49;38;5;95m▄�[0m �[0m
�[48;5;95;38;5;187m▄▄▄�[38;5;137m▄�[48;5;137m██�[48;5;95;38;5;95m█�[0m �[48;5;95;38;5;95m█�[48;5;130;38;5;130m███████�[48;5;137;38;5;137m███�[48;5;95m▄�[49;38;5;95m▄�[0m �[0m
�[38;5;187m▄�[48;5;187m███�[48;5;137;38;5;137m████�[48;5;95;38;5;95m█�[0m �[48;5;95;38;5;95m█�[48;5;130;38;5;130m█████████�[48;5;137;38;5;137m███�[48;5;95;38;5;95m█�[0m �[0m
�[38;5;187m▄�[48;5;187m███�[38;5;137m▄�[48;5;137m█�[48;5;95;38;5;95m█�[48;5;137;38;5;137m███�[48;5;95m▄�[49;38;5;95m▄�[0m �[38;5;95m▀�[48;5;130m▄�[38;5;130m███████�[48;5;137;38;5;137m████�[48;5;95;38;5;95m█�[0m�[0m
�[48;5;95;38;5;95m█�[48;5;187;38;5;187m████�[48;5;137;38;5;137m██�[48;5;95m▄�[48;5;137;38;5;95m▄�[38;5;137m██�[38;5;95m▄�[38;5;137m█�[48;5;95m▄�[49;38;5;95m▄�[0m �[48;5;95;38;5;95m█�[48;5;130;38;5;130m███████�[48;5;137;38;5;137m████�[48;5;95;38;5;95m█�[0m�[0m
�[38;5;95m▄�[48;5;95;38;5;137m▄�[48;5;187;38;5;187m████�[48;5;137;38;5;137m███�[48;5;95;38;5;95m█�[48;5;137;38;5;137m██�[48;5;95;38;5;95m█�[48;5;137;38;5;137m██�[48;5;95m▄�[49;38;5;95m▄�[0m �[48;5;95;38;5;95m█�[48;5;130;38;5;130m██████�[48;5;137;38;5;137m████�[48;5;95;38;5;95m█�[0m�[0m
�[38;5;95m▄�[48;5;95m██�[48;5;137m▄▄�[48;5;187;38;5;187m████�[48;5;137;38;5;95m▄▄�[48;5;95;38;5;137m▄�[48;5;137m█�[38;5;95m▄�[48;5;95;38;5;137m▄�[48;5;137m████�[48;5;95;38;5;95m█�[0m �[48;5;95;38;5;95m█�[48;5;130;38;5;130m██████�[48;5;137;38;5;137m████�[48;5;95;38;5;95m█�[0m�[0m
�[48;5;187;38;5;187m███�[48;5;95m▄�[38;5;137m▄▄▄▄�[48;5;137m██████�[48;5;95;38;5;95m█�[49m▄�[48;5;95;38;5;130m▄�[48;5;130m██████�[48;5;137;38;5;137m███�[38;5;95m▄�[49m▀�[0m�[0m
�[48;5;187;38;5;95m▄�[38;5;187m████�[48;5;137;38;5;137m█�[38;5;95m▄�[48;5;95;38;5;137m▄�[48;5;137m█████�[48;5;95;38;5;95m█�[48;5;130;38;5;130m███████�[38;5;137m▄�[48;5;137m████�[48;5;95;38;5;95m█�[0m �[0m
�[48;5;95;38;5;95m█�[48;5;187;38;5;137m▄�[38;5;187m███�[48;5;95;38;5;95m█�[48;5;137;38;5;137m██████�[48;5;95m▄▄�[48;5;130m▄▄▄▄▄�[48;5;137m██████�[48;5;95;38;5;95m█�[0m �[0m
�[38;5;95m▄▄▄�[48;5;95;38;5;137m▄�[48;5;187m▄�[38;5;187m██�[48;5;95m▄�[48;5;137;38;5;95m▄�[38;5;137m█████�[38;5;95m▄�[38;5;137m███████████�[48;5;95;38;5;95m█�[0m �[0m
�[38;5;95m▀▀▀▀▀▀▀▀�[48;5;187m▄▄▄�[48;5;95;38;5;137m▄�[48;5;137m██�[38;5;95m▄�[49m▀�[0m �[38;5;95m▀▀�[48;5;137m▄▄▄▄▄▄�[49m▀▀▀�[0m �[0m
�[38;5;95m▀▀▀▀▀▀▀▀▀�[0m �[0m
]]))
ansi2string
- ansi2string(text)
- Strips ANSI colour sequences from a string (text)
- See also: ansi2decho()
- Parameters
- text:
- String that contains ANSI colour sequences that should be removed.
- Return values
- string text:
- The plain text without ANSI colour sequences.
- Example
local replaced = ansi2string('\27[0;1;36;40mYou say in a baritone voice, "Test."\27[0;37;40m')
-- 'replaced' should now contain You say in a baritone voice, "Test."
print(replaced)appendBuffer
- appendBuffer(name)
- Pastes the previously copied rich text (including text formats like color etc.) into user window name.
- See also: selectCurrentLine(), copy(), paste()
- Parameters
- name:
- The name of the user window to paste into. Passed as a string.
- Example
--selects and copies an entire line to user window named "Chat"
selectCurrentLine()
copy()
appendBuffer("Chat")bg
- bg([window, ]colorName)
- Changes the background color of the text. Useful for highlighting text.
- See Also: fg(), setBgColor()
- Parameters
- window:
- The miniconsole to operate on - optional. If you'd like it to work on the main window, don't specify anything, or use main (since Mudlet 3.0).
- colorName:
- The name of the color to set the background to.


- Example
--This would change the background color of the text on the current line to magenta
selectCurrentLine()
bg("magenta")
-- or echo text with a green background to a miniconsole
bg("my window", "green")
echo("my window", "some green text\n")calcFontSize
- calcFontSize(window_or_fontsize, [fontname])
- Returns the average height and width of characters in a particular window, or a font name and size combination. Helpful if you want to size a miniconsole to specific dimensions.
- Returns two numbers, width/height
- See also: setMiniConsoleFontSize(), getMainWindowSize()
- Parameters
- window_or_fontsize:
- The miniconsole or font size you are wanting to calculate pixel sizes for.
- fontname:
- Specific font name (along with the size as the first argument) to calculate for.
![]() Note:
Window as an argument is available in Mudlet 3.10+, and font name in Mudlet 4.1+.
Note:
Window as an argument is available in Mudlet 3.10+, and font name in Mudlet 4.1+.
- Example
--this snippet will calculate how wide and tall a miniconsole designed to hold 4 lines of text 20 characters wide
--would need to be at 9 point font, and then changes miniconsole Chat to be that size
local width,height = calcFontSize(9)
width = width * 20
height = height * 4
resizeWindow("Chat", width, height)cecho
- cecho([window], text)
- Echoes text that can be easily formatted with colour and the below tags. You can also include unicode art in it - try some examples from 1lineart.
- Formatting
<b> - bold
</b> - bold off
<i> - italics
</i> - italics off
<u> - underline
</u> - underline off
<o> - overline
</o> - overline off
<s> - strikethrough
</s> - strikethrough off- See also: decho(), hecho(), creplaceLine()
![]() Note: Support for labels added in Mudlet 4.15; however, it does not turn a label into a miniconsole and every time you cecho it will erase any previous echo sent to the label.
Note: Support for labels added in Mudlet 4.15; however, it does not turn a label into a miniconsole and every time you cecho it will erase any previous echo sent to the label.
- Parameters
- window:
- Optional - the window name to echo to - can either be none or "main" for the main window, or a miniconsole, userwindow, or label name.
- text:
- The text to display, with color names inside angle brackets <>, ie <red>. If you'd like to use a background color, put it after a colon : - <:red>. You can use the <reset> tag to reset to the default color. You can select any from this list:
- Example
cecho("Hi! This text is <red>red, <blue>blue, <green> and green.")
cecho("<:green>Green background on normal foreground. Here we add an <ivory>ivory foreground.")
cecho("<blue:yellow>Blue on yellow text!")
cecho("\n<red>Red text with <i>italics</i>, <u>underline</u>, <s>strikethrough</s>, <o>overline</o>, and <b>bold</b>.")
cecho("\n<green><o><u>Green text with over and underline at the same time.</o></u>")
-- \n adds a new line
cecho("<red>one line\n<green>another line\n<blue>last line")
cecho("myinfo", "<green>All of this text is green in the myinfo miniconsole.")
cecho("<green>(╯°□°)<dark_green>╯︵ ┻━┻")
cecho("°º¤ø,¸¸,ø¤º°`°º¤ø,¸,ø¤°º¤ø,¸¸,ø¤º°`°º¤ø,¸")
cecho([[
██╗ ██╗ ██╗███╗ ██╗███████╗ █████╗ ██████╗ ████████╗
███║ ██║ ██║████╗ ██║██╔════╝ ██╔══██╗██╔══██╗╚══██╔══╝
╚██║ ██║ ██║██╔██╗ ██║█████╗ ███████║██████╔╝ ██║
██║ ██║ ██║██║╚██╗██║██╔══╝ ██╔══██║██╔══██╗ ██║
██║ ███████╗██║██║ ╚████║███████╗ ██║ ██║██║ ██║ ██║
╚═╝ ╚══════╝╚═╝╚═╝ ╚═══╝╚══════╝ ╚═╝ ╚═╝╚═╝ ╚═╝ ╚═╝
]])cechoLink
- cechoLink([windowName], text, command, hint, true)
- Echos a piece of text as a clickable link, at the end of the current selected line - similar to cecho(). This version allows you to use colours within your link text.
- See also: echoLink(), dechoLink(), hechoLink()
- Parameters
- windowName:
- optional parameter, allows selection between sending the link to a miniconsole or the main window.
- text:
- text to display in the echo. Same as a normal cecho().
- command:
- Lua code to do when the link is clicked, as text or a function (since Mudlet 4.11).
- hint:
- text for the tooltip to be displayed when the mouse is over the link.
- true:
- requires argument for the colouring to work.
- Example
-- echo a link named 'press me!' that'll send the 'hi' command to the game
cechoLink("<red>press <brown:white>me!", function() send("hi") end, "This is a tooltip", true)
-- alternatively, put command as text (in [[ and ]] to use quotation marks inside)
cechoLink("<red>press <brown:white>me!", [[send("hi")]], "This is a tooltip", true)cecho2ansi
- ansiFormattedString = cecho2ansi(text)
- Converts cecho formatted text to ansi formatted text. Used by cfeedTriggers, but useful if you want ansi formatted text for any other reason.
- See also
- cecho(), cfeedTriggers()
![]() Note: This function uses the ansi short colors (0-15) for color names which have base 16 ansi equivalents, such as 'red', 'blue', "lightBlue", "cyan", etc rather than the values defined in the color_table. If there is no base ansi equivalent then it will use the rgb values from the color_table for the color.
Note: This function uses the ansi short colors (0-15) for color names which have base 16 ansi equivalents, such as 'red', 'blue', "lightBlue", "cyan", etc rather than the values defined in the color_table. If there is no base ansi equivalent then it will use the rgb values from the color_table for the color.
- Parameters
- text:
- The cecho formatted text for conversion
- Returns
- String converted to ansi formatting
- Example
-- replicates the functionality of cfeedTriggers() for a single line.
-- you would most likely just use cfeedTriggers, but it makes for a tidy example.
feedTriggers(cecho2ansi("\n<red>This is red.<reset> <i>italic</i>, <b>bold</b>, <s>strikethrough</s>, <u>underline</u>\n"))
cechoPopup
- cechoPopup([windowName], text, {commands}, {hints}, [useCurrentFormatElseDefault])
- Creates text with a left-clickable link, and a right-click menu for more options at the end of the current line, like cecho(). The added text, upon being left-clicked, will do the first command in the list. Upon being right-clicked, it'll display a menu with all possible commands. The menu will be populated with hints, one for each line.
- Parameters
- windowName:
- (optional) name of the window to echo to. Use either main or omit for the main window, or the miniconsoles name otherwise.
- text:
- the text to display
- {commands}:
- a table of lua code to do, in text strings or as functions (since Mudlet 4.11), i.e.
{[[send("hello")]], function() echo("hi!") end}
- {hints}:
- a table of strings which will be shown on the popup and right-click menu. ie,
{"send the hi command", "echo hi to yourself"}
- useCurrentFormatElseDefault:
- (optional) a boolean value for using either the current formatting options (colour, underline, italic) or the link default (blue underline).
- Example
-- Create some text as a clickable with a popup menu:
cechoPopup("<red>activities<reset> to do", {function() send "sleep" end, function() send "sit" end, function() send "stand" end}, {"sleep", "sit", "stand"}, true)
-- alternatively, put command as text (in [[ and ]] to use quotation marks inside)
cechoPopup("<red>activities<reset> to do", {[[send "sleep"]], [[send "sit"]], [[send "stand"]]}, {"sleep", "sit", "stand"}, true)cinsertLink
- cinsertLink([windowName], text, command, hint, true)
- Echos a piece of text as a clickable link, at the end of the current cursor position - similar to cinsertText(). This version allows you to use colours within your link text.
- See also: insertLink(), hinsertLink()
- Parameters
- windowName:
- optional parameter, allows selection between sending the link to a miniconsole or the main window.
- text:
- text to display in the echo. Same as a normal cecho().
- command:
- Lua code to do when the link is clicked, as text or a function (since Mudlet 4.11).
- hint:
- text for the tooltip to be displayed when the mouse is over the link.
- true:
- requires argument for the colouring to work.
- Example
-- echo a link named 'press me!' that'll send the 'hi' command to the game
cinsertLink("<red>press <brown:white>me!", function() send("hi") end, "This is a tooltip", true)
-- alternatively, put command as text (in [[ and ]] to use quotation marks inside)
cinsertLink("<red>press <brown:white>me!", [[send("hi")]], "This is a tooltip", true)cinsertPopup
- cinsertPopup([windowName], text, {commands}, {hints}, [useCurrentFormatElseDefault])
- Creates text with a left-clickable link, and a right-click menu for more options at the end of the current cursor position, like cinsertText(). The added text, upon being left-clicked, will do the first command in the list. Upon being right-clicked, it'll display a menu with all possible commands. The menu will be populated with hints, one for each line.
- Parameters
- windowName:
- (optional) name of the window to echo to. Use either main or omit for the main window, or the miniconsoles name otherwise.
- text:
- the text to display
- {commands}:
- a table of lua code to do, in text strings or as functions (since Mudlet 4.11), i.e.
{[[send("hello")]], function() echo("hi!") end}
- {hints}:
- a table of strings which will be shown on the popup and right-click menu. ie,
{"send the hi command", "echo hi to yourself"}
- useCurrentFormatElseDefault:
- (optional) a boolean value for using either the current formatting options (colour, underline, italic) or the link default (blue underline).
- Example
-- Create some text as a clickable with a popup menu:
cinsertPopup("<red>activities<reset> to do", {function() send "sleep" end, function() send "sit" end, function() send "stand" end}, {"sleep", "sit", "stand"}, true)
-- Create some text as a clickable with a popup menu:
cinsertPopup("<red>activities<reset> to do", {[[send "sleep"]], [[send "sit"]], [[send "stand"]]}, {"sleep", "sit", "stand"}, true)cinsertText
- cinsertText([window], text)
- inserts text at the current cursor position, with the possibility for color tags.
- See Also: cecho(), creplaceLine()
- Parameters
- window:
- Optional - the window name to echo to - can either be none or "main" for the main window, or the miniconsoles name.
- text:
- The text to display, with color names inside angle brackets <>, ie <red>. If you'd like to use a background color, put it after a double colon : - <:red>. You can use the <reset> tag to reset to the default color. You can select any from this list:
- Example
cinsertText("Hi! This text is <red>red, <blue>blue, <green> and green.")
cinsertText("<:green>Green background on normal foreground. Here we add an <ivory>ivory foreground.")
cinsertText("<blue:yellow>Blue on yellow text!")
cinsertText("myinfo", "<green>All of this text is green in the myinfo miniconsole.")clearUserWindow
- clearUserWindow([name])
- This is (now) identical to clearWindow().
clearWindow
- clearWindow([windowName])
- Clears the label, mini console, or user window with the name given as argument (removes all text from it). If you don't give it a name, it will clear the main window.
- Parameters
- windowName:
- (optional) The name of the label, mini console, or user window to clear. Passed as a string.
- Example
--This would clear a label, user window, or miniconsole with the name "Chat"
clearWindow("Chat")-- this can clear your whole main window
clearWindow()closestColor
- closestColor(colorOrR[,G,B])
- Returns the closest color from the color_table to the one provided for use in cecho and associated functions.
- Parameters
- colorOrR:
- Either the string representation of a color from decho or hecho (IE "#ff0077" or "<255,0,128>"), a table of color values (IE {255,0,18}), or the Red component of RGB when followed by two next optional parameters
- G:
- (optional) green component of RGB coordinates. Only needed if first parameter sent as the Red component only
- B:
- (optional) blue component of RGB coordinates. Only needed if first parameter sent as the Red component only
- Returns
- The closest color name from the color_table to the one supplied on success
- nil + error if it cannot parse the parameters into a color.
- Example
local colorName = closestColor(255, 0, 0) -- "ansi_light_red"
local colorName = closestColor({127, 255, 127}) -- "ansi_120"
local colorName = closestColor("<127, 127, 127>") -- "ansi_008"
local colorName = closestColor("#a020e6") -- "purple"
local colorName = closestColor("blue") -- "blue" (you wouldn't necessarily do this on purpose, but during automated color conversions this might occur)copy
- copy([windowName])
- Copies the current selection to the lua virtual clipboard. This function operates on rich text, i. e. the selected text including all its format codes like colors, fonts etc. in the lua virtual clipboard until it gets overwritten by another copy operation.
- See also: selectString(), selectCurrentLine(), paste(), appendBuffer(), replace(), createMiniConsole(), openUserWindow()
- Parameters
- windowName (optional):
- the window from which to copy text - use the main console if not specified.
- Example
-- This script copies the current line on the main screen to a window (miniconsole or userwindow) called 'chat' and gags the output on the main screen.
selectString(line, 1)
copy()
appendBuffer("chat")
replace("This line has been moved to the chat window!")copy2decho
- copy2decho([window], [stringToCopy], [instanceToCopy])
- Copies a string from the current line of window, including color information in decho format.
- See also: decho()
- Parameters
- window (optional):
- the window to copy the text from. Defaults to "main".
- stringToCopy (optional):
- the string to copy. Defaults to copying the entire line.
- instanceToCopy (optional):
- the instance of the string to copy. Defaults to 1.
- Example
-- This copies the current line on the main console and dechos it to a miniconsole named "test"
decho("test", copy2decho())-- This when put into a trigger would copy matches[2] with color information and decho it to a Geyser miniconsole stored as the variable enemylist
enemylist:decho(copy2decho(matches[2]))copy2html
- copy2html([window], [stringToCopy], [instanceToCopy])
- Copies a string from the current line of window, including color information in html format for echoing to a label.
- Parameters
- window (optional):
- the window to copy the text from. Defaults to "main"
- stringToCopy (optional):
- the string to copy. Defaults to copying the entire line
- instanceToCopy (optional):
- the instance of the string to copy. Defaults to 1
- Example
-- This copies the current line on the main console and echos it to a label named "TestLabel"
echo("TestLabel", copy2html())-- This when put into a trigger would copy matches[2] with color information and echo it to a Geyser label stored as the variable enemylist
enemylist:echo(copy2html(matches[2]))createBuffer
- createBuffer(name)
- Creates a named buffer for formatted text, much like a miniconsole, but the buffer is not intended to be shown on the screen - use it for formatting text or storing formatted text.
- See also: selectString(), selectCurrentLine(), copy(), paste()
- Parameters
- name:
- The name of the buffer to create.
- Example
--This creates a named buffer called "scratchpad"
createBuffer("scratchpad")createCommandLine
- createCommandLine([name of userwindow], name, x, y, width, height)
- Creates a new command line inside the main window of Mudlet. If only a command line inside a miniConsole/UserWindow is needed see enableCommandLine().
- You can use appendCmdLine() / getCmdLine() and other command line functions to customize the input.
![]() Note: setCmdLineAction allows you to attach an action to your command line input.
Note: setCmdLineAction allows you to attach an action to your command line input.
- Returns true or false.
- See also: enableCommandLine(), disableCommandLine(), clearCmdLine(), getCmdLine(), printCmdLine(), appendCmdLine(), , selectCmdLineText()
- Parameters
- name of userwindow:
- Name of userwindow the command line is created in. Optional, defaults to the main window if not provided.
- name:
- The name of the command line. Must be unique. Passed as a string.
- x, y, width, height
- Parameters to set the command line size and location - it is also possible to set them by using moveWindow() and resizeWindow(), as createCommandLine() will only set them once.
createConsole
- createConsole([name of userwindow], consoleName, fontSize, charsPerLine, numberOfLines, Xpos, Ypos)
- Makes a new miniconsole which can be sized based upon the width of a 'W' character and the extreme top and bottom positions any character of the font should use. The background will be black, and the text color white.
- Parameters
- name of userwindow:
- Name of userwindow your new miniconsole is created in. Optional, defaults to the main window if not provided.
- consoleName:
- The name of your new miniconsole. Passed as a string.
- fontSize:
- The font size to use for the miniconsole. Passed as an integer number.
- charsPerLine:
- How many characters wide to make the miniconsole. Passed as an integer number.
- numberOfLines:
- How many lines high to make the miniconsole. Passed as an integer number.
- Xpos:
- X position of miniconsole. Measured in pixels, with 0 being the very left. Passed as an integer number.
- Ypos:
- Y position of miniconsole. Measured in pixels, with 0 being the very top. Passed as an integer number.
![]() Note:
userwindow argument only available in 4.6.1+
Note:
userwindow argument only available in 4.6.1+
- Example
-- this will create a console with the name of "myConsoleWindow", font size 8, 80 characters wide,
-- 20 lines high, at coordinates 300x,400y
createConsole("myConsoleWindow", 8, 80, 20, 200, 400)![]() Note:
Note:
(For Mudlet Makers) This function is implemented outside the application's core via the GUIUtils.lua file of the Mudlet supporting Lua code using createMiniConsole() and other functions to position and size the mini-console and configure the font.
createGauge
- createGauge([name of userwindow], name, width, height, Xpos, Ypos, gaugeText, r, g, b, orientation)
- createGauge([name of userwindow], name, width, height, Xpos, Ypos, gaugeText, colorName, orientation)
- Creates a gauge that you can use to express completion with. For example, you can use this as your healthbar or xpbar.
- See also: moveGauge(), setGauge(), setGaugeText(), setGaugeStyleSheet()
- Parameters
- name of userwindow:
- Name of userwindow the gauge is created in. Optional, defaults to the main window if not provided.
- name:
- The name of the gauge. Must be unique, you can not have two or more gauges with the same name. Passed as a string.
- width:
- The width of the gauge, in pixels. Passed as an integer number.
- height:
- The height of the gauge, in pixels. Passed as an integer number.
- Xpos:
- X position of gauge. Measured in pixels, with 0 being the very left. Passed as an integer number.
- Ypos:
- Y position of gauge. Measured in pixels, with 0 being the very top. Passed as an integer number.
- gaugeText:
- Text to display on the gauge. Passed as a string, unless you do not wish to have any text, in which case you pass nil
- r:
- The red component of the gauge color. Passed as an integer number from 0 to 255
- g:
- The green component of the gauge color. Passed as an integer number from 0 to 255
- b:
- The blue component of the gauge color. Passed as an integer number from 0 to 255
- colorName:
- the name of color for the gauge. Passed as a string.
- orientation:
- the gauge orientation. Can be horizontal (fills from left to right), vertical (fills bottom to top), goofy (fills right to left), or batty (fills top to bottom).
![]() Note:
userwindow argument only available in 4.6.1+
Note:
userwindow argument only available in 4.6.1+
- Example
-- This would make a gauge at that's 300px width, 20px in height, located at Xpos and Ypos and is green.
-- The second example is using the same names you'd use for something like [[fg]]() or [[bg]]().
createGauge("healthBar", 300, 20, 30, 300, nil, 0, 255, 0)
createGauge("healthBar", 300, 20, 30, 300, nil, "green")
-- If you wish to have some text on your label, you'll change the nil part and make it look like this:
createGauge("healthBar", 300, 20, 30, 300, "Now with some text", 0, 255, 0)
-- or
createGauge("healthBar", 300, 20, 30, 300, "Now with some text", "green")![]() Note:
Note:
If you want to put text on the back of the gauge when it's low, use an echo with the <gauge name>_back.
echo("healthBar_back", "This is a test of putting text on the back of the gauge!")createLabel
- createLabel([name of userwindow], name, Xpos, Ypos, width, height, fillBackground, [enableClickthrough])
- Creates a highly manipulable overlay which can take some css and html code for text formatting. Labels are clickable, and as such can be used as a sort of button. Labels are meant for small variable or prompt displays, messages, images, and the like. You should not use them for larger text displays or things which will be updated rapidly and in high volume, as they are much slower than miniconsoles.
- Returns true or false.
- See also: hideWindow(), showWindow(), resizeWindow(), setLabelClickCallback(), setTextFormat(), getTextFormat(), moveWindow(), setBackgroundColor(), getMainWindowSize(), calcFontSize(), deleteLabel()
- Parameters
- name of userwindow: Name of userwindow label is created in. Optional, defaults to the main window if not provided.
- name: name of the label. Must be unique, you can not have two or more labels with the same name. Passed as a string.
- Xpos: X position of the label. Measured in pixels, with 0 being the very left. Passed as an integer number.
- Ypos: Y position of the label. Measured in pixels, with 0 being the very top. Passed as an integer number.
- width: width of the label, in pixels. Passed as an integer number.
- height: height of the label, in pixels. Passed as an integer number.
- fillBackground: whether or not to display the background. Passed as integer number (1 or 0) or as boolean (true, false). 1 or true will display the background color, 0 or false will not.
- enableClickthrough: whether or not enable clickthrough on this label. Passed as integer number (1 or 0) or as boolean (true, false). 1 or true will enable clickthrough, 0 or false will not. Optional, defaults to clickthrough not enabled if not provided.
![]() Note:
userwindow argument only available in 4.6.1+
Note:
userwindow argument only available in 4.6.1+
- Example
-- a label situated at x=300 y=400 with dimensions 100x200
createLabel("a very basic label",300,400,100,200,1)-- this example creates a transparent overlay message box to show a big warning message "You are under attack!" in the middle
-- of the screen. Because the background color has a transparency level of 150 (0-255, with 0 being completely transparent
-- and 255 opaque) the background text can still be read through.
local width, height = getMainWindowSize()
createLabel("messageBox",(width/2)-300,(height/2)-100,250,150,1)
resizeWindow("messageBox",500,70)
moveWindow("messageBox", (width/2)-300,(height/2)-100 )
setBackgroundColor("messageBox", 255, 204, 0, 200)
echo("messageBox", [[<p style="font-size:35px"><b><center><font color="red">You are under attack!</font></center></b></p>]])
-- you can also make it react to clicks!
mynamespace = {
messageBoxClicked = function()
echo("hey you've clicked the box!\n")
end
}
setLabelClickCallback("messageBox", "mynamespace.messageBoxClicked")
-- uncomment code below to make it also hide after a short while
-- tempTimer(2.3, [[hideWindow("messageBox")]] ) -- close the warning message box after 2.3 secondscreateMiniConsole
- createMiniConsole([name of userwindow], name, x, y, width, height)
- Opens a miniconsole window inside the main window of Mudlet. This is the ideal fast colored text display for everything that requires a bit more text, such as status screens, chat windows, etc. Unlike labels, you cannot have transparency in them.
- You can use clearWindow() / moveCursor() and other functions for this window for custom printing as well as copy & paste functions for colored text copies from the main window. setWindowWrap() will allow you to set word wrapping, and move the main window to make room for miniconsole windows on your screen (if you want to do this as you can also layer mini console and label windows) see setBorderSizes(), setBorderColor() functions.
- Returns true or false.
- See also: createLabel(), hideWindow(), showWindow(), resizeWindow(), setTextFormat(), getTextFormat(), moveWindow(), setMiniConsoleFontSize(), handleWindowResizeEvent(), setBorderSizes(), setWindowWrap(), getMainWindowSize(), setMainWindowSize(), calcFontSize()
- Parameters
- name of userwindow: (available in Mudlet 4.6.1+)
- (Optional) name of userwindow the miniconsole is created in. Defaults to the main window if not provided.
- name:
- The name of the miniconsole. Must be unique. Passed as a string.
- x, y, width, height
- Parameters to set set the window size and location - in Mudlet version 2.1 and below it's best to set them via moveWindow() and resizeWindow(), as createMiniConsole() will only set them once. Starting with Mudlet version 3.0, however, that is fine and calling createMiniConsole() will re-position your miniconsole appropriately.
createScrollBox
- createScrollBox([name of parent window], name, x, y, width, height)
- creates a graphical elements able to hold other graphical elements such as labels, miniconsoles, command lines etc. in it.
If the added elements don't fit into the ScrollBox scrollbars appear and allow scrolling.
- Returns true or false.
- See also: createLabel(), hideWindow(), showWindow(), resizeWindow(), moveWindow(), setWindow()
- Parameters
- name of parent window:
- (Optional) name of the parent window the scrollBox is created in. Defaults to the main window if not provided.
- name:
- The name of the scrollBox. Must be unique. Passed as a string.
- x, y, width, height
- Parameters to set set the window size and location
- Example
-- create a ScrollBox with the name sBox
createScrollBox("SBox",0,0,300,200)
-- create 3 Labels and put them into the ScrollBox
createLabel("SBox","SBoxLabel",0,0,200,200,1)
createLabel("SBox","SBoxLabel2",200,0,200,200,1)
createLabel("SBox","SBoxLabel3",400,0,200,200,1)
-- put some text on the labels
echo("SBoxLabel","Label")
echo("SBoxLabel2","Label2")
echo("SBoxLabel3","Label3")
-- change the colours of the labels to make it easier to distinguish them
setBackgroundColor("SBoxLabel",255,0,0)
setBackgroundColor("SBoxLabel2",0,255,0)
setBackgroundColor("SBoxLabel3",0,0,255)creplace
- creplace([window, ]text)
- Replaces the output line from the game with a colour-tagged string.
See Also: cecho(), cinsertText()
- Parameters
- window:
- The window to replace the selection in. Optional, defaults to the main window if not provided.
- text:
- The text to display, with color names inside angle brackets as with cecho(). You can select any from this list:
- The text to display, with color names inside angle brackets as with cecho(). You can select any from this list:
- Example
selectCaptureGroup(1)
creplace("<magenta>[ALERT!]: <reset>"..matches[2])creplaceLine
- creplaceLine ([window], text)
- Replaces the output line from the game with a colour-tagged string.
See Also: cecho(), cinsertText()
- Parameters
- window (optional):
- the window to copy the text from. Defaults to "main". Only supported in Mudlet 4.12+
- text:
- The text to display, with color names inside angle brackets <>, ie <red>. If you'd like to use a background color, put it after a colon : - <:red>. You can use the <reset> tag to reset to the default color. You can select any from this list:
- The text to display, with color names inside angle brackets <>, ie <red>. If you'd like to use a background color, put it after a colon : - <:red>. You can use the <reset> tag to reset to the default color. You can select any from this list:
- Example
creplaceLine("<magenta>[ALERT!]: <reset>"..line)decho
- decho ([name of console,] text)
- Color changes can be made using the format <FR,FG,FB:BR,BG,BB,[BA]> where each field is a number from 0 to 255. The background portion can be omitted using <FR,FG,FB> or the foreground portion can be omitted using <:BR,BG,BB,[BA]>. Arguments 2 and 3 set the default fore and background colors for the string using the same format as is used within the string, sans angle brackets, e.g. decho("<50,50,0:0,255,0>test").
- You can also include the below tags.
- Formatting
<b> - bold
</b> - bold off
<i> - italics
</i> - italics off
<u> - underline
</u> - underline off
<o> - overline
</o> - overline off
<s> - strikethrough
</s> - strikethrough off![]() Note: Support for labels added in Mudlet 4.15; however, it does not turn a label into a miniconsole and every time you decho it will erase any previous echo sent to the label.
Note: Support for labels added in Mudlet 4.15; however, it does not turn a label into a miniconsole and every time you decho it will erase any previous echo sent to the label.
- See also: cecho(), hecho(), copy2decho()
- Parameters
- name of console
- (Optional) Name of the console to echo to. If no name is given, this will defaults to the main window.
- text:
- The text that you’d like to echo with embedded color tags. Tags take the RGB values only, see below for an explanation.
![]() Note:
Optional background transparancy parameter (BA) available in Mudlet 4.10+
Note:
Optional background transparancy parameter (BA) available in Mudlet 4.10+
- Example
decho("<50,50,0:0,255,0>test")
decho("miniconsolename", "<50,50,0:0,255,0>test")
decho("\n<255,0,0>Red text with <i>italics</i>, <u>underline</u>, <s>strikethrough</s>, and <b>bold</b> formatting.")
decho("<\n<0,128,0><o><u>Green text with both over and underlines.</u></o>")decho2ansi
- ansiFormattedString = decho2ansi(text)
- Converts decho formatted text to ansi formatted text. Used by dfeedTriggers, but useful if you want ansi formatted text for any other reason.
- See also
- decho(), dfeedTriggers()
![]() Note: non-color formatting added in Mudlet 4.15+
Note: non-color formatting added in Mudlet 4.15+
- Parameters
- text:
- The decho formatted text for conversion
- Returns
- String converted to ansi formatting
- Example
-- replicates the functionality of dfeedTriggers() for a single line.
-- you would most likely just use dfeedTriggers, but it makes for a tidy example.
feedTriggers(decho2ansi("\n<128,0,0>This is red.<r> <i>italic</i>, <b>bold</b>, <s>strikethrough</s>, <u>underline</u>\n"))dechoLink
- dechoLink([windowName], text, command, hint, true)
- Echos a piece of text as a clickable link, at the end of the current selected line - similar to decho(). This version allows you to use colours within your link text.
- Parameters
- windowName:
- (optional) allows selection between sending the link to a miniconsole or the "main" window.
- text:
- text to display in the echo. Same as a normal decho().
- command:
- Lua code to do when the link is clicked, as text or a function (since Mudlet 4.11).
- hint:
- text for the tooltip to be displayed when the mouse is over the link.
- true:
- requires argument for the colouring to work.
- Example
-- echo a link named 'press me!' that'll send the 'hi' command to the game
dechoLink("<50,50,0:0,255,0>press me!", function() send("hi") end, "This is a tooltip", true)
-- alternatively, put command as text (in [[ and ]] to use quotation marks inside)
dechoLink("<50,50,0:0,255,0>press me!", [[send("hi")]], "This is a tooltip", true)dechoPopup
- dechoPopup([windowName], text, {commands}, {hints}, [useCurrentFormatElseDefault])
- Creates text with a left-clickable link, and a right-click menu for more options at the end of the current line, like decho(). The added text, upon being left-clicked, will do the first command in the list. Upon being right-clicked, it'll display a menu with all possible commands. The menu will be populated with hints, one for each line.
- Parameters
- windowName:
- (optional) name of the window to echo to. Use either main or omit for the main window, or the miniconsoles name otherwise.
- text:
- the text to display
- {commands}:
- a table of lua code strings to do or a functions (since Mudlet 4.11). ie,
{[[send("hello")]], function() echo("hi!") end}
- {hints}:
- a table of lua code to do, in text strings or as functions (since Mudlet 4.11), i.e.
{"send the hi command", "echo hi to yourself"}
- useCurrentFormatElseDefault:
- (optional) a boolean value for using either the current formatting options (colour, underline, italic) or the link default (blue underline).
- Example
-- Create some text as a clickable with a popup menu:
dechoPopup("<255,0,0>activities<r> to do", {function() send "sleep" end, function() send "sit" end, function() send "stand" end}, {"sleep", "sit", "stand"}, true)
-- alternatively, put command as text (in [[ and ]] to use quotation marks inside)
dechoPopup("<255,0,0>activities<r> to do", {[[send "sleep"]], [[send "sit"]], [[send "stand"]]}, {"sleep", "sit", "stand"}, true)dinsertLink
- dinsertLink([windowName], text, command, hint, true)
- Echos a piece of text as a clickable link, at the end of the current cursor position - similar to dinsertText(). This version allows you to use colours within your link text.
- See also: insertLink(), hinsertLink()
- Parameters
- windowName:
- optional parameter, allows selection between sending the link to a miniconsole or the main window.
- text:
- text to display in the echo. Same as a normal decho().
- command:
- Lua code to do when the link is clicked, as text or a function (since Mudlet 4.11).
- hint:
- text for the tooltip to be displayed when the mouse is over the link.
- true:
- requires argument for the colouring to work.
- Example
-- echo a link named 'press me!' that'll send the 'hi' command to the game
dinsertLink("<255,0,0>press <165,42,42:255,255,255>me!", function() send("hi") end, "This is a tooltip", true)
-- alternatively, put command as text (in [[ and ]] to use quotation marks inside)
dinsertLink("<255,0,0>press <165,42,42:255,255,255>me!", [[send("hi")]], "This is a tooltip", true)dinsertPopup
- dinsertPopup([windowName], text, {commands}, {hints}, [useCurrentFormatElseDefault])
- Creates text with a left-clickable link, and a right-click menu for more options at the end of the current cursor position, like dinsertText(). The added text, upon being left-clicked, will do the first command in the list. Upon being right-clicked, it'll display a menu with all possible commands. The menu will be populated with hints, one for each line.
- Parameters
- windowName:
- (optional) name of the window to echo to. Use either main or omit for the main window, or the miniconsoles name otherwise.
- text:
- the text to display
- {commands}:
- a table of lua code to do, in text strings or as functions (since Mudlet 4.11), i.e.
{[[send("hello")]], function() echo("hi!") end}
- {hints}:
- a table of strings which will be shown on the popup and right-click menu. ie,
{"send the hi command", "echo hi to yourself"}
- useCurrentFormatElseDefault:
- (optional) a boolean value for using either the current formatting options (colour, underline, italic) or the link default (blue underline).
- Example
-- Create some text as a clickable with a popup menu:
dinsertPopup("<255,0,0>activities<r> to do", {function() send "sleep" end, function() send "sit" end, function() send "stand" end}, {"sleep", "sit", "stand"}, true)
-- alternatively, put command as text (in [[ and ]] to use quotation marks inside)
dinsertPopup("<255,0,0>activities<r> to do", {[[send "sleep"]], [[send "sit"]], [[send "stand"]]}, {"sleep", "sit", "stand"}, true)deleteLabel
- deleteLabel(labelName)
- Deletes and removes a label from the screen. Note that if you'd like to show the label again, it is much more performant to hide/show it instead.
- Note that you shouldn't use the Geyser label associated with the label you delete afterwards - that doesn't make sense and Geyser right now wouldn't know that it's been deleted, either.
- See also: hideWindow(), showWindow(), createLabel()
- Parameters
- labelName: name of the label to delete.
createLabel("a very basic label",300,400,100,200,1)
setBackgroundColor("a very basic label", 255, 204, 0, 200)
-- delete the label after 3 seconds
tempTimer(3, function()
deleteLabel("a very basic label")
end)deleteLine
- deleteLine([windowName])
- Deletes the current line under the user cursor. This is a high speed gagging tool and is very good at this task, but is only meant to be use when a line should be omitted entirely in the output. If you echo() to that line it will not be shown, and lines deleted with deleteLine() are simply no longer rendered. This is purely visual - triggers will still fire on the line as expected.
- See also: replace(), wrapLine()
- Parameters
- windowName:
- (optional) name of the window to delete the line in. If no name is given, it just deletes the line it is used on.
![]() Note: for replacing text, replace() is the proper option; doing the following:
Note: for replacing text, replace() is the proper option; doing the following: selectCurrentLine(); replace(""); cecho("new line!\n") is better.
- Example
-- deletes the line - just put this command into the big script box. Keep the case the same -
-- it has to be deleteLine(), not Deleteline(), deleteline() or anything else
deleteLine()
--This example creates a temporary line trigger to test if the next line is a prompt, and if so gags it entirely.
--This can be useful for keeping a pile of prompts from forming if you're gagging chat channels in the main window
--Note: isPrompt() only works on servers which send a GA signal with their prompt.
tempLineTrigger(1, 1, [[if isPrompt() then deleteLine() end]])
-- example of deleting multiple lines:
deleteLine() -- delete the current line
moveCursor(0,getLineNumber()-1) -- move the cursor back one line
deleteLine() -- delete the previous line nowdeselect
- deselect([window name])
- This is used to clear the current selection (to no longer have anything selected). Should be used after changing the formatting of text, to keep from accidentally changing the text again later with another formatting call.
- See also: selectString(), selectCurrentLine()
- Parameters
- window name:
- (optional) The name of the window to stop having anything selected in. If name is not provided the main window will have its selection cleared.
- Example
--This will change the background on an entire line in the main window to red, and then properly clear the selection to keep further
--changes from effecting this line as well.
selectCurrentLine()
bg("red")
deselect()disableClickthrough
- disableClickthrough(label)
- Disables clickthrough for a label - making it act 'normal' again and receive clicks, doubleclicks, onEnter, and onLeave events. This is the default behaviour for labels.
- See also: enableClickthrough()
- Parameters
- label:
- Name of the label to restore clickability on.
disableCommandLine
- disableCommandLine(windowName)
- Disables the command line for the miniConsole named windowName
- See Also: enableCommandLine()
- Parameters
- windowName:
- The name of the miniConsole to disable the command line in.
disableHorizontalScrollBar
- disableHorizontalScrollBar([windowName])
- Disables the horizontal scroll bar for the miniConsole/userwindow windowName or the main window
- See Also: enableHorizontalScrollBar()
- Parameters
- windowName:
- The name of the window to disable the scroll bar in. If "main" or not provided it is the main console.
disableScrollBar
- disableScrollBar([windowName])
- Disables the scroll bar for the miniConsole/userwindow windowName or the main window
- See Also: enableScrollBar()
- Parameters
- windowName:
- (optional) The name of the window to disable the scroll bar in. If "main" or not provided it is the main console.
dreplace
- dreplace([window, ]text)
- Replaces the output line from the game with a colour-tagged string.
See Also: decho(), dinsertText()
- Parameters
- window:
- The window to replace the selection in. Optional, defaults to the main window if not provided.
- text:
- The text to display, as with decho()
- Example
selectCaptureGroup(1)
dreplace("<255,0,255>[ALERT!]: <r>"..matches[2])dreplaceLine
- dreplaceLine ([window], text)
- Replaces the output line from the game with a colour-tagged string.
See Also: decho(), dinsertText()
- Parameters
- window (optional):
- the window to copy the text from. Defaults to "main".
- text:
- The text to display, with RGB color values inside angle brackets <>, ie <128,0,0>. If you'd like to use a background color, put it after a colon : - <:128,0,0>. You can use the <r> tag to reset to the default color.
- Example
dreplaceLine("<255,0,255>[ALERT!]: <r>"..line)echoLink
- echoLink([windowName], text, command, hint, [useCurrentFormatElseDefault])
- Echos a piece of text as a clickable link, at the end of the current selected line - similar to echo().
- See also: cechoLink(), hechoLink()
- Parameters
- windowName:
- (optional) either be none or "main" for the main console, or a miniconsole / userwindow name.
- text:
- Text to display in the echo. Same as a normal echo().
- command:
- Lua code to do when the link is clicked, as text or a function (since Mudlet 4.11).
- hint:
- Text for the tooltip to be displayed when the mouse is over the link.
- useCurrentFormatElseDefault:
- If true, then the link will use the current selection style (colors, underline, etc). If missing or false, it will use the default link style - blue on black underlined text.
- Example
-- echo a link named 'press me!' that'll send the 'hi' command to the game
echoLink("press me!", function() send("hi") end, "This is a tooltip")
-- alternatively, put command as text (in [[ and ]] to use quotation marks inside)
echoLink("press me!", [[send("hi")]], "This is a tooltip")
-- do the same, but send this link to a miniConsole
echoLink("my miniConsole", "press me!", function() send("hi") end, "This is a tooltip")![]() Note: The hint can contain the same sort of "rich-text" as can be used for "labels" - and if the command is set to be the empty string "" then this can be a means to show extra information for the text when the mouse is hovered over it but without a command being run should it be clicked upon, e.g.:
Note: The hint can contain the same sort of "rich-text" as can be used for "labels" - and if the command is set to be the empty string "" then this can be a means to show extra information for the text when the mouse is hovered over it but without a command being run should it be clicked upon, e.g.:
echoUserWindow
- echoUserWindow(windowName, text)
- This function will print text to both mini console windows, dock windows and labels. It is outdated however - echo() instead.
echoPopup
- echoPopup([windowName], text, {commands}, {hints}, [useCurrentFormatElseDefault])
- Creates text with a left-clickable link, and a right-click menu for more options at the end of the current line, like echo. The added text, upon being left-clicked, will do the first command in the list. Upon being right-clicked, it'll display a menu with all possible commands. The menu will be populated with hints, one for each line.
- Parameters
- windowName:
- (optional) name of the window to echo to. Use either main or omit for the main window, or the miniconsoles name otherwise.
- text:
- the text to display
- {commands}:
- a table of lua code to do, in text strings or as functions (since Mudlet 4.11), i.e.
{[[send("hello")]], function() echo("hi!") end}
- {hints}:
- a table of strings which will be shown on the popup and right-click menu. i.e.
{"send the hi command", "echo hi to yourself"}
- useCurrentFormatElseDefault:
- (optional) a boolean value for using either the current formatting options (colour, underline, italic) or the link default (blue underline).
- Example
-- Create some text as a clickable with a popup menu:
echoPopup("activities to do", {function() send "sleep" end, function() send "sit" end, function() send "stand" end}, {"sleep", "sit", "stand"})
-- alternatively, put commands as text (in [[ and ]] to use quotation marks inside)
echoPopup("activities to do", {[[send "sleep"]], [[send "sit"]], [[send "stand"]]}, {"sleep", "sit", "stand"})enableClickthrough
- enableClickthrough(label)
- Make a label 'invisible' to clicks - so if you have another label underneath, it'll be clicked on instead of this one on top.
- This affects clicks, double-clicks, right-clicks, as well as the onEnter/onLeave events.
- See also: disableClickthrough()
- Parameters
- label:
- The name of the label to enable clickthrough on.
enableCommandLine
- enableCommandLine(windowName)
- Enables the command line for the miniConsole named windowName
- See Also: disableCommandLine()
- Parameters
- windowName:
- The name of the miniConsole to enable the command line in.
![]() Note: The command line name is the same as the miniConsole name
Note: The command line name is the same as the miniConsole name
enableHorizontalScrollBar
- enableHorizontalScrollBar([windowName])
- Enables the horizontal scroll bar for the miniConsole/userwindow windowName or the main window
- See Also: disableHorizontalScrollBar()
- Parameters
- windowName:
- The name of the window to enable the scroll bar in. If "main" or not provided it is the main console.
enableScrollBar
- enableScrollBar([windowName])
- Enables the scroll bar for the miniConsole/userwindow windowName or the main window
- See Also: disableScrollBar()
- Parameters
- windowName:
- The name of the window to enable the scroll bar in. If "main" or not provided it is the main console.
fg
- fg([window], colorName)
- If used on a selection, sets the foreground color to colorName - otherwise, it will set the color of the next text-inserting calls (echo(), insertText, echoLink(), and others)
- See Also: bg(), setBgColor()
- Parameters
- window:
- (optional) name of the miniconsole to operate on. If you'd like it to work on the main window, don't specify anything or use main (since Mudlet 3.0).
- colorName:
- The name of the color to set the foreground to - list of possible names:
- Example
--This would change the color of the text on the current line to green
selectCurrentLine()
fg("green")
resetFormat()
--This will echo red, green, blue in their respective colors
fg("red")
echo("red ")
fg("green")
echo("green ")
fg("blue")
echo("blue ")
resetFormat()
-- example of working on a miniconsole
fg("my console", "red")
echo("my console", "red text")getAvailableFonts
- getAvailableFonts()
- This returns a "font - true" key-value list of available fonts which you can use to verify that Mudlet has access to a given font.
- To install a new font with your package, include the font file in your zip/mpackage and it'll be automatically installed for you.
- Example
-- check if Ubuntu Mono is a font we can use
if getAvailableFonts()["Ubuntu Mono"] then
-- make the miniconsole use the font at size 16
setFont("my miniconsole", "Ubuntu Mono")
setFontSize("my miniconsole", 16)
endgetBackgroundColor
- getBackgroundColor([windowName])
- Gets the background for the given label, miniconsole, or userwindow.
- Returns 4 values - red, green, blue, transparency. Colors returned are from 0 to 255 (0 being black), and transparency is from 0 to 255 (0 being completely transparent).
- Parameters
- windowName:
- (optional) name of the label/miniconsole/userwindow to getthe background color from, or "main" for the main window.
 Available in Mudlet4.15+
- Example
local r, g, b, a = getBackgroundColor()
local rW, gW, bW, aW = getBackgroundColor("myWindow")getBgColor
- getBgColor(windowName)
- This function returns the rgb values of the background color of the first character of the current selection on mini console (window) windowName. If windowName is omitted Mudlet will use the main screen.
- See also: setBgColor()
- Parameters
- windowName:
- A window to operate on - either a miniconsole or the main window.
- Example
local r,g,b;
selectString("troll",1)
r,g,b = getBgColor()
if r == 255 and g == 0 and b == 0 then
echo("HELP! troll is highlighted in red letters, the monster is aggressive!\n");
endgetBorderBottom
- getBorderBottom()
- Returns the size of the bottom border of the main window in pixels.
- See also: getBorderSizes(), setBorderBottom()
- Available in Mudlet4.0+
- Example
setBorderBottom(150)
getBorderBottom()
-- returns: 150getBorderLeft
- getBorderLeft()
- Returns the size of the left border of the main window in pixels.
- See also: getBorderSizes(), setBorderLeft()
- Available in Mudlet4.0+
- Example
setBorderLeft(5)
getBorderLeft()
-- returns: 5getBorderRight
- getBorderRight()
- Returns the size of the right border of the main window in pixels.
- See also: getBorderSizes(), setBorderRight()
- Available in Mudlet4.0+
- Example
setBorderRight(50)
getBorderRight()
-- returns: 50getBorderSizes
- getBorderSizes()
- Returns the a named table with the sizes of all borders of the main window in pixels.
- See also: setBorderSizes(), getBorderTop(), getBorderRight(),getBorderBottom(), getBorderLeft()
- Available in Mudlet4.0+
- Example
setBorderSizes(100, 50, 150, 0)
getBorderSizes()
-- returns: { top = 100, right = 50, bottom = 150, left = 0 }
getBorderSizes().right
-- returns: 50getBorderTop
- getBorderTop()
- Returns the size of the top border of the main window in pixels.
- See also: getBorderSizes(), setBorderTop()
- Available in Mudlet4.0+
- Example
setBorderTop(100)
getBorderTop()
-- returns: 100getClipboardText
- getClipboardText()
- Returns any text that is currently present in the clipboard.
- See also: setClipboardText()
 Note: Note: Available in Mudlet 4.10+
- Example
local clipboardContents = getClipboardText()
echo("Clipboard: " .. clipboardContents)getColorWildcard
- getColorWildcard(ansi color number)
- This function, given an ANSI color number (list), will return all strings on the current line that match it.
- See also: isAnsiFgColor(), isAnsiBgColor()
- Parameters
- ansi color number:
- A color number (list) to match.
- Example
-- we can run this script on a line that has the players name coloured differently to easily capture it from
-- anywhere on the line
local match = getColorWildcard(14) -- this will be a table of every match
if match then -- if there's a table, then we try and print it on the screen!
echo("\nFound "..table.concat(match, ", ").."!") -- this will combine all captured strings and separate them with a comma so it's easy to read.
else -- if there isn't something in match, then we haven't found anything to print on the screen!
echo("\nDidn't find anyone.")
endgetColumnCount
- getColumnCount([windowName])
- Gets the maximum number of columns (characters) that a given window can display on a single row, taking into consideration factors such as window width, font size, spacing, etc.
- Parameters
- windowName:
- (optional) name of the window whose number of columns we want to calculate. By default it operates on the main window.
- Example
print("Maximum number of columns on the main window "..getColumnCount())getColumnNumber
- getColumnNumber([windowName])
- Gets the absolute column number of the current user cursor.
- Parameters
- windowName:
- (optional) either be none or "main" for the main console, or a miniconsole / userwindow name.
![]() Note: the argument is available since Mudlet 3.0.
Note: the argument is available since Mudlet 3.0.
- Example
HelloWorld = Geyser.MiniConsole:new({
name="HelloWorld",
x="70%", y="50%",
width="30%", height="50%",
})
HelloWorld:echo("hello!\n")
HelloWorld:echo("hello!\n")
HelloWorld:echo("hello!\n")
moveCursor("HelloWorld", 3, getLastLineNumber("HelloWorld"))
-- should say 3, because we moved the cursor in the HellWorld window to the 3rd position in the line
print("getColumnNumber: "..tostring(getColumnNumber("HelloWorld")))
moveCursor("HelloWorld", 1, getLastLineNumber("HelloWorld"))
-- should say 3, because we moved the cursor in the HellWorld window to the 1st position in the line
print("getColumnNumber: "..tostring(getColumnNumber("HelloWorld")))getCurrentLine
- getCurrentLine([windowName])
- Returns the content of the current line under the user cursor in the buffer. The Lua variable line holds the content of getCurrentLine() before any triggers have been run on this line. When triggers change the content of the buffer, the variable line will not be adjusted and thus hold an outdated string. line = getCurrentLine() will update line to the real content of the current buffer. This is important if you want to copy the current line after it has been changed by some triggers. selectString( line,1 ) will return false and won't select anything because line no longer equals getCurrentLine(). Consequently, selectString( getCurrentLine(), 1 ) is what you need.
- Parameters
- windowName:
- (optional) name of the window in which to select text.
- Example
print("Currently selected line: "..getCurrentLine())getFgColor
- getFgColor(windowName)
- This function returns the rgb values of the color of the first character of the current selection on mini console (window) windowName. If windowName is omitted Mudlet will use the main screen.
- Parameters
- windowName:
- A window to operate on - either a miniconsole or the main window.
- Example
selectString("troll",1)
local r,g,b = getFgColor()
if r == 255 and g == 0 and b == 0 then
echo("HELP! troll is written in red letters, the monster is aggressive!\n")
endgetFont
- getFont([windowName])
- Gets the current font of the given window or console name. Can be used to get font of the main console, dockable userwindows and miniconsoles.
- See also: setFont(), setFontSize(), openUserWindow(), getAvailableFonts()
![]() Note: Since Mudlet 3.10, returns the actual font that was used in case you didn't have the required font when using setFont().
Note: Since Mudlet 3.10, returns the actual font that was used in case you didn't have the required font when using setFont().
- Parameters
- windowName:
- The window name to get font size of - can either be none or "main" for the main console, or a miniconsole/userwindow name.
- Example
-- The following will get the "main" console font size.
display("Font in the main window: "..getFont())
display("Font in the main window: "..getFont("main"))
-- This will get the font size of a user window named "user window awesome".
display("Font size: " .. getFont("user window awesome"))getFontSize
- getFontSize([windowName])
- Gets the current font size of the given window or console name. Can be used to get font size of the Main console as well as dockable UserWindows.
- See also: setFontSize(), openUserWindow()
- Parameters
- windowName:
- The window name to get font size of - can either be none or "main" for the main console, or a UserWindow name.
- Example
-- The following will get the "main" console font size.
local mainWindowFontSize = getFontSize()
if mainWindowFontSize then
display("Font size: " .. mainWindowFontSize)
end
local mainWindowFontSize = getFontSize("main")
if mainWindowFontSize then
display("Font size: " .. fs2)
end
-- This will get the font size of a user window named "user window awesome".
local awesomeWindowFontSize = getFontSize("user window awesome")
if awesomeWindowFontSize then
display("Font size: " .. awesomeWindowFontSize)
endgetHTMLformat
- spanTag = getHTMLformat(formatTable)
- Takes in a table of formatting options in the same style as getTextFormat() and returns a span tag which will format text after it as the table describes.
- See also
- getTextFormat(), getLabelFormat()
- Parameters
- formatTable:
- Table with formatting options configured. Keys are foreground, background, bold, underline, overline, strikeout, italic, and reverse. All except for foreground and background should be boolean (true/false) values. Foreground and background are either { r, g, b, a } tables, or strings with QSS formatting directives
- Returns
- A string with the html span tag to format text in accordance with the format table.
- Example
-- Returns a span tag for bold, red text on a green background
local span = getHTMLformat({
foreground = { 255, 0, 0 },
background = "#00FF00",
bold = true
})
-- span will be '<span style="color: rgb(255, 0, 0);background-color: #00FF00; font-weight: bold; font-style: normal; text-decoration: none;">'getImageSize
- getImageSize(imageLocation)
- Returns the width and the height of the given image. If the image can't be found, loaded, or isn't a valid image file - nil+error message will be returned instead.
- See also: createLabel()
- Parameters
- imageLocation:
- Path to the image.
- Example
local path = getMudletHomeDir().."/my-image.png"
cecho("Showing dimensions of the picture in: "..path.."\n")
local width, height = getImageSize(path)
if not width then
-- in case of an problem, we don't get a height back - but the error message
cecho("error: "..height.."\n")
else
cecho(string.format("They are: %sx%s", width, height))
endgetLabelFormat
- formatTable = getLabelFormat(labelName)
- Returns a format table like the one returned by getTextFormat and suitable for getHTMLformat which will format text the same way as simply doing an echo to the label would
- See also
- getTextFormat(), getHTMLformat()
- Parameters
- labelName:
- The name of the label to scan the format of
- Returns
- A table with all the formatting options to achieve a default text format for label labelName.
- Example
-- creates a test label, sets a stylesheet, and then returns the default format table for that label.
createLabel("testLabel", 10, 10, 300, 200, 1)
setLabelStyleSheet([[
color: rgb(0,0,180);
border-width: 1px;
border-style: solid;
border-color: gold;
border-radius: 10px;
font-size: 12.0pt;
background: QLinearGradient( x1: 0, y1: 0, x2: 0, y2: 1, stop: 0 #98f041, stop: 0.1 #8cf029, stop: 0.49 #66cc00, stop: 0.5 #52a300, stop: 1 #66cc00);
]])
local fmt = getLabelFormat("testLabel"))
--[[
{
background = "rgba(0, 0, 0, 0)", -- this is transparent
bold = false,
foreground = "rgb(0,0,180)",
italic = false,
overline = false,
reverse = false,
strikeout = false,
underline = false
}
--]]getLabelSizeHint
- width, height = getLabelSizeHint(labelName)
- Returns the suggested labelsize as width and height
- See also
- getTextFormat(), getHTMLformat()
- Parameters
- labelName:
- The name of the label to get the suggested size from
- Returns
- suggested width and height (to fit text and/or an image on a label)
- Example
-- text resizing example
-- create the label
createLabel("textLabel",400,400,300,300,1)
-- put some text on it
echo("textLabel", "This is my Test.\nAnother Test")
-- resizes the label to fit the text
resizeWindow("textLabel", getLabelSizeHint("textLabel"))
-- image resizing example
-- create the label
createLabel("imageLabel",400,400,300,300,1)
-- put some image on it
setBackgroundImage("imageLabel", getMudletHomeDir.."/myLabelImage.png")
-- resizes the label to fit the image
resizeWindow("imageLabel", getLabelSizeHint("imageLabel"))getLabelStyleSheet
- getLabelStyleSheet(labelName)
- Returns the stylesheet set on a given label, which is used to customise the labels look and feel.
- See also
- getTextFormat()
- Parameters
- labelName:
- The name of the label to get the stylesheet from
- Returns
- stylesheet as a string
- Example
createLabel("test", 50, 50, 100, 100, 0)
setLabelStyleSheet("test", [[
background-color: white;
border: 10px solid green;
font-size: 12px;
]])
echo("test", "test")
-- now retrieve it and display:
local stylesheet = getLabelStyleSheet("test")
cecho(f"<green>the label's stylesheet is now: \n<white>{stylesheet}\n")getLastLineNumber
- getLastLineNumber(windowName)
- Returns the latest line's number in the main window or the miniconsole. This could be different from getLineNumber() if the cursor was moved around.
- Parameters
- windowName:
- name of the window to use. Either use main for the main window, or the name of the miniconsole.
- Example
-- get the latest line's # in the buffer
local latestline = getLastLineNumber("main")getLineCount
- getLineCount([windowName])
- Gets the absolute amount of lines in the current console buffer
- Parameters
- windowName
- Optional name of the window to get the line count of. Defaults to the main window.
- Example
Need example
getLines
- getLines([windowName,] from_line_number, to_line_number)
- Returns a section of the content of the screen text buffer. Returns a Lua table with the content of the lines on a per line basis. The form value is result = {relative_linenumber = line}.
- Absolute line numbers are used.
- Parameters
- windowName
- (optional) name of the miniconsole/userwindow to get lines for, or "main" for the main window (Mudlet 3.17+)
- from_line_number:
- First line number
- to_line_number:
- End line number
- Example
-- retrieve & echo the last line:
echo(getLines(getLineNumber()-1, getLineNumber())[1])-- find out which server and port you are connected to (as per Mudlet settings dialog):
local t = getLines(0, getLineNumber())
local server, port
for i = 1, #t do
local s, p = t[i]:match("looking up the IP address of server:(.-):(%d+)")
if s then server, port = s, p break end
end
display(server)
display(port)getLineNumber
- getLineNumber([windowName])
- Returns the absolute line number of the current user cursor (the y position). The cursor by default is on the current line the triggers are processing - which you can move around with moveCursor() and moveCursorEnd(). This function can come in handy in combination when using with moveCursor() and getLines().
- Parameters
- windowName:
- (optional) name of the miniconsole to operate on. If you'd like it to work on the main window, don't specify anything.
![]() Note:
The argument is available since Mudlet 3.0.
Note:
The argument is available since Mudlet 3.0.
- Example
-- use getLines() in conjuction with getLineNumber() to check if the previous line has a certain word
if getLines(getLineNumber()-1, getLineNumber())[1]:find("attacks") then echo("previous line had the word 'attacks' in it!\n") end
-- check how many lines you've got in your miniconsole after echoing some text.
-- Note the use of moveCursorEnd() to update getLineNumber()'s output
HelloWorld = Geyser.MiniConsole:new({
name="HelloWorld",
x="70%", y="50%",
width="30%", height="50%",
})
print(getLineNumber("HelloWorld"))
HelloWorld:echo("hello!\n")
HelloWorld:echo("hello!\n")
HelloWorld:echo("hello!\n")
-- update the cursors position, as it seems to be necessary to do
moveCursorEnd("HelloWorld")
print(getLineNumber("HelloWorld"))getMainConsoleWidth
- getMainConsoleWidth()
- Returns a single number; the width of the main console (game output) in pixels. This also accounts for any borders that have been set.
- See also: getMainWindowSize()
- Parameters
- None
- Example
-- Save width of the main console to a variable for future use.
consoleWidth = getMainConsoleWidth()getMouseEvents
- events = getMouseEvents()
- Returns a table of registered mouse events, including any of the additional arguments they may have.
- See also
- addMouseEvent(), removeMouseEvent()
- Returns
- Returns a table with mouse event uniqueName as indexes, containing all the creation arguments as the sub-table members.
getMousePosition
- getMousePosition()
- Returns the coordinates of the mouse's position, relative to the Mudlet window itself.
- Parameters
- None
- Example
-- Retrieve x and y position of the mouse to determine where to create a new label, then use that position to create a new label
local x, y = getMousePosition()
createLabel("clickGeneratedLabel", x, y, 100, 100, 1)
-- if the label already exists, just move it
moveWindow("clickGeneratedLabel", x, y)
-- and make it easier to notice
setBackgroundColor("clickGeneratedLabel", 255, 204, 0, 200)getProfileTabNumber
- getProfileTabNumber()
- Returns the current tab number you're in. If you have just one profile loaded, it'll always return 1 - otherwise it'll be the nth tab that is currently open.
- Parameters
- None
- Example
print(f"Current playing in tab #{getProfileTabNumber()}.")getMainWindowSize
- getMainWindowSize()
- Returns two numbers, the width and height in pixels. This is useful for calculating the window dimensions and placement of custom GUI toolkit items like labels, buttons, mini consoles etc.
- See also: getUserWindowSize(), setMainWindowSize(), getMainConsoleWidth()
- Parameters
- None
- Example
--this will get the size of your main mudlet window and save them
--into the variables mainHeight and mainWidth
mainWidth, mainHeight = getMainWindowSize()getRowCount
- getRowCount([windowName])
- Gets the maximum number of rows that a given window can display at once, taking into consideration factors such as window height, font type, spacing, etc.
- Parameters
- windowName:
- (optional) name of the window whose maximum number of rows we want to calculate. By default it operates on the main window.
- Example
print("Maximum of rows on the main window "..getRowCount())getScroll
- getScroll([windowName])
- Returns line that the window is currently scrolled to.
- See also: scrollTo, scrollUp, scrollDown
- Parameters
- windowName:
- (optional) name of the window to ask about. Default is the main window.
- Example
-- button to jump to next instance of "Timbo"
local current = getScroll()
local data = getLines(current, getLineCount())
for count, line in ipairs(data) do
local match = string.findPattern(line, "Timbo")
if match then
scrollTo(current + count)
break
end
endgetSelection
- getSelection([windowName])
- Returns the text currently selected with selectString(), selectSection(), or selectCurrentLine(). Note that this isn't the text currently selected with the mouse.
- Also returns the start offset and length of the selection as second and third value.
- Parameters
- windowName:
- (optional) name of the window to get the selection from. By default it operates on the main window.
- Example
selectCurrentLine()
print("Current line contains: "..getSelection())- retrieving the selection
text,offset,len = getSelection()
-- manipulate the selection, e.g. to discover the color of characters other than the first
-- then restore it
selectSection(offset, len)getTextFormat
- getTextFormat([windowName])
- Gets the current text format of the currently selected text. May be used with other console windows. The returned values come in a table containing text attribute names and their values. The values given will be booleans for: bold, italics, underline, overline, strikeout, and reverse - followed by color triplet tables for the foreground and background colors.
- See Also: setTextFormat()
- Parameters
- windowName
- (optional) Specify name of selected window. If no name or "main" is given, the format will be gathered from the main console.
- Example
-- A suitable test for getTextFormat()
-- (copy it into an alias or a script)
clearWindow()
echo("\n")
local SGR = string.char(27)..'['
feedTriggers("Format attributes: '"..SGR.."1mBold"..SGR.."0m' '"..SGR.."3mItalic"..SGR.."0m' '"..SGR.."4mUnderline"..SGR.."0m' '"..SGR.."5mBlink"..SGR.."0m' '"..SGR.."6mF.Blink"..SGR.."0m' '"..SGR.."7mReverse"..SGR.."0m' '"..SGR.."9mStruckout"..SGR.."0m' '"..SGR.."53mOverline"..SGR.."0m'.\n")
moveCursor(1,1)
selectSection(1,1)
local results = getTextFormat()
echo("For first character in test line:\nBold detected: " .. tostring(results["bold"]))
echo("\nItalic detected: " .. tostring(results["italic"]))
echo("\nUnderline detected: " .. tostring(results["underline"]))
echo("\nReverse detected: " .. tostring(results["reverse"]))
echo("\nStrikeout detected: " .. tostring(results["strikeout"]))
echo("\nOverline detected: " .. tostring(results["overline"]))
echo("\nForeground color: (" .. results["foreground"][1] .. ", " .. results["foreground"][2] .. ", " .. results["foreground"][3] .. ")")
echo("\nBackground color: (" .. results["background"][1] .. ", " .. results["background"][2] .. ", " .. results["background"][3] .. ")")
selectSection(21,1)
echo("\n\nFor individual parts of test text:")
echo("\nBold detected (character 21): " .. tostring(results["bold"]))
selectSection(28,1)
echo("\nItalic detected (character 28): " .. tostring(results["italic"]))
selectSection(37,1)
echo("\nUnderline detected (character 37): " .. tostring(results["underline"]))
selectSection(67,1)
echo("\nReverse detected (character 67): " .. tostring(results["reverse"]))
selectSection(77,1)
echo("\nStrikeout detected (character 77): " .. tostring(results["strikeout"]))
selectSection(89,1)
echo("\nOverline detected (character 89): " .. tostring(results["overline"]))
echo("\n")getUserWindowSize
- getUserWindowSize(windowName)
- Returns two numbers, the width and height in pixels. This is useful for calculating the given userwindow dimensions and placement of custom GUI toolkit items like labels, buttons, mini consoles etc.
- See also: getMainWindowSize()
- Parameters
- windowName
- the name of the userwindow we will get the dimensions from
- Example
--this will get the size of your userwindow named "ChatWindow" and save them
--into the variables mainHeight and mainWidth
mainWidth, mainHeight = getUserWindowSize("ChatWindow")
getWindowWrap
- getWindowWrap(windowName)
- gets at what position in the line the will start word wrap.
- Parameters
- windowName:
- Name of the "main" console or user-created miniconsole which you want to be wrapped differently. If you want to wrap the main window, use windowName "main" or leave empty.
- Example
setWindowWrap("main", 10)
display(getWindowWrap("main"))
-- The following output will result in the main window console:
-- 10- Practical Example
-- display ======== line with maximum possible width without wrapping
echo(string.rep("=", getWindowWrap("main")))handleWindowResizeEvent
- handleWindowResizeEvent()
- (deprecated) This function is deprecated and should not be used; it's only documented here for historical reference - use the sysWindowResizeEvent event instead.
The standard implementation of this function does nothing. However, this function gets called whenever the main window is being manually resized. You can overwrite this function in your own scripts to handle window resize events yourself and e. g. adjust the screen position and size of your mini console windows, labels or other relevant GUI elements in your scripts that depend on the size of the main Window. To override this function you can simply put a function with the same name in one of your scripts thus overwriting the original empty implementation of this.
- Parameters
- None
- Example
function handleWindowResizeEvent()
-- determine the size of your screen
WindowWidth=0;
WindowHeight=0;
WindowWidth, WindowHeight = getMainWindowSize();
-- move mini console "sys" to the far right side of the screen whenever the screen gets resized
moveWindow("sys",WindowWidth-300,0)
endhasFocus
- hasFocus()
- Returns true or false depending if Mudlet's main window is currently in focus (ie, the user isn't focused on another window, like a browser). If multiple profiles are loaded, this can also be used to check if a given profile is in focus.
- Parameters
- None
- Example
if attacked and not hasFocus() then
runaway()
else
fight()
endhecho
- hecho([windowName], text)
- Echoes text that can be easily formatted with colour tags in the hexadecimal format. You can also add the below tags.
- Formatting
<b> - bold
</b> - bold off
<i> - italics
</i> - italics off
<u> - underline
</u> - underline off
<o> - overline
</o> - overline off
<s> - strikethrough
</s> - strikethrough off![]() Note: Support for labels added in Mudlet 4.15; however, it does not turn a label into a miniconsole and every time you hecho it will erase any previous echo sent to the label.
Note: Support for labels added in Mudlet 4.15; however, it does not turn a label into a miniconsole and every time you hecho it will erase any previous echo sent to the label.
- Parameters
- windowName:
- (optional) name of the window to echo to. Can either be omitted or "main" for the main window, else specify the miniconsoles name.
- text:
- The text to display, with color changes made within the string using the format |cFRFGFB,BRBGBB or #FRFGFB,BRBGBB where FR is the foreground red value, FG is the foreground green value, FB is the foreground blue value, BR is the background red value, etc., BRBGBB is optional. |r or #r can be used within the string to reset the colors to default. Hexadecimal color codes can be found here: https://www.color-hex.com/
![]() Note:
Transparency for background in hex-format available in Mudlet 4.10+
Note:
Transparency for background in hex-format available in Mudlet 4.10+
- Example
hecho("\n#ffffff White text!")
-- your text in white
hecho("\n#ca0004 Red text! And now reset #rit to the default color")
-- your text in red, then reset to default using #r
hecho("\n#ffffff,ca0004 White text with a red background!")
-- your text in white, against a red background
hecho("\n|c0000ff Blue text, this time using |c instead of #")
-- your text in blue, activated with |c vs #.
hecho("\n#ff0000Red text with #iitalics#/i, |uunderline|/u, #ooverline#/o, #sstrikethrough#/s, and #bbold#/b formatting.")
-- shows the various individual formatting options
hecho("\n#008000#o#uGreen text with both over and underlines.#/o#/u")hecho2ansi
- ansiFormattedString = hecho2ansi(text)
- Converts hecho formatted text to ansi formatted text. Used by hfeedTriggers, but useful if you want ansi formatted text for any other reason.
- See also
- hecho(), hfeedTriggers()
![]() Note: non-color formatting added in Mudlet 4.15+
Note: non-color formatting added in Mudlet 4.15+
- Parameters
- text:
- The hecho formatted text for conversion
- Returns
- String converted to ansi formatting
- Example
-- replicates the functionality of hfeedTriggers() for a single line.
-- you would most likely just use hfeedTriggers, but it makes for a tidy example.
feedTriggers(hecho2ansi("\n#800000This is red.#r #iitalic#/i, #bbold#/b, #sstrikethrough#/s, #uunderline#/u\n"))hechoLink
- hechoLink([windowName], text, command, hint, true)
- Echos a piece of text as a clickable link, at the end of the current selected line - similar to hecho(). This version allows you to use colours within your link text.
- See also: cechoLink(), dechoLink()
- Parameters
- windowName:
- (optional) - allows selection between sending the link to a miniconsole or the main window.
- text:
- text to display in the echo. Same as a normal hecho().
- command:
- Lua code to do when the link is clicked, as text or a function (since Mudlet 4.11).
- hint:
- text for the tooltip to be displayed when the mouse is over the link.
- true:
- requires argument for the colouring to work.
- Example
-- echo a link named 'press me!' that'll send the 'hi' command to the game
hechoLink("|ca00040black!", function() send("hi") end, "This is a tooltip", true)
-- # format also works
hechoLink("#ca00040black!", function() send("hi") end, "This is a tooltip", true)
-- alternatively, put command as text (in [[ and ]] to use quotation marks inside)
hechoLink("#ca00040black!", [[send("hi")]], "This is a tooltip", true)hechoPopup
- hechoPopup([windowName], text, {commands}, {hints}, [useCurrentFormatElseDefault])
- Creates text with a left-clickable link, and a right-click menu for more options at the end of the current line, like hecho(). The added text, upon being left-clicked, will do the first command in the list. Upon being right-clicked, it'll display a menu with all possible commands. The menu will be populated with hints, one for each line.
- Parameters
- windowName:
- (optional) name of the window to echo to. Use either main or omit for the main window, or the miniconsoles name otherwise.
- text:
- the text to display
- {commands}:
- a table of lua code to do, in text strings or as functions (since Mudlet 4.11), i.e.
{[[send("hello")]], function() echo("hi!") end}
- {hints}:
- a table of strings which will be shown on the popup and right-click menu. ie,
{"send the hi command", "echo hi to yourself"}
- useCurrentFormatElseDefault:
- (optional) a boolean value for using either the current formatting options (colour, underline, italic) or the link default (blue underline).
- Example
-- Create some text as a clickable with a popup menu:
hechoPopup("#ff0000activities#r to do", {function() send "sleep" end, function() send "sit" end, function() send "stand" end}, {"sleep", "sit", "stand"}, true)
-- alternatively, put command as text (in [[ and ]] to use quotation marks inside)
hechoPopup("#ff0000activities#r to do", {[[send "sleep"]], [[send "sit"]], [[send "stand"]]}, {"sleep", "sit", "stand"}, true)hideGauge
- hideGauge(gaugeName)
- hides the given gauge.
- See also: showGauge(), createGauge()
- Parameters
- gaugeName:
- name of the gauge to show.
- Example
hideGauge("my gauge")
showGauge("my gauge")hinsertLink
- hinsertLink([windowName], text, command, hint, true)
- Echos a piece of text as a clickable link, at the end of the current cursor position - similar to hinsertText(). This version allows you to use colours within your link text.
- See also: insertLink(), dinsertLink()
- Parameters
- windowName:
- optional parameter, allows selection between sending the link to a miniconsole or the main window.
- text:
- text to display in the echo. Same as a normal hecho().
- command:
- Lua code to do when the link is clicked, as text or a function (since Mudlet 4.11).
- hint:
- text for the tooltip to be displayed when the mouse is over the link.
- true:
- requires argument for the colouring to work.
- Example
-- echo a link named 'press me!' that'll send the 'hi' command to the game
hinsertLink("#ff0000press #a52a2a,ffffffme!", function() send("hi") end, "This is a tooltip", true)
-- alternatively, put command as text (in [[ and ]] to use quotation marks inside)
hinsertLink("#ff0000press #a52a2a,ffffffme!", [[send("hi")]], "This is a tooltip", true)hinsertPopup
- hinsertPopup([windowName], text, {commands}, {hints}, [useCurrentFormatElseDefault])
- Creates text with a left-clickable link, and a right-click menu for more options at the end of the current cursor position, like hinsertText(). The added text, upon being left-clicked, will do the first command in the list. Upon being right-clicked, it'll display a menu with all possible commands. The menu will be populated with hints, one for each line.
- Parameters
- windowName:
- (optional) name of the window to echo to. Use either main or omit for the main window, or the miniconsoles name otherwise.
- text:
- the text to display
- {commands}:
- a table of lua code strings to do or a functions (since Mudlet 4.11). ie,
{[[send("hello")]], function() echo("hi!") end}
- {hints}:
- a table of lua code to do, in text strings or as functions (since Mudlet 4.11), i.e.
{"send the hi command", "echo hi to yourself"}
- useCurrentFormatElseDefault:
- (optional) a boolean value for using either the current formatting options (colour, underline, italic) or the link default (blue underline).
- Example
-- Create some text as a clickable with a popup menu:
hinsertPopup("#ff0000activities#r to do", {function() send "sleep" end, function() send "sit" end, function() send "stand" end}, {"sleep", "sit", "stand"}, true)
-- alternatively, put command as text (in [[ and ]] to use quotation marks inside)
hinsertPopup("#ff0000activities#r to do", {[[send "sleep"]], [[send "sit"]], [[send "stand"]]}, {"sleep", "sit", "stand"}, true)hreplaceLine
- hreplaceLine ([window], text)
- Replaces the output line from the game with a colour-tagged string.
See Also: hecho(), hinsertText()
- Parameters
- window (optional):
- the window to copy the text from. Defaults to "main".
- text:
- The text to display, with hex color values , ie #ff00ff. If you'd like to use a background color, put it after a comma , - #,ff99ff. You can use the #r tag to reset to the default color.
- Example
hreplaceLine("#ff00ff[ALERT!]: #r"..line)hreplace
- hreplace([window, ]text)
- Replaces the output line from the game with a colour-tagged string.
See Also: hecho(), hinsertText()
- Parameters
- window:
- The window to replace the selection in. Optional, defaults to the main window if not provided.
- text:
- The text to display, as with hecho()
- Example
selectCaptureGroup(1)
hreplace("#EE00EE[ALERT!]: #r"..matches[2])hideToolBar
- hideToolBar(name)
- Hides the toolbar with the given name name and makes it disappear. If all toolbars of a tool bar area (top, left, right) are hidden, the entire tool bar area disappears automatically.
- Parameters
- name:
- name of the button group to hide
- Example
hideToolBar("my offensive buttons")hideWindow
- hideWindow(name)
- This function hides a mini console, a user window or a label with the given name. To show it again, use showWindow().
- See also: createMiniConsole(), createLabel(), deleteLabel()
- Parameters
- name
- specifies the label or console you want to hide.
- Example
function miniconsoleTest()
local windowWidth, windowHeight = getMainWindowSize()
-- create the miniconsole
createMiniConsole("sys", windowWidth-650,0,650,300)
setBackgroundColor("sys",255,69,0,255)
setMiniConsoleFontSize("sys", 8)
-- wrap lines in window "sys" at 40 characters per line - somewhere halfway, as an example
setWindowWrap("sys", 40)
print("created red window top-right")
tempTimer(1, function()
hideWindow("sys")
print("hid red window top-right")
end)
tempTimer(3, function()
showWindow("sys")
print("showed red window top-right")
end)
end
miniconsoleTest()insertLink
- insertLink([windowName], text, command, hint, [useCurrentLinkFormat])
- Inserts a piece of text as a clickable link at the current cursor position - similar to insertText().
- Parameters
- windowName:
- (optional) the window to insert the link in - use either "main" or omit for the main window.
- text:
- text to display in the window. Same as a normal echo().
- command:
- Lua code to do when the link is clicked, as text or a function (since Mudlet 4.11).
- hint:
- text for the tooltip to be displayed when the mouse is over the link.
- useCurrentLinkFormat:
- (optional) true or false. If true, then the link will use the current selection style (colors, underline, etc). If missing or false, it will use the default link style - blue on black underlined text.
- Example
-- link with the default blue on white colors
insertLink("hey, click me!", function() echo("you clicked me!\n") end, "Click me popup")
-- alternatively, put command as text (in [[ and ]] to use quotation marks inside)
insertLink("hey, click me!", [[echo("you clicked me!\n")]], "Click me popup")
-- use current cursor colors by adding true at the end
fg("red")
insertLink("hey, click me!", function() echo("you clicked me!\n") end, "Click me popup", true)
resetFormat()![]() Note: The hint can contain the same sort of "rich-text" as can be used for "labels" - and if the command is set to be the empty string "" then this can be a means to show extra information for the text when the mouse is hovered over it but without a command being run should it be clicked upon, e.g.:
Note: The hint can contain the same sort of "rich-text" as can be used for "labels" - and if the command is set to be the empty string "" then this can be a means to show extra information for the text when the mouse is hovered over it but without a command being run should it be clicked upon, e.g.:
insertPopup
- insertPopup([windowName,] text, {commands}, {hints}[, useCurrentLinkFormat])
- Creates text with a left-clickable link, and a right-click menu for more options exactly where the cursor position is, similar to insertText(). The inserted text, upon being left-clicked, will do the first command in the list. Upon being right-clicked, it'll display a menu with all possible commands. The menu will be populated with hints, one for each line.
- Parameters
- windowName:
- (optional) name of the window to echo to - use either main or omit for the main window, or the miniconsoles name otherwise.
- text:
- the text inserted for the popup to be applied to.
- {commands}:
- a table of lua code commands to do, in text strings or as functions (since Mudlet 4.11), i.e.
{[[send("hello")]], function() echo("hi!") end}.
- {hints}:
- a table of strings which will be shown when the pointer hovers over the popup's text and on the right-click menu. ie,
{"send the hi command", "echo hi to yourself"}.
- useCurrentLinkFormat:
- (optional) boolean value for using either the current formatting options (colour, underline, italic) or the link default (blue underline).
- Example
-- Create some text as a clickable with a popup menu:
insertPopup("activities to do", {function() send "sleep" end, function() send "sit" end, function() send "stand" end}, {"sleep", "sit", "stand"})
-- alternatively, put command as text (in [[ and ]] to use quotation marks inside)
insertPopup("activities to do", {[[send "sleep"]], [[send "sit"]], [[send "stand"]]}, {"sleep", "sit", "stand"})insertText
- insertText([windowName], text)
- Inserts text at cursor postion in window - unlike echo(), which inserts the text at the end of the last line in the buffer (typically the one being processed by the triggers). You can use moveCursor() to move the cursor into position first.
- insertHTML() also does the same thing as insertText, if you ever come across it.
- See also: cinsertText()
- Parameters
- windowName:
- (optional) The window to insert the text to.
- text:
- The text you will insert into the current cursor position.
- Example
-- move the cursor to the end of the previous line and insert some text
-- move to the previous line
moveCursor(0, getLineNumber()-1)
-- move the end the of the previous line
moveCursor(#getCurrentLine(), getLineNumber())
fg("dark_slate_gray")
insertText(' <- that looks nice.')
deselect()
resetFormat()
moveCursorEnd()ioprint
- ioprint(text, some more text, ...)
- Prints text to the to the stdout. This is only available if you launched Mudlet from cmd.exe on Windows, from the terminal on Mac, or from the terminal on a Linux OS (launch the terminal program, type mudlet and press enter).
Similar to echo(), but does not require a "\n" at the end for a newline and can print several items given to it. It cannot print whole tables. This function works similarly to the print() you will see in guides for Lua.
This function is useful in working out potential crashing problems with Mudlet due to your scripts - as you will still see whatever it printed when Mudlet crashes.
- Parameters
- text:
- The information you want to display.
- Example
ioprint("hi!")
ioprint(1,2,3)
ioprint(myvariable, someothervariable, yetanothervariable)isAnsiBgColor
- isAnsiBgColor(bgColorCode)
- This function tests if the first character of the current selection in the main console has the background color specified by bgColorCode.
- Parameters
- bgColorCode:
- A color code to test for, possible codes are:
0 = default text color
1 = light black
2 = dark black
3 = light red
4 = dark red
5 = light green
6 = dark green
7 = light yellow
8 = dark yellow
9 = light blue
10 = dark blue
11 = light magenta
12 = dark magenta
13 = light cyan
14 = dark cyan
15 = light white
16 = dark white- Example
selectString( matches[1], 1 )
if isAnsiBgColor( 5 ) then
bg( "red" );
resetFormat();
echo( "yes, the background of the text is light green" )
else
echo( "no sorry, some other background color" )
end![]() Note:
The variable named matches[1] holds the matched trigger pattern - even in substring, exact match, begin of line substring trigger patterns or even color triggers that do not know about the concept of capture groups. Consequently, you can always test if the text that has fired the trigger has a certain color and react accordingly. This function is faster than using getBgColor() and then handling the color comparison in Lua.
Note:
The variable named matches[1] holds the matched trigger pattern - even in substring, exact match, begin of line substring trigger patterns or even color triggers that do not know about the concept of capture groups. Consequently, you can always test if the text that has fired the trigger has a certain color and react accordingly. This function is faster than using getBgColor() and then handling the color comparison in Lua.
Also note that the color code numbers are Mudlet specific, though they do represent the colors in the 16 ANSI color-set for the main console they are not in the same order and they additionally have the default background color in the zeroth position.
isAnsiFgColor
- isAnsiFgColor(fgColorCode)
- This function tests if the first character of the current selection in the main console has the foreground color specified by fgColorCode.
- Parameters
- fgColorCode:
- A color code to test for, possible codes are:
0 = default text color
1 = light black
2 = dark black
3 = light red
4 = dark red
5 = light green
6 = dark green
7 = light yellow
8 = dark yellow
9 = light blue
10 = dark blue
11 = light magenta
12 = dark magenta
13 = light cyan
14 = dark cyan
15 = light white
16 = dark white- Example
selectString( matches[1], 1 )
if isAnsiFgColor( 5 ) then
bg( "red" );
resetFormat();
echo( "yes, the text is light green" )
else
echo( "no sorry, some other foreground color" )
end![]() Note:
The variable named matches[1] holds the matched trigger pattern - even in substring, exact match, begin of line substring trigger patterns or even color triggers that do not know about the concept of capture groups. Consequently, you can always test if the text that has fired the trigger has a certain color and react accordingly. This function is faster than using getFgColor() and then handling the color comparison in Lua.
Note:
The variable named matches[1] holds the matched trigger pattern - even in substring, exact match, begin of line substring trigger patterns or even color triggers that do not know about the concept of capture groups. Consequently, you can always test if the text that has fired the trigger has a certain color and react accordingly. This function is faster than using getFgColor() and then handling the color comparison in Lua.
Also note that the color code numbers are Mudlet specific, though they do represent the colors in the 16 ANSI color-set for the main console they are not in the same order and they additionally have the default foreground color in the zeroth position.
loadWindowLayout
- loadWindowLayout()
- Resets the layout of userwindows (floating miniconsoles) to the last saved state.
- See also: saveWindowLayout(), openUserWindow()
- Example
loadWindowLayout()lowerWindow
- lowerWindow(labelName)
- Moves the referenced label/console below all other labels/consoles. For the opposite effect, see: raiseWindow().
- Parameters
- labelName:
- the name of the label/console you wish to move below the rest.
- Example
createLabel("blueLabel", 300, 300, 100, 100, 1) --creates a blue label
setBackgroundColor("blueLabel", 50, 50, 250, 255)
createLabel("redLabel", 350, 350, 100, 100, 1) --creates a red label which is placed on TOP of the blue label, as the last made label will sit at the top of the rest
setBackgroundColor("redLabel", 250, 50, 50, 255)
lowerWindow("redLabel") --lowers redLabel, causing blueLabel to be back on topmoveCursor
- moveCursor([windowName], x, y)
- Moves the user cursor of the window windowName, or the main window, to the absolute point (x,y). This function returns false if such a move is impossible e.g. the coordinates don’t exist. To determine the correct coordinates use getLineNumber(), getColumnNumber() and getLastLineNumber(). The trigger engine will always place the user cursor at the beginning of the current line before the script is run. If you omit the windowName argument, the main screen will be used.
- Returns true or false depending on if the cursor was moved to a valid position. Check this before doing further cursor operations - because things like deleteLine() might invalidate this.
- Parameters
- windowName:
- (optional) The window you are going to move the cursor in.
- x:
- The horizontal axis in the window - that is, the letter position within the line.
- y:
- The vertical axis in the window - that is, the line number.
- Example
-- move cursor to the start of the previous line and insert -<(
-- the first 0 means we want the cursor right at the start of the line,
-- and getLineNumber()-1 means we want the cursor on the current line# - 1 which
-- equals to the previous line
moveCursor(0, getLineNumber()-1)
insertText("-<(")
-- now we move the cursor at the end of the previous line. Because the
-- cursor is on the previous line already, we can use #getCurrentLine()
-- to see how long it is. We also just do getLineNumber() because getLineNumber()
-- returns the current line # the cursor is on
moveCursor(#getCurrentLine(), getLineNumber())
insertText(")>-")
-- finally, reset it to the end where it was after our shenaningans - other scripts
-- could expect the cursor to be at the end
moveCursorEnd()-- a more complicated example showing how to work with Mudlet functions
-- set up the small system message window in the top right corner
-- determine the size of your screen
local WindowWidth, WindowHeight = getMainWindowSize()
-- define a mini console named "sys" and set its background color
createMiniConsole("sys",WindowWidth-650,0,650,300)
setBackgroundColor("sys",85,55,0,255)
-- you *must* set the font size, otherwise mini windows will not work properly
setMiniConsoleFontSize("sys", 12)
-- wrap lines in window "sys" at 65 characters per line
setWindowWrap("sys", 60)
-- set default font colors and font style for window "sys"
setTextFormat("sys",0,35,255,50,50,50,0,0,0)
-- clear the window
clearUserWindow("sys")
moveCursorEnd("sys")
setFgColor("sys", 10,10,0)
setBgColor("sys", 0,0,255)
echo("sys", "test1---line1\n<this line is to be deleted>\n<this line is to be deleted also>\n")
echo("sys", "test1---line2\n")
echo("sys", "test1---line3\n")
setTextFormat("sys",158,0,255,255,0,255,0,0,0);
--setFgColor("sys",255,0,0);
echo("sys", "test1---line4\n")
echo("sys", "test1---line5\n")
moveCursor("sys", 1,1)
-- deleting lines 2+3
deleteLine("sys")
deleteLine("sys")
-- inserting a line at pos 5,2
moveCursor("sys", 5,2)
setFgColor("sys", 100,100,0)
setBgColor("sys", 255,100,0)
insertText("sys","############## line inserted at pos 5/2 ##############")
-- inserting a line at pos 0,0
moveCursor("sys", 0,0)
selectCurrentLine("sys")
setFgColor("sys", 255,155,255)
setBold( "sys", true );
setUnderline( "sys", true )
setItalics( "sys", true )
insertText("sys", "------- line inserted at: 0/0 -----\n")
setBold( "sys", true )
setUnderline( "sys", false )
setItalics( "sys", false )
setFgColor("sys", 255,100,0)
setBgColor("sys", 155,155,0)
echo("sys", "*** This is the end. ***\n")moveCursorDown
- moveCursorDown([windowName,] [lines,] [keepHorizontal])
- Moves the cursor in the given window down a specified number of lines.
- See also: moveCursor(), moveCursorUp(), moveCursorEnd()
- Parameters
- windowName:
- (optional) name of the miniconsole/userwindow, or "main" for the main window.
- lines:
- (optional) number of lines to move cursor down by, or 1 by default.
- keepHorizontal:
- (optional) true/false to specify if horizontal position should be retained, or reset to the start of the line otherwise.
- Example
Need example
moveCursorUp
- moveCursorUp([windowName,] [lines,] [keepHorizontal])
- Moves the cursor in the given window up a specified number of lines.
- See also: moveCursor(), moveCursorDown(), moveCursorEnd()
- Parameters
- windowName:
- (optional) name of the miniconsole/userwindow, or "main" for the main window.
- lines:
- (optional) number of lines to move cursor up by, or 1 by default.
- keepHorizontal:
- (optional) true/false to specify if horizontal position should be retained, or reset to the start of the line otherwise.
- Example
Need example
moveCursorEnd
- moveCursorEnd([windowName])
- Moves the cursor to the end of the buffer. "main" is the name of the main window, otherwise use the name of your user window.
- See Also: moveCursor()
- Returns true or false
- Parameters
- windowName:
- (optional) name of the miniconsole/userwindow, or "main" for the main window.
- Example
Need example
moveGauge
- moveGauge(gaugeName, newX, newY)
- Moves a gauge created with createGauge to the new x,y coordinates. Remember the coordinates are relative to the top-left corner of the output window.
- Parameters
- gaugeName:
- The name of your gauge
- newX:
- The horizontal pixel location
- newY:
- The vertical pixel location
- Example
-- This would move the health bar gauge to the location 1200, 400
moveGauge("healthBar", 1200, 400)moveWindow
- moveWindow(name, x, y)
- This function moves window name to the given x/y coordinate. The main screen cannot be moved. Instead you’ll have to set appropriate border values → preferences to move the main screen e.g. to make room for chat or information mini consoles, or other GUI elements. In the future moveWindow() will set the border values automatically if the name parameter is omitted.
- See Also: createMiniConsole(), createLabel(), handleWindowResizeEvent(), resizeWindow(), setBorderSizes(), openUserWindow()
- Parameters
- name:
- The name of your window
- newX:
- The horizontal pixel location
- newY:
- The vertical pixel location
![]() Note:
Since Mudlet 3.7 this method can also be used on UserWindow consoles.
Note:
Since Mudlet 3.7 this method can also be used on UserWindow consoles.
openUserWindow
- openUserWindow(windowName, [restoreLayout], [autoDock], [dockingArea])
- Opens a user dockable console window for user output e.g. statistics, chat etc. If a window of such a name already exists, nothing happens. You can move these windows (even to a different screen on a system with a multi-screen display), dock them on any of the four sides of the main application window, make them into notebook tabs or float them.
- Parameters
- windowName:
- name of your window, it must be unique across ALL profiles if more than one is open (for multi-playing).
- restoreLayout: (available in Mudlet 3.2+)
- (optional) - only relevant, if false is provided. Then the window won't be restored to its last known position.
- autoDock: (available in Mudlet 4.7+)
- (optional) - only relevant, if false is provided. Then the window won't dock automatically at the corners.
- dockingArea: (available in Mudlet 4.7+)
- (optional) - the area your UserWindow will be docked at. possible docking areas your UserWindow will be created in (f" floating "t" top "b" bottom "r" right and "l" left). Docking area is "right" if not given any value.
![]() Note:
Since Mudlet version 3.2, Mudlet will automatically remember the window's last position.
Note:
Since Mudlet version 3.2, Mudlet will automatically remember the window's last position.
- Examples
openUserWindow("My floating window")
cecho("My floating window", "<red>hello <blue>bob!")
-- if you don't want Mudlet to remember its last position:
openUserWindow("My floating window", false)paste
- paste(windowName)
- Pastes the previously copied text including all format codes like color, font etc. at the current user cursor position. The copy() and paste() functions can be used to copy formated text from the main window to a user window without losing colors e. g. for chat windows, map windows etc.
- Parameters
- windowName:
- The name of your window
pauseMovie
- pauseMovie(label name)
- Pauses the gif animation on the label
- Returns true
- See also: setMovie(), startMovie(), setMovieFrame(), setMovieSpeed()
- Parameters
- label name:
- name of the gif label
- Example
-- create a label with the name myMovie
createLabel("myMovie",0,0,200,200,0)
-- puts the gif on the label and animates it
setMovie("myMovie", getMudletHomeDir().."/movie.gif")
--stops the animation
pauseMovie("myMovie")prefix
- prefix(text, [writingFunction], [foregroundColor], [backgroundColor], [windowName])
- Prefixes text at the beginning of the current line when used in a trigger.
- Parameters
- text:
- the information you want to prefix
- "writingFunction:"
- optional parameter, allows the selection of different functions to be used to write the text, valid options are: echo, cecho, decho, and hecho.
- "foregroundColor:"
- optional parameter, allows a foreground color to be specified if using the echo function using a color name, as with the fg() function
- "backgroundColor:"
- optional parameter, allows a background color to be specified if using the echo function using a color name, as with the bg() function
- "windowName:"
- optional parameter, allows the selection a miniconsole or the main window for the line that will be prefixed
- Example
-- Prefix the hours, minutes and seconds onto our prompt even though Mudlet has a button for that
prefix(os.date("%H:%M:%S "))
-- Prefix the time in red into a miniconsole named "my_console"
prefix(os.date("<red>%H:%M:%S<reset>", cecho, nil, nil, "my_console"))- See also: suffix()
- print(text, some more text, ...)
- Prints text to the main window. Similar to echo(), but does not require a "\n" at the end for a newline and can print several items given to it. It cannot print whole tables - use display() for those. This function works similarly to the print() you will see in guides for Lua.
- Parameters
- text:
- The information you want to display.
- Example
print("hi!")
print(1,2,3)
print(myvariable, someothervariable, yetanothervariable)raiseWindow
- raiseWindow(labelName)
- Raises the referenced label/console above all over labels/consoles. For the opposite effect, see: lowerWindow().
- Parameters
- labelName:
- the name of the label/console you wish to bring to the top of the rest.
- Example
createLabel("blueLabel", 300, 300, 100, 100, 1) --creates a blue label
setBackgroundColor("blueLabel", 50, 50, 250, 255)
createLabel("redLabel", 350, 350, 100, 100, 1) --creates a red label which is placed on TOP of the bluewindow, as the last made label will sit at the top of the rest
setBackgroundColor("redLabel", 250, 50, 50, 255)
raiseWindow("blueLabel") --raises blueLabel back at the top, above redLabelremoveCommandLineMenuEvent
- removeCommandLineMenuEvent([window,] label)
- Removes an existing command line menu event.
- Parameters
- window:
- Window that item is associated with. Optional, defaults to "main" (main window console).
- label:
- Label under which element is registered
- Returns
- Returns True If the mouse event was removed successfully.
removeMouseEvent
- removeMouseEvent(uniqueName)
- Removes an existing mouse event. Returns True If the event exists and was removed successfully, throws a warning if the event doesn't exist.
- See also
- getMouseEvents(), addMouseEvent()
- Parameters
- uniqueName:
- A unique identifier that the mouse event was registered under.
- Returns
- Returns True If the mouse event was removed successfully.
replace
- replace([windowName], with, [keepcolor])
- Replaces the currently selected text with the new text. To select text, use selectString(), selectSection() or a similar function.
![]() Note:
If you’d like to delete/gag the whole line, use deleteLine() instead.
Note:
If you’d like to delete/gag the whole line, use deleteLine() instead.
![]() Note:
when used outside of a trigger context (for example, in a timer instead of a trigger), replace() won't trigger the screen to refresh. Instead, use replace("") and insertText("new text") as insertText() does.
Note:
when used outside of a trigger context (for example, in a timer instead of a trigger), replace() won't trigger the screen to refresh. Instead, use replace("") and insertText("new text") as insertText() does.
See also: creplace
- Parameters
- windowName:
- (optional) name of window (a miniconsole)
- with:
- the new text to display.
- keepcolor:
- (optional) argument, setting this to true will keep the existing colors (since Mudlet 3.0+)
- Example
-- replace word "troll" with "cute trolly"
selectString("troll",1)
replace("cute trolly")
-- replace the whole line
selectCurrentLine()
replace("Out with the old, in with the new!")replaceAll
- replaceAll(what, with, [keepcolor])
- Replaces all occurrences of what in the current line with with.
- Parameters
- what:
- the text to replace
![]() Note:
This accepts Lua patterns
Note:
This accepts Lua patterns
- with:
- the new text to have in place
- keepcolor:
- setting this to true will keep the existing colors.
![]() Note: keepcolor is available in Mudlet 4.10+
Note: keepcolor is available in Mudlet 4.10+
- Examples
-- replace all occurrences of the word "south" in the line with "north"
replaceAll("south", "north")-- replace all occurrences of the text that the variable "target" has
replaceAll(target, "The Bad Guy")replaceLine
- replaceLine ([window], text)
- Replaces the output line from the game with your own text.
See Also: echo(), insertText()
- Parameters
- window (optional):
- the window to copy the text from. Defaults to "main".
- text:
- The text to display
- Example
replaceLine("[ALERT!]: "..line)replaceWildcard
- replaceWildcard(which, replacement, [keepcolor])
- Replaces the given wildcard (as a number) with the given text. Equivalent to doing:
selectString(matches[2], 1)
replace("text")- Parameters
- which:
- Wildcard to replace.
- replacement:
- Text to replace the wildcard with.
- keepcolor:
- setting this to true will keep the existing colors
![]() Note: keepcolor available in Mudlet 4.10+
Note: keepcolor available in Mudlet 4.10+
- Example
replaceWildcard(2, "hello") -- on a perl regex trigger of ^You wave (goodbye)\.$, it will make it seem like you waved helloresetCmdLineAction
- resetCmdLineAction(commandLineName)
- Resets the action on the command line so the it behaves like the main command line again.
- Parameters
- commandLineName
- The name of the command line the action will be resetet.
- See also: setCmdLineAction()
resetBackgroundImage
- resetBackgroundImage([windowName])
- Resets the console background-image
- Parameters
- windowName
- (optional) name of the console the image will be reset
- See also: setBackgroundImage()
resetFormat
- resetFormat([windowName])
- Resets the colour/bold/italics formatting. Always use this function when done adjusting formatting, so make sure what you've set doesn't 'bleed' onto other triggers/aliases.
- Parameters
- windowName
- (optional) name of the console to reset formatting. Defaults to "main" if missing.
- Example
-- select and set the 'Tommy' to red in the line
if selectString("Tommy", 1) ~= -1 then fg("red") end
-- now reset the formatting, so our echo isn't red
resetFormat()
echo(" Hi Tommy!")
-- another example: just highlighting some words
for _, word in ipairs{"he", "she", "her", "their"} do
if selectString(word, 1) ~= -1 then
bg("blue")
end
end
resetFormat()resetLabelCursor
- resetLabelCursor(labelName)
- Resets your mouse cursor to the default one.
- See also: setLabelCursor(), setLabelCustomCursor()
- Parameters
- labelName: label for which to reset the cursor for.
- Example
resetLabelCursor("myLabel")
-- This will reset the mouse cursor over myLabel to the default oneresetLabelToolTip
- resetLabelToolTip(labelName)
- Resets the tooltip on the given label.
- Parameters
- labelName:
- The name of the label the tooltip will be reseted.
- See also: setLabelToolTip()
resetMapWindowTitle
- resetMapWindowTitle()
- resets the title of the popped out map window to default.
- See also: setMapWindowTitle()
resetUserWindowTitle
- resetUserWindowTitle(windowName)
- resets the title of the UserWindow windowName
- Parameters
- windowName:
- Name of the userwindow for which the title will be resetet
- See also: setUserWindowTitle(), openUserWindow()
resizeWindow
- resizeWindow(windowName, width, height)
- Resizes a mini console, label, or floating User Windows.
- See also: createMiniConsole(), createLabel(), handleWindowResizeEvent(), resizeWindow(), setBorderSizes(), openUserWindow()
- Parameters
- windowName:
- The name of your window
- width:
- The new width you want
- height:
- The new height you want
![]() Note:
Since Mudlet 3.7 this method can also be used on User Window consoles if they are floating.
Note:
Since Mudlet 3.7 this method can also be used on User Window consoles if they are floating.
saveWindowLayout
- saveWindowLayout()
- Saves the layout of userwindows (floating miniconsoles), in case you'd like to load them again later.
- See also: loadWindowLayout(), openUserWindow()
- Example
saveWindowLayout()scaleMovie
- scaleMovie(label name, [autoscale])
- Resizes the gif to fill the full size of its label
- See also: setMovie(), startMovie()
- Parameters
- label name:
- name of the label the gif will be scaled upon
- autoscale:
- (optional) if false the gif will only be scaled once, resizing the label won't rescale the image
selectCaptureGroup
- selectCaptureGroup(groupNumber)
- Selects the content of the capture group number in your Perl regular expression (from matches[]). Also works with named capture group. It does not work with multimatches.
- See also: selectCurrentLine()
- Parameters
- groupNumberOrName:
- number of the capture group you want to select, or the name of the capture group as a string
- Example
--First, set a Perl Reqular expression e.g. "you have (\d+) Euro".
--If you want to color the amount of money you have green you do:
selectCaptureGroup(1)
setFgColor(0,255,0)
-- Or perhaps instead if you were to use "you have (?<euro>\d+) Euro"
selectCaptureGroup("euro")
fg("green")selectCmdLineText
- selectCmdLineText([commandLine])
- Selects the text in your command line. You can specify which one, if you got many.
- See also: createCommandLine()
- Parameters
- commandLine:
- (optional) name of the command line you want to have selected
- Example
-- First, create an extra commandline with the following lua script:
inputContainer = inputContainer or Adjustable.Container:new({
x = 0, y = "-4c",
name = "InputContainer", padding = 2,
width = "100%", height = "4c",
autoLoad = false
})
extraCmdLine = extraCmdLine or Geyser.CommandLine:new({
name = "extraCmdLine",
x = 0, y = 0, width = "100%", height = "100%"
}, inputContainer)
inputContainer:attachToBorder("bottom")
-- Now you can send the following lua code with your main command line.
-- It will give 2 seconds time to click around, unselect its text, etc. before selecting its text for you:
lua tempTimer(2, function() selectCmdLineText() end)
-- This will instead select the text in the command line named extraCmdLine:
lua selectCmdLineText('extraCmdLine')
-- Same as before, but using the Geyser.CommandLine function instead:
lua extraCmdLine:selectText()selectCurrentLine
- selectCurrentLine([windowName])
- Selects the content of the current line that the cursor at. By default, the cursor is at the start of the current line that the triggers are processing, but you can move it with the moveCursor() function.
![]() Note:
This selects the whole line, including the linebreak - so it has a subtle difference from the slightly slower selectString(line, 1) selection method.
Note:
This selects the whole line, including the linebreak - so it has a subtle difference from the slightly slower selectString(line, 1) selection method.
- Parameters
- windowName:
- (optional) name of the window in which to select text.
- Example
-- color the whole line green!
selectCurrentLine()
fg("green")
deselect()
resetFormat()
-- to select the previous line, you can do this:
moveCursor(0, getLineNumber()-1)
selectCurrentLine()
-- to select two lines back, this:
moveCursor(0, getLineNumber()-2)
selectCurrentLine()selectSection
- selectSection( [windowName], fromPosition, length )
- Selects the specified parts of the line starting from the left and extending to the right for however how long. The line starts from 0.
- Returns true if the selection was successful, and false if the line wasn't actually long enough or the selection couldn't be done in general.
- See also: selectString(), selectCurrentLine(), getSelection()
- Parameters
- "windowName:"
- (optional) name of the window in which to select text. By default the main window, if no windowName is given.
- Will not work if "main" is given as the windowName to try to select from the main window.
- fromPosition:
- number to specify at which position in the line to begin selecting
- length:
- number to specify the amount of characters you want to select
- Example
-- select and colour the first character in the line red
if selectSection(0,1) then fg("red") end
-- select and colour the second character green (start selecting from the first character, and select 1 character)
if selectSection(1,1) then fg("green") end
-- select and colour three character after the first two grey (start selecting from the 2nd character for 3 characters long)
if selectSection(2,3) then fg("grey") endselectString
- selectString([windowName], text, number_of_match)
- Selects a substring from the line where the user cursor is currently positioned - allowing you to edit selected text (apply colour, make it be a link, copy to other windows or other things).
![]() Note:
You can move the user cursor with moveCursor(). When a new line arrives from the game, the user cursor is positioned at the beginning of the line. However, if one of your trigger scripts moves the cursor around you need to take care of the cursor position yourself and make sure that the cursor is in the correct line if you want to call one of the select functions. To deselect text, see deselect().
Note:
You can move the user cursor with moveCursor(). When a new line arrives from the game, the user cursor is positioned at the beginning of the line. However, if one of your trigger scripts moves the cursor around you need to take care of the cursor position yourself and make sure that the cursor is in the correct line if you want to call one of the select functions. To deselect text, see deselect().
- See also: deselect()
- Parameters
- windowName:
- (optional) name of the window in which to select text. By default the main window, if no windowName or an empty string is given.
- text:
- The text to select. It is matched as a substring match (so the text anywhere within the line will get selected).
- number_of_match:
- The occurrence of text on the line that you'd like to select. For example, if the line was "Bob and Bob", 1 would select the first Bob, and 2 would select the second Bob.
Returns position in line or -1 on error (text not found in line)
![]() Note:
To prevent working on random text if your selection didn't actually select anything, check the -1 return code before doing changes:
Note:
To prevent working on random text if your selection didn't actually select anything, check the -1 return code before doing changes:
- Example
if selectString("big monster", 1) > -1 then fg("red") endsetAppStyleSheet
- setAppStyleSheet(stylesheet [, tag])
- Sets a stylesheet for the entire Mudlet application and every open profile. Because it affects other profiles that might not be related to yours, it's better to use setProfileStyleSheet() instead of this function.
- Raises the sysAppStyleSheetChange event which comes with two arguments in addition to the event name. The first is the optional tag which was passed into the function, or "" if nothing was given. The second is the profile which made the stylesheet changes.
- See also: setProfileStyleSheet()
- Parameters
- stylesheet:
- The entire stylesheet you'd like to use.
- tag: (available in Mudlet 3.19+)
- (optional) string tag or identifier that will be passed as a second argument in the sysAppStyleSheetChange event
- References
- See Qt Style Sheets Reference for the list of widgets you can style and CSS properties you can apply on them.
- See also QDarkStyleSheet, a rather extensive stylesheet that shows you all the different configuration options you could apply, available as an mpackage here.
- Example
-- credit to Akaya @ http://forums.mudlet.org/viewtopic.php?f=5&t=4610&start=10#p21770
local background_color = "#26192f"
local border_color = "#b8731b"
setAppStyleSheet([[
QMainWindow {
background: ]]..background_color..[[;
}
QToolBar {
background: ]]..background_color..[[;
}
QToolButton {
background: ]]..background_color..[[;
border-style: solid;
border-width: 2px;
border-color: ]]..border_color..[[;
border-radius: 5px;
font-family: BigNoodleTitling;
color: white;
margin: 2px;
font-size: 12pt;
}
QToolButton:hover { background-color: grey;}
QToolButton:focus { background-color: grey;}
]])![]() Note: Enhanced in Mudlet version 3.19.0 to generate an event that profiles/packages can utilise to redraw any parts of the UI that they themselves had previously styled so their effects can be re-applied to the new application style.
Note: Enhanced in Mudlet version 3.19.0 to generate an event that profiles/packages can utilise to redraw any parts of the UI that they themselves had previously styled so their effects can be re-applied to the new application style.
It is anticipated that the Mudlet application itself will make further use of application styling effects and two strings are provisionally planned for the second parameter in the sysAppStyleSheetChange event: "mudlet-theme-dark" and "mudlet-theme-light"; it will also set the third parameter to "system".
setBackgroundColor
- setBackgroundColor([windowName], r, g, b, [transparency])
- Sets the background for the given label, miniconsole, or userwindow. Colors are from 0 to 255 (0 being black), and transparency is from 0 to 255 (0 being completely transparent).
- Parameters
- windowName:
- (optional) name of the label/miniconsole/userwindow to change the background color on, or "main" for the main window.
- r:
- Amount of red to use, from 0 (none) to 255 (full).
- g:
- Amount of green to use, from 0 (none) to 255 (full).
- b:
- Amount of red to use, from 0 (none) to 255 (full).
- transparency:
- (optional) amount of transparency to use, from 0 (fully transparent) to 255 (fully opaque). Defaults to 255 if omitted.
![]() Note:
Transparency also available for main/miniconsoles in Mudlet 4.10+
Note:
Transparency also available for main/miniconsoles in Mudlet 4.10+
- Example
-- make a red label that's somewhat transparent
setBackgroundColor("some label",255,0,0,200)setBackgroundImage
- setBackgroundImage(labelName, imageLocation)
- setBackgroundImage([windowname], imageLocation, [mode])
- Loads an image file (png) as a background image for a label or console. This can be used to display clickable buttons in combination with setLabelClickCallback() and such.
![]() Note:
You can also load images on labels via setLabelStyleSheet().
Note:
You can also load images on labels via setLabelStyleSheet().
- Parameters (label)
- labelName:
- The name of the label to change it's background color.
- imageLocation:
- The full path to the image location. It's best to use [[ ]] instead of "" for it - because for Windows paths, backslashes need to be escaped.
- Parameters (consoles)
- windowName:
- (optional) name of the miniconsole/userwindow to change the background image on, or "main" for the main window.
- imageLocation:
- The full path to the image location. It's best to use [[ ]] instead of "" for it - because for Windows paths, backslashes need to be escaped.
- mode:
- (optional) allows different modes for drawing the background image. Possible modes areː
- border - the background image is stretched (1)
- center - the background image is in the center (2),
- tile - the background image is 'tiled' (3)
- style - choose your own background image stylesheet, see example below (4)
- See also: resetBackgroundImage()
- Example (label)
-- give the top border a nice look
setBackgroundImage("top bar", [[/home/vadi/Games/Mudlet/games/top_bar.png]])- Example (main/miniconsole)
-- give the main window a background image
setBackgroundImage("main", [[:/Mudlet_splashscreen_development.png]], "center")
-- or use your own for the main window:
setBackgroundImage("main", [[C:\Documents and Settings\bub\Desktop\mypicture.png]], "center")
-- give my_miniconsole a nice background image and put it in the center
setBackgroundImage("my_miniconsole", [[:/Mudlet_splashscreen_development.png]], "center")
-- give my_miniconsole a nice background image with own stylesheet option
setBackgroundImage("my_miniconsole", [[background-image: url(:/Mudlet_splashscreen_development.png); background-repeat: no-repeat; background-position: right;]], "style")![]() Note: setBackgroundImage for main/miniconsoles and userwindows available in Mudlet 4.10+
Note: setBackgroundImage for main/miniconsoles and userwindows available in Mudlet 4.10+
setBgColor
- setBgColor([windowName], r, g, b, [transparency])
- Sets the current text background color in the main window unless windowName parameter given. If you have selected text prior to this call, the selection will be highlighted otherwise the current text background color will be changed. If you set a foreground or background color, the color will be used until you call resetFormat() on all further print commands.
- If you'd like to change the background color of a window, see setBackgroundColor().
- See also: cecho(), setBackgroundColor()
- Parameters
- windowName:
- (optional) either be none or "main" for the main console, or a miniconsole / userwindow name.
- r:
- The red component of the gauge color. Passed as an integer number from 0 to 255
- g:
- The green component of the gauge color. Passed as an integer number from 0 to 255
- b:
- The blue component of the gauge color. Passed as an integer number from 0 to 255
- transparency:
- Amount of transparency to use, from 0 (fully transparent) to 255 (fully opaque). Optional, if not used color is fully opaque
![]() Note:
Transparency parameter available in Mudlet 4.10+
Note:
Transparency parameter available in Mudlet 4.10+
- Example
--highlights the first occurrence of the string "Tom" in the current line with a red background color.
selectString( "Tom", 1 )
setBgColor( 255,0,0 )--prints "Hello" on red background and "You" on blue.
setBgColor(255,0,0)
echo("Hello")
setBgColor(0,0,255)
echo(" You!")
resetFormat()setBold
- setBold(windowName, boolean)
- Sets the current text font to bold (true) or non-bold (false) mode. If the windowName parameters omitted, the main screen will be used. If you've got text currently selected in the Mudlet buffer, then the selection will be bolded. Any text you add after with echo() or insertText() will be bolded until you use resetFormat().
- windowName:
- Optional parameter set the current text background color in windowname given.
- boolean:
- A
trueorfalsethat enables or disables bolding of text
- Example
-- enable bold formatting
setBold(true)
-- the following echo will be bolded
echo("hi")
-- turns off bolding, italics, underlines and colouring. It's good practice to clean up after you're done with the formatting, so other your formatting doesn't "bleed" into other echoes.
resetFormat()setBorderBottom
- setBorderBottom(size)
- Sets the size of the bottom border of the main window in pixels. A border means that the game text won't go on it, so this gives you room to place your graphical elements there.
- See Also: setBorderSizes(), setBorderColor(), getBorderBottom()
- Parameters
- size:
- Height of the border in pixels - with 0 indicating no border.
- Example
setBorderBottom(150)setBorderColor
- setBorderColor(red, green, blue)
- Sets the color of the main windows border that you can create either with lua commands, or via the main window settings.
- See Also: setBorderSizes()
- Parameters
- red:
- Amount of red color to use, from 0 to 255.
- green:
- Amount of green color to use, from 0 to 255.
- blue:
- Amount of blue color to use, from 0 to 255.
- Example
-- set the border to be completely blue
setBorderColor(0, 0, 255)
-- or red, using a name
setBorderColor( unpack(color_table.red) )setBorderLeft
- setBorderLeft(size)
- Sets the size of the left border of the main window in pixels. A border means that the game text won't go on it, so this gives you room to place your graphical elements there.
- See Also: setBorderSizes(), setBorderColor(), getBorderLeft()
- Parameters
- size:
- Width of the border in pixels - with 0 indicating no border.
- Example
setBorderLeft(5)setBorderRight
- setBorderRight(size)
- Sets the size of the right border of the main window in pixels. A border means that the game text won't go on it, so this gives you room to place your graphical elements there.
- See Also: setBorderSizes(), setBorderColor(), getBorderRight()
- Parameters
- size:
- Width of the border in pixels - with 0 indicating no border.
- Example
setBorderRight(50)setBorderSizes
- setBorderSizes(top, right, bottom, left)
- Sets the size of all borders of the main window in pixels. A border means that the game text won't go on it, so this gives you room to place your graphical elements there.
- The exact result of this function depends on how many numbers you give to it as arguments.
- See also: getBorderSizes(), setBorderTop(), setBorderRight(), setBorderBottom(), setBorderLeft(), setBorderColor()
- Available in Mudlet4.0+
- Arguments
- setBorderSizes(top, right, bottom, left)
- 4 arguments: All borders will be set to their new given size.
- setBorderSizes(top, width, bottom)
- 3 arguments: Top and bottom borders will be set to their new given size, and right and left will gain the same width.
- setBorderSizes(height, width)
- 2 arguments: Top and bottom borders will gain the same height, and right and left borders gain the same width.
- setBorderSizes(size)
- 1 argument: All borders will be set to the same size.
- setBorderSizes()
- 0 arguments: All borders will be hidden or set to size of 0 = no border.
- Example
setBorderSizes(100, 50, 150, 0)
-- big border at the top, bigger at the bottom, small at the right, none at the left
setBorderSizes(100, 50, 150)
-- big border at the top, bigger at the bottom, small at the right and the left
setBorderSizes(100, 50)
-- big border at the top and the bottom, small at the right and the left
setBorderSizes(100)
-- big borders at all four sides
setBorderSizes()
-- no borders at all four sidessetBorderTop
- setBorderTop(size)
- Sets the size of the top border of the main window in pixels. A border means that the game text won't go on it, so this gives you room to place your graphical elements there.
- See Also: setBorderSizes(), setBorderColor(), getBorderTop()
- Parameters
- size:
- Height of the border in pixels - with 0 indicating no border.
- Example
setBorderTop(100)setFgColor
- setFgColor([windowName], red, green, blue)
- Sets the current text foreground color in the main window unless windowName parameter given.
- windowName:
- (optional) either be none or "main" for the main console, or a miniconsole / userwindow name.
- red:
- The red component of the gauge color. Passed as an integer number from 0 to 255
- green:
- The green component of the gauge color. Passed as an integer number from 0 to 255
- blue:
- The blue component of the gauge color. Passed as an integer number from 0 to 255
- See also: setBgColor(), setHexFgColor(), setHexBgColor(), resetFormat()
- Example
--highlights the first occurrence of the string "Tom" in the current line with a red foreground color.
selectString( "Tom", 1 )
setFgColor( 255, 0, 0 )setButtonStyleSheet
- setButtonStyleSheet(button, markup)
- Applies Qt style formatting to a button via a special markup language.
- Parameters
- button:
- The name of the button to be formatted.
- markup:
- The string instructions, as specified by the Qt Style Sheet reference.
- Note: You can instead use QWidget { markup }. QWidget will reference 'button', allowing the use of pseudostates like QWidget:hover and QWidget:selected
- Example
setButtonStyleSheet("my test button", [[
QWidget {
background-color: #999999;
border: 3px #777777;
}
QWidget:hover {
background-color: #bbbbbb;
}
QWidget:checked {
background-color: #77bb77;
border: 3px #559955;
}
QWidget:hover:checked {
background-color: #99dd99;
} ]])setClipboardText
- setClipboardText(textContent)
- Sets the value of the computer's clipboard to the string data provided.
- See also: getClipboardText()
- Parameters
- textContent:
- The text to be put into the clipboard.
- Note: Note: Available in Mudlet 4.10+
- Example
setClipboardText("New Clipboard Contents")
echo("Clipboard: " .. getClipboardText()) -- should echo "Clipboard: New Clipboard Contents"setCmdLineAction
- setCmdLineAction(commandLineName, luaFunctionName, [any arguments])
- Specifies a Lua function to be called if the user sends text to the command line. This function can pass any number of string or integer number values as additional parameters. These parameters are then used in the callback - thus you can associate data with the command line action. Additionally, this function passes the command line input text as the final argument.
![]() Note: If no action is set the command line behaves like the main command line and sends commands directly to the game or alias engine.
Note: If no action is set the command line behaves like the main command line and sends commands directly to the game or alias engine.
The function specified in luaFunctionName is called like so:
luaFuncName(optional number of arguments, text)- See also: resetCmdLineAction()
- Parameters
- commandLineName:
- The name of the command line to attach the action function to.
- luaFunctionName:
- The Lua function name to call, as a string.
- any arguments:
- (optional) Any amount of arguments you'd like to pass to the calling function.
![]() Note: You can also pass a function directly instead of using a string
Note: You can also pass a function directly instead of using a string
- Example
function sendTextToMiniConsole(miniConsoleName, cmdLineText)
echo(miniConsoleName, cmdLineText.."\n")
end
setCmdLineAction("myCmdLine", "sendTextToMiniConsole", "myMiniConsole")setCmdLineStyleSheet
- setCmdLineStyleSheet([commandLineName], markup)
- Applies Qt style formatting to a command line via a special markup language.
- Parameters
- commandLineName:
- (optional) Name of the command line (or miniconsole the command line is in). If not given the stylesheet will be applied to the main command line.
- markup
- The string instructions, as specified by the Qt Style Sheet reference.
- See also: enableCommandLine(), createCommandLine()
- Examples
-- move the main command line over to the right
setCmdLineStyleSheet("main", [[
QPlainTextEdit {
padding-left: 100px; /* change 100 to your number */
background-color: black; /* change it to your background color */
}
]])
--only change font-size of your main command line
setCmdLineStyleSheet("main", [[
QPlainTextEdit {
font-sizeː20pt;
}
]])
--change bg/fg color of your miniconsole command line (name of the miniconsole is 'myMiniconsole'
--the command line in the miniconsole has to be enabled
setCmdLineStyleSheet("myMiniConsole", [[
QPlainTextEdit {
background: rgb(0,100,0);
color: rgb(0,200,255);
font-size: 10pt;
}
]])setFont
- setFont(name, font)
- Sets the font on the given window or console name. Can be used to change font of the main console, miniconsoles, and userwindows. Prefer a monospaced font - those work best with text games. See here for more.
- See also: getFont(), setFontSize(), getFontSize(), openUserWindow(), getAvailableFonts()
- Parameters
- name:
- Optional - the window name to set font size of - can either be none or "main" for the main console, or a miniconsole / userwindow name.
- font:
- The font to use.
- Example
-- The following will set the "main" console window font to Ubuntu Mono, another font included in Mudlet.
setFont("Ubuntu Mono")
setFont("main", "Ubuntu Mono")
-- This will set the font size of a miniconsole named "combat" to Ubuntu Mono.
setFont("combat", "Ubuntu Mono")setFontSize
- setFontSize(name, size)
- Sets a font size on the given window or console name. Can be used to change font size of the Main console as well as dockable UserWindows.
- See Also: getFontSize(), openUserWindow()
- Parameters
- name:
- Optional - the window name to set font size of - can either be none or "main" for the main console, or a UserWindow name.
- size:
- The font size to apply to the window.
- Example
-- The following will set the "main" console window font to 12-point font.
setFontSize(12)
setFontSize("main", 12)
-- This will set the font size of a user window named "uw1" to 12-point font.
setFontSize("uw1", 12)setGauge
- setGauge(gaugeName, currentValue, maxValue, gaugeText)
- Use this function when you want to change the gauges look according to your values. Typical usage would be in a prompt with your current health or whatever value, and throw in some variables instead of the numbers.
- See also: moveGauge(), createGauge(), setGaugeText()
- Example
-- create a gauge
createGauge("healthBar", 300, 20, 30, 300, nil, "green")
--Change the looks of the gauge named healthBar and make it
--fill to half of its capacity. The height is always remembered.
setGauge("healthBar", 200, 400)--If you wish to change the text on your gauge, you’d do the following:
setGauge("healthBar", 200, 400, "some text")setGaugeStyleSheet
- setGaugeStyleSheet(gaugeName, css, cssback, csstext)
- Sets the CSS stylesheets on a gauge - one on the front (the part that resizes accoding to the values on the gauge) and one in the back. You can use Qt Designer to create stylesheets.
- Example
setGaugeStyleSheet("hp_bar", [[background-color: QLinearGradient( x1: 0, y1: 0, x2: 0, y2: 1, stop: 0 #f04141, stop: 0.1 #ef2929, stop: 0.49 #cc0000, stop: 0.5 #a40000, stop: 1 #cc0000);
border-top: 1px black solid;
border-left: 1px black solid;
border-bottom: 1px black solid;
border-radius: 7;
padding: 3px;]],
[[background-color: QLinearGradient( x1: 0, y1: 0, x2: 0, y2: 1, stop: 0 #bd3333, stop: 0.1 #bd2020, stop: 0.49 #990000, stop: 0.5 #700000, stop: 1 #990000);
border-width: 1px;
border-color: black;
border-style: solid;
border-radius: 7;
padding: 3px;]])setGaugeText
- setGaugeText(gaugename, css, ccstext )
- Set the formatting of the text used inside the inserted gaugename.
- Example
setGaugeText("healthBar", [[<p style="font-weight:bold;color:#C9C9C9;letter-spacing:1pt;word-spacing:2pt;font-size:12px;text-align:center;font-family:arial black, sans-serif;">]]..MY_NUMERIC_VARIABLE_HERE..[[</p>]])- Useful resources
- http://csstxt.com - Generate the text exactly how you like it before pasting it into the css slot.
- https://www.w3schools.com/colors/colors_picker.asp - Can help you choose colors for your text!
setHexBgColor
- setHexBgColor([windowName], hexColorString)
- Sets the current text background color in the main window unless windowName parameter given. This function allows to specify the color as a 6 character hexadecimal string.
- windowName:
- Optional parameter set the current text background color in windowname given.
- hexColorString
- 6 character long hexadecimal string to set the color to. The first two characters 00-FF represent the red part of the color, the next two the green and the last two characters stand for the blue part of the color
- See also: setBgColor(), setHexFgColor()
- Example
--highlights the first occurrence of the string "Tom" in the current line with a red Background color.
selectString( "Tom", 1 )
setHexBgColor( "FF0000" )setHexFgColor
- setHexFgColor([windowName], hexColorString)
- Sets the current text foreground color in the main window unless windowName parameter given. This function allows to specify the color as a 6 character hexadecimal string.
- windowName:
- Optional parameter set the current text foreground color in windowname given.
- hexColorString
- 6 character long hexadecimal string to set the color to. The first two characters 00-FF represent the red part of the color, the next two the green and the last two characters stand for the blue part of the color
- See also: setFgColor(), setHexBgColor()
- Example
--highlights the first occurrence of the string "Tom" in the current line with a red foreground color.
selectString( "Tom", 1 )
setHexFgColor( "FF0000" )setItalics
- setItalics(windowName, bool)
- Sets the current text font to italics/non-italics mode. If the windowName parameters omitted, the main screen will be used.
setLabelToolTip
- setLabelToolTip(labelName, text, [duration])
- Sets a tooltip on the given label.
- Parameters
- labelName:
- The name of the label to set the tooltip to.
- text:
- The text to be shown. Can contain Qt rich text formats.
- duration:
- Duration of the tooltip timeout in seconds. Optional, if not set the default duration will be set.
- See also: resetLabelToolTip()
setLabelClickCallback
- setLabelClickCallback(labelName, luaFunctionName, [any arguments])
- Specifies a Lua function to be called if the user clicks on the label/image. This function can pass any number of string or integer number values as additional parameters. These parameters are then used in the callback - thus you can associate data with the label/button. Additionally, this function passes an event table as the final argument. This table contains information about the mouse button clicked, other buttons that were pressed at the time, and the mouse cursor's local (relative to the label) and global (relative to the Mudlet window) position. The function specified in luaFunctionName is called like so:
luaFuncName(optional number of arguments, event)where event has the following structure:
event = {
x = 100,
y = 200,
globalX = 300,
globalY = 320,
button = "LeftButton",
buttons = {"RightButton", "MidButton"},
}- See also: setLabelDoubleClickCallback(), setLabelReleaseCallback(), setLabelMoveCallback(), setLabelWheelCallback(),setLabelOnEnter(), setLabelOnLeave()
- Parameters
- labelName:
- The name of the label to attach a callback function to.
- luaFunctionName:
- Lua function to call, or the function name, as a string.
- any arguments:
- (optional) Any amount of arguments you'd like to pass to the calling function.
![]() Note: Event argument is available in 3.6+, and in 4.8+ you can pass a function directly instead of a string.
Note: Event argument is available in 3.6+, and in 4.8+ you can pass a function directly instead of a string.
![]() Note:
While event.button may contain a single string of any listed below, event.buttons will only ever contain some combination of "LeftButton", "MidButton", and "RightButton"
Note:
While event.button may contain a single string of any listed below, event.buttons will only ever contain some combination of "LeftButton", "MidButton", and "RightButton"
- The following mouse button strings are defined:
"LeftButton" "RightButton" "MidButton" "BackButton" "ForwardButton" "TaskButton" "ExtraButton4" "ExtraButton5" "ExtraButton6" "ExtraButton7" "ExtraButton8" "ExtraButton9" "ExtraButton10" "ExtraButton11" "ExtraButton12" "ExtraButton13" "ExtraButton14" "ExtraButton15" "ExtraButton16" "ExtraButton17" "ExtraButton18" "ExtraButton19" "ExtraButton20" "ExtraButton21" "ExtraButton22" "ExtraButton23" "ExtraButton24"
- Example
createLabel("testLabel", 50, 50, 100, 100, 0)
function onClickGoNorth(event)
if event.button == "LeftButton" then
send("walk north")
elseif event.button == "RightButton" then
send("swim north")
elseif event.button == "MidButton" then
send("gallop north")
end
end
setLabelClickCallback("testLabel", "onClickGoNorth")
-- you can also use them within tables:
mynamespace =
{
onClickGoNorth =
function()
echo("the north button was clicked!")
end,
}
setLabelClickCallback("testLabel", "mynamespace.onClickGoNorth")
-- or by passing the function directly:
setLabelClickCallback("testLabel", onClickGoNorth)setLabelDoubleClickCallback
- setLabelDoubleClickCallback(labelName, luaFunctionName, [any arguments])
- Specifies a Lua function to be called if the user double clicks on the label/image. This function can pass any number of string or integer number values as additional parameters. These parameters are then used in the callback - thus you can associate data with the label/button. Additionally, this function passes an event table as the final argument, as in setLabelClickCallback()
- See also: setLabelClickCallback(), setLabelReleaseCallback(), setLabelMoveCallback(), setLabelWheelCallback(), setLabelOnEnter(), setLabelOnLeave()
- Parameters
- labelName:
- The name of the label to attach a callback function to.
- luaFunctionName:
- The Lua function name to call, as a string.
- any arguments:
- (optional) Any amount of arguments you'd like to pass to the calling function.
setLabelMoveCallback
- setLabelMoveCallback(labelName, luaFunctionName, [any arguments])
- Specifies a Lua function to be called when the mouse moves while inside the specified label/console. This function can pass any number of string or integer number values as additional parameters. These parameters are then used in the callback - thus you can associate data with the label/button. Additionally, this function passes an event table as the final argument, as in setLabelClickCallback()
- See Also: setLabelClickCallback(), setLabelDoubleClickCallback(), setLabelReleaseCallback(), setLabelWheelCallback(), setLabelOnEnter(), setLabelOnLeave()
- Parameters
- labelName:
- The name of the label to attach a callback function to.
- luaFunctionName:
- The Lua function name to call, as a string.
- any arguments:
- (optional) Any amount of arguments you'd like to pass to the calling function.
setLabelOnEnter
- setLabelOnEnter(labelName, luaFunctionName, [any arguments])
- Specifies a Lua function to be called when the mouse enters within the labels borders. This function can pass any number of string or integer number values as additional parameters. These parameters are then used in the callback - thus you can associate data with the label/button. Additionally, this function passes an event table as the final argument, similar to setLabelClickCallback(), but with slightly different information.
- For this callback, the event argument has the following structure:
event = {
x = 100,
y = 200,
globalX = 300,
globalY = 320,
}- See Also: setLabelClickCallback(), setLabelDoubleClickCallback(), setLabelReleaseCallback(), setLabelMoveCallback(), setLabelWheelCallback(), setLabelOnLeave()
- Parameters
- labelName:
- The name of the label to attach a callback function to.
- luaFunctionName:
- The Lua function name to call, as a string - it must be registered as a global function, and not inside any namespaces (tables).
- any arguments:
- (optional) Any amount of arguments you'd like to pass to the calling function.
- Example
function onMouseOver()
echo("The mouse is hovering over the label!\n")
end
setLabelOnEnter( "compassNorthImage", "onMouseOver" )setLabelOnLeave
- setLabelOnLeave(labelName, luaFunctionName, [any arguments])
- Specifies a Lua function to be called when the mouse leaves the labels borders. This function can pass any number of string or integer number values as additional parameters. These parameters are then used in the callback - thus you can associate data with the label/button.
- See Also: setLabelClickCallback(), setLabelOnEnter()
- Parameters
- labelName:
- The name of the label to attach a callback function to.
- luaFunctionName:
- The Lua function name to call, as a string - it must be registered as a global function, and not inside any namespaces (tables).
- any arguments:
- (optional) Any amount of arguments you'd like to pass to the calling function.
- Example
function onMouseLeft(argument)
echo("The mouse quit hovering over the label the label! We also got this as data on the function: "..argument)
end
setLabelOnLeave( "compassNorthImage", "onMouseLeft", "argument to pass to function" )setLabelReleaseCallback
- setLabelReleaseCallback(labelName, luaFunctionName, [any arguments])
- Specifies a Lua function to be called when a mouse click ends that originated on the specified label/console. This function is called even if you drag the mouse off of the label/console before releasing the click. This function can pass any number of string or integer number values as additional parameters. These parameters are then used in the callback - thus you can associate data with the label/button. Additionally, this function passes an event table as the final argument, as in setLabelClickCallback()
- See Also: setLabelClickCallback(), setLabelDoubleClickCallback(), setLabelMoveCallback(), setLabelWheelCallback(), setLabelOnEnter(), setLabelOnLeave()
- Parameters
- labelName:
- The name of the label to attach a callback function to.
- luaFunctionName:
- The Lua function name to call, as a string.
- any arguments:
- (optional) Any amount of arguments you'd like to pass to the calling function.
![]() Note:
The event argument only available since Mudlet 3.6
Note:
The event argument only available since Mudlet 3.6
- Example
function onReleaseNorth()
echo("the north button was released!")
end
setLabelReleaseCallback( "compassNorthImage", "onReleaseNorth" )
-- you can also use them within tables:
mynamespace = {
onReleaseNorth = function()
echo("the north button was released!")
end
}
setLabelReleaseCallback( "compassNorthImage", "mynamespace.onReleaseNorth" )setLabelStyleSheet
- setLabelStyleSheet(label, markup)
- Applies Qt style formatting to a label via a special markup language.
- Parameters
- label:
- The name of the label to be formatted (passed when calling createLabel).
- markup:
- The string instructions, as specified by the Qt Style Sheet reference.
- Note that when specifying a file path for styling purposes, forward slashes, / , must be used, even if your OS uses backslashes, \ , normally.
- Example
-- This creates a label with a white background and a green border, with the text "test"
-- inside.
createLabel("test", 50, 50, 100, 100, 0)
setLabelStyleSheet("test", [[
background-color: white;
border: 10px solid green;
font-size: 12px;
]])
echo("test", "test")-- This creates a label with a single image, that will tile or clip depending on the
-- size of the label. To use this example, please supply your own image.
createLabel("test5", 50, 353, 164, 55, 0)
setLabelStyleSheet("test5", [[
background-image: url("C:/Users/Administrator/.config/mudlet/profiles/Midkemia Online/Vyzor/MkO_logo.png");
]])-- This creates a label with a single image, that can be resized (such as during a
-- sysWindowResizeEvent). To use this example, please supply your own image.
createLabel("test9", 215, 353, 100, 100, 0)
setLabelStyleSheet("test9", [[
border-image: url("C:/Users/Administrator/.config/mudlet/profiles/Midkemia Online/Vyzor/MkO_logo.png");
]])--This creates a label whose background changes when the users mouse hovers over it.
--putting the styleSheet in a variable allows us to easily change the styleSheet. We also are placing colors in variables that have been preset.
local labelBackgroundColor = "#123456"
local labelHoverColor = "#654321"
local labelFontSize = 12
local labelName = "HoverLabel"
local ourLabelStyle = [[
QLabel{
background-color: ]]..labelBackgroundColor..[[;
font-size: ]]..labelFontSize..[[px;
qproperty-alignment: 'AlignCenter | AlignCenter';
}
QLabel::hover{
background-color: ]]..labelHoverColor..[[;
font-size: ]]..labelFontSize..[[px;
qproperty-alignment: 'AlignCenter | AlignCenter';
}
]]
--Creating the label using the labelName and ourLabelStyle variables created above.
createLabel(labelName,0,0,400,400,1)
setLabelStyleSheet(labelName, ourLabelStyle)
echo("HoverLabel","This text shows while mouse is or is not over the label.")--Using QLabel::hover mentioned above. Lets "trick" the label into changing it's text.
--Please keep in mind that the setLabelMoveCallback allows for much more control over not just your label but your entire project.
--putting the styleSheet in a variable allows us to easily change the styleSheet. We also are placing colors in variables that have been preset.
local labelBackgroundColor = "#123456"
local labelHoverColor = "#654321"
local labelFontSize = 12
local labelName = "HoverLabel"
--Notice we are adding a string returned from a function. In this case, the users profile directory.
local ourLabelStyle = [[
QLabel{
border-image: url("]]..getMudletHomeDir()..[[/imagewithtext.png");
}
QLabel::hover{
border-image: url("]]..getMudletHomeDir()..[[/imagewithhovertext.png");
}
]]
--Creating the label using the labelName and ourLabelStyle variables created above.
createLabel(labelName,0,0,400,400,1)
setLabelStyleSheet(labelName, ourLabelStyle)
--This is just to example that echos draw on top of the label. You would not want to echo onto a label you were drawing text on with images, because echos would draw on top of them.
echo("HoverLabel","This text shows while mouse is or is not over the label.")setLabelCursor
- setLabelCursor(labelName, cursorShape)
- Changes how the mouse cursor looks like when over the label. To reset the cursor shape, use resetLabelCursor().
- See also: resetLabelCursor(), setLabelCustomCursor()
- Parameters
- labelName:
- Name of the label which you want the mouse cursor change at.
- cursorShape
- Shape of the mouse cursor. List of possible cursor shapes is available here.
- Example
setLabelCursor("myLabel", "Cross")
-- This will change the mouse cursor to a cross if it's over the label myLabelsetLabelCustomCursor
- setLabelCustomCursor(labelName, custom cursor, [hotX, hotY])
- Changes the mouse cursor shape over your label to a custom cursor. To reset the cursor shape, use resetLabelCursor().
- See also: resetLabelCursor(), setLabelCursor()
- Parameters
- labelName:
- Name of the label which you want the mouse cursor change at.
- custom cursor
- Location of your custom cursor file. To be compatible with all systems it is recommended to use png files with size of 32x32.
- hotX
- X-coordinate of the cursors hotspot position. Optional, if not set it is set to -1 which is in the middle of your custom cursor.
- hotY
- Y-coordinate of the cursors hotspot position. Optional, if not set it is set to -1 which is in the middle of your custom cursor.
- Example
setLabelCustomCursor("myLabel", getMudletHomeDir().."/custom_cursor.png")
-- This will change the mouse cursor to your custom cursor if it's over the label myLabelsetLabelWheelCallback
- setLabelWheelCallback(labelName, luaFunctionName, [any arguments])
- Specifies a Lua function to be called when the mouse wheel is scrolled while inside the specified label/console. This function can pass any number of string or integer number values as additional parameters. These parameters are then used in the callback - thus you can associate data with the label/button. Additionally, this function passes an event table as the final argument, similar to setLabelClickCallback(), but with slightly different information.
- For this callback, the event argument has the following structure:
event = {
x = 100,
y = 200,
globalX = 300,
globalY = 320,
buttons = {"RightButton", "MidButton"},
angleDeltaX = 0,
angleDeltaY = 120
}- Keys angleDeltaX and angleDeltaY correspond with the horizontal and vertical scroll distance, respectively. For most mice, these values will be multiples of 120.
- See Also: setLabelClickCallback(), setLabelDoubleClickCallback(), setLabelReleaseCallback(), setLabelMoveCallback(), setLabelOnEnter(), setLabelOnLeave()
- Parameters
- labelName:
- The name of the label to attach a callback function to.
- luaFunctionName:
- The Lua function name to call, as a string.
- any arguments:
- (optional) Any amount of arguments you'd like to pass to the calling function.
- Example
function onWheelNorth(event)
if event.angleDeltaY > 0 then
echo("the north button was wheeled forwards over!")
else
echo("the north button was wheeled backwards over!")
end
end
setLabelWheelCallback( "compassNorthImage", "onWheelNorth" )
-- you can also use them within tables:
mynamespace = {
onWheelNorth = function()
echo("the north button was wheeled over!")
end
}
setWheelReleaseCallback( "compassNorthImage", "mynamespace.onWheelNorth" )setLink
- setLink([windowName], command, tooltip)
- Turns the selected text into a clickable link - upon being clicked, the link will do the command code. Tooltip is a string which will be displayed when the mouse is over the selected text.
- Parameters
- windowName:
- (optional) name of a miniconsole or a userwindow in which to select the text in.
- command:
- command to do when the text is clicked, as text or Lua function.
- tooltip:
- tooltip to show when the mouse is over the text - explaining what would clicking do.
- Example
-- you can clickify a lot of things to save yourself some time - for example, you can change
-- the line where you receive a message to be clickable to read it!
-- perl regex trigger:
-- ^You just received message #(\w+) from \w+\.$
-- script:
selectString(matches[2], 1)
setUnderline(true) setLink([[send("msg read ]]..matches[2]..[[")]], "Read #"..matches[2])
resetFormat()
-- example of selecting text in a miniconsole and turning it into a link:
HelloWorld = Geyser.MiniConsole:new({
name="HelloWorld",
x="70%", y="50%",
width="30%", height="50%",
})
HelloWorld:echo("hi")
selectString("HelloWorld", "hi", 1)
setLink("HelloWorld", "echo'you clicked hi!'", "click me!")setMainWindowSize
- setMainWindowSize(mainWidth, mainHeight)
- Changes the size of your main Mudlet window to the values given.
- See Also: getMainWindowSize()
- Parameters
- mainWidth:
- The new width in pixels.
- mainHeight:
- The new height in pixels.
- Example
--this will resize your main Mudlet window
setMainWindowSize(1024, 768)setMapWindowTitle
- setMapWindowTitle(text)
- Changes the title shown in the mapper window when it's popped out.
- See also: resetMapWindowTitle()
- Parameters
- text:
- New window title to set.
- Example
setMapWindowTitle("my cool game map")setMiniConsoleFontSize
- setMiniConsoleFontSize(name, fontSize)
- Sets the font size of the mini console. see also: setFontSize(), createMiniConsole(), createLabel()
setMovie
- setMovie(label name, path to gif)
- Adds a gif to the selected label and animates it. Note that gifs are pretty expensive to play, so don't add too many at once.
- Some websites you can get gifs from are Tenor and Giphy (not officially endorsed).
- Returns true
- See also: startMovie(), pauseMovie(), setMovieFrame(), setMovieSpeed()
- Parameters
- label name:
- name of the label the gif will be animated on
- path:
- path of the gif file
- Example
-- download & show a gif within mudlet
local saveto = getMudletHomeDir().."/kymip.gif"
-- animation credit to https://opengameart.org/content/kymiball-ii-third-prototype-scraps
local url = "https://opengameart.org/sites/default/files/kymip_0.gif"
if downloadHandler then killAnonymousEventHandler(downloadHandler) end
downloadHandler = registerAnonymousEventHandler("sysDownloadDone",
function(_, filename)
if filename ~= saveto then
return true
end
local width, height = getImageSize(saveto)
createLabel("kymip", 300, 300, width, height, 0)
setMovie("kymip", saveto)
setLabelReleaseCallback("kymip", function() deleteLabel("kymip") end)
end, true)
downloadFile(saveto, url)local gifpath = getMudletHomeDir().."/movie.gif"
local width, height = getImageSize(gifpath)
-- create a label with the name mygif
createLabel("mygif", 0, 0, width, height,0)
-- put the gif on the label and animate it
setMovie("mygif", gifpath)setMovieFrame
- setMovieFrame(label name, frame nr)
- Jump to a specific frame in the gif.
- Returns true if successful, and false if frame doesn't exist.
- See also: setMovie(), startMovie(), pauseMovie(), setMovieSpeed()
- Parameters
- label name:
- name of the gif label
- frame nr:
- the gif animations frame nr to jump to
- Example
-- create a label with the name myMovie
createLabel("myMovie",0,0,200,200,0)
-- puts the gif on the label and animates it
setMovie("myMovie", getMudletHomeDir().."/movie.gif")
--stops the animation
pauseMovie("myMovie")
-- jumps to frame 12 of the animation
setMovieFrame("myMovie", 12)
--start the animation
startMovie("myMovie")setMovieSpeed
- setMovieSpeed(label name, speed in percent)
- Set the animation speed, in percent.
- Returns true
- See also: setMovie(), startMovie(), pauseMovie(), setMovieFrame()
- Parameters
- label name:
- name of the gif label
- speed in percent:
- the gif animations speed in percent for example 50 for 50% speed
- Example
-- create a label with the name myMovie
createLabel("myMovie",0,0,200,200,0)
-- puts the gif on the label and animates it
setMovie("myMovie", getMudletHomeDir().."/movie.gif")
--accelerates the animation to a speed of 150%
setMovieSpeed("myMovie",150)setOverline
- setOverline([windowName], boolean)
- Sets the current text font to be overlined (true) or not overlined (false) mode. If the windowName parameters omitted, the main screen will be used. If you've got text currently selected in the Mudlet buffer, then the selection will be overlined. Any text you add after with echo() or insertText() will be overlined until you use resetFormat().
- windowName:
- (optional) name of the window to set the text to be overlined or not.
- boolean:
- A true or false that enables or disables overlining of text
- Example
-- enable overlined text
setOverline(true)
-- the following echo will be have an overline
echo("hi")
-- turns off bolding, italics, underlines, colouring, and strikethrough (and, after this and reverse have been added, them as well). It's good practice to clean up after you're done with the formatting, so other your formatting doesn't "bleed" into other echoes.
resetFormat()setPopup
- setPopup([windowName], {lua code}, {hints})
- Turns the selected() text into a left-clickable link, and a right-click menu for more options. The selected text, upon being left-clicked, will do the first command in the list. Upon being right-clicked, it'll display a menu with all possible commands. The menu will be populated with hints, one for each line.
- Parameters
- windowName:
- the name of the console to operate on. If not using this in a miniConsole, use "main" as the name.
- This argument was ignored before Mudlet 4.11.
- {lua code}:
- a table of lua code to do, in text strings or as functions (since Mudlet 4.11), i.e.
{[[send("hello")]], function() echo("hi!") end}
- {hints}:
- a table of strings which will be shown on the popup and right-click menu. ie,
{"send the hi command", "echo hi to yourself"}.
- Example
-- In a `Raising your hand in greeting, you say "Hello!"` exact match trigger,
-- the following code will make left-clicking on `Hello` show you an echo, while right-clicking
-- will show some commands you can do.
selectString("Hello", 1)
setPopup("main", {function() send("bye") end, function() echo("hi!") end}, {"send 'bye' to the MUD", "click to echo 'hi!'"})
-- alternatively, put command as text (in [[ and ]] to use quotation marks inside)
setPopup("main", {[[send("bye")]], [[echo("hi!")]]}, {"send 'bye' to the MUD", "click to echo 'hi!'"})setProfileStyleSheet
- setProfileStyleSheet(stylesheet)
- Sets a stylesheet for the current Mudlet profile - allowing you to customise content outside of the main window (the profile tabs, the scrollbar, and so on). This function is better than setAppStyleSheet() because it affects only the current profile and not every other one as well.
- See also: setAppStyleSheet()
- Parameters
- stylesheet:
- The entire stylesheet you'd like to use. See Qt Style Sheets Reference for the list of widgets you can style and CSS properties you can apply on them.
- See also QDarkStyleSheet, a rather extensive stylesheet that shows you all the different configuration options you could apply, available as an mpackage here.
- Example
-- credit to Akaya @ http://forums.mudlet.org/viewtopic.php?f=5&t=4610&start=10#p21770
local background_color = "#26192f"
local border_color = "#b8731b"
setProfileStyleSheet([[
QMainWindow {
background: ]]..background_color..[[;
}
QToolBar {
background: ]]..background_color..[[;
}
QToolButton {
background: ]]..background_color..[[;
border-style: solid;
border-width: 2px;
border-color: ]]..border_color..[[;
border-radius: 5px;
font-family: BigNoodleTitling;
color: white;
margin: 2px;
font-size: 12pt;
}
QToolButton:hover { background-color: grey;}
QToolButton:focus { background-color: grey;}
QTreeView {
background: ]]..background_color..[[;
color: white;
}
QMenuBar{ background-color: ]]..background_color..[[;}
QMenuBar::item{ background-color: ]]..background_color..[[;}
QDockWidget::title {
background: ]]..border_color..[[;
}
QStatusBar {
background: ]]..border_color..[[;
}
QScrollBar:vertical {
background: ]]..background_color..[[;
width: 15px;
margin: 22px 0 22px 0;
}
QScrollBar::handle:vertical {
background-color: ]]..background_color..[[;
min-height: 20px;
border-width: 2px;
border-style: solid;
border-color: ]]..border_color..[[;
border-radius: 7px;
}
QScrollBar::add-line:vertical {
background-color: ]]..background_color..[[;
border-width: 2px;
border-style: solid;
border-color: ]]..border_color..[[;
border-bottom-left-radius: 7px;
border-bottom-right-radius: 7px;
height: 15px;
subcontrol-position: bottom;
subcontrol-origin: margin;
}
QScrollBar::sub-line:vertical {
background-color: ]]..background_color..[[;
border-width: 2px;
border-style: solid;
border-color: ]]..border_color..[[;
border-top-left-radius: 7px;
border-top-right-radius: 7px;
height: 15px;
subcontrol-position: top;
subcontrol-origin: margin;
}
QScrollBar::up-arrow:vertical, QScrollBar::down-arrow:vertical {
background: white;
width: 4px;
height: 3px;
}
QScrollBar::add-page:vertical, QScrollBar::sub-page:vertical {
background: none;
}
]])
-- if you'd like to reset it, use:
setProfileStyleSheet("")
-- to only affect scrollbars within the main window and miniconsoles, prefix them with 'TConsole':
setProfileStyleSheet[[
TConsole QScrollBar:vertical {
border: 2px solid grey;
background: #32CC99;
width: 15px;
margin: 22px 0 22px 0;
}
TConsole QScrollBar::handle:vertical {
background: white;
min-height: 20px;
}
TConsole QScrollBar::add-line:vertical {
border: 2px solid grey;
background: #32CC99;
height: 20px;
subcontrol-position: bottom;
subcontrol-origin: margin;
}
TConsole QScrollBar::sub-line:vertical {
border: 2px solid grey;
background: #32CC99;
height: 20px;
subcontrol-position: top;
subcontrol-origin: margin;
}
TConsole QScrollBar::up-arrow:vertical, QScrollBar::down-arrow:vertical {
border: 2px solid grey;
width: 3px;
height: 3px;
background: white;
}
TConsole QScrollBar::add-page:vertical, QScrollBar::sub-page:vertical {
background: none;
}
]]setReverse
- setReverse([windowName], boolean)
- Sets the current text to swap foreground and background color settings (true) or not (false) mode. If the windowName parameters omitted, the main screen will be used. If you've got text currently selected in the Mudlet buffer, then the selection will have it's colors swapped. Any text you add after with echo() or insertText() will have their foreground and background colors swapped until you use resetFormat().
- windowName:
- (optional) name of the window to set the text colors to be reversed or not.
- boolean:
- A true or false that enables or disables reversing of the fore- and back-ground colors of text
- Example
-- enable fore/back-ground color reversal of text
setReverse(true)
-- the following echo will have the text colors reversed
echo("hi")
-- turns off bolding, italics, underlines, colouring, and strikethrough (and, after this and overline have been added, them as well). It's good practice to clean up after you're done with the formatting, so other your formatting doesn't "bleed" into other echoes.
resetFormat()![]() Note: Although the visual effect on-screen is the same as that of text being selected if both apply to a piece of text they neutralise each other - however the effect of the reversal will be carried over in copies made by the "Copy to HTML" and in logs made in HTML format log file mode.
Note: Although the visual effect on-screen is the same as that of text being selected if both apply to a piece of text they neutralise each other - however the effect of the reversal will be carried over in copies made by the "Copy to HTML" and in logs made in HTML format log file mode.
setStrikeOut
- setStrikeOut([windowName], boolean)
- Sets the current text font to be striken out (true) or not striken out (false) mode. If the windowName parameters omitted, the main screen will be used. If you've got text currently selected in the Mudlet buffer, then the selection will be bolded. Any text you add after with echo() or insertText() will be striken out until you use resetFormat().
- windowName:
- (optional) name of the window to set the text to be stricken out or not.
- boolean:
- A true or false that enables or disables striking out of text
- Example
-- enable striken-out text
setStrikeOut(true)
-- the following echo will be have a strikethrough
echo("hi")
-- turns off bolding, italics, underlines, colouring, and strikethrough. It's good practice to clean up after you're done with the formatting, so other your formatting doesn't "bleed" into other echoes.
resetFormat()setTextFormat
- setTextFormat(windowName, r1, g1, b1, r2, g2, b2, bold, underline, italics, [strikeout], [overline], [reverse])
- Sets current text format of selected window. This is a more convenient means to set all the individual features at once compared to using setFgColor(windowName, r,g,b), setBold(windowName, true), setItalics(windowName, true), setUnderline(windowName, true), setStrikeOut(windowName, true).
- See Also: getTextFormat()
- Parameters
- windowName
- Specify name of selected window. If empty string "" or "main" format will be applied to the main console
- r1,g1,b1
- To color text background, give number values in RBG style
- r2,g2,b2
- To color text foreground, give number values in RBG style
- bold
- To format text bold, set to 1 or true, otherwise 0 or false
- underline
- To underline text, set to 1 or true, otherwise 0 or false
- italics
- To format text italic, set to 1 or true, otherwise 0 or false
- strikeout
- (optional) To strike text out, set to 1 or true, otherwise 0 or false or simply no argument
- overline
- (optional) To use overline, set to 1 or true, otherwise 0 or false or simply no argument
- reverse
- (optional) To swap foreground and background colors, set to 1 or true, otherwise 0 or false or simply no argument
- Example
--This script would create a mini text console and write with bold, struck-out, yellow foreground color and blue background color "This is a test".
createMiniConsole( "con1", 0,0,300,100);
setTextFormat("con1",0,0,255,255,255,0,true,0,false,1);
echo("con1","This is a test")![]() Note: In versions prior to 3.7.0 the error messages and this wiki were wrong in that they had the foreground color parameters as r1, g1 and b1 and the background ones as r2, g2 and b2.
Note: In versions prior to 3.7.0 the error messages and this wiki were wrong in that they had the foreground color parameters as r1, g1 and b1 and the background ones as r2, g2 and b2.
setUnderline
- setUnderline(windowName, bool)
- Sets the current text font to underline/non-underline mode. If the windowName parameters omitted, the main screen will be used.
setUserWindowTitle
- setUserWindowTitle(windowName, text)
- sets a new title text for the UserWindow windowName
- Parameters
- windowName:
- Name of the userwindow
- text
- new title text
- See also: resetUserWindowTitle(), openUserWindow()
setUserWindowStyleSheet
- setUserWindowStyleSheet(windowName, markup)
- Applies Qt style formatting to the border/title area of a userwindow via a special markup language.
- Parameters
- windowName:
- Name of the userwindow
- markup
- The string instructions, as specified by the Qt Style Sheet reference.
- Note that when you dock the userwindow the border style is not provided by this
- Example
-- changes the title area style of the UserWindow 'myUserWindow'
setUserWindowStyleSheet("myUserWindow", [[QDockWidget::title{
background-color: rgb(0,255,150);
border: 2px solid red;
border-radius: 8px;
text-align: center;
}]])- See also: openUserWindow()
setWindow
- setWindow(windowName, name, [Xpos, Ypos, show])
- Changes the parent window of an element.
- Parameters
- windowName:
- Name of the userwindow which you want the element put in. If you want to put the element into the main window, use windowName "main".
- name
- Name of the element which you want to switch the parent from. Elements can be labels, miniconsoles and the embedded mapper. If you want to move the mapper use the name "mapper"
- Xpos:
- X position of the element. Measured in pixels, with 0 being the very left. Passed as an integer number. Optional, if not given it will be 0.
- Ypos:
- Y position of the element. Measured in pixels, with 0 being the very top. Passed as an integer number. Optional, if not given it will be 0.
- show:
- true or false to decide if the element will be shown or not in the new parent window. Optional, if not given it will be true.
- Example
setWindow("myuserwindow", "mapper")
-- This will put your embedded mapper in your userwindow "myuserwindow".setWindowWrap
- setWindowWrap(windowName, wrapAt)
- sets at what position in the line the will start word wrap.
- Parameters
- windowName:
- Name of the "main" console or user-created miniconsole which you want to be wrapped differently. If you want to wrap the main window, use windowName "main".
- wrapAt:
- Number of characters at which the wrap must happen at the latest. This means, it probably will be wrapped earlier than that.
- Example
setWindowWrap("main", 10)
display("This is just a test")
-- The following output will result in the main window console:
"This is
just a
test"setWindowWrapIndent
- setWindowWrapIndent(windowName, wrapTo)
- sets how many spaces wrapped text will be indented with (after the first line of course).
- Parameters
- windowName:
- Name of the "main" console or user-created miniconsole which you want to be wrapped differently. If you want to wrap the main window, use windowName "main".
- wrapTo:
- Number of spaces which wrapped lines are prefixed with.
- Example
setWindowWrap("main", 10)
setWindowWrapIndent("main", 3)
display("This is just a test")
-- The following output will result in the main window console:
"This is
just a
test"showCaptureGroups
- showCaptureGroups()
- Lua debug function that highlights in random colors all capture groups in your trigger regex on the screen. This is very handy if you make complex regex and want to see what really matches in the text. This function is defined in DebugTools.lua.
- Example
- Make a trigger with the regex (\w+) and call this function in a trigger. All words in the text will be highlighted in random colors.
showMultimatches
- showMultimatches()
- Lua helper function to show you what the table multimatches[n][m] contains. This is very useful when debugging multiline triggers - just doing showMultimatches() in your script will make it give the info. This function is defined in DebugTools.lua.
- Example
See How to use multimatches[n][m] for a more thorough explanation including examples.
showWindow
- showWindow(name)
- Makes a hidden window (label or miniconsole) be shown again.
- See also: hideWindow()
startMovie
- startMovie(label name)
- Starts the gif animation - if it was previously stopped or paused.
- Returns true
- See also: setMovie(), pauseMovie(), setMovieFrame(), setMovieSpeed()
- Parameters
- label name:
- name of the gif label
- Example
-- create a label with the name myMovie
createLabel("myMovie",0,0,200,200,0)
-- puts the gif on the label and animates it
setMovie("myMovie", getMudletHomeDir().."/movie.gif")
--stops the animation
pauseMovie("myMovie")
--restart the animation
startMovie("myMovie")showColors
- showColors([columns], [filterColor], [sort])
- shows the named colors currently available in Mudlet's color table. These colors are stored in color_table, in table form. The format is color_table.colorName = {r, g, b}.
- Parameters
- columns:
- (optional) number of columns to print the color table in.
- filterColor:
- (optional) filter text. If given, the colors displayed will be limited to only show colors containing this text.
- sort:
- (optional) sort colors alphabetically.
- Example
-- display as four columns:
showColors(4)
-- show only red colours:
showColors("red")The output for this is:
showGauge
- showGauge(gaugeName)
- shows the given gauge, in case it was hidden previously.
- See also: hideGauge(), createGauge()
- Parameters
- gaugeName:
- name of the gauge to show.
- Example
hideGauge("my gauge")
showGauge("my gauge")showToolBar
- showToolBar(name)
- Makes a toolbar (a button group) appear on the screen.
- Parameters
- name:
- name of the button group to display
- Example
showToolBar("my attack buttons")suffix
- suffix(text, [writingFunction], [foregroundColor], [backgroundColor], [windowName])
- Suffixes text at the end of the current line. This is similar to echo(), which also suffixes text at the end of the line, but different - echo() makes sure to do it on the last line in the buffer, while suffix does it on the line the cursor is currently on.
- Parameters
- text
- the information you want to prefix
- writingFunction
- optional parameter, allows the selection of different functions to be used to write the text, valid options are: echo, cecho, decho, and hecho.
- foregroundColor
- optional parameter, allows a foreground color to be specified if using the echo function using a color name, as with the fg() function
- backgroundColor
- optional parameter, allows a background color to be specified if using the echo function using a color name, as with the bg() function
- windowName
- optional parameter, allows the selection a miniconsole or the main window for the line that will be prefixed
setCommandBackgroundColor
- setCommandBackgroundColor([windowName], r, g, b, [transparency])
- Sets the background color for echo of commands. Colors are from 0 to 255 (0 being black), and transparency is from 0 to 255 (0 being completely transparent).
- Parameters
- windowName:
- (optional) name of the label/miniconsole/userwindow to change the background color on, or "main" for the main window.
- r:
- Amount of red to use, from 0 (none) to 255 (full).
- g:
- Amount of green to use, from 0 (none) to 255 (full).
- b:
- Amount of red to use, from 0 (none) to 255 (full).
- transparency:
- (optional) amount of transparency to use, from 0 (fully transparent) to 255 (fully opaque). Defaults to 255 if omitted.
- Example
-- make a red command background color in main console.
setCommandBackgroundColor(255,0,0,200)setCommandForegroundColor
- setCommandForegroundColor([windowName], r, g, b, [transparency])
- Sets the foreground color for echo of commands. Colors are from 0 to 255 (0 being black), and transparency is from 0 to 255 (0 being completely transparent).
- Parameters
- windowName:
- (optional) name of the label/miniconsole/userwindow to change the background color on, or "main" for the main window.
- r:
- Amount of red to use, from 0 (none) to 255 (full).
- g:
- Amount of green to use, from 0 (none) to 255 (full).
- b:
- Amount of red to use, from 0 (none) to 255 (full).
- transparency:
- (optional) amount of transparency to use, from 0 (fully transparent) to 255 (fully opaque). Defaults to 255 if omitted.
- Example
-- make a red command foreground color in main console.
setCommandForegroundColor(255,0,0,200)scrollDown
- scrollDown([windowName,] [lines])
- Scrolls down in window by a certain number of lines.
- See also: getScroll, scrollTo, scrollUp
- Parameters
- windowName:
- (optional) name of the window in which to scroll. Default is the main window.
- lines:
- (optional) how many lines to scroll by. Default is 1.
- Example
-- scroll down by 7 lines
scrollDown(7)scrollUp
- scrollUp([windowName,] [lines])
- Scrolls up in window by a certain number of lines.
- See also: getScroll, scrollTo, scrollDown
- Parameters
- windowName:
- (optional) name of the window in which to scroll. Default is the main window.
- lines:
- (optional) how many lines to scroll by. Default is 1.
- Example
-- scroll up by 7 lines
scrollUp(7)scrollTo
- scrollTo([windowName,] [lineNumber])
- Scrolls window to a specific line in the buffer.
- Parameters
- windowName:
- (optional) name of the window in which to scroll. Default is the main window.
- lineNumber:
- (optional) target line to scroll to, counting from the top of buffer or with negative numbers to count from the end of buffer. Default is the end of the buffer, to stop scrolling.
- See also: getScroll, scrollUp, scrollDown
- Example
-- scroll to line 42 in buffer
scrollTo(42)
-- start of session
scrollTo(0)
-- 20 lines ago
scrollTo(-20)
-- chat window to line 30
scrollTo("chat", 30)
-- stop scrolling main window
scrollTo()
-- stop scrolling chat window
scrollTo("chat")windowType
- typeOfWindow = windowType(windowName)
- Given the name of a window, will return if it's a label, miniconsole, userwindow or a commandline.
- See also
- createLabel(), openUserWindow()
- Parameters
- windowName:
- The name used to create the window element. Use "main" for the main console
- Returns
- Window type as string ("label", "miniconsole", "userwindow", or "commandline") or nil+error if it does not exist.
- Example
-- Create a Geyser label and and check its type
testLabel = Geyser.Label:new({name = "testLabel"})
display(windowType(testLabel.name)) -- displays "label"
-- the main console returns "miniconsole" because it uses the same formatting functions
display(windowType("main")) -- displays "miniconsole"
-- check for the existence of a window
local windowName = "this thing does not exist"
local ok, err = windowType(windowName)
if ok then
-- do things with it, as it does exist.
-- the ok variable will hold the type of window it is ("label", "commandline", etc)
else
cecho("<red>ALERT!! window does not exist")
end- Additional development notes
wrapLine
- wrapLine(windowName, lineNumber)
- wraps the line specified by lineNumber of mini console (window) windowName. This function will interpret \n characters, apply word wrap and display the new lines on the screen. This function may be necessary if you use deleteLine() and thus erase the entire current line in the buffer, but you want to do some further echo() calls after calling deleteLine(). You will then need to re-wrap the last line of the buffer to actually see what you have echoed and get your \n interpreted as newline characters properly. Using this function is no good programming practice and should be avoided. There are better ways of handling situations where you would call deleteLine() and echo afterwards e.g.:
selectString(line,1)
replace("")This will effectively have the same result as a call to deleteLine() but the buffer line will not be entirely removed. Consequently, further calls to echo() etc. sort of functions are possible without using wrapLine() unnecessarily.
- See Also: replace(), deleteLine()
- Parameters
- windowName:
- The miniconsole or the main window (use main for the main window)
- lineNumber:
- The line number which you'd like re-wrapped.
- Example
-- re-wrap the last line in the main window
wrapLine("main", getLineCount())
Discord Functions
<translate> All functions to customize the information Mudlet displays in Discord's rich presence interface. For an overview on how all of these functions tie in together, see our Discord scripting overview.</translate>
getDiscordDetail
- getDiscordDetail()
- <translate> Returns the text used for the Discord Rich Presence detail field. See Discord docs for a handy image reference on where the detail is shown.</translate>
<translate> See also: </translate> setDiscordDetail
- <translate> Example</translate>
print("<translate><!--T:130--> Discord detail is: </translate>".. getDiscordDetail())
getDiscordLargeIcon
- getDiscordLargeIcon()
- <translate> Returns the large icon name used for the Discord Rich Presence. See Discord docs for a handy image reference on where the large icon is shown.</translate>
<translate> See also: </translate> setDiscordLargeIcon
- <translate> Example</translate>
print("<translate><!--T:135--> Discord large icon is: </translate>".. getDiscordLargeIcon())
getDiscordLargeIconText
- getDiscordLargeIconText()
- <translate> Returns the text used as a tooltip for the large icon in the Discord Rich Presence. See Discord docs for a handy image reference on where the large icon is shown.</translate>
<translate> See also: </translate> setDiscordLargeIconText
- <translate> Example</translate>
print("<translate><!--T:140--> Discord large icon tooltip is: </translate>".. getDiscordLargeIconText())
getDiscordParty
- getDiscordParty()
- <translate> Returns the current and max party values used in the Discord Rich Presence. See Discord docs for a handy image reference on where the the party info is shown.</translate>
<translate> See also: </translate> setDiscordParty
- <translate> Example</translate>
local currentsize, maxsize = getDiscordParty()
print(string.format("<translate><!--T:145--> Discord party: %d out of %d</translate>", currentsize, maxsize))
getDiscordSmallIcon
- getDiscordSmallIcon()
- <translate> Returns the small icon name used for the Discord Rich Presence. See Discord docs for a handy image reference on where the small icon is shown.</translate>
<translate> See also: </translate> setDiscordSmallIcon
- <translate> Example</translate>
print("<translate><!--T:150--> Discord small icon is: </translate>".. getDiscordSmallIcon())
getDiscordSmallIconText
- getDiscordSmallIconText()
- <translate> Returns the text used as a tooltip for the small icon in the Discord Rich Presence. See Discord docs for a handy image reference on where the small icon is shown.</translate>
<translate> See also: </translate> setDiscordSmallIconText
- <translate> Example</translate>
print("<translate><!--T:155--> Discord small icon tooltip is: </translate>".. getDiscordSmallIconText())
getDiscordState
- getDiscordState()
- <translate> Returns the text used for the Discord Rich Presence state field. See Discord docs for a handy image reference on where the state is shown.</translate>
<translate> See also: </translate> setDiscordState
- <translate> Example</translate>
print("<translate><!--T:160--> Discord state is: </translate>".. getDiscordState())
getDiscordTimeStamps
- getDiscordTimeStamps()
- <translate>Returns the start/end Discord timestamps as set by setDiscordElapsedStartTime() and setDiscordRemainingEndTime().</translate>
<translate> See also: </translate> setDiscordElapsedStartTime, setDiscordRemainingEndTime
- <translate> Example</translate>
display(getDiscordTimeStamps())
resetDiscordData
- resetDiscordData()
- Reset Discord Rich Presence for current profile to the Mudlet default settings.
- Example
-- Use 'afk' emote in game, clear Discord party status and estimate return
send("afk")
resetDiscordData()
setDiscordState("Back in 15")
setDiscordRemainingEndTime(os.time(os.date("*t"))+(60 * 15))
setDiscordApplicationID
- setDiscordApplicationID(id)
- <translate> Set a custom Discord ID so Discord Rich Presence will show "Playing <your game>" instead of "Playing Mudlet". This function is intended for game authors. Note that you can also set it automatically over GMCP, no pre-installation of scripts required. This will currently (as of Mudlet 4.9.1) bypass the Discord privacy option "Enable Lua API" on future sessions if a non-empty id is specified. Returns true if the Discord application ID is in the correct format.</translate>
<translate> If you're a game author, you can register your game over at Discord to obtain the "client ID" to be used for this function. Once you do so, make sure to upload the games icon as an art asset under the name of server-icon.</translate>
<translate> Mudlet calls this the Application ID to avoid confusion with Mudlet being a game client - however Discord uses both Application ID and Client ID to refer to this detail (which seems to be an 18 digit number).</translate>
- <translate> Parameters </translate>
- id: <translate> (required) id as a string.</translate>

<translate> See also: </translate> setDiscordGame, usingMudletsDiscordID
- <translate> Example</translate>
-- <translate><!--T:169--> set the ID to Mudlets own as an example</translate>
setDiscordApplicationID("450571881909583884")![]() Note: <translate> So you do not have to remember that long number you can also reset to the default Mudlet ID by calling this function without an argument:</translate>
Note: <translate> So you do not have to remember that long number you can also reset to the default Mudlet ID by calling this function without an argument:</translate>
setDiscordApplicationID()
setDiscordDetail
- setDiscordDetail(text)
- <translate> Sets the text to be shown in the detail field of Discord Rich Presence. See Discord docs for a handy image reference on where the detail is shown. Note that this will overwrite the same information set by setDiscordGame().</translate>
<translate> See also: </translate> getDiscordDetail, setDiscordGame
![]() Note: <translate> To ensure privacy, the detail will only be shown if the Lua API is enabled and the detail is not hidden.</translate>
Note: <translate> To ensure privacy, the detail will only be shown if the Lua API is enabled and the detail is not hidden.</translate>
- <translate> Example</translate>
-- <translate><!--T:176--> set detail to your character name in-game, as an example</translate>
setDiscordDetail("Vadi")
setDiscordElapsedStartTime
- setDiscordElapsedStartTime(time)
- <translate> Sets the time to be shown for "## elapsed" field in Discord Rich Presence. See Discord docs for a handy image reference on where the elapsed time is shown.</translate>
- <translate> Parameters </translate>
- time: <translate> (required) time as a Unix time. To get the current Unix time in Lua, use
os.time(os.date("*t")).</translate>
<translate> See also: </translate> setDiscordRemainingEndTime
![]() Note: <translate> To ensure privacy, the time will only be shown if the Lua API is enabled and the time is not hidden.</translate>
Note: <translate> To ensure privacy, the time will only be shown if the Lua API is enabled and the time is not hidden.</translate>
- <translate> Example</translate>
-- <translate><!--T:184--> set the timer to start counting up from now:</translate>
setDiscordElapsedStartTime(os.time(os.date("*t")))
setDiscordGame
- setDiscordGame(text)
- <translate> Sets the given game to be shown in the "detail" field and the game's icon as the large icon in Discord Rich Presence. See Discord docs for a handy image reference on where the detail and large icon is shown. This is an alternative way of showing which game you're playing - a better way, if you're the game author, is to use GMCP (no pre-installation of scripts required) or setDiscordApplicationID().</translate>
<translate> Currently supported games are: Achaea, Aetolia, Imperian, Luminari, Lusternia, MidMUD, Starmourn, WoTMUD. To add a new game to the list, get in touch.</translate>
<translate> See also: </translate> setDiscordApplicationID
![]() Note: <translate> To ensure privacy, the game and icon will only be shown if the Lua API is enabled, and detail and large icon are set to show.</translate>
Note: <translate> To ensure privacy, the game and icon will only be shown if the Lua API is enabled, and detail and large icon are set to show.</translate>
- <translate> Example</translate>
setDiscordGame("WoTMUD")
setDiscordGameUrl
- setDiscordGameUrl([url], [name])
- Set or clear the game Discord invite URL via Lua. It has the same effect as the GMCP message External.Discord.Info.
![]() Note: This will update the Discord button on the main toolbar, and add an option in the Help menu.
Note: This will update the Discord button on the main toolbar, and add an option in the Help menu.
- Parameters
- url:
- (optional) URL of Discord invite
- name:
- (optional) Name of game
- Example
-- set Discord invite to CoffeeMUD
setDiscordGameUrl("https://discord.gg/HgDxtas", "CoffeeMUD")
-- remove the Discord invite
setDiscordGameUrl()
setDiscordLargeIcon
- setDiscordLargeIcon(iconName)
- <translate> Sets the large icon to be shown in Discord Rich Presence. See Discord docs for a handy image reference the icon is shown.</translate>
<translate> Icons supported by default in Mudlet: armor, axe, backpack, bow, coin, dagger, envelope, gem-blue, gem-green, gem-red, hammer, heart, helmet, map, shield, tome, tools, wand, wood-sword (icons credit). To add a new icon to the list, get in touch (the Discord limit is 150 icons).</translate>
<translate> If you're a game author, you can register your own game with Discord and upload your own icons instead of using the ones registered by Mudlet, see setDiscordApplicationID().</translate>
<translate> See also: </translate> getDiscordLargeIcon, setDiscordLargeIconText, setDiscordApplicationID
![]() Note: <translate> To ensure privacy, the icon will only be shown if the Lua API is enabled and the large icon is not hidden.</translate>
Note: <translate> To ensure privacy, the icon will only be shown if the Lua API is enabled and the large icon is not hidden.</translate>
- <translate> Example</translate>
setDiscordLargeIcon("coin")
setDiscordLargeIconText("<translate><!--T:198--> Fishing</translate>")
setDiscordState("<translate><!--T:199--> Fishing</translate>")
setDiscordLargeIconText
- setDiscordLargeIconText(text)
- <translate> Sets the tooltip for the large icon in the Discord Rich Presence. See Discord docs for a handy image reference the large icon is shown.</translate>
<translate> See also: </translate> setDiscordLargeIcon
![]() Note: <translate> To ensure privacy, the tooltip will only be shown if the Lua API is enabled, and large icon with the large icon tooltip is set to show.</translate>
Note: <translate> To ensure privacy, the tooltip will only be shown if the Lua API is enabled, and large icon with the large icon tooltip is set to show.</translate>
- <translate> Example</translate>
setDiscordLargeIcon("axe")
setDiscordLargeIconText("<translate><!--T:205--> Killing heterics</translate>")
setDiscordParty
- setDiscordParty(current, max)
- <translate> Sets the party information the Discord Rich Presence. See Discord docs for a handy image reference the party is shown.</translate>
- <translate> Parameters </translate>
- current: <translate> (required) current party amount.</translate>
- max: <translate> (optional) max party amount - if not provided, then the max is set to the current amount.</translate>
<translate> See also: </translate> getDiscordParty
![]() Note: <translate> To ensure privacy, the party will only be shown if the Lua API is enabled and the party information is not hidden.</translate>
Note: <translate> To ensure privacy, the party will only be shown if the Lua API is enabled and the party information is not hidden.</translate>
- <translate> Example</translate>
-- <translate><!--T:214--> show that 5 out of 10 people are in currently in the party</translate>
setDiscordParty(5, 10)
setDiscordRemainingEndTime
- setDiscordRemainingEndTime(time)
- <translate> Sets the time to be shown for "## remaining" field in Discord Rich Presence. See Discord docs for a handy image reference on where the remaining time is shown.</translate>
- <translate> Parameters </translate>
- time: <translate> (required) time as a Unix time. To get the current Unix time in Lua, use
os.time(os.date("*t")).</translate>
<translate> See also: </translate> setDiscordElapsedStartTime
![]() Note: <translate> To ensure privacy, the time will only be shown if the Lua API is enabled and the time is not hidden.</translate>
Note: <translate> To ensure privacy, the time will only be shown if the Lua API is enabled and the time is not hidden.</translate>
- <translate> Example</translate>
-- <translate><!--T:222--> set the timer to start counting down from an hour from now</translate>
setDiscordRemainingEndTime(os.time(os.date("*t"))+(60 * 60))
setDiscordSmallIcon
- setDiscordSmallIcon(iconName)
- <translate> Sets the small icon to be shown in Discord Rich Presence. See Discord docs for a handy image reference the icon is shown.</translate>
<translate> Icons supported by default in Mudlet: armor, axe, backpack, bow, coin, dagger, envelope, gem-blue, gem-green, gem-red, hammer, heart, helmet, map, shield, tome, tools, wand, wood-sword (icons credit). To add a new icon to the list, get in touch (the Discord limit is 150 icons).</translate>
<translate> If you're a game author, you can register your own game with Discord and upload your own icons instead of using the ones registered by Mudlet, see setDiscordApplicationID().</translate>
<translate> See also: </translate> getDiscordSmallIcon, setDiscordSmallIconText, setDiscordApplicationID
![]() Note: <translate> To ensure privacy, the icon will only be shown if the Lua API is enabled and the small icon is not hidden.</translate>
Note: <translate> To ensure privacy, the icon will only be shown if the Lua API is enabled and the small icon is not hidden.</translate>
- <translate> Example</translate>
setDiscordSmallIcon("envelope")
setDiscordSmallIconText("<translate><!--T:230--> Writing letters</translate>")
setDiscordState("<translate><!--T:231--> Writing letters</translate>")
setDiscordSmallIconText
- setDiscordSmallIconText(text)
- <translate> Sets the tooltip for the small icon in the Discord Rich Presence. See Discord docs for a handy image reference the small icon is shown.</translate>
<translate> See also: </translate> setDiscordSmallIcon
![]() Note: <translate> To ensure privacy, the tooltip will only be shown if the Lua API is enabled, and small icon with the small icon tooltip is set to show.</translate>
Note: <translate> To ensure privacy, the tooltip will only be shown if the Lua API is enabled, and small icon with the small icon tooltip is set to show.</translate>
- <translate> Example</translate>
setDiscordSmallIcon("map")
setDiscordSmallIconText("<translate><!--T:237--> Exploring</translate>")
setDiscordState
- setDiscordState(state)
- <translate> Sets the text to be shown in the state field of Discord Rich Presence. See Discord docs for a handy image reference on where the state is shown.</translate>
<translate> See also: </translate> getDiscordState, setDiscordDetail
![]() Note: <translate> To ensure privacy, the state will only be shown if the Lua API is enabled and the state is not hidden.</translate>
Note: <translate> To ensure privacy, the state will only be shown if the Lua API is enabled and the state is not hidden.</translate>
- <translate> Example</translate>
-- <translate><!--T:243--> set state to your current area</translate>
local currentarea = getRoomArea(getPlayerRoom())
local areaname = getAreaTableSwap()[currentarea]
setDiscordDetail(areaname)
usingMudletsDiscordID
- usingMudletsDiscordID()
- <translate> Returns true if the currently playing game is set to "Mudlet". You can change this with setDiscordApplicationID().</translate>
<translate> See also: </translate> setDiscordApplicationID
- <translate> Example</translate>
if usingMudletsDiscordID() then
print('<translate><!--T:248--> It is showing "Playing Mudlet" right now!</translate>')
end