Difference between revisions of "Manual:Introduction"
(introduce f function) |
|||
| (46 intermediate revisions by the same user not shown) | |||
| Line 3: | Line 3: | ||
{{#description2:Basic introduction to Mudlet, including aliases, variables, scripts, triggers, keybindings, timers, events, etc.}} | {{#description2:Basic introduction to Mudlet, including aliases, variables, scripts, triggers, keybindings, timers, events, etc.}} | ||
<translate> | <translate> | ||
| + | |||
| + | Thank you for choosing Mudlet. This page will help you get started with the basics and introduce you to the various screens and automation tools that Mudlet provides. Many areas of Mudlet have tool-tips displayed when you hover over a button or other element to provide more help. | ||
{{Manual:Connection_Window}} | {{Manual:Connection_Window}} | ||
| Line 8: | Line 10: | ||
{{Manual:Main_Window}} | {{Manual:Main_Window}} | ||
| − | = Automation and | + | {{Manual:General_Features}} |
| + | |||
| + | |||
| + | = Automation and Scripting = <!--T:3--> | ||
| + | |||
| + | == Game Rules ==<!--T:1--> | ||
<!--T:2--> | <!--T:2--> | ||
| Line 16: | Line 23: | ||
By including scripting support in Mudlet, we effectively give you the ability to create and utilize AI toolkits. However, '''we do not endorse or promote the usage of automation if it is prohibited in your game!''' Keep in mind that by cheating you can lessen the quality of gameplay for both your fellow players and yourself. | By including scripting support in Mudlet, we effectively give you the ability to create and utilize AI toolkits. However, '''we do not endorse or promote the usage of automation if it is prohibited in your game!''' Keep in mind that by cheating you can lessen the quality of gameplay for both your fellow players and yourself. | ||
| − | = | + | == Automation Features == |
<!--T:4--> | <!--T:4--> | ||
| Line 24: | Line 31: | ||
; [[#Aliases|Aliases]] | ; [[#Aliases|Aliases]] | ||
: User-defined text input, which is converted into a different, usually longer input before being sent to the game. | : User-defined text input, which is converted into a different, usually longer input before being sent to the game. | ||
| − | : e.g. typing | + | : e.g. typing <code>gg</code> to have <code>get gold from ground;put gold in bag</code> be sent to the game. |
<!--T:9--> | <!--T:9--> | ||
; [[#Variables|Variables]] | ; [[#Variables|Variables]] | ||
| − | : allow the user to store text | + | : allow the user to store text, numbers, tables, etc. for easier use inside scripts. |
<!--T:7--> | <!--T:7--> | ||
; [[#Triggers|Triggers]] | ; [[#Triggers|Triggers]] | ||
: execute user-defined commands upon receiving specific out from the game, | : execute user-defined commands upon receiving specific out from the game, | ||
| − | : e.g. | + | : e.g. the game sends: <code>You see Elyssa standing here.</code> and Mudlet automatically sends <code>wave to Elyssa</code> back to the game |
<!--T:6--> | <!--T:6--> | ||
; [[#Keybindings|Keybindings]] | ; [[#Keybindings|Keybindings]] | ||
: also known as hotkeys, allow executing certain user-defined commands by simultaneously pressing a specific combination of keys | : also known as hotkeys, allow executing certain user-defined commands by simultaneously pressing a specific combination of keys | ||
| − | :e.g. pressing | + | :e.g. pressing <code>CTRL+H</code> to send <code>say Hello Miyuki!</code> to the game or play 'La Marseillaise' |
<!--T:8--> | <!--T:8--> | ||
; [[#Timers|Timers]] | ; [[#Timers|Timers]] | ||
: delay the execution of a command or execute it after a specified period of time. | : delay the execution of a command or execute it after a specified period of time. | ||
| − | : e.g. | + | : e.g. Display a reminder to visit the questmaster after 30 minutes. |
| + | |||
| + | ; [[#Scripts|Scripts]] | ||
| + | : write a custom GUI or reusable functions | ||
| + | : Make use of Mudlet's Lua capabilities and [[Manual:Technical Manual|API]]. | ||
<!--T:10--> | <!--T:10--> | ||
| − | ; [[Manual:Event_Engine|Events]] | + | ; [[Manual:Event_Engine|Events (Advanced)]] |
: allow the user to make triggers for specific events like when Mudlet has connected to the game, or even user-defined events to use in complex system making. | : allow the user to make triggers for specific events like when Mudlet has connected to the game, or even user-defined events to use in complex system making. | ||
| Line 53: | Line 64: | ||
<!--T:12--> | <!--T:12--> | ||
| − | + | {{note}} Mudlet users tend to use the word ''script'' interchangeably. A script is a section of code that performs a task. Scripts can be used in aliases, timers, triggers, etc.. and do not only have to be written in the '''Script Editor / Scripts''' section. Although once you become a more advanced script writer you will find ways to reuse code by using ''functions'' which are typically written in the '''Scripts''' section. | |
| + | Keep on reading for an introduction to each of these Mudlet features. | ||
| + | = A Quick Note on Combining Text = | ||
| + | |||
| + | Throughout this introduction (and the wiki itself) you will see various methods to combine two ''strings'' (words, variables, characters, etc) together. One commonly used method is by using two periods, ie. <code>..</code> to concatenate things together, another method is using the ''function'' <code>f</code>. You can [[Manual:Technical_Manual#f|read more about this now]], or just follow along with the introduction and you will get familiar with this concept as we progress. | ||
</translate> | </translate> | ||
| − | |||
<translate> | <translate> | ||
| Line 64: | Line 78: | ||
<!--T:14--> | <!--T:14--> | ||
| − | Aliases are the most basic way of automating the gameplay - you can use aliases to shorten the amount of typing you do. Aliases convert one command into longer or multiple commands. Aliases are defined in the Script Editor (Alt+E) under Aliases ( | + | Aliases are the most basic way of automating the gameplay - you can use aliases to shorten the amount of typing you do. Aliases convert one command into longer or multiple commands. Aliases are defined in the Script Editor (Alt+E) under Aliases (Ctrl+2). See more detailed info here: [[Manual:Alias Engine|Manual:Alias Engine]] |
To shorten multiple commands; | To shorten multiple commands; | ||
| Line 75: | Line 89: | ||
put gold in bag | put gold in bag | ||
| − | saving you from having to type both of these lines every time you | + | saving you from having to type both of these lines every time you see some gold. See how you can create an alias like this in the next section. |
== Making an Alias == <!--T:21--> | == Making an Alias == <!--T:21--> | ||
<!--T:22--> | <!--T:22--> | ||
| − | To make our <code>gg</code> alias open the '''Script Editor''' (Alt+E) and click on the '''Aliases''' button ( | + | To make our <code>gg</code> alias open the '''Script Editor''' (Alt+E) and click on the '''Aliases''' button (Ctrl+2), and then click on the '''Add''' button (Ctrl+N). This will make a new blank alias for you and we will fill in the details. |
| − | [[File:New-alias-creation.png| | + | [[File:New-alias-creation.png|800px|center|A new blank alias.]] |
<!--T:23--> | <!--T:23--> | ||
The '''Name:''' field is optional - it’s mainly used for the alias list on the left as an easy way to distinguish between all of the aliases you will likely write. Let's name it <code>Get gold</code> for now. | The '''Name:''' field is optional - it’s mainly used for the alias list on the left as an easy way to distinguish between all of the aliases you will likely write. Let's name it <code>Get gold</code> for now. | ||
| − | The '''Pattern:''' field is where you type a regex pattern to describe the command you'll enter to make your new alias spring into action. Our alias pattern is <code>gg</code> which will perform the larger get and put commands. Since this is a regex pattern though, we will use <code>^gg$</code>. More on | + | The '''Pattern:''' field is where you type a regex pattern to describe the command you'll enter to make your new alias spring into action. Our alias pattern is <code>gg</code> which will perform the larger get and put commands. Since this is a regex pattern though, we will use <code>^gg$</code>. More on this later ([[Regex|or read about it now here]]). |
The '''Command:''' field is where we put our larger commands. Here we put our two commands, <code>get gold;;put gold in bag</code>. The semi-colon separates the line into two commands to send to the game. | The '''Command:''' field is where we put our larger commands. Here we put our two commands, <code>get gold;;put gold in bag</code>. The semi-colon separates the line into two commands to send to the game. | ||
| − | [[File:Simple-alias.png| | + | [[File:Simple-alias.png|800px|center|gg alias with name, pattern and commmand]] |
Click the '''save''' button and close the Script Editor window. Now when you type <code>gg</code> into the command line, Mudlet will send <code>get gold;;put gold in bag</code>. | Click the '''save''' button and close the Script Editor window. Now when you type <code>gg</code> into the command line, Mudlet will send <code>get gold;;put gold in bag</code>. | ||
| Line 102: | Line 116: | ||
Mudlet uses Perl regular expression aliases. [[Regex]] is a special way of matching patterns of words. For the beginners it is enough to think of them as a general way to specify the words itself and their placement within the line. For basic aliases know that the character <code>^</code> symbolizes the beginning of the line and the character <code>$</code> symbolizes the end of the line. | Mudlet uses Perl regular expression aliases. [[Regex]] is a special way of matching patterns of words. For the beginners it is enough to think of them as a general way to specify the words itself and their placement within the line. For basic aliases know that the character <code>^</code> symbolizes the beginning of the line and the character <code>$</code> symbolizes the end of the line. | ||
| − | If you want to make an alias <code>tw</code> that sends the command <code>take weapon</code>, you don’t have to care about placement or pattern matching in general. All you need to do is fill <code>^tw$</code> in the '''Pattern''' field and type | + | If you want to make an alias <code>tw</code> that sends the command <code>take weapon</code>, you don’t have to care about placement or pattern matching in general. All you need to do is fill <code>^tw$</code> in the '''Pattern''' field and type <code>take weapon</code> in the '''Command''' field, then save. If we didn't do this then sending the command <code>twiddle</code> would match because they both contain the letters 'tw'. |
| − | Some basic examples can be found on the [[Regex]] page. More advanced usage will be described | + | Some basic examples can be found on the [[Regex]] page. More advanced usage will be described throughout the manual. |
== Alias Scripts == <!--T:15--> | == Alias Scripts == <!--T:15--> | ||
| Line 137: | Line 151: | ||
Now typing <code>quest</code> on the command line will execute the script and gather all the ingredients to brew up the potion. | Now typing <code>quest</code> on the command line will execute the script and gather all the ingredients to brew up the potion. | ||
| − | This example forgoes using the '''Command''' field and instead uses the larger Lua script area below it. It makes use of a few Mudlet Lua functions to send the commands to the game and performs the same thing as our simple example of getting gold does; notably the <code>send</code> function. We could thus turn our get gold example into this; | + | This example forgoes using the '''Command''' field and instead uses the larger Lua script area below it. It makes use of a few Mudlet Lua functions to send the commands to the game and performs the same thing as our simple example of getting gold does; notably the <code>send</code> function. More on this later ([[Manual:Introduction#The_SEND_function|or read about it now here]]). We could thus turn our get gold example into this; |
send("get gold") | send("get gold") | ||
| Line 154: | Line 168: | ||
In the '''Name:''' field, call it | In the '''Name:''' field, call it | ||
| − | + | Targeting system | |
In the '''Pattern:''' field, place the following: | In the '''Pattern:''' field, place the following: | ||
<!--T:28--> | <!--T:28--> | ||
| − | + | ^t (.+)$ | |
<!--T:29--> | <!--T:29--> | ||
| Line 177: | Line 191: | ||
Our script does the following; | Our script does the following; | ||
| − | * assigns a variable called <code>target</code> with the value of <code>matches[2]</code>. <code>matches[2]</code> comes from the pattern matching [[Regex]] is performing and capturing for you. | + | * assigns a variable called <code>target</code> with the value of <code>matches[2]</code>. <code>matches[2]</code> comes from the pattern matching [[Regex]] is performing and capturing for you. More on variables later (or read about [[Manual:Lua_API|global variables here]]). |
| − | * sends a notification line (only to you on in the main screen, not to the game) via the <code>echo</code> function showing that the variable <code>target</code> now contains whatever matched when you typed in the alias <code>t</code> | + | * sends a notification line (only to you on in the main screen, not to the game) via the <code>echo</code> function showing that the variable <code>target</code> now contains whatever matched when you typed in the alias <code>t</code>. More about the echo function later ([[Manual:Introduction#The_ECHO_function|or read about it now here]]). |
{{note}} You can also </code>echo</code> lines that are coloured by using <code>cecho</code> (coloured echo) as in the example screenshot. See a list of [[Manual:UI_Functions#showColors|all available colours here]]. | {{note}} You can also </code>echo</code> lines that are coloured by using <code>cecho</code> (coloured echo) as in the example screenshot. See a list of [[Manual:UI_Functions#showColors|all available colours here]]. | ||
| Line 186: | Line 200: | ||
<!--T:37--> | <!--T:37--> | ||
| − | That's it - whenever you use alias <code>t</code>, your target will be remembered in the <code>target</code> variable. | + | That's it - whenever you use alias pattern <code>t</code>, your target will be remembered in the <code>target</code> variable. |
<!--T:38--> | <!--T:38--> | ||
| Line 206: | Line 220: | ||
<!--T:43--> | <!--T:43--> | ||
| − | This alias will dirt kick the target when you type in ''dk''. Feel free to adjust the | + | This alias will dirt kick the target when you type in ''dk''. Feel free to adjust the alias pattern and script as you see fit. |
How about a healing function? | How about a healing function? | ||
| Line 237: | Line 251: | ||
<translate> | <translate> | ||
| − | == Variables | + | == Built-in aliases == <!--T:183--> |
| + | |||
| + | <!--T:184--> | ||
| + | The following aliases are available by default in new Mudlet profiles. | ||
| + | |||
| + | <!--T:185--> | ||
| + | {| class="wikitable" | ||
| + | |- | ||
| + | ! Alias !! Description !! Examples | ||
| + | |- | ||
| + | | lua || Run Lua code from the input line. || lua print("hello")<br>lua 2+2<br>lua clearWindow() | ||
| + | |- | ||
| + | | `echo || Simulate text from the game to test your triggers.<br>You can use $ for a new line. || `echo You see a rabbit cross the road.<br>`echo line1$line2 | ||
| + | |} | ||
| + | |||
| + | <!--T:186--> | ||
| + | If an alias on the list isn't working for you - try copying it from a new profile, since existing profiles will not get new aliases as they're introduced to Mudlet. | ||
| + | |||
| + | = Variables = <!--T:45--> | ||
<!--T:46--> | <!--T:46--> | ||
| − | Variables are containers for data. In Lua, they can store numbers or | + | Variables are containers for data. In Mudlet's scripting language (Lua), they can store numbers, words, booleans (true or false) or tables. You can use variables to store important information like how much gold do you have, your hit points or an enemy target like described in our aliases introduction. |
<!--T:47--> | <!--T:47--> | ||
| − | The syntax for making a variable remember a number is the following - create them in the Script | + | The syntax for making a variable remember a number is the following - you can create them directly in the '''Script Editor''' (Alt+E) in a '''new script''' (Ctrl+3): |
<syntaxhighlight lang="lua">variable = 1234</syntaxhighlight> | <syntaxhighlight lang="lua">variable = 1234</syntaxhighlight> | ||
| Line 249: | Line 281: | ||
Or to make it remember some text: | Or to make it remember some text: | ||
<syntaxhighlight lang="lua">my_name = "Bob"</syntaxhighlight> | <syntaxhighlight lang="lua">my_name = "Bob"</syntaxhighlight> | ||
| + | |||
| + | As we touched on in the alias introduction, variables can also be made directly when performing an alias or matching a trigger. | ||
<!--T:49--> | <!--T:49--> | ||
| − | It | + | It will then appear in the '''Variables''' view, like so: |
<!--T:50--> | <!--T:50--> | ||
| Line 257: | Line 291: | ||
</translate> | </translate> | ||
| − | {{note | + | {{note}} The variables view doesn't automatically refresh, but it can be refreshed by clicking the '''Variables''' button. |
<translate> | <translate> | ||
<!--T:51--> | <!--T:51--> | ||
You can also do basic maths easily, for example: | You can also do basic maths easily, for example: | ||
| + | |||
| + | hp = 100 + 25 -- hp now equals 125 | ||
| + | hp = hp * 2 -- the value of hp multiplied by 2 | ||
<!--T:52--> | <!--T:52--> | ||
| − | To concatenate strings together, you can use the .. expression: | + | To concatenate strings together, you can use the <code>..</code> expression: |
| − | <syntaxhighlight lang="lua">my_full_name = "Bob" .. " the Builder"</syntaxhighlight> | + | <syntaxhighlight lang="lua">my_full_name = "Bob " .. "the Builder"</syntaxhighlight> |
<!--T:53--> | <!--T:53--> | ||
| Line 286: | Line 323: | ||
<!--T:57--> | <!--T:57--> | ||
| − | While you can create variables in the Variables view, remember that they won't be saved when Mudlet shuts down - if you'd like them to be more permanent, create scripts with the variables instead. | + | {{note}} While you can create variables in the Variables view, remember that they won't be saved when Mudlet shuts down - if you'd like them to be more permanent, create scripts with the variables instead. [[Manual:Using Variables in Mudlet|More advanced information on variables is available here.]] |
| − | = | + | == String Interpolation == |
| − | + | String Interpolation is a fancy term for inserting a variable name into the string itself using placeholder syntax. This method uses the shorthand <code>f</code> function, which is best shown with some examples ([[Manual:Using_Variables_in_Mudlet#String_Interpolation_-_the_f_function|further reading here]]). | |
| − | + | <syntaxhighlight lang="lua"> | |
| − | + | gold = 5 | |
| − | + | echo(f("I have {gold} gold coins.")) | |
| − | + | </syntaxhighlight> | |
| − | + | ||
| − | + | You can see we added the <code>f</code> function to the echo and wrapped the variable named <code>gold</code> with curly parentheses. This will display in exactly the same way as: | |
| − | + | ||
| − | + | <syntaxhighlight lang="lua"> | |
| − | + | gold = 5 | |
| − | + | echo("I have " .. gold .. " gold coins.")) | |
| − | + | </syntaxhighlight> | |
| − | |||
| − | |||
| − | |||
| − | |||
| − | |||
| − | |||
| − | |||
| − | |||
| − | |||
| − | |||
| − | |||
| − | |||
| − | |||
| − | |||
| − | |||
| − | |||
| − | |||
| − | |||
| − | |||
| − | |||
| − | |||
| − | |||
| − | |||
| − | |||
| − | |||
| − | |||
| − | |||
| − | |||
| − | |||
| − | |||
| − | |||
| − | |||
| − | |||
| − | |||
| − | |||
| − | |||
| − | |||
| − | |||
| − | |||
| − | |||
| − | |||
| − | |||
| − | |||
| − | |||
| − | |||
| − | |||
| − | |||
| − | |||
| − | |||
| − | |||
| − | + | You can use either method and decide which is best for you. You will see both types used throughout this manual. | |
| − | = | + | = The <code>send</code> function = <!--T:58--> |
<!--T:59--> | <!--T:59--> | ||
| − | To send a command to the game, you can use the send() function. Data inside the quotes is sent to the game. | + | To send a command to the game from a script, you can use the send() function. Data inside the quotes is sent to the game. |
<!--T:60--> | <!--T:60--> | ||
| Line 367: | Line 354: | ||
<!--T:61--> | <!--T:61--> | ||
If you’d like to include variables in the send command, you need to prefix and suffix them with two dots outside the quotes, like this: | If you’d like to include variables in the send command, you need to prefix and suffix them with two dots outside the quotes, like this: | ||
| − | <syntaxhighlight lang="lua">send("My | + | <syntaxhighlight lang="lua">send("My target is " .. target .. ". What's yours?")</syntaxhighlight> |
<!--T:62--> | <!--T:62--> | ||
| Line 389: | Line 376: | ||
<syntaxhighlight lang="lua">sendAll("attack", "cast magic missile")</syntaxhighlight> | <syntaxhighlight lang="lua">sendAll("attack", "cast magic missile")</syntaxhighlight> | ||
| − | = | + | = The <code>echo</code> function = <!--T:65--> |
<!--T:66--> | <!--T:66--> | ||
| − | To | + | To show text to yourself you can use the <code>echo()</code> function from a script. This does not send any commands to the game, it is simply a way to give yourself visual feedback. For example, the following code will display "Time to eat dinner!" on your screen: |
<!--T:67--> | <!--T:67--> | ||
| Line 405: | Line 392: | ||
<!--T:69--> | <!--T:69--> | ||
| − | If you'd like to include a new line in your text, insert | + | If you'd like to include a new line in your text, insert <code>\n</code> for it: |
<!--T:70--> | <!--T:70--> | ||
| Line 418: | Line 405: | ||
</syntaxhighlight> | </syntaxhighlight> | ||
| + | Coloured echoes are performed with the <code>cecho</code> function and using html-like colour tags. | ||
| + | |||
| + | cecho("<blue>My target is now: <red>" .. target .. "<reset>\n") | ||
| + | There are also [[Manual:Lua_Functions#decho|decho]] and [[Manual:Lua_Functions#hecho|hecho]] functions which can use RGB or hexadecimal colour codes. You can read more about them in the [[Manual:Lua_Functions|Mudlet API]]. | ||
= Seeing errors in your code = <!--T:72--> | = Seeing errors in your code = <!--T:72--> | ||
| Line 430: | Line 421: | ||
<!--T:75--> | <!--T:75--> | ||
| − | When you type something in that doesn't make sense to Lua, it's called a | + | When you type something in that doesn't make sense to Lua, it's called a [http://en.wikipedia.org/wiki/Syntax_error syntax error]. Mudlet will realize this and show you a little ladybug, and also tell you on which line the mistake is. Here's an example: |
<!--T:76--> | <!--T:76--> | ||
| Line 436: | Line 427: | ||
<!--T:77--> | <!--T:77--> | ||
| − | The | + | The <code>echo()</code> function on line 3 is missing a closing bracket - every bracket in Lua that's not green needs to be closed. Mudlet showed you a ladybug symbol on the alias, to indicate that the alias has a problem. It also showed you that the ( bracket should be closed on line 3. To fix this, you'd add the <code>)</code>, save, and the warning will disappear. |
| − | |||
| − | |||
== Runtime errors aka Errors View == <!--T:78--> | == Runtime errors aka Errors View == <!--T:78--> | ||
<!--T:79--> | <!--T:79--> | ||
| − | Another type of mistake is when what you typed in makes sense to Lua when you typed it in, but when it's time for code to be actually run, something wrong happens. For example, you asked Lua to | + | Another type of mistake is when what you typed in makes sense to Lua when you typed it in, but when it's time for code to be actually run, something wrong happens. For example, you asked Lua to <code>eecho("hey!")</code> - this is valid, you typed it in right, but there is one problem - <coded>eecho</code> doesn't exist. So when you run the alias, nothing actually happens. Why? |
<!--T:80--> | <!--T:80--> | ||
| − | Mudlet puts all problems that happen when things are run into the Errors view. It is hidden by default, open it | + | Mudlet puts all problems that happen when things are run into the Errors view. It is hidden by default, open it from the '''Script Editor''' (Alt+E) and pressing the exclamation '''Error button''' (Ctrl+8). This is where the error is logged by default - not in your main window, so you aren't spammed when you make a mistake in a piece of code that happens very often. |
| + | |||
| + | {{note}} If you do wish to see the errors in your main window you can change your preferences (Alt+P) (Preferences -> Main display -> Echo Lua errors to the main console). | ||
<!--T:81--> | <!--T:81--> | ||
| Line 452: | Line 443: | ||
<!--T:82--> | <!--T:82--> | ||
| − | [[File: | + | [[File:Buggy alias.png|800px|center]] |
<!--T:83--> | <!--T:83--> | ||
| − | Let's analyse the message that's shown to us. | + | Let's analyse the message that's shown to us. <code>object:<chat></code> is the Mudlet name you gave to the thing which errored. <code>function</code> will tell you <code>Alias</code>, <code>Trigger</code>, <code>Script</code> or something else - this helps you locate the problematic item in question. |
<!--T:84--> | <!--T:84--> | ||
| − | Next red line is the actual error: it's saying that on | + | Next red line is the actual error: it's saying that on line 1, <code>eecho</code> is a <code>nil value</code>. In Lua, ''nil'' means doesn't exist. Hence what it's telling you is that <code>eecho</code> does not actually exist! Change it to <code>echo</code>, run it again, and there will be no errors. |
<!--T:85--> | <!--T:85--> | ||
| − | + | As you tinker with Mudlet you will become more familiar with the errors shown and be able to quickly debug your scripts. | |
| − | |||
| + | {{note}} If you need help with a script you can also ask on our friendly [https://discordapp.com/invite/kuYvMQ9 Discord server]. | ||
</translate> | </translate> | ||
| − | |||
<translate> | <translate> | ||
| Line 472: | Line 462: | ||
<!--T:87--> | <!--T:87--> | ||
| − | Triggers are an automation feature offered in | + | Triggers are an automation feature offered in most game clients. They help you respond quicker to a particular situation and generally make things more convenient for you since you need to do less manual work. Your triggers can perform all the repetitive tasks for you like eating and drinking or keeping spells maintained. |
<!--T:88--> | <!--T:88--> | ||
| − | The way a trigger works is simple | + | The way a trigger works is simple - you define a response to an incoming line from the game. The incoming line will need to match the ''trigger pattern'' and the response will be your script (or some other feature available in Mudlet like playing sounds). When the trigger "sees" this text in the game output, it will run the commands you have selected. |
| + | |||
| + | The trigger window is similar to the Alias window in that you need fill in the three main elements; trigger name, trigger pattern and trigger response (a command, script, sound, etc). | ||
<!--T:89--> | <!--T:89--> | ||
| − | + | == Example - Basic Pickup Trigger == | |
| + | |||
| + | Scenario: whenever you see gold laying on the ground you want to pick it up | ||
<!--T:90--> | <!--T:90--> | ||
| − | # | + | # In the '''Name:''' field, type <code>pickup gold automatically</code>. Remember this is an arbitrary name that helps you identify it in the trigger list on the left. |
| − | # | + | # Decide on the text the game sends and how you want to react. We notice that every time there is gold on the ground the game sends: |
| − | |||
| − | + | Some gold has been dropped here. | |
| − | |||
| − | < | + | # Type <code>Some gold has been dropped here.</code> in the data field titled "1". This is the ''trigger pattern'' section that Mudlet will respond to. Check the trigger drop-down type on the right of the line says "substring" to match the phrase on any line received from the game |
| − | + | # Now you type <code>get gold;;put gold in bag</code> in the '''Command''' field. This will be the command that the trigger will send to your game whenever the trigger fires. | |
| + | # Finally click "Save Item" to save your gold pickup trigger. The blue checkbox icon in front of the trigger name (in the trigger tree on the left side) gets checked. The trigger is now activated. Drop some gold on the ground and look around. Did you automatically pick it back up? | ||
| − | <!--T: | + | <!--T:209--> |
| − | + | [[File:Trigger-example-1.png|1000px|thumb|center]] | |
| − | + | {{note}} Trigger pattern type 'exact match' or 'start of line' would also be appropriate here. See more information on the [[Manual:Trigger_Engine#Pattern_Matching_Types|different trigger types here]]. | |
| − | |||
| + | <!--T:91--> | ||
| + | As the trigger is active, each time the phrase <code>Some gold has been dropped here.</code> appears in the game output your trigger will issue the command <code>get gold</code> and <code>put gold in bag</code> automatically. It will repeat this as long as the trigger stays active. | ||
| + | == Disabling Triggers == | ||
| − | + | When you want to stop a trigger from responding to game output simply select the trigger from the list and then click on the padlock icon to deactivate it. The check mark will vanish and the trigger will stop firing until you re-enable it again via the padlock icon. | |
| − | <!--T: | + | <!--T:92--> |
| − | You can also | + | == Trigger Groups == |
| + | You can also put triggers in a group via the '''Add Group''' button and lock a group of triggers or an entire trigger branch. If you do that, all triggers in this group or branch will be locked until you remove the lock again. The locking starts from the root of the tree down to the end. As soon as a lock is met the trigger engine will skip the locked branch. Locking and unlocking branches is one of the most common actions you have to take care of when playing. For example, you can turn on your defensive triggers when engaging into a battle and you turn them off afterwards, or you turn on your harvesting triggers only when you are going to harvest. | ||
| − | + | [[File:Locked-triggers.png|800px|center]] | |
| − | |||
| − | + | Above, the defensive triggers are active but the harvest triggers are inactive. | |
| − | |||
| − | |||
| − | |||
| − | |||
| − | |||
| − | |||
| − | <!--T: | + | <!--T:93--> |
| − | + | == Highlighting of Trigger Patterns == | |
| − | |||
| − | |||
| − | + | When starting out it is helpful to use Mudlet's built-in highlight triggers to highlight the text that has been a match for a trigger (trigger pattern match) to get the hang of the different trigger and pattern types. Click on the '''highlight trigger''' option and pick a foreground and a background color that you like to highlight your trigger with. When the trigger matches it automatically highlight its pattern. It is a quick and easy way of highlighting words that are important to you at the moment. You don’t have to know anything about scripting, regular expressions, etc to use highlight triggers. Just type in the word you like to be highlighted, select appropriate colors, save the new trigger and activate it. | |
| − | |||
| − | + | [[File:Highlight example 2.png|1000px|center]] | |
| − | |||
| − | < | + | <code>Some gold has been dropped here.</code> will be highlighted in red, with a yellow background. |
| − | |||
| − | |||
| − | + | == Further Reading == | |
| − | |||
| − | + | * Triggers can get quite advanced and further examples with triggers can be found on the [[Regex#Trigger_Examples|regex examples page]]. | |
| − | + | * To read more about ''trigger pattern'' matching types, [[Manual:Trigger_Engine#Pattern_Matching_Types|read this part of the manual]]. | |
| − | + | = Keybindings = <!--T:136--> | |
| − | |||
| − | |||
| − | |||
| − | |||
| − | + | {{note}} [https://forums.mudlet.org/viewtopic.php?t=2853 A basic number-pad movement keybinding package can be found on the forums]. | |
| − | |||
| − | <!--T: | + | <!--T:137--> |
| − | + | Keybindings (also known as hotkeys or macros) allow you to press a button to execute a script and are in many respects very similar to aliases. However, instead of typing in what you want to be done (maybe including additional parameters) and pressing Enter, you simply hit a single key (or combination of keys) to let Mudlet do the work. | |
| − | |||
| − | |||
| − | <!--T: | + | <!--T:138--> |
| − | + | Open the '''Script Editor''' (Alt+E) and click the '''Keybindings''' button (Ctrl+5). The keybinding window is similar to the Alias window in that you need fill in the three main elements; keybinding name, keybinding (the actual keypress combination) and keybinding response (the command or script). | |
| − | + | [[File:New-keybinding.png|800px|center]] | |
| − | |||
| − | == | + | == Example - Number Pad Movement == |
| + | You wish to use the number pad for moving around in game instead of having type north, south, east and west. | ||
| − | + | You have decided, number pad 8 will be north, south will be number pad 2, east is number pad 6 and west is number pad 4. | |
| − | |||
| − | + | Create a new keybinding and in the '''Name:''' field put | |
| − | |||
| − | |||
| − | + | North | |
| − | |||
| − | + | '''Command:''' will be the exact command you want to substitute for your keypress. In this case the command is north. | |
| − | |||
| − | |||
| − | + | north | |
| − | |||
| − | + | '''Keybinding:''' is the actual key combination to set. Click the '''Grab New Key''' button to the right of this field and hit the number pad 8 on your keyboard. | |
| − | |||
| − | + | Save your new keybinding. | |
| − | |||
| − | |||
| − | + | [[File:New-keybinding-north.png|800px|center]] | |
| − | [[File: | ||
| − | + | {{note}} When saving a keybinding, the symbol for unsaved items disappears and makes way for a little blue checkbox. If this box is checked the keybinding is active. If the blue box is empty, the keybinding is deactivated and will not work until you press the activate toggle padlock icon. | |
| − | |||
| − | + | {{note}} Keybindings can also be in groups, just like aliases and triggers. | |
| − | |||
| − | + | Continue this same procedure for south, east and west. | |
| − | |||
| + | == Example - Target System == | ||
| + | Let's build on the targetting system we created during the alias tutorial. | ||
| + | Scenario: you regularly fight goblins. They tend to get the jump on you with a surprise attack so you have decided it's quicker to hit a keybinding than typing out <code>t goblin</code> in the midst of battle. But you also don't want to lose the target you were tracking after the goblin fight is over. | ||
| − | + | You want two keybindings to instantly set your target to one or the other. You have decided on Ctrl+G for targetting goblins, Ctrl+O for reverting to the old target. | |
| + | We need to use the Lua script section as this is not a basic game command. | ||
| + | ==== Part 1 ==== | ||
| − | + | Create a new keybinding and in the '''Name:''' field put | |
| − | |||
| − | + | Target Goblins | |
| − | |||
| + | '''Command:''' will be left blank as we will utilise the script section. | ||
| − | < | + | '''Keybinding:''' is the actual key combination to set. Click the '''Grab New Key''' button to the right of this field and hit the <code>Ctrl</code> and <code>g</code> keys. |
| − | |||
| + | In the script section we will modify our targetting script slightly to save an old target. | ||
| − | + | oldTarget = target or "not set" | |
| − | + | target = "goblin" | |
| + | echo("My target is now: " .. target .. " (old target: " .. oldTarget .. ")\n") | ||
| + | Save your new keybinding. | ||
| − | + | [[File:Keybind-target-goblin.png|800px|center]] | |
| − | |||
| − | |||
| + | What does this script do? | ||
| + | * we set a variable <code>oldTarget</code> to an existing target set with the <code>t</code> alias, but if that's not set we will use <code>not set</code> as a placeholder to remind us | ||
| + | * we set the variable <code>target</code> to <code>goblin</code> | ||
| + | * we echo our change as a notification | ||
| − | + | === Part 2 === | |
| − | |||
| + | Create another keybinding and in the '''Name:''' field put | ||
| + | Target Old Target | ||
| + | '''Command:''' will be left blank as we will utilise the script section. | ||
| − | + | '''Keybinding:''' is the actual key combination to set. Click the '''Grab New Key''' button to the right of this field and hit the <code>Ctrl</code> and <code>o</code> keys. | |
| + | In the script section we will recall our old target. | ||
| − | + | target = oldTarget or "not set" | |
| − | + | echo("My target is now: " .. target .. "\n") | |
| + | Save your new keybinding. | ||
| − | + | [[File:Target-old-keybinding.png|800px|center]] | |
| − | |||
| − | |||
| + | What does this script do? | ||
| + | * we set a variable <code>target</code> back to its <code>oldTarget</code> we saved earlier alias, but if that's not set we will use <code>not set</code> as a placeholder to remind us | ||
| + | * we echo our change as a notification | ||
| − | + | === Usage === | |
| − | |||
| + | Let's see how this would work in action. | ||
| − | + | # You get a quest to hunt down a brigand. Set your target to brigand using the alias <code>t brigand</code> | |
| + | # Wander stealthily along the path, alas, you get surprised by goblins. | ||
| + | # Hit Ctrl+G on your keyboard to temporarily switch to targetting goblins, making full use of your other skill and spell aliases to dirt kick and cast fireball. | ||
| + | # After triumph, hit Ctrl+O to revert your target back to hunting the brigand. | ||
| − | = | + | </translate> |
| + | <span id="timers"></span> | ||
| + | <translate> | ||
| − | + | = Timers = <!--T:143--> | |
| − | + | Timers can be used to execute a specific command at a certain time, after a certain time or once every so often. They can be created in the '''Script Editor''' or directly from a script (via aliases, triggers, keybindings, etc) with the latter being the most flexible. | |
| − | < | + | == via Script Editor == |
| + | <!--T:144--> | ||
| + | You can only create recurring timers with the Script Editor i.e. ones that will continually execute a script over and over again, but you have the advantage of being able to identify and turn them on of off easily with the interface. | ||
| − | + | Open the '''Script Editor''' (Alt+E) and click on '''Timers'''. | |
| − | + | Scenario: You want to be reminded every 30 minutes to check in with your quest master for a new quest. | |
| − | + | Create a new timer with the '''Add Item''' button. | |
| − | |||
| − | + | In the '''Name:''' field, add | |
| − | |||
| − | |||
| − | + | quest check reminder | |
| − | |||
| − | |||
| − | + | Leave the '''Command:''' field blank, as we will call a simple script instead. | |
| − | |||
| − | |||
| − | |||
| − | + | Set the timer to 30 minutes. | |
| − | |||
| − | + | In the '''Script''' section type | |
| − | |||
| − | + | echo("Reminder! Check to see if the quest master has any new quests.") | |
| − | |||
| − | |||
| − | |||
| − | |||
| − | |||
| − | |||
| − | |||
| − | |||
| − | |||
| − | |||
| − | |||
| − | + | The result should resemble the screenshot. | |
| − | |||
| + | [[File:Timer-example.png|800px|center]] | ||
| + | Adding some colouring to make it stand out with <code>cecho</code>, and never forget to quest again. | ||
| + | {{note}} When saving a timer, the symbol for unsaved items disappears and makes way for a little blue checkbox. If this box is checked the timer is active. If the blue box is empty, the timer is deactivated and will not work until you press the activate toggle padlock icon. | ||
| − | + | == via Script Code == | |
| − | |||
| − | |||
| − | + | More advanced timer usage is available with scripts and using the <code>tempTimer</code> function. | |
| − | |||
| − | < | ||
| − | |||
<!--T:200--> | <!--T:200--> | ||
| − | + | The syntax to use a simple countdown timer that performs an action after a period then stops is this: | |
<!--T:145--> | <!--T:145--> | ||
| Line 718: | Line 675: | ||
<!--T:201--> | <!--T:201--> | ||
| − | Seconds needs to be a number | + | Seconds needs to be a number (with an optional decimal point) that is the time until the <code>code</code> executes, e.g. <code>1</code> or <code>0.5</code> as 1 second or half a second). |
| − | + | Code can be any commands which you want executed surrounded in square brackets, <code>[[</code> and <code>]]</code>. | |
| − | |||
<!--T:146--> | <!--T:146--> | ||
| − | Here's | + | Here's an example which you can copy and put in your code directly: |
<!--T:147--> | <!--T:147--> | ||
| Line 743: | Line 699: | ||
<!--T:148--> | <!--T:148--> | ||
| − | {{note}} All timers which are made at the same time, will start counting from this common point in time, not relative to each other - so if you want to make one timer go off 1 second after another, | + | {{note}} All timers which are made at the same time, will start counting from this common point in time, not relative to each other - so if you want to make one timer go off 1 second after another, <u>don't do this</u>: |
<!--T:149--> | <!--T:149--> | ||
| Line 753: | Line 709: | ||
<!--T:150--> | <!--T:150--> | ||
| − | Both of these timers will go off at once, because both started together, right away! Instead, | + | Both of these timers will go off at once, because both started together, right away! Instead, <u>do this</u>: |
<!--T:151--> | <!--T:151--> | ||
| Line 763: | Line 719: | ||
<!--T:205--> | <!--T:205--> | ||
| − | {{note}} | + | {{note}} An alternate way to using <nowiki>[[ brackets ]]</nowiki> is to wrap the commands using function style as below. (This is available since Mudlet 3.5). This helps retain syntax highlighting (colouring) in the script editor, which you may find easier to read. |
<!--T:206--> | <!--T:206--> | ||
| Line 777: | Line 733: | ||
<!--T:154--> | <!--T:154--> | ||
| − | You can use Mudlet to create simple buttons on your screen without much coding at all | + | You can use Mudlet to create simple buttons on your screen without much coding at all. They can be attached to bars at the top, left or right side of the screen. Each of these locations can contain an infinite number of button bars that are shown when active or hidden when inactive. You can also create drop-down menus or two-state buttons - ones that you can click on and they stay pressed down. |
<!--T:155--> | <!--T:155--> | ||
| Line 981: | Line 937: | ||
You should now be able to click the button and see the echo to the main screen. | You should now be able to click the button and see the echo to the main screen. | ||
| − | === Adjustable Containers | + | |
| + | === Incorporating Adjustable Containers === | ||
[[Manual:Geyser#Adjustable.Container|Adjustable Containers]] are a Geyser element that provides a flexible, user configurable, dockable window. Let's move our buttons to one of these containers and see what else we can do. | [[Manual:Geyser#Adjustable.Container|Adjustable Containers]] are a Geyser element that provides a flexible, user configurable, dockable window. Let's move our buttons to one of these containers and see what else we can do. | ||
| Line 1,038: | Line 995: | ||
This example can be further expanded to add images to the labels, highlighting when hovering over labels or even multi-state buttons with variables to track the state. Your imagination is the only limit. | This example can be further expanded to add images to the labels, highlighting when hovering over labels or even multi-state buttons with variables to track the state. Your imagination is the only limit. | ||
| − | = | + | == Making Buttons with Geyser.Button == |
| + | |||
| + | Mudlet 4.18 introduced yet another way to create buttons using the Geyser.Button element. Head over to the [[Manual:Geyser#Geyser.Button|Geyser manual]] for some ideas on how to use a Geyser.Button in your GUI. | ||
| + | |||
| + | = Scripts = | ||
| + | |||
| + | A script is a piece of code written in the Lua language very much like the above examples in aliases, triggers, etc. They are typically more extensive (such as creating a graphical user interface), but can also be simple helper functions which can save a lot on typing. By using scripts you gain access to the [[Manual:Technical Manual|full API]] which can, for example, create triggers and aliases programmatically, respond to [[Manual:Event Engine|events]], or [[Manual:Geyser#Geyser.Gauge|create gauges]] to track your health. | ||
| + | |||
| + | |||
| + | {{note}} Mudlet users tend to use the word '''script''' interchangeably. A script is a section of code that performs a task. Scripts can be used in aliases, timers, triggers, etc.. and do not only have to be written in the '''Script Editor / Scripts''' section. Although once you become a more advanced script writer you will find ways to reuse code by using ''functions'' which are typically written in the Scripts section. These are the types of scripts we are discussing in this section of the manual. | ||
| + | |||
| + | |||
| + | Scripts are edited in the Script Editor (Alt+E), Scripts tab (Ctrl+3). | ||
| + | |||
| + | == Functions == | ||
| + | |||
| + | Functions are pieces of code that perform a certain task, much like a response to a trigger or a button press. Functions are the basis for ''reusable code'' and allow you to write some code once and reuse it many times over. Functions are ''called'' whenever they need to be ''run''. You are already familiar with <code>send</code> and <code>echo</code>, those are both functions being called when we want them to run. | ||
| + | |||
| + | === Example: spellup function === | ||
| + | |||
| + | For example, we have made a button called ''spellup''. We also have an alias <code>spellup</code> that performs exactly the same thing. We also have a trigger that identifies when we have been dispelled that again performs the exact same thing. | ||
| + | |||
| + | The problem now is that we have three different areas of code to maintain. What if we wanted to change the spells slightly? We would need to change the code in all three sections. This is a perfect use case for a function. | ||
| + | |||
| + | To create a new script, open the Script Editor (Alt+E) and the Scripts tab (Ctrl+3). | ||
| + | |||
| + | Add a New Item (Ctrl+N) and in the '''Name''' field type <code>Spellup Functions</code>. Ignore event handlers for now as that is an advanced topic and add the following example to the script section: | ||
| + | |||
| + | function spellup() | ||
| + | send("cast bless") | ||
| + | send("cast haste") | ||
| + | send("cast fly") | ||
| + | send("cast sanctuary") | ||
| + | end | ||
| + | |||
| + | We use the <code>function</code> keyword followed by whatever we wish to name this function, in this case <code>spellup</code>, followed by some parentheses. We added some commands to send to the game using the <code>send</code> keyword (which is in itself a function call). We then <code>end</code> or close the function off. | ||
| + | |||
| + | Now in our button, alias and trigger our script to cast those four spells would simply be: | ||
| + | |||
| + | spellup() | ||
| + | |||
| + | The function <code>spellup()</code> is found by Mudlet and runs (or ''executes'') whatever the function contains, in our case casting four spells. | ||
| + | |||
| + | For further reading about scripts check out the [[Manual:Scripting|scripting part of the manual]]. | ||
| + | |||
| + | = Final Thoughts = | ||
| + | |||
| + | We hope this has given you a solid introduction to using Mudlet. As you can see it is a very advanced MUD client capable of handling a variety of tasks in many ways. The key takeaway is defining your problem first then using the appropriate method to resolve it. | ||
| − | + | * I want to be able to drink automatically when thirsty. Trigger. | |
| − | |||
| − | + | * I want to cut down on repetitive typing. Alias. | |
| − | |||
| − | |||
| − | |||
| − | |||
| − | |||
| − | |||
| − | |||
| − | |||
| − | + | * I want to save my game every 10 minutes. Timer. | |
| − | |||
| − | + | * I want a hotkey to quit the game when I see the boss coming. Keybinding. | |
| − | |||
| − | |||
| − | + | {{note}} We strive to provide good documentation and would appreciate any feedback on clarity or further helpful examples. Join us on the [https://forums.mudlet.org/ forums] or [https://discordapp.com/invite/kuYvMQ9 Discord]. | |
| − | |||
| − | |||
| − | |||
| − | |||
| − | |||
| − | + | Happy MUDding! | |
| − | |||
| − | |||
| − | |||
| − | |||
| − | |||
| − | |||
| − | |||
<!--T:196--> | <!--T:196--> | ||
[[Category:Mudlet Manual]] | [[Category:Mudlet Manual]] | ||
</translate> | </translate> | ||
Latest revision as of 11:25, 4 August 2024
Thank you for choosing Mudlet. This page will help you get started with the basics and introduce you to the various screens and automation tools that Mudlet provides. Many areas of Mudlet have tool-tips displayed when you hover over a button or other element to provide more help.
Connection Window
The connection dialog is the first screen you will be greeted with when starting Mudlet. This window is how you set up your initial connection parameters and begin connecting to your game.

![]() Note: The first time Mudlet is run, some options cannot be edited until you create your first new profile or after you start your first game.
Note: The first time Mudlet is run, some options cannot be edited until you create your first new profile or after you start your first game.
Pre-Configured Games
In the left of the window, you will notice a list of several MUD games. To play, select one from the list and click the "Connect" button.
![]() Note: Game admins: like to see your game added to Mudlet? Visit Listing Your MUD.
Note: Game admins: like to see your game added to Mudlet? Visit Listing Your MUD.
New Connections
If you're using Mudlet with an unlisted game or for other telnet services, you'll want to click on the New button then enter a name for the profile (perhaps your character or game name) in the Profile name section. Next enter your Server address and port, these are typically listed on the game website.

![]() Note: Connection parameters cannot be edited while a connection is in progress for a selected profile.
Note: Connection parameters cannot be edited while a connection is in progress for a selected profile.
To connect to a game securely (via TLS or SSL) tick the 'Secure' box in the profile connection settings:

![]() Note: Game admins/developers: check out our sample configuration page or this example of a TLS proxy using nginx for some examples on how to setup a secure connection for your game.
Note: Game admins/developers: check out our sample configuration page or this example of a TLS proxy using nginx for some examples on how to setup a secure connection for your game.
Automatic Login
If your game takes in the characters name first and password next, Mudlet can automatically login for you. To make use of this feature in the Options tab type your name and password into the relevant sections as seen below.

All passwords by default are stored securely in the computers credential store - which means you can't just open up the file with the password and look at it.
When the password is stored securely on the computer, you can find it in the credential manager.
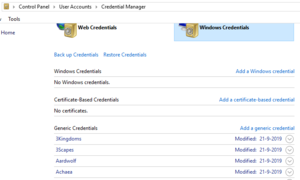
Passwords stored securely in Windows
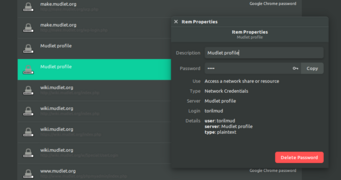
Passwords stored securely in Linux
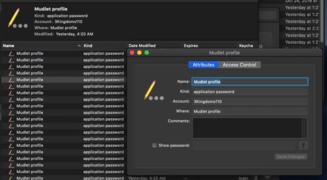
Passwords stored securely in macOS


![]() Note: The drawback of storing the password on the computer itself, however, is that if you use cloud sync for your profiles - the password won't the synchronised. You can go to Special Options in Mudlet's Preferences and change the password to be stored within the profile to make that work, if you'd like the password to be portable but visible in plaintext.
Note: The drawback of storing the password on the computer itself, however, is that if you use cloud sync for your profiles - the password won't the synchronised. You can go to Special Options in Mudlet's Preferences and change the password to be stored within the profile to make that work, if you'd like the password to be portable but visible in plaintext.
Discord Rich Presence
Since version 3.14 forward, Mudlet supports Discord Rich Presence integration for games using GMCP.
This feature can only be enabled on the pre-configured games which currently also support the feature. For more information, read about Discord GMCP
Main Window
The main window is where you interact with your chosen game. Thanks to Mudlet's graphical user capabilities this window can look vastly different depending on which game you play or how you choose to set it up. The main elements always remain the same though as seen below.

Command Line
Mudlets command line is especially designed for playing MUD and MUSH games. It aims at reducing the amount of typing by using autocompletion and tab completion schemes that are optimized for typical game playing situations. The command line offers tab completion (TAB key with or without shift) and autocompletion (cursor up and cursor down keys).
Tab completion searches the last 100 lines in the game output buffer for words matching the word that you are currently typing. This is useful if you have to type complicated long names. You only have to type the first letters and then press the tab key until the proposal is what you want.
Autocompletion tries to match your current typing with your command history. Example: If you typed the same command a while ago, you only have to start typing the first couple of letters and then press the cursor up key until the proposal matches the command that you want to use.
Command history - if you haven’t started to type anything yet, you can browse through your command history with the cursor up and cursor down keys. However, if you have started typing pressing cursor up will result in a shot at autocompletion.
Escape key - to get out of autocompletion you can press the ESC key any time. After pressing ESC the entire text gets selected and you can overwrite it or get back into command history mode.
Command-line Shortcuts
The command line has some built in keyboard shortcuts.
| Tab | Tab completion, see this technical manual section. |
| Up or Down | Command line history, see this technical manual section. |
| Home | Move cursor to beginning of line. |
| End | Move cursor to end of line. |
| CTRL+A | Select all. |
| CTRL+F | Move cursor to search bar. |
| SHIFT+Enter | Create an additional input line. |
| SHIFT+Left | Highlight one character left of the cursor (or unhighlight if already highlighted). |
| SHIFT+Right | Highlight one character right of the cursor (or unhighlight if already highlighted). |
| CTRL+Left | Move cursor one word to the left. |
| CTRL+Right | Move cursor one word to the right. |
| Backspace | Deletes the character to the left of the cursor. |
| CTRL+Backspace | Remove one word left of the cursor. |
| Delete | Deletes the character to the right of the cursor. |
| CTRL+Delete | Remove one word right of the cursor. |
| SHIFT+CTRL+Left | Highlight one word left of cursor. |
| SHIFT+CTRL+Right | Highlight one word right of cursor. |
| CTRL+C | Copies the selected text to the clipboard. |
| CTRL+Insert | Copies the selected text to the clipboard. |
| CTRL+K | Deletes to the end of the line. |
| CTRL+V | Pastes the clipboard text into line edit. |
| SHIFT+Insert | Pastes the clipboard text into line edit. |
| CTRL+X | Deletes the selected text and copies it to the clipboard. |
| SHIFT+Delete | Deletes the selected text and copies it to the clipboard. |
| Ctrl+Z | Undoes the last operation. |
| Ctrl+Y | Redoes the last undone operation. |
| PgUp | Scroll up one page in the main window buffer |
| PgDn | Scroll down one page in the main window buffer |
| Ctrl+Enter | Return to the bottom of the main window buffer |
See also: QT manual
Logging Output to text or HTML Log Files
Press on the little button with the blue folder with the green arrow icon on the lower right side of the command line to turn on plain text logging. Click again to stop logging.

This will inform you about the file name and path of the log file. If you want to log in color you can choose to log to files in HTML format, but note that due to the nature of HTML, these log files tend to get very large quickly. This, along with other options, can be set in the Preferences window (Alt+P).
Log files can be found at the Mudlet home directory in your profile directory. To get the path to your Mudlet home directory you can type on the command line:
lua getMudletHomeDir()Log files are stored in "<mudletHomeDir>/logs". Each profile has its own <mudletHomeDir> path. Log files have a similar naming convention to the autosaved profiles: date#time.txt or date#time.html
Split Screen
Mudlet has a split screen: if you scroll up in the game text screen (or any other mini console window), the screen will split in two parts. The lower part will follow the game output while the upper part will stay focused on your scrolling: this way you can read easier through old passages without missing what is going on at the moment. Split screen can be activated via the scroll bar, page up / page down keys or the mouse wheel.
Scrolling back to the end will close the split screen automatically. A click on the middle mouse button will close the split screen immediately as well as pressing Ctrl+Enter on the keyboard (command+return for mac). The size of the 2 parts of the split screen can be modified by dragging the separator bar in the middle with the mouse. Split screen can be helpful when selecting text in order to copy it to trigger editor e.g. when making triggers. If you don’t use split screen when selecting text, new arriving text will upset your selection.
To scroll quicker, hold Ctrl while scrolling. Conversely, to scroll just one line at a time hold Shift (available in Mudlet 4.11+).
Multi Session Gaming
Mudlet lets you play several simultaneous game sessions. However, currently we have the restriction that you cannot use the same profile twice. Consequently, if you want to play three characters on the same game at the same time, you need to make 3 profiles with 3 different names e.g. ernie@avalon.de, bert@avalon.de etc.
Each profile will be shown in a new tab as a session of its own. That means, your old session will not be stopped, when you start a second one. When you have more than one active session, try clicking the menu button "MultiView" to see them all together.
You can switch between profiles (characters) by pressing Ctrl+Tab or select a particular one with Ctrl+<number of tab>.
Want to be able to control all your profiles at once for games that allow multiplaying? Check out a package just for this. On Mudlet 4.10 and earlier, a pre-installed send-to-all-profiles package provided control through the :<command> alias.
Automation and Scripting
Game Rules
It is possible to create an Artificial Intelligence (AI) that does everything you can do in a game. Even more so, an AI can outperform you in every routine operation, depending on the complexity of the task. Because scripting is so powerful, it can give you a competitive advantage that some people consider unfair or even cheating. In some cases it can have much more far reaching consequences on a game, such as inflation, loss of balance in terms of game-mechanics or, ultimately, a complete crash of in-game economy. For these and various other reasons the administrators and owners of some games forbid or limit the use of automation tools.
By including scripting support in Mudlet, we effectively give you the ability to create and utilize AI toolkits. However, we do not endorse or promote the usage of automation if it is prohibited in your game! Keep in mind that by cheating you can lessen the quality of gameplay for both your fellow players and yourself.
Automation Features
Mudlet offers a vast array of standard features to automate or otherwise improve your gaming experience. These include, but are not limited to:
- Aliases
- User-defined text input, which is converted into a different, usually longer input before being sent to the game.
- e.g. typing
ggto haveget gold from ground;put gold in bagbe sent to the game.
- Variables
- allow the user to store text, numbers, tables, etc. for easier use inside scripts.
- Triggers
- execute user-defined commands upon receiving specific out from the game,
- e.g. the game sends:
You see Elyssa standing here.and Mudlet automatically sendswave to Elyssaback to the game
- Keybindings
- also known as hotkeys, allow executing certain user-defined commands by simultaneously pressing a specific combination of keys
- e.g. pressing
CTRL+Hto sendsay Hello Miyuki!to the game or play 'La Marseillaise'
- Timers
- delay the execution of a command or execute it after a specified period of time.
- e.g. Display a reminder to visit the questmaster after 30 minutes.
- Events (Advanced)
- allow the user to make triggers for specific events like when Mudlet has connected to the game, or even user-defined events to use in complex system making.
To get started on programming in Mudlet, watch these screencasts that explain the basics that'll help you get started.
![]() Note: Mudlet users tend to use the word script interchangeably. A script is a section of code that performs a task. Scripts can be used in aliases, timers, triggers, etc.. and do not only have to be written in the Script Editor / Scripts section. Although once you become a more advanced script writer you will find ways to reuse code by using functions which are typically written in the Scripts section.
Note: Mudlet users tend to use the word script interchangeably. A script is a section of code that performs a task. Scripts can be used in aliases, timers, triggers, etc.. and do not only have to be written in the Script Editor / Scripts section. Although once you become a more advanced script writer you will find ways to reuse code by using functions which are typically written in the Scripts section.
Keep on reading for an introduction to each of these Mudlet features.
A Quick Note on Combining Text
Throughout this introduction (and the wiki itself) you will see various methods to combine two strings (words, variables, characters, etc) together. One commonly used method is by using two periods, ie. .. to concatenate things together, another method is using the function f. You can read more about this now, or just follow along with the introduction and you will get familiar with this concept as we progress.
Aliases
Aliases are the most basic way of automating the gameplay - you can use aliases to shorten the amount of typing you do. Aliases convert one command into longer or multiple commands. Aliases are defined in the Script Editor (Alt+E) under Aliases (Ctrl+2). See more detailed info here: Manual:Alias Engine
To shorten multiple commands;
gg
could sending be these commands to the game instead;
 get gold
 put gold in bag
saving you from having to type both of these lines every time you see some gold. See how you can create an alias like this in the next section.
Making an Alias
To make our gg alias open the Script Editor (Alt+E) and click on the Aliases button (Ctrl+2), and then click on the Add button (Ctrl+N). This will make a new blank alias for you and we will fill in the details.

The Name: field is optional - it’s mainly used for the alias list on the left as an easy way to distinguish between all of the aliases you will likely write. Let's name it Get gold for now.
The Pattern: field is where you type a regex pattern to describe the command you'll enter to make your new alias spring into action. Our alias pattern is gg which will perform the larger get and put commands. Since this is a regex pattern though, we will use ^gg$. More on this later (or read about it now here).
The Command: field is where we put our larger commands. Here we put our two commands, get gold;;put gold in bag. The semi-colon separates the line into two commands to send to the game.

Click the save button and close the Script Editor window. Now when you type gg into the command line, Mudlet will send get gold;;put gold in bag.
![]() Note: When saving an alias, the symbol for unsaved items disappears and makes way for a little blue checkbox. If this box is checked the alias is active. If the blue box is empty, the alias is deactivated and will not work until you press the activate toggle padlock icon.
Note: When saving an alias, the symbol for unsaved items disappears and makes way for a little blue checkbox. If this box is checked the alias is active. If the blue box is empty, the alias is deactivated and will not work until you press the activate toggle padlock icon.
Regex Patterns in Aliases
Mudlet uses Perl regular expression aliases. Regex is a special way of matching patterns of words. For the beginners it is enough to think of them as a general way to specify the words itself and their placement within the line. For basic aliases know that the character ^ symbolizes the beginning of the line and the character $ symbolizes the end of the line.
If you want to make an alias tw that sends the command take weapon, you don’t have to care about placement or pattern matching in general. All you need to do is fill ^tw$ in the Pattern field and type take weapon in the Command field, then save. If we didn't do this then sending the command twiddle would match because they both contain the letters 'tw'.
Some basic examples can be found on the Regex page. More advanced usage will be described throughout the manual.
Alias Scripts
You’re walking around the epic dungeon of the Unholy Firedragon gathering roots in order to brew a potion and thus restore the growth of hair on Farmer Benedict’s bald head. Once you see a root, you need to:
open the bag of tools
get the sickle of damnation from the bag of tools
cut the root of hair-growth
<wait 5 seconds>
clean the sickle of damnation of deadly root acid
put the sickle of damnation in the bag of tools
close the bag of tools
open the magical bag of storing
take the root
put the root into the magical bag of storing
close the magical of storing
And once you’re done, do the exact same thing nine more times… thrice a day!
Alternatively, you can just create an alias that would do this all with a single command - for example, quest. Since there is so many commands it doesn't make sense to use the Command field. We instead will put all of this in a Lua script which makes it easier to read and modify later. Here's a sneak peek on what you should have in the end:

Now typing quest on the command line will execute the script and gather all the ingredients to brew up the potion.
This example forgoes using the Command field and instead uses the larger Lua script area below it. It makes use of a few Mudlet Lua functions to send the commands to the game and performs the same thing as our simple example of getting gold does; notably the send function. More on this later (or read about it now here). We could thus turn our get gold example into this;
 send("get gold")
 send("put gold in bag")
You should remove the commands from the Command field and gg will now perform that same thing. This sets us up for more advanced scripting in the future, e.g. getting different objects to put in a bag through variables or making a targetting alias for killing enemies.
Making a Targetting Alias
Making an alias that will remember your target will make it easier to use your skills and save you the hassle of typing the target in all the time. Note the use of Regex and Lua scripting in this example and try to become familiar with the basic concepts.
Open the Script Editor / Aliases and do the following:
In the Name: field, call it
Targeting system
In the Pattern: field, place the following:
^t (.+)$
That will match all commands that you type in the format of t <any words> - it'll match t rat, t tsol'aa, t human, etc.
Since we will use a script here, we do not need to place anything in the Command field.
Next in the script box add this:
target = matches[2]
echo("My target is now: " .. target .. "\n")
Our script does the following;
- assigns a variable called
targetwith the value ofmatches[2].matches[2]comes from the pattern matching Regex is performing and capturing for you. More on variables later (or read about global variables here). - sends a notification line (only to you on in the main screen, not to the game) via the
echofunction showing that the variabletargetnow contains whatever matched when you typed in the aliast. More about the echo function later (or read about it now here).
![]() Note: You can also echo lines that are coloured by using
Note: You can also echo lines that are coloured by using cecho (coloured echo) as in the example screenshot. See a list of all available colours here.

That's it - whenever you use alias pattern t, your target will be remembered in the target variable.
Next, you'd like to make use of this variable in your skills or spells - so make another alias that will do the actual attacking for you! Here's an example one:
Pattern:
^dk$
Script:
send("dirt kick "..target)This alias will dirt kick the target when you type in dk. Feel free to adjust the alias pattern and script as you see fit.
How about a healing function?
Pattern:
^heal$
Script:
send("cast 'cure critical' " .. target)
Optional Target
You can also make an alias with an optional target:
^cs(?: (.+))?$
with this example script:
send("cast spell at "..(matches[2] or target))Now the target, if it is supplied, is going to be in matches[2], otherwise it will revert to the one you set earlier with your targeting system. Good for fighting multiple enemies, but keeping a main foe on the ready.
Built-in aliases
The following aliases are available by default in new Mudlet profiles.
| Alias | Description | Examples |
|---|---|---|
| lua | Run Lua code from the input line. | lua print("hello") lua 2+2 lua clearWindow() |
| `echo | Simulate text from the game to test your triggers. You can use $ for a new line. |
`echo You see a rabbit cross the road. `echo line1$line2 |
If an alias on the list isn't working for you - try copying it from a new profile, since existing profiles will not get new aliases as they're introduced to Mudlet.
Variables
Variables are containers for data. In Mudlet's scripting language (Lua), they can store numbers, words, booleans (true or false) or tables. You can use variables to store important information like how much gold do you have, your hit points or an enemy target like described in our aliases introduction.
The syntax for making a variable remember a number is the following - you can create them directly in the Script Editor (Alt+E) in a new script (Ctrl+3):
variable = 1234Or to make it remember some text:
my_name = "Bob"As we touched on in the alias introduction, variables can also be made directly when performing an alias or matching a trigger.
It will then appear in the Variables view, like so:

![]() Note: The variables view doesn't automatically refresh, but it can be refreshed by clicking the Variables button.
Note: The variables view doesn't automatically refresh, but it can be refreshed by clicking the Variables button.
You can also do basic maths easily, for example:
 hp = 100 + 25        -- hp now equals 125
 hp = hp * 2          -- the value of hp multiplied by 2
To concatenate strings together, you can use the .. expression:
my_full_name = "Bob " .. "the Builder"Don't forget to use a space when you're concatenating two variables together:
firstname = "Apple"
lastname = "Red"

-- bad: will produce "AppleRed"
full_name = firstname .. lastname

-- good: will produce "Apple Red"
full_name = firstname .. " " .. lastname
You can also edit and delete variables from the variables view. Be careful when changing or deleting existing variables made by third-party scripts - you might break them. If that happens, re-opening the profiles will restore the variables back to working order.
![]() Note: While you can create variables in the Variables view, remember that they won't be saved when Mudlet shuts down - if you'd like them to be more permanent, create scripts with the variables instead. More advanced information on variables is available here.
Note: While you can create variables in the Variables view, remember that they won't be saved when Mudlet shuts down - if you'd like them to be more permanent, create scripts with the variables instead. More advanced information on variables is available here.
String Interpolation
String Interpolation is a fancy term for inserting a variable name into the string itself using placeholder syntax. This method uses the shorthand f function, which is best shown with some examples (further reading here).
gold = 5
echo(f("I have {gold} gold coins."))
You can see we added the f function to the echo and wrapped the variable named gold with curly parentheses. This will display in exactly the same way as:
gold = 5
echo("I have " .. gold .. " gold coins."))
You can use either method and decide which is best for you. You will see both types used throughout this manual.
The send function
To send a command to the game from a script, you can use the send() function. Data inside the quotes is sent to the game.
For example, the following code sends the command to eat bread:
send("eat bread")If you’d like to include variables in the send command, you need to prefix and suffix them with two dots outside the quotes, like this:
send("My target is " .. target .. ". What's yours?")If your commands ends with a variable, you don't need the two dots after:
send("Hi, my name is " .. character)Should you want to include double quotes, use a double set of square brackets like this:
send([[say "Hi, I'm new here!"]])When inserting a variable, you'd use the ]] and [[ appropriately:
send([[poke ]]..victim)To send many directions, use speedwalk():
speedwalk("n;e;s;w;")To send many actions, use sendAll():
sendAll("attack", "cast magic missile")The echo function
To show text to yourself you can use the echo() function from a script. This does not send any commands to the game, it is simply a way to give yourself visual feedback. For example, the following code will display "Time to eat dinner!" on your screen:
echo("Time to eat dinner!")If you’d like to include variables in your echo, you concatenate (put together) the value of your variable to the text:
my_gold = 5
echo("I have " .. my_gold .. " pieces of gold!\n")
If you'd like to include a new line in your text, insert \n for it:
echo("this echo\nis on\nthree lines!")

-- comes out at:
this echo
is on
three lines!
Coloured echoes are performed with the cecho function and using html-like colour tags.
cecho("<blue>My target is now: <red>" .. target .. "<reset>\n")
There are also decho and hecho functions which can use RGB or hexadecimal colour codes. You can read more about them in the Mudlet API.
Seeing errors in your code
Undoubtedly you'll be making mistakes when you're coding! To err is human, after all. There are two types of mistakes you can make in general: when the words you've typed in make no sense to Lua at all, or they do make sense, but they don't do what you actually thought and intended them to do - or other circumstances are preventing it from working at that point in time.
Syntax errors aka Ladybugs
When you type something in that doesn't make sense to Lua, it's called a syntax error. Mudlet will realize this and show you a little ladybug, and also tell you on which line the mistake is. Here's an example:

The echo() function on line 3 is missing a closing bracket - every bracket in Lua that's not green needs to be closed. Mudlet showed you a ladybug symbol on the alias, to indicate that the alias has a problem. It also showed you that the ( bracket should be closed on line 3. To fix this, you'd add the ), save, and the warning will disappear.
Runtime errors aka Errors View
Another type of mistake is when what you typed in makes sense to Lua when you typed it in, but when it's time for code to be actually run, something wrong happens. For example, you asked Lua to eecho("hey!") - this is valid, you typed it in right, but there is one problem - <coded>eecho doesn't exist. So when you run the alias, nothing actually happens. Why?
Mudlet puts all problems that happen when things are run into the Errors view. It is hidden by default, open it from the Script Editor (Alt+E) and pressing the exclamation Error button (Ctrl+8). This is where the error is logged by default - not in your main window, so you aren't spammed when you make a mistake in a piece of code that happens very often.
![]() Note: If you do wish to see the errors in your main window you can change your preferences (Alt+P) (Preferences -> Main display -> Echo Lua errors to the main console).
Note: If you do wish to see the errors in your main window you can change your preferences (Alt+P) (Preferences -> Main display -> Echo Lua errors to the main console).
Opening it up will show this:

Let's analyse the message that's shown to us. object:<chat> is the Mudlet name you gave to the thing which errored. function will tell you Alias, Trigger, Script or something else - this helps you locate the problematic item in question.
Next red line is the actual error: it's saying that on line 1, eecho is a nil value. In Lua, nil means doesn't exist. Hence what it's telling you is that eecho does not actually exist! Change it to echo, run it again, and there will be no errors.
As you tinker with Mudlet you will become more familiar with the errors shown and be able to quickly debug your scripts.
![]() Note: If you need help with a script you can also ask on our friendly Discord server.
Note: If you need help with a script you can also ask on our friendly Discord server.
Triggers
Triggers are an automation feature offered in most game clients. They help you respond quicker to a particular situation and generally make things more convenient for you since you need to do less manual work. Your triggers can perform all the repetitive tasks for you like eating and drinking or keeping spells maintained.
The way a trigger works is simple - you define a response to an incoming line from the game. The incoming line will need to match the trigger pattern and the response will be your script (or some other feature available in Mudlet like playing sounds). When the trigger "sees" this text in the game output, it will run the commands you have selected.
The trigger window is similar to the Alias window in that you need fill in the three main elements; trigger name, trigger pattern and trigger response (a command, script, sound, etc).
Example - Basic Pickup Trigger
Scenario: whenever you see gold laying on the ground you want to pick it up
- In the Name: field, type
pickup gold automatically. Remember this is an arbitrary name that helps you identify it in the trigger list on the left. - Decide on the text the game sends and how you want to react. We notice that every time there is gold on the ground the game sends:
Some gold has been dropped here.
- Type
Some gold has been dropped here.in the data field titled "1". This is the trigger pattern section that Mudlet will respond to. Check the trigger drop-down type on the right of the line says "substring" to match the phrase on any line received from the game - Now you type
get gold;;put gold in bagin the Command field. This will be the command that the trigger will send to your game whenever the trigger fires. - Finally click "Save Item" to save your gold pickup trigger. The blue checkbox icon in front of the trigger name (in the trigger tree on the left side) gets checked. The trigger is now activated. Drop some gold on the ground and look around. Did you automatically pick it back up?

![]() Note: Trigger pattern type 'exact match' or 'start of line' would also be appropriate here. See more information on the different trigger types here.
Note: Trigger pattern type 'exact match' or 'start of line' would also be appropriate here. See more information on the different trigger types here.
As the trigger is active, each time the phrase Some gold has been dropped here. appears in the game output your trigger will issue the command get gold and put gold in bag automatically. It will repeat this as long as the trigger stays active.
Disabling Triggers
When you want to stop a trigger from responding to game output simply select the trigger from the list and then click on the padlock icon to deactivate it. The check mark will vanish and the trigger will stop firing until you re-enable it again via the padlock icon.
Trigger Groups
You can also put triggers in a group via the Add Group button and lock a group of triggers or an entire trigger branch. If you do that, all triggers in this group or branch will be locked until you remove the lock again. The locking starts from the root of the tree down to the end. As soon as a lock is met the trigger engine will skip the locked branch. Locking and unlocking branches is one of the most common actions you have to take care of when playing. For example, you can turn on your defensive triggers when engaging into a battle and you turn them off afterwards, or you turn on your harvesting triggers only when you are going to harvest.

Above, the defensive triggers are active but the harvest triggers are inactive.
Highlighting of Trigger Patterns
When starting out it is helpful to use Mudlet's built-in highlight triggers to highlight the text that has been a match for a trigger (trigger pattern match) to get the hang of the different trigger and pattern types. Click on the highlight trigger option and pick a foreground and a background color that you like to highlight your trigger with. When the trigger matches it automatically highlight its pattern. It is a quick and easy way of highlighting words that are important to you at the moment. You don’t have to know anything about scripting, regular expressions, etc to use highlight triggers. Just type in the word you like to be highlighted, select appropriate colors, save the new trigger and activate it.

Some gold has been dropped here. will be highlighted in red, with a yellow background.
Further Reading
- Triggers can get quite advanced and further examples with triggers can be found on the regex examples page.
- To read more about trigger pattern matching types, read this part of the manual.
Keybindings
![]() Note: A basic number-pad movement keybinding package can be found on the forums.
Note: A basic number-pad movement keybinding package can be found on the forums.
Keybindings (also known as hotkeys or macros) allow you to press a button to execute a script and are in many respects very similar to aliases. However, instead of typing in what you want to be done (maybe including additional parameters) and pressing Enter, you simply hit a single key (or combination of keys) to let Mudlet do the work.
Open the Script Editor (Alt+E) and click the Keybindings button (Ctrl+5). The keybinding window is similar to the Alias window in that you need fill in the three main elements; keybinding name, keybinding (the actual keypress combination) and keybinding response (the command or script).

Example - Number Pad Movement
You wish to use the number pad for moving around in game instead of having type north, south, east and west.
You have decided, number pad 8 will be north, south will be number pad 2, east is number pad 6 and west is number pad 4.
Create a new keybinding and in the Name: field put
North
Command: will be the exact command you want to substitute for your keypress. In this case the command is north.
north
Keybinding: is the actual key combination to set. Click the Grab New Key button to the right of this field and hit the number pad 8 on your keyboard.
Save your new keybinding.

![]() Note: When saving a keybinding, the symbol for unsaved items disappears and makes way for a little blue checkbox. If this box is checked the keybinding is active. If the blue box is empty, the keybinding is deactivated and will not work until you press the activate toggle padlock icon.
Note: When saving a keybinding, the symbol for unsaved items disappears and makes way for a little blue checkbox. If this box is checked the keybinding is active. If the blue box is empty, the keybinding is deactivated and will not work until you press the activate toggle padlock icon.
![]() Note: Keybindings can also be in groups, just like aliases and triggers.
Note: Keybindings can also be in groups, just like aliases and triggers.
Continue this same procedure for south, east and west.
Example - Target System
Let's build on the targetting system we created during the alias tutorial.
Scenario: you regularly fight goblins. They tend to get the jump on you with a surprise attack so you have decided it's quicker to hit a keybinding than typing out t goblin in the midst of battle. But you also don't want to lose the target you were tracking after the goblin fight is over.
You want two keybindings to instantly set your target to one or the other. You have decided on Ctrl+G for targetting goblins, Ctrl+O for reverting to the old target.
We need to use the Lua script section as this is not a basic game command.
Part 1
Create a new keybinding and in the Name: field put
Target Goblins
Command: will be left blank as we will utilise the script section.
Keybinding: is the actual key combination to set. Click the Grab New Key button to the right of this field and hit the Ctrl and g keys.
In the script section we will modify our targetting script slightly to save an old target.
 oldTarget = target or "not set"
 target = "goblin"
 echo("My target is now: " .. target .. " (old target: " .. oldTarget .. ")\n")
Save your new keybinding.

What does this script do?
- we set a variable
oldTargetto an existing target set with thetalias, but if that's not set we will usenot setas a placeholder to remind us - we set the variable
targettogoblin - we echo our change as a notification
Part 2
Create another keybinding and in the Name: field put
Target Old Target
Command: will be left blank as we will utilise the script section.
Keybinding: is the actual key combination to set. Click the Grab New Key button to the right of this field and hit the Ctrl and o keys.
In the script section we will recall our old target.
target = oldTarget or "not set"
echo("My target is now: " .. target .. "\n")
Save your new keybinding.

What does this script do?
- we set a variable
targetback to itsoldTargetwe saved earlier alias, but if that's not set we will usenot setas a placeholder to remind us - we echo our change as a notification
Usage
Let's see how this would work in action.
- You get a quest to hunt down a brigand. Set your target to brigand using the alias
t brigand - Wander stealthily along the path, alas, you get surprised by goblins.
- Hit Ctrl+G on your keyboard to temporarily switch to targetting goblins, making full use of your other skill and spell aliases to dirt kick and cast fireball.
- After triumph, hit Ctrl+O to revert your target back to hunting the brigand.
Timers
Timers can be used to execute a specific command at a certain time, after a certain time or once every so often. They can be created in the Script Editor or directly from a script (via aliases, triggers, keybindings, etc) with the latter being the most flexible.
via Script Editor
You can only create recurring timers with the Script Editor i.e. ones that will continually execute a script over and over again, but you have the advantage of being able to identify and turn them on of off easily with the interface.
Open the Script Editor (Alt+E) and click on Timers.
Scenario: You want to be reminded every 30 minutes to check in with your quest master for a new quest.
Create a new timer with the Add Item button.
In the Name: field, add
quest check reminder
Leave the Command: field blank, as we will call a simple script instead.
Set the timer to 30 minutes.
In the Script section type
echo("Reminder! Check to see if the quest master has any new quests.")
The result should resemble the screenshot.

Adding some colouring to make it stand out with cecho, and never forget to quest again.
![]() Note: When saving a timer, the symbol for unsaved items disappears and makes way for a little blue checkbox. If this box is checked the timer is active. If the blue box is empty, the timer is deactivated and will not work until you press the activate toggle padlock icon.
Note: When saving a timer, the symbol for unsaved items disappears and makes way for a little blue checkbox. If this box is checked the timer is active. If the blue box is empty, the timer is deactivated and will not work until you press the activate toggle padlock icon.
via Script Code
More advanced timer usage is available with scripts and using the tempTimer function.
The syntax to use a simple countdown timer that performs an action after a period then stops is this:
tempTimer(seconds, [[code]])Seconds needs to be a number (with an optional decimal point) that is the time until the code executes, e.g. 1 or 0.5 as 1 second or half a second).
Code can be any commands which you want executed surrounded in square brackets, [[ and ]].
Here's an example which you can copy and put in your code directly:
-- this timer will greet you exactly 2 seconds after it was made
tempTimer(2, [[ echo("hello!\n") ]])
You can combine both normal and timed commands, for example as code in an alias or keybinding:
-- this code will let you go north immediately, then go east after 2 seconds
send("n")
tempTimer(2, [[ send("e") ]])![]() Note: All timers which are made at the same time, will start counting from this common point in time, not relative to each other - so if you want to make one timer go off 1 second after another, don't do this:
Note: All timers which are made at the same time, will start counting from this common point in time, not relative to each other - so if you want to make one timer go off 1 second after another, don't do this:
-- incorrect:
tempTimer(1, [[ echo("hello!\n") ]])
tempTimer(1, [[ echo("how are you?\n") ]])
Both of these timers will go off at once, because both started together, right away! Instead, do this:
-- correct:
tempTimer(1, [[ echo("hello!\n") ]])
tempTimer(2, [[ echo("how are you?\n") ]])![]() Note: An alternate way to using [[ brackets ]] is to wrap the commands using function style as below. (This is available since Mudlet 3.5). This helps retain syntax highlighting (colouring) in the script editor, which you may find easier to read.
Note: An alternate way to using [[ brackets ]] is to wrap the commands using function style as below. (This is available since Mudlet 3.5). This helps retain syntax highlighting (colouring) in the script editor, which you may find easier to read.
-- this timer will greet you exactly 2 seconds after it was made
tempTimer(2, function() echo("hello!\n") end)
That's it for the basics of scriptable timers in Mudlet. Want to know more? Here is a full description of timers in Mudlet.
Buttons
You can use Mudlet to create simple buttons on your screen without much coding at all. They can be attached to bars at the top, left or right side of the screen. Each of these locations can contain an infinite number of button bars that are shown when active or hidden when inactive. You can also create drop-down menus or two-state buttons - ones that you can click on and they stay pressed down.
To get started with buttons, make a group (buttons have to be in a group to show) and add buttons inside them. Active buttons or groups to make them be visible. Here's an example - by making a new group and a button inside it, and activating both, we got a button to spawn:

Buttons show in the order they appear in - so if you'd like one button to be above another, just drag it visually in the editor!
Menus
An important use case for buttons is to have various menus which contain a number of checkbox buttons or sub menus in order to quickly set various scripting configuration or other options in your scripts. To start a menu of buttons, create another group inside your toolbar group and add individual buttons inside it, like so:

To change the side of Mudlet that the buttons use, change the Dock area <side> option and save. You can also make buttons align themselves top to bottom or left to right with the Orientation <horizontal or vertical> option.

Making buttons do stuff
Buttons are half as useful only being there. You can also make them do commands for you for when you press them! To make a button do your command, or alias, or anything - type it into the Command on Button Down field. Pressing the button will do that command then:

You can also make a button do two things, toggling between each. To do that, enable the Push Down Button option, and type the command you'd like your button to do when it's released in the Command on Button Up field.

![]() Note:
Note:
If you'd like to include & in the button name, put double && - a single & will act as a mnemonic to underline the shortcut letter.
Coloring & customizing buttons
To change how your buttons look, you put descriptions into the CSS Style Sheet field, in the format of <a word describing something>: <how it should look>;. For example, if you'd like to make the button be red, put background-color: red; into the CSS box:

A full list of names you can use to customize your buttons view is available here. Take note of how that page has the descriptions inside {} brackets - you don't need them, only paste what's inside them in Mudlet.
Applying some skills, we can make our buttons look much more aesthetic:

This was the code used, feel free to start your buttons off with it:
color: white; background-color: orange; font-size: 12px;
padding: 6px;
border-radius: 5px;
Users with OS Windows 10 may find that for Mudlet versions 4.11+, the background-color: <colour>; is not changing the background as expected. This can be fixed by changing the border of the button. For example border: none;. Although that may destroy the size of button and it has to be set manualy. To achieve somehow similar size to default buttons you can use something like this:
background-color: <your_colour>;
border: 1px solid gray;
width: 90px; height: 25px;
margin: 1px;
font-size: 14px;
Managed layouts
To get your buttons to align into rows or columns (that depends on their orientation), add a number to the Number of columns or rows field. Here's an example with two columns on the left:

Here's another example with three columns on the left:

![]() Note:
Note:
You can change how your buttons are aligned within rows by clicking on the button group - it will cycle through different possible configurations for you.
Making Buttons with Labels
Labels can also be used to make buttons. They are far more flexible and you can design almost any UI you can dream up considering they are simply clickable images.
We'll start by making twelve buttons along the top of our screen.
-- set a 10% margin from the top border to provide space
local width, height = getMainWindowSize()
setBorderTop(height/10)

-- create some variable space so we don't pollute global variables
MyButtons = {}

-- create a label for the entire margin, for now
MyButtons.Top = Geyser.Label:new({
  name = "MyButtons.Top",
  x = 0, y = 0,
  width = "100%",
  height = "10%",
})

-- create a horizontal box to organise the buttons equally
MyButtons.TopHBox = Geyser.HBox:new({
  name = "MyButtons.TopHBox",
  x = 0, y = 0,
  width = "100%",
  height = "100%",
},MyButtons.Top)

-- add some buttons to the HBox using a Geyser label
for i=1,12 do
  MyButtons["MyButton"..i] = Geyser.Label:new({
    name = "MyButtons.Button"..i,
  },MyButtons.TopHBox)
  MyButtons["MyButton"..i]:echo("<center>My Button "..i)
end

The main function creating the button labels is Geyser.Label. You should now see the results as above. A bit plain, you could add some CSS to spark things up a bit.
-- add some buttons to the HBox using a Geyser label
for i=1, 12 do
  MyButtons["MyButton"..i] = Geyser.Label:new({
    name = "MyButtons.Button"..i,
  },MyButtons.TopHBox)
  MyButtons["MyButton"..i]:echo("<center>My Button "..i)

  -- colour my buttons with CSS
  MyButtons["MyButton"..i]:setStyleSheet([[
    background-color: rgba(135,206,250,100);
    border-style: solid;
    border-width: 1px;
    border-color: white;
    border-radius: 5px;
    margin: 5px;
    qproperty-wordWrap: true;
  ]])
end
Much better. But currently they are just twelve pretty labels that don't perform any function. Let's make them clickable with setClickCallback
setClickCallback assigns a function to a Geyser label that will be called when the mouse is clicked on the label. This function has similar methods for double clicking, hovering, etc.. all of which can be found in the Geyser manual. Let's keep it straightforward for now with a single click. Consider the following addition;
-- add some buttons to the HBox using a Geyser label
for i=1,12 do
  MyButtons["MyButton"..i] = Geyser.Label:new({
    name = "MyButtons.Button"..i,
  },MyButtons.TopHBox)
  MyButtons["MyButton"..i]:echo("<center>My Button "..i)

  -- colour my buttons with CSS
  MyButtons["MyButton"..i]:setStyleSheet([[
    background-color: rgba(135,206,250,100);
    border-style: solid;
    border-width: 1px;
    border-color: white;
    border-radius: 5px;
    margin: 5px;
    qproperty-wordWrap: true;
  ]])

  -- make our buttons clickable
  MyButtons["MyButton"..i]:setClickCallback(function() echo("My Button " ..i.." clicked!\n") end)
end

You should now be able to click the button and see the echo to the main screen.
Incorporating Adjustable Containers
Adjustable Containers are a Geyser element that provides a flexible, user configurable, dockable window. Let's move our buttons to one of these containers and see what else we can do.
-- create some variable space so we don't pollute global variables
MyButtons = {}

-- create an adjustable container for more flexibility
MyButtons.Top = Adjustable.Container:new({
  name = "MyButtons.Top",
  x = 0, y = 0,
  width = "100%",
  height = "10%",
})

-- create a horizontal box to organise the buttons equally
MyButtons.TopHBox = Geyser.HBox:new({
  name = "MyButtons.TopHBox",
  x = 0, y = 0,
  width = "100%",
  height = "100%",
},MyButtons.Top)

-- add some buttons to the HBox using a Geyser label
for i=1, 12 do
  MyButtons["MyButton"..i] = Geyser.Label:new({
    name = "MyButtons.Button"..i,
  },MyButtons.TopHBox)
  MyButtons["MyButton"..i]:echo("<center>My Button "..i)

  -- colour my buttons with CSS
  MyButtons["MyButton"..i]:setStyleSheet([[
    background-color: rgba(135,206,250,100);
    border-style: solid;
    border-width: 1px;
    border-color: white;
    border-radius: 5px;
    margin: 5px;
    qproperty-wordWrap: true;
  ]])

  -- make our buttons clickable
  MyButtons["MyButton"..i]:setClickCallback(function() echo("My Button " ..i.." clicked!\n") end)
end

We removed the setBorderTop code because the adjustable container can be docked to a border by right clicking on the title bar and a margin is automatically created. It is docked to the top border in this example.
The container can be resized and moved around or perhaps changed to a VBox for slick left and right border docking.

This example can be further expanded to add images to the labels, highlighting when hovering over labels or even multi-state buttons with variables to track the state. Your imagination is the only limit.
Making Buttons with Geyser.Button
Mudlet 4.18 introduced yet another way to create buttons using the Geyser.Button element. Head over to the Geyser manual for some ideas on how to use a Geyser.Button in your GUI.
Scripts
A script is a piece of code written in the Lua language very much like the above examples in aliases, triggers, etc. They are typically more extensive (such as creating a graphical user interface), but can also be simple helper functions which can save a lot on typing. By using scripts you gain access to the full API which can, for example, create triggers and aliases programmatically, respond to events, or create gauges to track your health.
![]() Note: Mudlet users tend to use the word script interchangeably. A script is a section of code that performs a task. Scripts can be used in aliases, timers, triggers, etc.. and do not only have to be written in the Script Editor / Scripts section. Although once you become a more advanced script writer you will find ways to reuse code by using functions which are typically written in the Scripts section. These are the types of scripts we are discussing in this section of the manual.
Note: Mudlet users tend to use the word script interchangeably. A script is a section of code that performs a task. Scripts can be used in aliases, timers, triggers, etc.. and do not only have to be written in the Script Editor / Scripts section. Although once you become a more advanced script writer you will find ways to reuse code by using functions which are typically written in the Scripts section. These are the types of scripts we are discussing in this section of the manual.
Scripts are edited in the Script Editor (Alt+E), Scripts tab (Ctrl+3).
Functions
Functions are pieces of code that perform a certain task, much like a response to a trigger or a button press. Functions are the basis for reusable code and allow you to write some code once and reuse it many times over. Functions are called whenever they need to be run. You are already familiar with send and echo, those are both functions being called when we want them to run.
Example: spellup function
For example, we have made a button called spellup. We also have an alias spellup that performs exactly the same thing. We also have a trigger that identifies when we have been dispelled that again performs the exact same thing.
The problem now is that we have three different areas of code to maintain. What if we wanted to change the spells slightly? We would need to change the code in all three sections. This is a perfect use case for a function.
To create a new script, open the Script Editor (Alt+E) and the Scripts tab (Ctrl+3).
Add a New Item (Ctrl+N) and in the Name field type Spellup Functions. Ignore event handlers for now as that is an advanced topic and add the following example to the script section:
function spellup()
   send("cast bless")
   send("cast haste")
   send("cast fly")
   send("cast sanctuary")
end
We use the function keyword followed by whatever we wish to name this function, in this case spellup, followed by some parentheses. We added some commands to send to the game using the send keyword (which is in itself a function call). We then end or close the function off.
Now in our button, alias and trigger our script to cast those four spells would simply be:
spellup()
The function spellup() is found by Mudlet and runs (or executes) whatever the function contains, in our case casting four spells.
For further reading about scripts check out the scripting part of the manual.
Final Thoughts
We hope this has given you a solid introduction to using Mudlet. As you can see it is a very advanced MUD client capable of handling a variety of tasks in many ways. The key takeaway is defining your problem first then using the appropriate method to resolve it.
- I want to be able to drink automatically when thirsty. Trigger.
- I want to cut down on repetitive typing. Alias.
- I want to save my game every 10 minutes. Timer.
- I want a hotkey to quit the game when I see the boss coming. Keybinding.
![]() Note: We strive to provide good documentation and would appreciate any feedback on clarity or further helpful examples. Join us on the forums or Discord.
Note: We strive to provide good documentation and would appreciate any feedback on clarity or further helpful examples. Join us on the forums or Discord.
Happy MUDding!