Руководство: Введение
Автоматизация и правила игры
Фактически говоря, можно создать ИИ (искусственный интеллект), который делает все, что вы можете сделать в игре. Даже более того, программа сможет превзойти тебя почти в каждой рутинной операции. Сложность создания такой программы зависит от задач, которые ей предстоит выполнить: сбор бабла очень легко, проходя через подземелье и прокачки персонажа быть в меру легким и социально взаимодействовать с другими реальными людьми, будучи зверски трудно (см. A.L.I.C.E.). В конце концов, вы учите Mudlet обрабатывать информацию и действовать так, как вы считаете лучше всего подходит. Потому что код настолько мощный, он может дать вам конкурентное преимущество в том, что некоторые люди считают несправедливыми или даже обман. На момент написания этой статьи (2 ноября 2008), такая автоматизация может быть лучше всего наблюдена в коммерческих массивно-многопользовательских онлайновых ролевых игр (MMORPG), известно как золото-сельское хозяйство или прокачка. Основная идея заключается в создании системы, которая позволит поднять своего персонажа до максимального уровня и собирать игровую валюту в процессе, оба из которых могут быть эффективно обменять на реальные деньги. Распространение вышеуказанных аспектов может иметь гораздо более далеко идущие последствия, чем просто несправедливость, таких как инфляция, потеря равновесия с точки зрения игровой механики или, в конечном итоге, полный крах экономики в игре. Дополнительные сведения см. в статье "простая Экономика на реальные деньги торговли в онлайн-играх" от Июня-это сок из Сеульского Национального университета. По этим и разным другим причинам администраторы и владельцы соответствующих виртуальных миров могут запретить использование средств автоматизации. Несоблюдение может привести к приостановке или удаление персонажа пользователя или учетной записи для будущих отказу в обслуживании.
В том числе поддержка скриптов в Mudlet, мы фактически даем Вам возможность создания и использования инструментальных средств ИИ, однако, мы не одобряем или поощряем использование этих систем, если это запрещено в вашей игре. Имейте в виду, что путем обмана можно уменьшить качество угры для других игроков и себя.
Функции автоматизации Mudlet
Mudlet предлагает широкий спектр стандартных функций для автоматизации или иным образом улучшить ваш игровой опыт. Они включают, но не ограничиваются:
- Псевдонимы
- пользовательский ввод текста, который преобразуется в другой, как правило, более длинный чем введенный в Mudlet.
- например набрав "'вз"' текст преобразуется в "'взять золото с земли;положить золото в мешок" и будет отправлен в игру"'.
- Сочетания клавиш
- также известные как "горячие клавиши", позволяют выполнение определенных пользовательских команд нажатием определенной комбинации клавиш
- например нажмите CTRL+H чтобы отправить "сказать Привет Василий!" в MUD или сыграть Марсельезу
- выполняют определяемые пользователем команды при получении конкретной строки из MUD,
- например, MUD отправляет: "Вы видите, что здесь стоит Вася", а Mudlet автоматически посылает "пнуть Вася" в MUD.
- [ [#Timers| Таймеры]]
- отсрочка выполнения команды или выполнение ее по истечении заданного периода времени.
- например, бросить рукавицу в Эрика-подождать 3 секунды-воскликнуть Давайте закончим это здесь!
- позволяют пользователю хранить текст или числа для легкого и удобного использования внутри скриптов.
- позволяет пользователю создавать триггеры для определенных событий, например, когда Mudlet подключился к MUD, или даже определенных пользователем событий для создания комплексной или сложной обработки.
Чтобы начать программировать в Mudlet, посмотрите три скринкаста которые объясняют основные моменты - это поможет вам изучить основы.
Продолжайте читать для введения в функции Mudlet:
Псевдонимы
Псевдонимы - самый простой способ автоматизировать игровой процесс - вы можете использовать псевдонимы, чтобы сократить количество набираемого вами текста. Более подробная информация здесь: Руководство:Механизм псевдонимов]
Пример - Самогон'О'Matic 6000
Вы прогуливаетесь по эпическому подземелью Нечестивого Файррагона Вестерсанда, собирая корни, чтобы заварить зелье и тем самым восстановить рост волос на лысой голове фермера Бенедикта. Как только вы видите корень, вы должны:
открыть мешок с инструментами
получить серп проклятия из мешка с инструментами
обрезать корень
<ждать 5 секунд>
очистить серп проклятия от смертельной корневой кислоты
положить серп проклятия в мешок с инструментами
закрыть мешок с инструментами
открыть волшебный мешок для хранения
взять корень
положить корень в волшебный мешок для хранения
закрыть волшебный мешок для хранения
И как только вы закончите, сделайте то же самое еще девять раз... три раза в день!
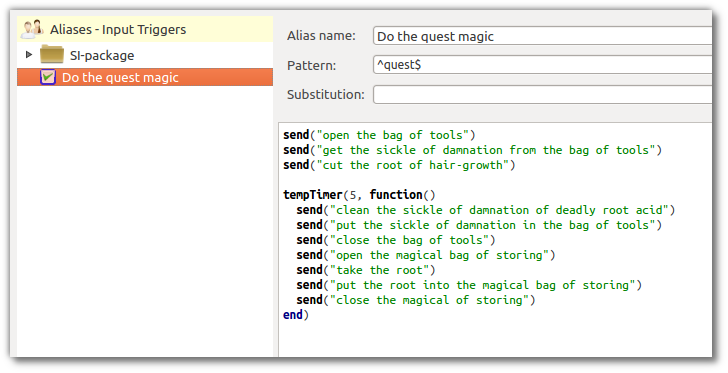
Альтернативой будет создание "псевдонима", который будет делать все это с помощью одной команды - например, "quest". Чтобы это произошло, читайте дальше! Вот краткий обзор на то, что должно получится в итоге:
Создание псевдонима
Для начала нажмите на кнопку Псевдонимы(Aliases) в Mudlet, а затем на кнопку Добавить. Это создаст пустой псевдоним, который мы сейчас заполним.
Поле Имя псевдонима не является обязательным - оно в основном используется для списка псевдонимов, который вы видите слева, как простой способ отличить все псевдонимы. Пока, что вы можете просто назвать наш псевдоним "тест". Поле Шаблон(Pattern) - это то место, куда вы помещаете регулярное выражение-шаблон для описания команды, которую вы введете, чтобы ваш новый псевдоним сработал. Допустим, мы хотим, чтобы наш новый псевдоним посылал команду "сказать Привет" всякий раз, когда мы набираем "сп". Шаблон регулярного выражения будет '^сп$. Затем в поле "Команда(Commands)" мы ставим "сказать Привет". После сохранения и активации нового псевдонима "test", всякий раз, когда вы набираете "сп" Mudlet будет посылать не "сп", а "сказать Привет". Мы называем этот процесс подмены разворачиванием псевдонима.
Mudlet использует механизм регулярных выражений Perl. Регексы - это особый способ сопоставления слов. Новичкам достаточно подумать о них как об общем способе указания самих слов и их расположения в строке. Для основных псевдонимов достаточно знать, что символ ^ символизирует начало строки, а символ $ символизирует конец строки. Если вы хотите сделать псевдоним "во", который посылает команду "взять оружие", вам не нужно заботиться о размещении или подборе шаблона в целом. Все, что вам нужно сделать, это поместить ^во$ в поле под названием "Шаблон(Pattern)" и ввести взять оружие в поле под названием "Команда(Command)". Затем нужно сохранить новый псевдоним, нажав на иконку "Сохранить" в верхнем среднем углу. Символ "Сохранить" исчезнет и освободит место для маленькой синей галочки. Если этот флажок установлен, то псевдоним активен. Если синее поле пустое, псевдоним деактивируется и не будет работать, пока вы не нажмёте на значок "активировать" (иконка закрытого навесного замОчка). Теперь все готово к работе. Введите "во" в командной строке и нажмите клавишу ввода. Mudlet отправит "взять оружие" в MUD. Псевдонимы - это, в основном, функция, позволяющая немного сократить набор текста (так же, как и горячие клавиши, которые будут подробно описаны в следующем разделе руководства). Более подробное описание использования псевдонимов будет дано позже в руководстве.
Создание псевдонима для цели
Чтобы сделать псевдоним, который запомнит вашу цель - упростит использование ваших навыков и уменьшит сложность ввода цели в любое время, сделайте следующее:
В поле 'Шаблон(Pattern)' разместите следующее:
^ц (.+)$
Это будет соответствовать всем командам, которые вы набираете в формате 'ц <любой текст> - это будет соответствовать ц крыса, ц Т'харн, ц человек и так далее.
Далее вставляем это в большое поле ввода:
target = matchs[2]
cecho ("<light_slate_blue>Моя цель сейчас: <red>".. target.. "\n")
Вы также можете создать псевдоним с необязательной целью:
^ц(?: (.+))?$
Теперь целью, если она указывается, будет matches[2]. С помощью этого кода можно проверить, была ли указана цель:
send("колдовать заклинание на "..(matches[2] or target))
Вот и все - всякий раз, когда вы используете этот псевдоним, ваша цель будет запоминаться в переменной target.
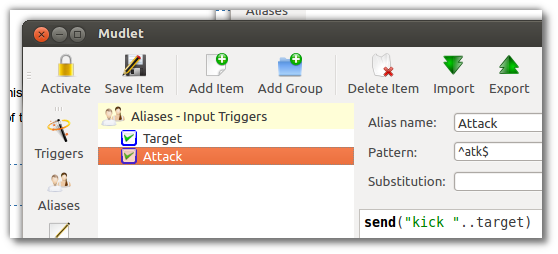
Далее, вы бы хотели использовать эту переменную - так сделайте еще один псевдоним, который сформирует атаку для вас! Вот пример:
Шаблон(Pattern):
^ацп$
Код:
send("пнуть "..target)Результатом выполнения этого псевдонима станет пинок по цели, когда вы наберете ацп. Не стесняйтесь подстраивать слово-"триггер"(Шаблон) и команду так как необходимо вам.
Переменные
Переменные представляют собой контейнеры для данных. В Lua они могут хранить цифры или слова. Вы можете использовать переменные для хранения важной информации, например, сколько золота у вас есть, или чтобы они запоминали что-то для вас.
Синтаксис для того, чтобы переменная запомнила число, следующий - напишите или скопируйте в редакторе Скрипты(Script) в новом скрипте:
variable = 1234Или чтобы переменная запомнила какой-нибудь текст:
my_name = "Bob"It'll then appear in the Variables view, like so:
Вы также можете легко проводить базовые математические вычисления, например:
Чтобы соединить строки вместе, можно использовать символы".." :
my_full_name = "Bob" .. " the Builder"Не забывайте использовать пробел, когда вы соединяете две переменные вместе:
имя = "Вася"
фамилия = "Пупкин"

-- неправильно: получится "ВасяПупкин"
full_name = firstname .. lastname

-- правильно: получится "Вася Пупкин"
full_name = firstname .. " " .. lastname
Вы также можете редактировать и удалять переменные из окна списка переменных. Будьте осторожны при изменении или удалении существующих переменных, сделанных сторонними скриптами - вы можете их сломать. Если это произойдет, при повторном открытии профилей переменные будут возвращены в рабочее состояние.
Хотя вы можете создавать переменные в окне "Переменные", помните, что они не будут сохраняться при выключении клиента Mudlet - если вы хотите, чтобы они были более постоянными, создавайте скрипты с переменными вместо них.
Отправка команд в MUD
Для отправки команды в MUD можно использовать функцию send(). Данные внутри кавычек отправляются в MUD.
Например, следующий код посылает команду съесть хлеб:
send("есть хлеб")Если вы хотите включить переменные в команду send, вам нужно префиксовать и суффиксовать их двумя точками вне кавычек, вот так:
send("Меня зовут ".. full_name .. ".. А как тебя зовут?")Если ваши команды заканчиваются переменной, вам не нужны две точки после нее:
send("Привет, меня зовут ".. character")Если вы хотите включить двойные кавычки, используйте двойной набор квадратных скобок вот так:
send([[скажите "Привет, я тут новенький!"]])При вставке переменной вы используете ]] и [[ соответственно:
send([[пнуть ]]..жертва)Чтобы отправить сразу несколько направлений(SpeedWalk), используйте speedwalk():
speedwalk("n;e;s;w;")Чтобы отправить сразу несколько действий, используйте sendAll():
sendAll("атаковать, "колдовать магическую стрелу")Отображение текста на экране
Для эхоповтора (показать текст самому себе без отправки его в MUD) можно использовать функцию echo () или insertText (). Например, в следующем коде будет показано "Время обедать!" на вашем экране:
echo("Время обедать!")Если вы хотите включить переменные в эхо, вы конкатенуете (складываете) значение вашей переменной в текст:
my_gold = 5
echo("У меня ".. my_gold.. " кусочков золота!\n")
Если вы хотите чтобы последующий текст показывался уже на другой строке - вставьте \n:
echo("this echo\nis on\nthree lines!")

-- вывод на экран будет следующим:
this echo
is on
three lines!
Проверка ошибок в вашем коде
Несомненно, вы будете делать ошибки, когда будете кодить! В конце концов, вы всего лишь человек. Есть два типа ошибок, которые вы можете сделать в целом: когда слова, которые вы ввели, не имеют никакого смысла, или они имеют смысл, но они не делают то, что вы на самом деле думали и намереваетесь сделать-или другие обстоятельства мешают исполнению в этот момент времени.
Синтаксические ошибки это же божьи коровки
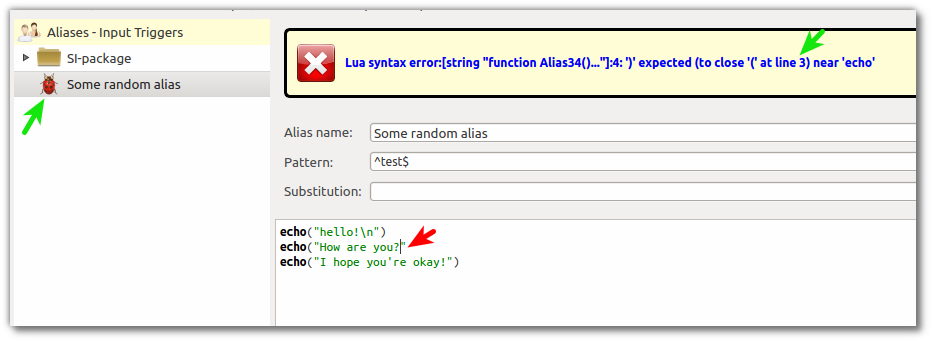
Когда вы вводите что-то, что не имеет смысла для Lua, это называется синтаксической ошибкой (или[1]). Mudlet это поймет и покажет вам маленькую божью коровку, а также ' скажет вам, в какой строке ошибка. Вот пример:
The echo() function on line 3 is missing a closing bracket - every bracket in Lua that's not green needs to be closed. Mudlet showed you a ladybug symbol on the alias, to indicate that the alias has a problem. It also showed you that the ( bracket should be closed on line 3. To fix this, you'd add the ), save, and it will be all happy.
Runtime errors aka Errors View
Another type of mistake is when what you typed in makes sense to Lua when you typed it in, but when it's time for code to be actually run, something wrong happens. For example, you asked Lua to eecho("hey!") - this is valid, you typed it in right, but there is one problem - eecho doesn't exist. So when you run the alias, nothing actually happens. Why?
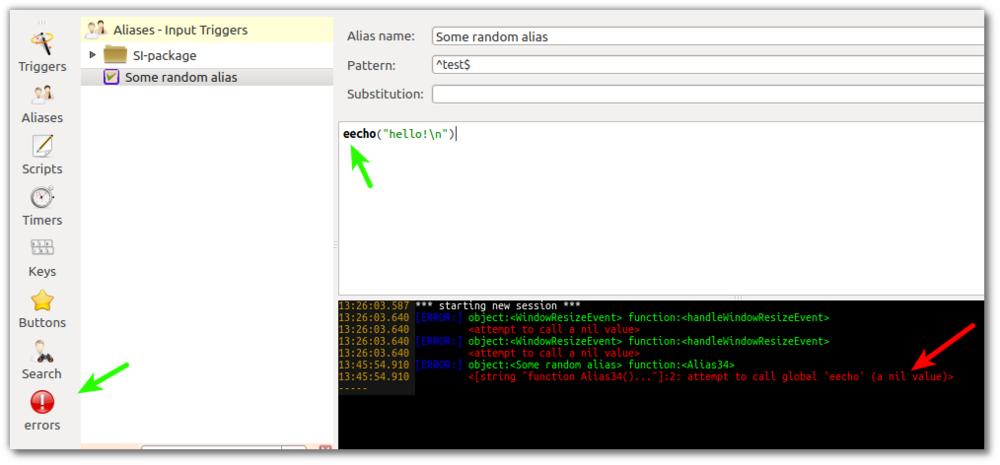
Mudlet puts all problems that happen when things are run (runtime errors) into the Errors view. It is hidden by default, open it by pressing the errors button that you see on bottom-left. This is where the error is logged at - not your main window, so you aren't spammed when you make a mistake in a piece of code that happens very often.
Opening it up will show this:
Let's analyse the message that's shown to us. object:<Some random alias> means that the Mudlet name you gave to the thing that had a problem is Some random alias - which is, indeed, our alias. function will tell you Alias, Trigger, Script or something else - this helps you locate the problematic item in question.
Next red line is the actual error: it's saying that on line 2 (it's off by one - so actually line 1), eecho is a nil value. In Lua, nil means doesn't exist. Hence what it's telling you is that eecho does not actually exist! Change it to echo, run it again, and there will be happiness.
That's it for now - this page in time will be improved with common techniques you can use to diagnose errors quickly, etc... if you know anything about this, feel free to add it here!
Триггеры
Triggers are an automation feature offered in all MUD clients. They help you respond quicker a particular situation and generally make things more convenient for you since you need to do less manual work as your triggers will do the hard work for you often times. This helps you concentrate more on the important aspects of the game and lessen stress.
The way a trigger works is simple: You define some text that you want to trigger some action. This is called the trigger pattern. When the trigger "sees" this text in the MUD output, it’ll run the commands you’ve told it to.
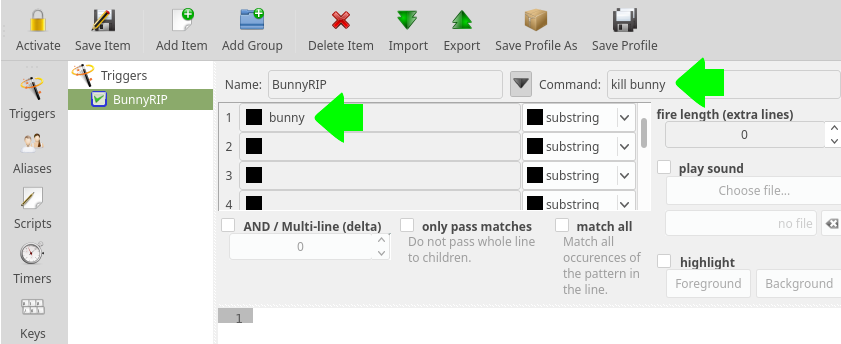
Simple example: Whenever you see a bunny, you want to attack it (meanie!).
- You type "bunny" in the data field titled "1" to add this word to the list of texts this trigger fires on. Make sure the dropdown next to it says "substring".
- Now you type "kill bunny" in the field called "Command". This will be the command that the trigger will send to your game whenever the trigger fires.
- Finally click "Save Item" to save your new trigger and also click "Activate". By doing this, the blue checkbox icon in front of the trigger name (in the trigger tree on the left side) gets checked. The trigger is now activated.
As the trigger is active, each time the word "bunny" will appear in the MUD output, your trigger will issue the command "kill bunny" automatically. It will repeat this as long as the trigger stays active. When you want to stop hunting bunnies, you can simply select the bunny trigger and then click on the padlock icon to deactivate the trigger. The check mark will vanish and the trigger will stop firing until you re-enable it again via the padlock icon.
You can also put triggers in a group, then lock a group of triggers or an entire trigger branch. If you do that, all triggers in this group or branch will be locked until you remove the lock again. The locking starts from the root of the tree down to the end. As soon as a lock is met the trigger engine will skip the locked branch. Locking and unlocking branches is one of the most common actions you have to take care of when playing. For example, you can turn on your defensive triggers when engaging into a battle and you turn them off afterwards, or you turn on your harvesting triggers only when you are going to harvest.
Beginners should use Mudlet's automated highlight triggers in the beginning to highlight the text that has been triggered on to get the hang of the different trigger and pattern types. Click on the "highlight trigger" option and pick a foreground and a background color that you like to highlight your trigger with. When the trigger matches it automatically highlights its pattern. This is the most used form of triggers in mudding as it is a quick way of highlighting words that are important to you at the moment. You don’t have to know anything about scripting, regular expressions etc. to use highlight triggers. Just type in the word you like to be highlighted, select appropriate colors, save the new trigger and activate it.
Сопоставление одного неизвестного слова
You can also set up a trigger to gather the weapons, gold or whatever skeletons could carry around with them. Since we do not know what the loot is exactly just yet, we will need to set up a trigger to match the line, identify the loot and take whatever it is that was dropped.
Examples for messages received could be:
 The skeleton drops ring.
 The skeleton drops gold.
 The skeleton drops scimitar.
 The skeleton drops wooden key.
"The skeleton drops " (including the last space character) is the generic segment of the line, but the loot itself varies. Thus, we need to tell the client to take whatever the skeleton dropped. We do this by setting up a so-called regular expression:
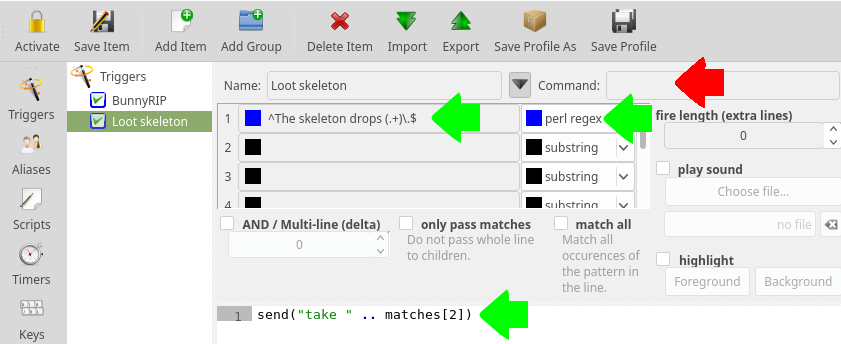
- In the data field titled "1" write the following perl regex type pattern:
^The skeleton drops (.+)\.$
- Make sure to change the dropdown menu for this line to "perl regex" as well
- In the big script box below write the following lua code:
send("take " .. matches[2])
The regular expression (.+) matches any characters that the client receives between "The skeleton drops " (NB: notice the blank/space character at the end) and the full-stop symbol that ends the sentence. Know that the variable matches[2] simply transfers the first matched text fitting the search criteria into the output. For this example, it will be the dropped loot we now will take automatically. This text may actually contain more than one word, like in the fourth example shown above.
In case you may wonder, matches[1] contains the entire line in whitch the matched text was found, whereas matches[2] contains only the first capture group. More on this in section two of the manual. The symbols ^ and $ indicate the start and end of a whole line.
Сопоставление много неизвестных слов
Now, we don't want to take only loot from skeletons but from many different sources.
Примерами могут быть:
 The skeleton drops ring.
 The giant drops gold.
 The king drops scimitar.
 The box drops wooden key.
So let’s make a trigger that would gather the loot from anybody:
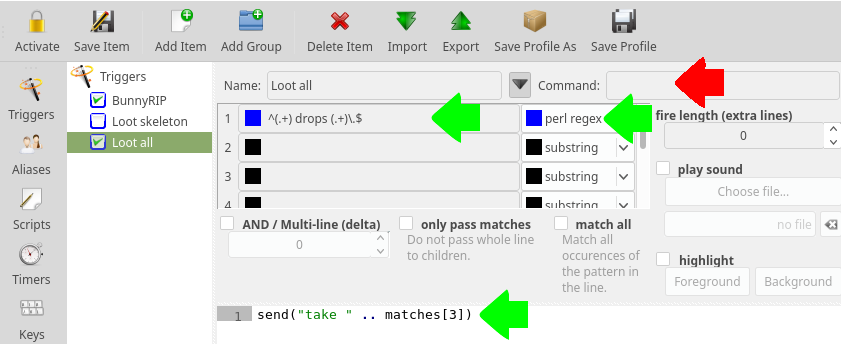
- In data field "1" write:
^(.+) drops (.+)\.$
- Select perl regex type pattern again
- Below write the lua code:
send("take " .. matches[3])
In this case, any time somebody, or something, "drops" something or someone else, the client will pick it up. Note that we used matches[3] instead of matches[2] this time, in order to pick up the second match. If we used matches[2], we’d end up picking up the skeleton’s corpse.
Сопоставление известных вариантов
If you’re playing a MUD in English, you’ll notice that these triggers probably won’t work due to English syntax. Compare:
Скелет падает кольцо.
Скелет падает кольцо.
Chances are that you’ll see the later case a little more often. If we used our old regex, the trigger would produce something like this.
 TRIGGERED LINE: The skeleton drops a ring.
 OUR REACTION: take a ring
However most MUDs can’t handle determiners in user-input, such as articles (i.e. a, an, the) or quantifiers (e.g. five, some, each). In effect, our triggered reaction won't suffice. Instead we would need to react with just "take ring" again.
To correctly handle lines like this, we could either create multiple triggers matching every possible article, which could become very cumbersome. Instead we make one regular expression filtering out all these words and phrases:
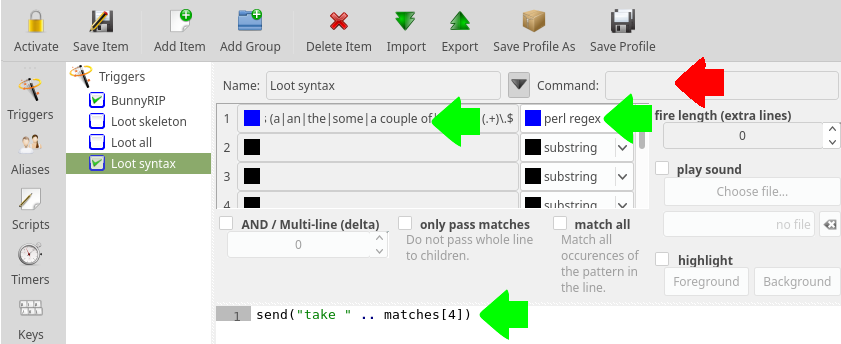
- Write a new perl regex type pattern:
(.+) drops (a|an|the|some|a couple of|a few|) (.+)\.$
- With this script:
send("take " .. matches[4])
Once again, note that this time we are using the third matched group through matches[4] now.
![]() Note:
Certain other languages, with a morphology richer than that of English, might require a somewhat different approach. If you’re stuck, and your MUD-administrators don’t prohibit the use of triggers, try asking on the corresponding world’s forums.
Note:
Certain other languages, with a morphology richer than that of English, might require a somewhat different approach. If you’re stuck, and your MUD-administrators don’t prohibit the use of triggers, try asking on the corresponding world’s forums.
For more information, see the chapter Regular Expressions.
Basic Regex Characters
You already know (.+) which will match to any and all characters that follow until the end of line or another specific text that you may put in your regex. How about if you only want to match to certain type of characters?
Извлечение номеров из триггеров
Wildcards from triggers are stored in the matches[] table. The first wildcard goes into matches[2], second into matches[3], and so on, for however many wildcards do you have in your trigger.
For example, you’d like to say out loud how much gold did you pick up from a slain monster. The message that you get when you pick up the gold is the following:
Вы подбираете 16 золотых.
Триггер, соответствующий этой схеме может быть:
- Perl Regex:
^You pick up (\d+) gold\.$
- Script:
echo("I got " .. tonumber(matches[2]) .. " gold!")
In your code, the variable matches[2] will contain the amount of gold you picked up - in this case, 16. Now you say out loud how much gold you did loot. Notice also that (\d+) will only recognize numbers but not letters or a space character.
Извлечение слов из триггеров
Here’s a more advanced example by Heiko, which makes you talk like Yoda:
- Perl Regex:
^say (\w+) *(\w*) .*?(.*)
- Script:
send( "say "..matches[4].." "..matches[2].." "..matches[3] )
The trigger will recognize that you say something, and save in seperate groups the first word, the second word and then the rest of you text. Here the \w wildcards will match any numbers or letters but no non-alphanumeric characters. It then shows you say the rest of the text first, then the first word and finally the second word. Notice this will only affect the text displayed for yourself, but if you want to also adjust the text you are sending to other players, please see the chapter about aliases.
Выделение слов
To highlight something in the MUD output, make a trigger and use the "highlight trigger" option to highlight the matched trigger pattern.
Optionally, you can also make use of the bg() and fg() functions in scripting to highlight.
Keybindings
Keybindings (also known as hotkeys or macros), are in many respects very similar to aliases. However, instead of typing in what you want to be done (maybe including additional parameters) and pressing Enter, you simply hit a single key (or combination of keys) to let Mudlet do the work.
Example - You don’t drink tea, you sip it! You’re participating in an in-game tea sipping contest. The winner is the first person to sip an Earl Grey, should the quiz-master make a vague reference to a series of tubes, or a Ceylon Mint, if he begins talking about the specific theory of relativity. In order to give us a competitive advantage, we will define two keybindings:
HOTKEY: F1 command on button down: sip earl gray
HOTKEY: F2 command on button down: sip ceylon mint Now you just have to listen, or rather read, carefully and hit either F1 or F2 to claim that prize.
Another practical use for keybindings would be creating a so-called "targeting system", which is especially useful for grinding down armies of pumpkin-men in MUDs without auto-attack. See the Variables chapter for further details.
Example instructions on how to make a keybinding (for a set of settings for binding the keypad):
- Click the Keys button: File:Keys button.jpg
- If you wish to group them together, click the Add Group button
- Then name your group, Keypad for instance
- With the group selected now click the Add Item button
- Name it, let's say North, in the Name: widget
- If you only need a single command, like north for our example, place it into the Command: widget, otherwise skip to step 9
- Click the Grab New Key button
- Click the button sequence you want to use for your keybinding, keypad 8 for north
- Now if you need additional code to execute when you click your keybinding, or want more complicated code, place it into the giant code box.
- Click the Save Item button if done or New Item button if not.
- Click the Activate button when finished to make sure they work.
Here is a link to the resulting keybinding XML file on the forums: [2]
Таймеры
Timers, as the name suggests, can be used to execute a specific command at a certain time, after a certain time or once every so often. They can be used by clicking in the "timer" editor, or direcly in your script.
To use a simple timer that does something after a period, write like this:
tempTimer(seconds, [[code]])Seconds needs to be a number, the time until the timer starts. Code can be any commands which you want executed then.
![]() Note: Seconds can be a decimal, so 0.5 for half a second, or 1 for a full second will both work as expected.
Note: Seconds can be a decimal, so 0.5 for half a second, or 1 for a full second will both work as expected.
Here's a finished example which you can copy and put in your code directly:
-- this timer will greet you exactly 2 seconds after it was made
tempTimer(2, [[ echo("hello!\n") ]])
You can combine both normal and timed commands, for example as code in an alias or keybinding:
-- this code will let you go north immediately, then go east after 2 seconds
send("n")
tempTimer(2, [[ send("e") ]])![]() Note: All timers which are made at the same time, will start counting from this common point in time, not relative to each other - so if you want to make one timer go off 1 second after another, don't do this:
Note: All timers which are made at the same time, will start counting from this common point in time, not relative to each other - so if you want to make one timer go off 1 second after another, don't do this:
-- incorrect:
tempTimer(1, [[ echo("hello!\n") ]])
tempTimer(1, [[ echo("how are you?\n") ]])
Both of these timers will go off at once, because both started together, right away! Instead, do this:
-- correct:
tempTimer(1, [[ echo("hello!\n") ]])
tempTimer(2, [[ echo("how are you?\n") ]])![]() Note: If you do not want to put all your timed code in [[ brackets ]] there is another way of writing the same example. (This is available since Mudlet 3.5)
Note: If you do not want to put all your timed code in [[ brackets ]] there is another way of writing the same example. (This is available since Mudlet 3.5)
-- this timer will greet you exactly 2 seconds after it was made
tempTimer(2, function() echo("hello!\n") end)
That's it for the basics of scriptable timers in Mudlet. Want to know more? Here is a full description of timers in Mudlet.
Кнопки
You can use Mudlet to create simple buttons on your screen without much coding at all - you can attach button bars to the top, left or right side of the screen. Each of these locations can contain an infinite number of button bars that are shown when active or hidden when inactive. You can also create drop-down menus or or two-state buttons - ones that you can click on and they stay pressed down.
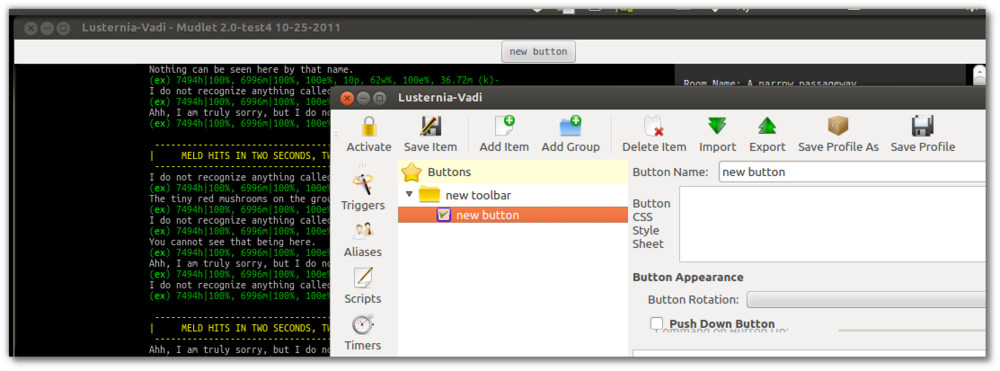
To get started with buttons, make a group (buttons have to be in a group to show) and add buttons inside them. Active buttons or groups to make them be visible. Here's an example - by making a new group and a button inside it, and activating both, we got a button to spawn:
Buttons show in the order they appear in - so if you'd like one button to be above another, just drag it visually in the editor!
Меню
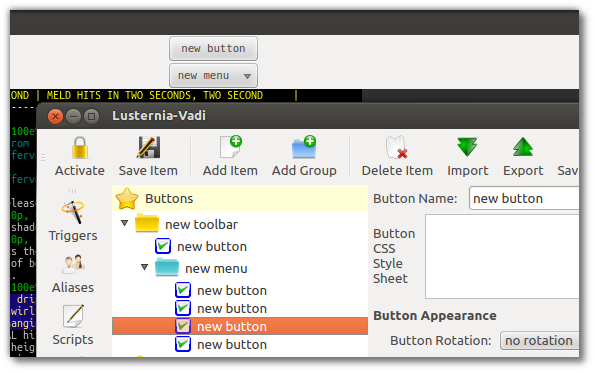
An important use case for buttons is to have various menus which contain a number of checkbox buttons or sub menus in order to quickly set various scripting configuration or other options in your scripts. To start a menu of buttons, create another group inside your toolbar group and add individual buttons inside it, like so:
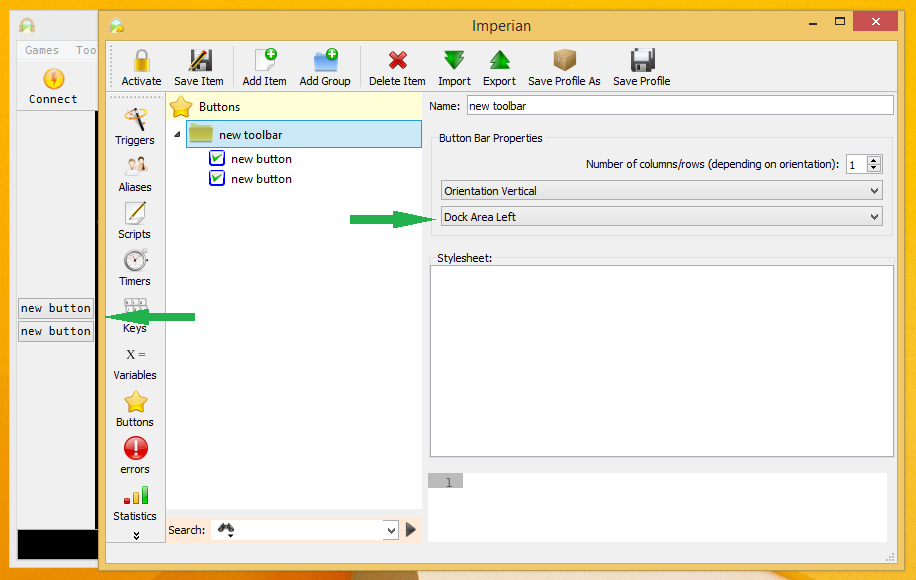
To change the side of Mudlet that the buttons use, change the Dock area <side> option and save. You can also make buttons align themselves top to bottom or left to right with the Orientation <horizontal or vertical> option.
Making buttons do stuff
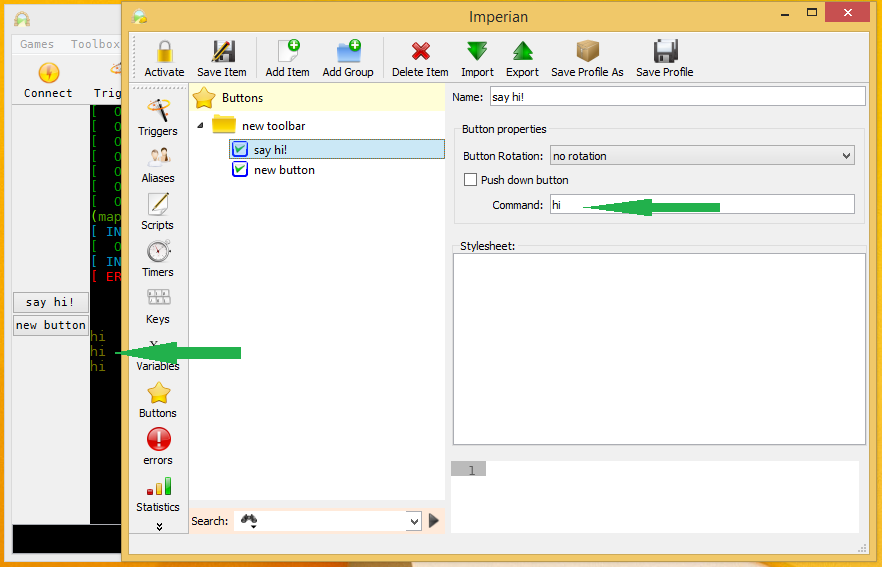
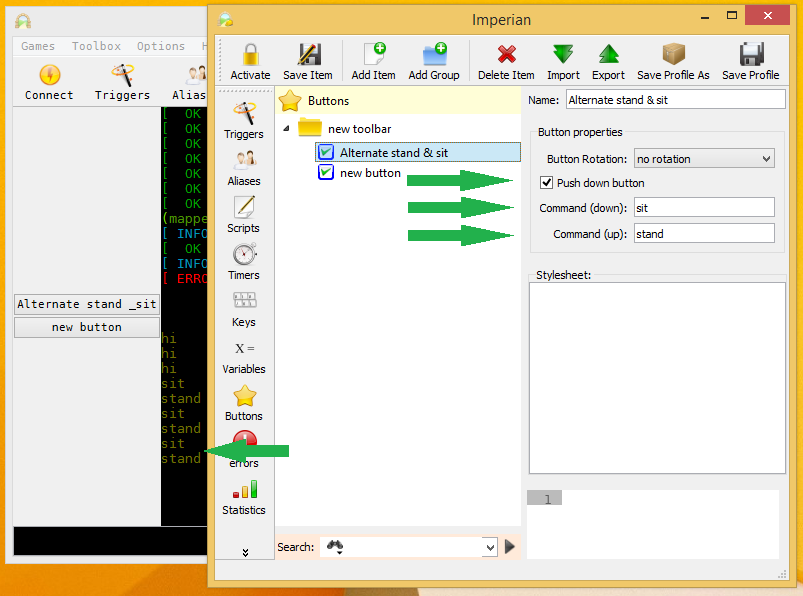
Buttons are half as useful only being there. You can also make them do commands for you for when you press them! To make a button do your command, or alias, or anything - type it into the Command on Button Down field. Pressing the button will do that command then:
You can also make a button do two things, toggling between each. To do that, enable the Push Down Button option, and type the command you'd like your button to do when it's released in the Command on Button Up field.
![]() Note:
Note:
If you'd like to include & in the button name, put double && - a single & will act as a mnemonic to underline the shortcut letter.
Окраска & настройка кнопок
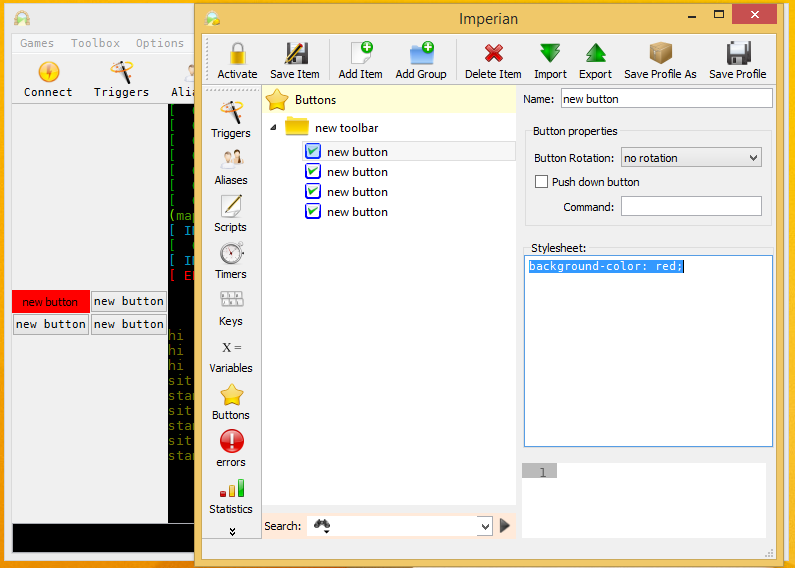
To change how your buttons look, you put descriptions into the CSS Style Sheet field, in the format of <a word describing something>: <how it should look>;. For example, if you'd like to make the button be red, put background-color: red; into the CSS box:
A full list of names you can use to customize your buttons view is available here. Take note of how that page has the descriptions inside {} brackets - you don't need them, only paste what's inside them in Mudlet.
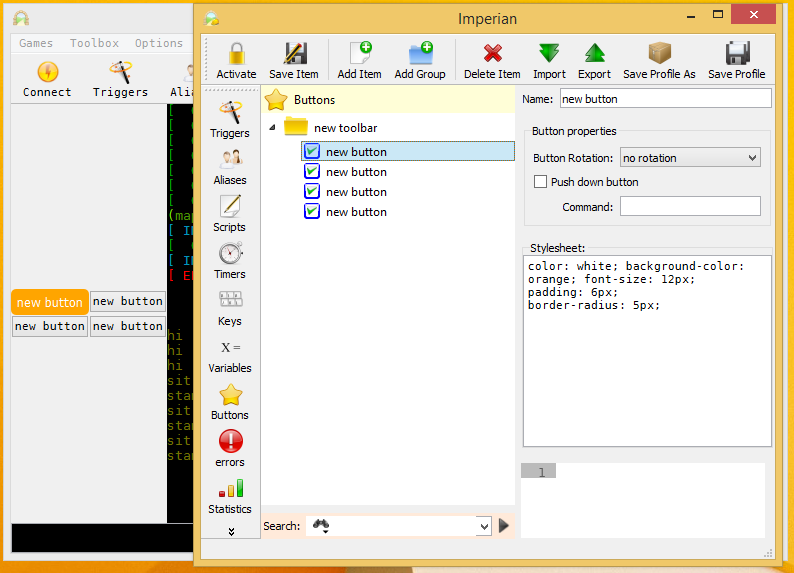
Applying some skills, we can make our buttons look much more aesthetic:
This was the code used, feel free to start your buttons off with it:
color: white; background-color: orange; font-size: 12px;
padding: 6px;
border-radius: 5px;
Managed layouts
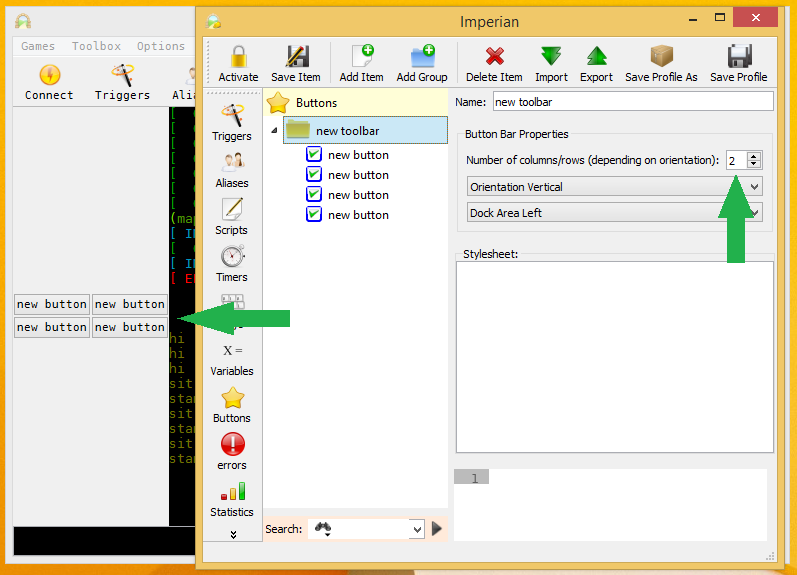
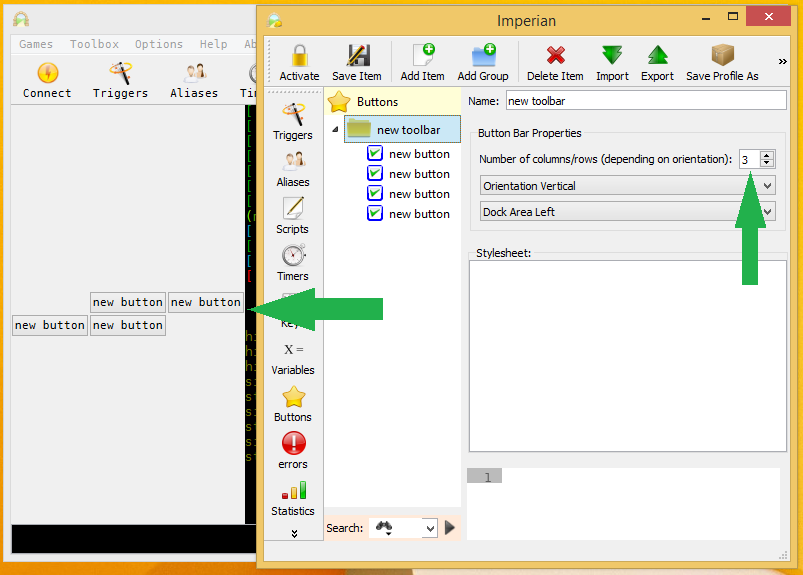
To get your buttons to align into rows or columns (that depends on their orientation), add a number to the Number of columns or rows field. Here's an example with two columns on the left:
Here's another example with three columns on the left:
![]() Note:
Note:
You can change how your buttons are aligned within rows by clicking on the button group - it will cycle through different possible configurations for you.
Встроенные aлиасы
The following aliases are available by default in new Mudlet profiles.
| Alias | Description | Examples |
|---|---|---|
| lua | Run Lua code from the input line. | lua print("hello") lua 2+2 lua clearWindow() |
| `echo | Simulate text from the game to test your triggers. You can use $ for a new line. |
`echo You see a rabbit cross the road. `echo line1$line2 |
| : | Send a command to all open profiles. | :hello :follow alice :e |
If an alias on the list isn't working for you - try copying it from a new profile, since existing profiles will not get new aliases as they're introduced to Mudlet.
Разные примеры
Вот еще несколько разных примеров.
Mud syntax: get coins from corpse and also get coins from corpse 3. Alias Pattern: ^gcc(?:\s(\d+))?$ (can accept simply gcc and also gcc 3 for example).
send("get coins from corpse " .. (matches[2] or "") )Mud syntax: unlock northwest with steel key Alias Pattern: ^un (\w+) (.*)$
send("unlock " .. matches[2] .. " with " .. matches[3] )See also: Mudlet Technical Manual
