Difference between revisions of "Manual:Introduction"
(→Highlighting Words[edit | edit source]: fix weird formatting) |
(add connection window and profile preferences pages) |
||
| Line 3: | Line 3: | ||
{{#description2:Basic introduction to Mudlet, including aliases, variables, scripts, triggers, keybindings, timers, events, etc.}} | {{#description2:Basic introduction to Mudlet, including aliases, variables, scripts, triggers, keybindings, timers, events, etc.}} | ||
<translate> | <translate> | ||
| + | |||
| + | {{:Connection_Window}} | ||
| + | |||
| + | {{:Profile_Preferences}} | ||
| + | |||
= Automation and game rules = <!--T:1--> | = Automation and game rules = <!--T:1--> | ||
Revision as of 05:12, 23 June 2024
Connection Window
The connection dialog is the first screen you will be greeted with when starting Mudlet. This window is how you set up your initial connection parameters and begin connecting to your game.

![]() Note: The first time Mudlet is run, some options cannot be edited until you create your first new profile or after you start your first game.
Note: The first time Mudlet is run, some options cannot be edited until you create your first new profile or after you start your first game.
Pre-Configured Games
In the left of the window, you will notice a list of several MUD games. To play, select one from the list and click the "Connect" button.
![]() Note: Game admins: like to see your game added to Mudlet? Visit Listing Your MUD.
Note: Game admins: like to see your game added to Mudlet? Visit Listing Your MUD.
New Connections
If you're using Mudlet with an unlisted game or for other telnet services, you'll want to click on the New button then enter a name for the profile (perhaps your character or game name) in the Profile name section. Next enter your Server address and port, these are typically listed on the game website.

![]() Note: Connection parameters cannot be edited while a connection is in progress for a selected profile.
Note: Connection parameters cannot be edited while a connection is in progress for a selected profile.
To connect to a game securely (via TLS or SSL) tick the 'Secure' box in the profile connection settings:

![]() Note: Game admins/developers: check out our sample configuration page or this example of a TLS proxy using nginx for some examples on how to setup a secure connection for your game.
Note: Game admins/developers: check out our sample configuration page or this example of a TLS proxy using nginx for some examples on how to setup a secure connection for your game.
Connecting via telnet:// links
Mudlet registers itself as a handler for telnet:// and telnets:// URI schemes. This means you can connect to a game by clicking a link on a website or running it from the command line:
telnet://aardmud.org:4000
telnets://securemud.example.com
When Mudlet receives a telnet link, it will:
- Look for an existing profile matching the server address and port
- If found, load that profile and connect
- If not found, create a new profile and connect
telnets:// links enable TLS encryption automatically. The default port is 23 for telnet:// and 992 for telnets://.
For MUD administrators: You can add these links to your website so players can connect with a single click:
<a href="telnet://yourmud.com:4000">Play Now</a>
<a href="telnets://yourmud.com:4000">Play Now (secure)</a>
Automatic Login
If your game takes in the characters name first and password next, Mudlet can automatically login for you. To make use of this feature in the Options tab type your name and password into the relevant sections as seen below.

All passwords by default are stored securely in the computers credential store - which means you can't just open up the file with the password and look at it.
When the password is stored securely on the computer, you can find it in the credential manager.
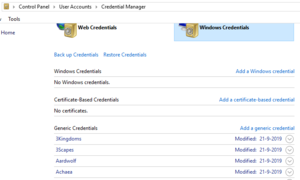
Passwords stored securely in Windows
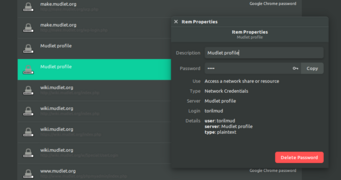
Passwords stored securely in Linux
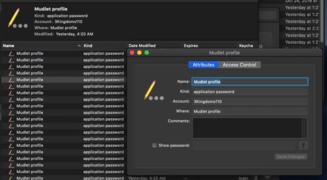
Passwords stored securely in macOS


![]() Note: The drawback of storing the password on the computer itself, however, is that if you use cloud sync for your profiles - the password won't the synchronised. You can go to Special Options in Mudlet's Preferences and change the password to be stored within the profile to make that work, if you'd like the password to be portable but visible in plaintext.
Note: The drawback of storing the password on the computer itself, however, is that if you use cloud sync for your profiles - the password won't the synchronised. You can go to Special Options in Mudlet's Preferences and change the password to be stored within the profile to make that work, if you'd like the password to be portable but visible in plaintext.
Discord Rich Presence
Since version 3.14 forward, Mudlet supports Discord Rich Presence integration for games using GMCP.
This feature can only be enabled on the pre-configured games which currently also support the feature. For more information, read about Discord GMCP
Profile Preferences
The Profile Preferences dialog allows you to customize various aspects of your Mudlet profile's behavior and appearance. This dialog can be accessed through the Settings menu or by pressing the Settings button in the main toolbar.
The preferences are organized into multiple tabs, each focusing on different aspects of your profile configuration. Changes are saved when you click the Save button at the bottom of the dialog.
General Tab
The General tab contains fundamental settings that affect the overall behavior and appearance of your Mudlet profile.
Icon Sizes
These settings control the visual scale of icons throughout Mudlet's interface:
- Icon size toolbars: Controls the size of icons displayed in toolbars using a scale of 1-4
- Scale 1: Smallest icons (16x16 pixels) - best for small screens or high information density
- Scale 2: Small icons (24x24 pixels) - good balance for most users
- Scale 3: Medium icons (32x32 pixels) - default setting, comfortable for most displays
- Scale 4: Large icons (48x48 pixels) - best for high-resolution displays or accessibility needs
- Icon size in tree views: Sets the icon size for items in the script editor tree view (1-4 scale)
- Affects the visual hierarchy in trigger, alias, script, and other editing windows
- Larger icons make it easier to distinguish between different item types at a glance
Menu and Toolbar Visibility
These options control when Mudlet's interface elements are visible, which is particularly useful for maximizing screen space for gameplay:
- Show menu bar: Choose when to display the menu bar
- Never: Menu bar is always hidden (access functions through keyboard shortcuts or toolbars)
- Until a profile is loaded: Shows menu bar until you connect to a game, then hides automatically
- Always: Menu bar is always visible (recommended for new users)
- Show main toolbar: Similar options for the main toolbar visibility
- The main toolbar contains quick access buttons for common functions like connect/disconnect, settings, and window toggles
- Hidden toolbars save vertical screen space but require menu navigation or keyboard shortcuts
Language & Data Encoding
These settings control how text appears in Mudlet and how the interface is presented:
- Interface language: Select the language for Mudlet's user interface
- Available languages depend on community translations
- Note: Changing this requires restarting Mudlet to take effect
- Help translate Mudlet at: https://www.mudlet.org/translate
- Server data encoding: Choose how text from the game server is interpreted
- UTF-8: Modern Unicode standard, recommended for most games (supports international characters, emojis, and special symbols)
- ASCII: Basic English characters only, compatible with very old servers
- ISO-8859-1 (Latin-1): Western European characters, common on older European servers
- CP437: DOS/OEM encoding, used by some legacy BBS-style systems
- CP1252: Windows encoding, sometimes used by Windows-based servers
- Encodings marked with m are provided by Mudlet rather than your operating system
- Troubleshooting: If you see question marks (�) or broken characters instead of text, try UTF-8 first, then consult your game's documentation
- Ambiguous width characters (East Asian): Controls display width for characters that Unicode classifies as having ambiguous width (tri-state checkbox)
- Some East Asian MUDs may use glyphs that Unicode classifies as being of Ambiguous width when drawn in a font with a so-called fixed pitch; in fact such text is duo-spaced when not using a proportional font. These symbols can be drawn using either a half or the whole space of a full character.
- By default Mudlet tries to choose the right width automatically but you can override the setting for each profile.
- Unchecked ('narrow'): Draw ambiguous width characters in a single 'space'
- Checked ('wide'): Draw ambiguous width characters two 'spaces' wide
- Partly checked (Default, 'auto'): Use 'wide' setting for MUD Server encodings of Big5/Big5-HKSCS, GBK, GBK18030 or EUC-KR and 'narrow' for all others
Miscellaneous Options
- Appearance: Controls Mudlet's overall visual theme
- System setting: Follows your operating system's light/dark mode preference
- Light: Traditional light theme with dark text on light backgrounds
- Dark: Modern dark theme with light text on dark backgrounds (easier on eyes in low light)
- A prompt will appear asking if you want to match the code editor theme when switching to dark mode
- Auto save on exit: Automatically saves your profile when closing Mudlet
- Saves triggers, aliases, scripts, variables, and other profile data
- Recommended to keep enabled to prevent data loss
- Notify on new data: Shows a toolbar notification when minimized and new game data arrives
- Helpful for monitoring multiple games or staying aware of important events while multitasking
- Works with your operating system's notification system
- Show icons on menus: Controls whether menu items display icons (tri-state checkbox)
- Unchecked ('off'): Prevent menus from being drawn with icons
- Checked ('on'): Allow menus to be drawn with icons
- Partly checked (Default, 'auto'): Use the setting that the system provides
- Note: This setting is only processed when individual menus are created and changes may not propagate everywhere until Mudlet is restarted.
- Run all keybindings: Controls how multiple matching keybindings are handled
- When unchecked (default), Mudlet only reacts to the first matching keybinding (combination of key and modifiers) even if more than one is set to be active. This means that a temporary keybinding (not visible in the Editor) created by a script or package may be used in preference to a permanent one that is shown and is set to be active.
- When checked, all matching keybindings will be run.
- Compatibility note: It is recommended to not enable this option if you need to maintain compatibility with scripts or packages for Mudlet versions prior to 3.9.0.
- Timer debug output minimum interval: Adjusts a threshold that hides success messages in the Central Debug Console for timers that run correctly when the timer's interval is less than this setting.
- A timer with a short interval will quickly fill up the Central Debug Console with messages that it ran correctly on each occasion it is called. This per-profile control helps reduce that noise.
- Important: Any timer script that has errors will still have its error messages reported in the debug console, whatever this setting is.
- Enable text analyzer: Adds a context (right-click) menu action on any console/user window
- When the mouse cursor is hovered over the menu action, it will display the UTF-16 and UTF-8 items that make up each Unicode codepoint on the first line of any selection.
- This utility feature is intended to help users identify any grapheme (visual equivalent to a character) that a game server may send, even if it is composed of multiple bytes - as any non-ASCII character will be in the Lua sub-system, which uses the UTF-8 encoding system.
- Particularly useful when debugging trigger patterns that should match special characters, understanding how multi-byte characters are encoded, or identifying unexpected characters sent by the MUD server.
Game Protocols
Game protocols are special communication methods between Mudlet and game servers that enhance functionality:
- Choose protocols: Opens a dialog to select which game protocols to enable
- GMCP (Generic Mud Communication Protocol): Modern standard for exchanging structured data
- MSDP (Mud Server Data Protocol): Alternative to GMCP for server-client communication
- MSSP (Mud Server Status Protocol): Provides server information and capabilities
- MXP (Mud eXtension Protocol): Enables clickable links, formatting, and interactive elements
- MCMP (Mud Client Media Protocol): Allows servers to send sounds and music
- MSP (Mud Sound Protocol): Older standard for game sounds
- Technical note: Most modern games use GMCP; consult your game's documentation for specific requirements
- Allow server to install script packages: Permits the game server to send and install script packages
- Useful for games that provide official GUI packages or automation scripts
- Security consideration: Only enable for trusted game servers as this allows code execution
- Allow server to download and play media: Enables media support through supported protocols
- Requires GMCP to be enabled in protocols
- Allows background music, sound effects, and ambient audio from the game
- Media files are cached locally and can be managed in the Special Options tab
Log Options
Logging captures all game text to files for later review, analysis, or sharing:
- Save log files in HTML format instead of plain text: Preserves formatting, colors, and fonts in log files
- HTML logs: Maintain colors, fonts, and formatting but are larger files
- Plain text logs: Smaller files, better for processing with external tools, but lose visual formatting
- Important: You must stop and restart logging for this change to take effect on existing log files
- Add timestamps at the beginning of log lines: Includes time information in logs
- Format: [HH:MM:SS] at the beginning of each line
- Useful for tracking when events occurred or measuring response times
- Save log files in: Choose the directory where log files are stored
- Default location is within your profile folder
- Browse: Select a custom location (useful for cloud sync folders or external storage)
- Reset: Return to the default profile-specific location
- Log format: Select how log files are named and organized
- Formats include date-based naming, session-based, or custom patterns
- Choose based on how you prefer to organize and locate your logs
- Log name: Customize the base name for your log files
- Combined with the log format to create the final filename
- Extension (.txt or .html) is added automatically based on the HTML format setting
Input Line Tab
This tab controls how the command input line behaves and appears, which directly affects your gameplay experience.
Input Settings
These settings modify how your commands are processed and sent to the game:
- Strict UNIX line endings: Use UNIX-style line endings for compatibility with older UNIX servers
- Most modern servers handle both types automatically
- Enable only if your game documentation specifically mentions line ending issues
- Technical: Sends LF instead of CRLF line terminators
- Auto clear the input line after you sent text: Automatically empties the input line after sending commands
- Useful for rapid command entry without manual clearing
- Some players prefer to keep the last command visible for easy repetition
- Highlight history: Highlights text when scrolling through command history
- Makes it easier to see that you're viewing history rather than typing new text
- History is accessed with Up/Down arrow keys in the input line
- React to all keybindings on the same key: Allows multiple key bindings to trigger on the same key combination
- Default behavior: Only the first matching keybinding runs (Mudlet 3.8 and earlier)
- New behavior: All matching keybindings run in sequence
- Useful for complex automation where multiple actions should occur on one keypress
- Compatibility note: Defaults to unchecked to maintain compatibility with older scripts
- Show sent commands: Controls how sent commands appear in the main display
- Never: Commands are not echoed to the main window (silent command entry)
- Script controlled: Lua scripts can control visibility using `send(command, true/false)`
- Always: Commands always appear in the main window regardless of script settings
- Note: The game server can override this setting if it negotiates telnet ECHO mode
- Command separator: Text used to separate multiple commands on one line
- Default is typically semicolon (;) allowing "north;look;inventory" to execute as three commands
- Leave blank to disable multi-command functionality
- Some games use different separators like "&&" or "then"
- Command line minimum height in pixels: Sets the minimum height of the input area
- Range: 0-300 pixels
- Useful for accommodating larger fonts or multiple lines of input
- Higher values provide more space for complex command composition
Spell Checking
Spell checking helps catch typos in your commands and communications:
- System/Mudlet dictionary: Enable spell checking using system or Mudlet dictionaries
- Uses your operating system's spell checker when available
- Provides red wavey underlines for misspelled words in the input line, and cyan dashed underlines for words not in the System/Mudlet dictionary that are present in the User dictionary
- Dropdown shows available languages based on your system configuration
- User dictionary: Choose between profile-specific or shared user dictionaries
- Profile: Dictionary specific to this profile only (game-specific terms, character names)
- Shared: Dictionary shared across all profiles (useful for common gaming terms)
- User dictionaries store words you add via right-click → "Add to dictionary"
- Game-specific terms like "scimitar" or "mithril" can be added to avoid false positives
Main Display Tab
This tab controls the appearance and behavior of the main game text display, which is where you'll spend most of your time reading game output.
Font Settings
Font choice significantly impacts readability and game experience:
- Font: Choose the font family for displaying game text
- Monospace fonts (recommended): All characters have the same width
- Examples: Consolas, Courier New, Monaco, Source Code Pro
- Benefits: Perfect alignment for ASCII maps, tables, and formatted text
- Drawbacks: Can look mechanical or less elegant
- Variable-width fonts: Characters have different widths based on their shape
- Examples: Arial, Times New Roman, Helvetica
- Benefits: More natural reading experience, better for narrative text
- Drawbacks: May break alignment of ASCII art, maps, or tabular data
- Warning displayed: Mudlet will warn you if a selected font may cause alignment issues
- Monospace fonts (recommended): All characters have the same width
- Size: Set the font size (1-99 points)
- Common ranges: 10-14 for normal displays, 16-20 for high-DPI screens
- Consider both readability and screen real estate when choosing size
- Enable anti-aliasing: Smooths font rendering for better appearance
- Recommended for high-resolution displays and larger font sizes
- May make small fonts appear blurry on low-resolution displays
- Turn off if text appears fuzzy or hard to read
Display Border
Fine-tune the spacing around the text display to optimize your screen layout:
- Top border height: Space above the text (can be negative)
- Positive values: Add space above text (useful with toolbars or custom UI elements)
- Negative values: Move text up beyond the normal screen boundary (advanced usage)
- Range: -1,000,000 to 1,000,000 pixels
- Bottom border height: Space below the text (can be negative)
- Affects positioning relative to the input line
- Negative values allow text to extend below normal boundaries
- Left border width: Space to the left of text (can be negative)
- Useful for accommodating chat windows or custom panels
- Negative values can move text beyond the left screen edge
- Right border width: Space to the right of text (can be negative)
- Helpful when using mapper or other right-side panels
- Allows fine-tuning of text area width
Advanced usage note: Negative border values are primarily useful for custom UI layouts or working around display limitations.
Word Wrapping
These settings control how long lines of text are handled:
- Wrap lines at: Number of characters before text wraps to the next line
- Default: 90 characters (suitable for most displays)
- Shorter values: More line breaks, better for narrow screens or side panels
- Longer values: Fewer line breaks, better for wide displays or reading flow
- Consider your game's typical line lengths when adjusting
- Indent wrapped lines by: Number of characters to indent continuation lines
- Helps visually distinguish wrapped lines from new lines
- Common values: 0 (no indent), 2-4 (subtle indent), 8+ (clear indent)
- Useful for maintaining readability in long descriptions
- Indent hanging wrapped lines by: Additional indentation for subsequent wrapped lines
- Creates a cascading indent effect: first wrap gets basic indent, subsequent wraps get additional indent
- Helps with complex, multi-line text structures
- Usually set to 0-2 characters more than the basic wrapped line indent
Double-click Behavior
Controls word selection when double-clicking on text:
- Stop selecting a word on these characters: Characters that terminate word selection
- Default: `'"` (apostrophes and quotation marks)
- Without this setting: Double-clicking "Hello" in `You say, "Hello!"` selects `"Hello!"`
- With this setting: Double-clicking "Hello" selects only `Hello`
- Customize based on your game's text formatting and your selection preferences
- Common additions: `!`, `.`, `,`, `;`, `:` for more precise word selection
Display Options
Advanced options for text processing and display:
- Fix unnecessary linebreaks on GA servers: Fixes display issues with certain game servers
- Specifically addresses a bug in IRE MUD servers (Iron Realms Entertainment)
- Prevents text from being incorrectly appended to prompt lines
- Enable if you see text appearing on the wrong lines or prompts getting corrupted
- Enable text analyzer: Enables advanced text analysis features
- Provides additional processing and pattern recognition capabilities
- May be used by advanced scripts or debugging tools
- Echo Lua errors to the main console: Shows script errors in the main display
- In addition to showing errors in the error tab of the script editor
- Helpful for immediate error notification during gameplay
- Can be overwhelming if you have many script errors
- Display control characters as: How to render special control characters
- Nothing: Hide control characters (default, cleanest display)
- Unicode Control Pictures: Show symbolic representations (⌐, ␍, ␊, etc.)
- CP437 (OEM Font)-like: Show DOS-style representations
- Useful for debugging server output or identifying formatting issues or, in the CP437 mode the Server is trying to emulate a MSDos text window and uses some ASCII control characters as normal displayable character.
- Show connection status on tabs: Displays connection indicators on profile tabs
- Visual indicators show whether each profile is connected or disconnected
- Helpful when managing multiple game connections simultaneously
Editor Tab
This tab customizes the built-in script editor's appearance and behavior, which is essential for writing triggers, aliases, and other automation.
Theme Selection
The code editor theme affects syntax highlighting and overall appearance:
- Code editor theme: Choose from various syntax highlighting themes
- Themes control colors for different code elements (keywords, strings, comments, etc.)
- Light themes: Better for bright environments, traditional appearance
- Dark themes: Easier on eyes in low light, modern appearance
- Popular options often include Monokai, Solarized, and GitHub themes
- Theme updates are downloaded from colorsublime.github.io when available
- Script preview: Select a sample script to preview theme appearance
- Shows how different code elements will appear in your chosen theme
- Includes examples of Lua syntax, comments, and strings
- Change the preview script to see how themes handle different types of code
Autocomplete
- Autocomplete Lua functions in code editor: Enables function name suggestions while typing
- Provides pop-up suggestions for Mudlet's Lua functions as you type
- Includes function signatures showing required parameters
- Speeds up script development and reduces syntax errors
- Press Tab or Enter to accept suggestions, Escape to dismiss
Display Options
Visual aids for code editing and debugging:
- Show Spaces/Tabs: Makes whitespace characters visible
- Displays dots for spaces and arrows for tabs
- Essential for debugging indentation issues in Lua code
- Helpful for maintaining consistent code formatting
- Show Line/Paragraphs: Shows line ending markers
- (Intended to display symbols at the end of each line and the end of the text but not yet available/implemented)
- Currently puts a faint line under each text line.
- Intended to eventually help debug text processing scripts by clearly indicating the extents of the text.
- Show invisible Unicode control characters: Displays potentially problematic Unicode characters
- Reveals hidden characters that might cause script issues
- Important for debugging copy-pasted code from various sources
- Helps identify security risks like bidirectional text overrides
- Show Items' ID number: Shows internal Mudlet ID numbers for debugging
- Each trigger, alias, script, etc. has a unique internal ID number
- Displayed in the editor tree view next to item names
- Useful for advanced debugging and when working with Lua API functions
- ID numbers may change between profile sessions if items are added/removed
Color View Tab
This tab allows you to customize colors used in the main display and for game text, giving you complete control over your visual experience.
Basic Display Colors
These colors control the fundamental appearance of Mudlet's interface:
- Foreground: Default text color for game output
- Used when the game doesn't specify a particular color
- Should contrast well with the background color for readability
- Background: Default background color for the main console
- Forms the canvas behind all game text
- Light backgrounds (white, cream) work well in bright environments
- Dark backgrounds (black, dark gray) reduce eye strain in low light
- Command line foreground/background: Colors for the input area
- Can be set to match or contrast with the main display
- Some users prefer different colors to clearly distinguish input from output
- Command foreground/background: Colors for sent commands when they appear in the main display
- Only visible when "Show sent commands" is enabled in Input Line tab
- Helps distinguish your commands from game responses
ANSI Colors (16-Color Palette)
These 16 colors form the standard palette used by most text-based games:
Standard Colors (0-7)
- Black (0): Often used for emphasis or hidden text
- Red (1): Commonly used for damage, warnings, or important text
- Green (2): Often represents healing, success, or nature
- Yellow (3): Frequently used for gold, light, or caution
- Blue (4): Often represents water, magic, or information
- Magenta (5): Used for special effects or rare items
- Cyan (6): Often represents ice, technology, or secondary information
- White (7): Standard text color, maximum contrast
Bright/Light Colors (8-15)
- Light Black (8): Dark gray, often used for less important text
- Light Red (9): Bright red for high-priority warnings or critical damage
- Light Green (10): Bright green for major healing or success
- Light Yellow (11): Bright yellow for gold or sunlight
- Light Blue (12): Bright blue for water or magical effects
- Light Magenta (13): Bright magenta for rare or magical items
- Light Cyan (14): Bright cyan for ice or technological elements
- Light White (15): Pure white for maximum emphasis
Advanced Color Options
- Server allowed to redefine these colors: Permits the game server to change color definitions
- Uses ANSI OSC (Operating System Command) escape codes
- Format: `<ESC>]Pi;rrggbb<ESC>\` where i=color index (0-F), rrggbb=hex color values
- Reset command: `<ESC>]R<ESC>\` restores default colors
- Security consideration: Generally safe but allows server to control your visual experience
- Reset all colors to default: Restores original color scheme
- Useful if you've experimented with colors and want to start over
- Also triggered by server reset commands if server color redefinition is enabled
Mapper Tab
The Mapper tab contains settings for Mudlet's built-in mapping system, which helps you navigate and visualize game worlds.
Map Files
These options control loading, saving, and managing your map data:
- Save your current map: Export the current map to a file
- Creates a backup of your map outside the profile
- Useful for sharing maps with other players
- File format depends on the "Map format version" setting below
- Load another map file in: Import a different map file
- Replaces your current map entirely
- Warning: This will overwrite any existing map data
- Useful for loading community-created maps or personal backups
- Or load an older version: Restore from automatic map backups
- Mudlet automatically creates map backups periodically
- Dropdown shows available backup versions with timestamps
- Useful for recovering from mapping errors or corruption
- Delete map: Remove the current map data
- Completely removes all rooms, areas, and connections
- Cannot be undone - ensure you have backups before using
- Useful for starting fresh with a new game or major world changes
- Copy map to other profiles: Share maps between different profiles
- Select destination profiles, then press Copy
- Useful for using the same map across multiple characters
- Copies rooms, areas, labels, and all associated data
- Map format version: Choose compatibility level for saved maps
- Latest version: Includes all modern features but may not work with older Mudlet versions
- Older versions: Compatible with previous Mudlet releases but loses some features
- Consider your needs: latest features vs. backward compatibility
- Report map issues on screen: Control verbosity of map error reporting
- When enabled: Shows detailed error messages during map loading/validation
- When disabled: Reduces on-screen clutter, writes detailed report to log file
- Useful for large maps where extensive error reports can overwhelm the display
Map Download
For games that provide official maps:
- Download latest map provided by your game: Get updated maps from supported games
- Important: This will overwrite any local changes you've made to your map
- Uses the new map exclusively, discarding personal modifications
- Useful for games with frequent world updates or official mapping support
Map View Options
These settings control how the map appears and behaves:
- Use high quality graphics in 2D view: Enables anti-aliasing for smoother map rendering
- Makes lines and shapes appear smoother and more professional
- Disable on very slow computers if map rendering feels sluggish
- 3D map view always uses high quality graphics
- Show room borders: Displays borders around map rooms
- Makes individual rooms more distinct
- Color can be customized in the Mapper Colors tab
- Particularly useful for complex areas with many connected rooms
- Show the default area in map area selection: Includes the temporary holding area in area lists
- Area ID -1 is used by some mapping scripts as temporary storage
- Rooms are placed here before being assigned to proper areas
- Usually hidden unless you're developing mapping scripts
- Use large area exit arrows in 2D view: Makes exit indicators more prominent
- Larger arrows are easier to see and click
- Particularly helpful for users with visual impairments or high-resolution displays
- Invert map zoom direction: Reverses the scroll wheel zoom behavior
- When enabled: Scrolling up zooms out, scrolling down zooms in
- When disabled: Standard behavior (scroll up = zoom in)
- Useful for users accustomed to different zoom conventions
- Draw rooms on upper and lower levels: Shows rooms from adjacent Z-levels
- Renders rooms above and below the current level in muted colors
- Helps visualize vertical relationships in multi-level areas
- Colors configurable in Mapper Colors tab (Upper/Lower level color)
- Room size: Controls the visual size of rooms on the 2D map (1-50)
- Larger values make rooms more prominent and easier to click
- Smaller values allow more rooms to fit on screen
- Exit size: Controls the visual size of exit lines/arrows (1-50)
- Affects thickness of lines connecting rooms
- Larger values make exits more visible
- Grid size: Controls spacing for grid overlay when enabled
- Affects alignment guides for room placement
- Useful when manually editing map layouts
Room Symbol Font Configuration
- 2D Map Room Symbol Font: Select the only or the primary font used (depending on the Only use symbols (glyphs) from chosen font setting) to produce the 2D mapper room symbols.
- Monospace fonts often work best for consistent symbol alignment
- Font choice impacts readability of room information
- Only use symbols (glyphs) from chosen font: Using a single font is likely to produce a more consistent style but may cause the font replacement character ('�') to show if the font does not have a needed glyph (a font's individual character/symbol) to represent the grapheme (what is to be represented). Clearing this checkbox will allow the best alternative glyph from another font to be used to draw that grapheme.
- Show Glyph Usage: Opens a display showing all the symbols used in the current map and whether they can be drawn using just the specified font, any other font, or not at all.
- Shows the sequence of Unicode code-points that make up each symbol, so that they can be identified even if they cannot be displayed
- Lists up to the first thirty-two rooms that are using each symbol, which may help identify any unexpected or odd cases
- Useful for troubleshooting symbol display issues and ensuring your chosen font can display all the symbols you're using in your map
Player Room Marker Customization
- 2D map player room marker style: Customize how your current location appears
- Original: Simple cross-hair style marker
- Red ring: Circular red outline around current room
- Blue/Yellow ring: Two-tone circular marker
- Custom ring: User-defined colors and sizes
- Outer ring color/Inner ring color: Customize colors for ring-style markers
- Only available for custom ring style
- Choose colors that contrast well with your room colors
- Outer diameter: Percentage ratio of marker size to room size (50-200%, default 120%)
- Larger values make the marker more prominent
- Smaller values keep the marker subtle
- Inner diameter: Percentage of inner ring relative to outer ring (up to 83%, default 70%)
- Only applies to ring styles with inner elements
- Controls the thickness of the ring indicator
Mapper Colors Tab
This tab provides detailed color customization specifically for the mapping system, separate from the main display colors.
Map-Specific Colors
These colors control various elements of the map display:
- Link color: Color for connections between rooms
- Lines, arrows, and paths connecting rooms
- Should contrast well with the background for visibility
- Background color: Map background color
- The canvas behind all map elements
- Independent of main console background color
- Room border color: Border color for rooms when borders are enabled
- Only visible if "Show room borders" is enabled in Mapper tab
- Helps define room boundaries in dense areas
- Map info background: Background for map information displays
- Used for room information pop-ups, area labels, and other overlay text
- Should provide good contrast for text readability
- Lower level color: Color for rooms above your current level
- Helps visualize vertical relationships in multi-level areas
- Typically a muted or faded version of normal room colors
- Upper level color: Color for rooms below your current level
- Complements the lower level color for complete vertical awareness
- Often uses transparency or different hue to indicate depth
- Overlapping rooms border: Highlight color for room conflicts
- Used when multiple rooms occupy the same map coordinates
- Bright, attention-grabbing color to indicate mapping issues that need resolution
Room Colors (ANSI Palette)
The same 16 ANSI colors as the main display, but specifically for coloring map rooms:
These colors are used when rooms are colored using ANSI color codes (0-15). Each game may use different conventions for room coloring:
- Some games color-code rooms by terrain type (blue=water, green=forest, brown=mountains)
- Others use colors to indicate danger levels or special properties
- Player-created maps often use colors for organizational purposes
The ability to customize these colors allows you to:
- Match your personal preferences for terrain visualization
- Maintain consistency with your main display color scheme
- Accommodate visual accessibility needs
- Create themed color schemes for different games
- Reset all colors to default: Restores the standard color scheme
- Useful for returning to baseline after experimentation
- Maintains compatibility with standard mapping conventions
Chat Tab
This tab configures Discord Rich Presence integration, allowing your Discord status to show your Mudlet activity.
Note: IRC client settings are configured separately via Settings > IRC in the main menu.
Discord Privacy
Discord Rich Presence integration shows your Mudlet activity in your Discord status:
Icon and Tooltip Privacy
- Large icon privacy: Control main activity icon and tooltip visibility
- Don't hide: Shows full game information and Mudlet icon
- Hide tooltip: Shows icon but removes descriptive text
- Hide icon and tooltip: Removes large icon entirely from Discord status
- Small icon privacy: Control secondary icon and tooltip visibility
- Similar options to large icon but affects the smaller status indicator
- Often shows connection status or activity type
Detail Information Control
- Hide detail: Prevents sharing of detailed game information
- Details often include character name, current area, or activity
- Useful for privacy or when playing multiple characters
- Hide state: Control game state information sharing
- State information might include "Connected to GameName" or current status
- Another layer of privacy control for Discord integration
Party and Timer Information
- Hide party details: Control group/party information sharing
- Prevents Discord from showing if you're grouped with other players
- Useful for maintaining privacy about your gaming relationships
- Hide timer: Control session timing information
- Prevents Discord from showing how long you've been playing
- Helps maintain privacy about your gaming habits and time investment
Advanced Discord Options
- Enable Lua API: Allow scripts to control Discord status
- Enables Mudlet Lua functions for custom Discord status updates
- Allows scripts to set custom activity text, images, and status information
- Advanced users can create dynamic status updates based on game events
- Restrict to specific Discord username: Limit Rich Presence to specific account
- Format: username#1234 (with discriminator number)
- Useful if you have multiple Discord accounts and want to control which shows Mudlet activity
- Leave empty to show Rich Presence on any Discord account you're logged into
- Discriminator is the 4-digit number after the # in your full Discord username
Connection Tab
This tab configures secure connections and proxy settings for connecting to game servers.
TLS/SSL Secure Connection
Transport Layer Security (TLS) and its predecessor Secure Sockets Layer (SSL) encrypt your connection to the game server:
Certificate Information Display
When connected via TLS/SSL, Mudlet displays certificate details:
- Issuer: The certificate authority that verified the server's identity
- Well-known authorities: Let's Encrypt, DigiCert, Comodo
- Self-signed certificates show the server's own information
- Issued to: The server or domain the certificate is valid for
- Should match the server hostname you're connecting to
- Wildcards (*.example.com) cover multiple subdomains
- Expires: Certificate expiration date
- Certificates must be renewed regularly for continued security
- Expired certificates indicate potential security or maintenance issues
- Serial: Unique identifier for the certificate
- Used for certificate management and revocation checking
Security Exception Options
These options lower security standards and should be used cautiously:
- Accept self-signed certificates: Allow certificates not verified by a trusted authority
- Security risk: No guarantee the server is who it claims to be
- Sometimes necessary for privately-run game servers
- Vulnerable to man-in-the-middle attacks
- Accept expired certificates: Allow connections despite certificate expiration
- Security risk: Expired certificates may have been compromised
- Should only be temporary while server administrators renew certificates
- May indicate poor server maintenance
- Accept all certificate errors: Bypass all certificate validation
- High security risk: Negates most benefits of encrypted connections
- Only use for testing or when absolutely necessary
- Vulnerable to various attack types
Connection Status Notification Area
Visual feedback area showing connection security status:
- Warning icons for security exceptions or certificate issues
- Error indicators for connection problems
- Information messages about successful secure connections
Secure Connection Reminder
- Allow secure connection reminder: Prompt to switch to encrypted connections when available
- Uses Mud Server Status Protocol (MSSP) to detect available secure ports
- Encourages enhanced privacy and data protection
- Helpful reminder when servers support both secure and insecure connections
Proxy Settings
For users who need to connect through proxy servers:
- Connect to the game via proxy: Enable proxy server usage
- Checkbox enables the entire proxy configuration section
- Required for networks that block direct game connections
- Address: Proxy server hostname or IP address
- Format: proxy.example.com or 192.168.1.100
- Obtain from your network administrator or proxy service
- Port: Proxy server port number
- Common ports: 8080, 3128, 1080
- Format: numeric port number (1-65535)
- Username/Password: Credentials for authenticated proxies
- Many proxies require authentication for access
- Username and password fields for proxy login
- Not the same as your game login credentials
Shortcuts Tab
This tab allows you to customize keyboard shortcuts for main window functions, enabling quick access to frequently used features.
Main Window Shortcuts
Keyboard shortcuts provide rapid access to Mudlet functions without using menus:
Connection Management
- Connect/Disconnect: Toggle connection to your game server
- Reconnect: Disconnect and immediately reconnect
- Quick Connect: Connect using saved connection details
Window Management
- Show/Hide Triggers: Toggle the Triggers window
- Show/Hide Aliases: Toggle the Aliases window
- Show/Hide Timers: Toggle the Timers window
- Show/Hide Scripts: Toggle the Scripts window
- Show/Hide Keys: Toggle the Key Bindings window
- Show/Hide Variables: Toggle the Variables window
- Show/Hide Mapper: Toggle the map window
- Show/Hide Notepad: Toggle the built-in notepad
Display Controls
- Toggle Timestamps: Show/hide timestamps on game output
- Toggle Logging: Start/stop logging game output
- Clear Console: Clear the main display window
- Mute/Unmute: Toggle audio output from media protocols
Editing and Debug
- Central Debug Console: Open the main debugging interface
- Lua Code: Open code execution dialog
- Error Console: Show script errors and debug information
Shortcut Customization
- Modifying Shortcuts: Click on any shortcut field to change the key combination
- Press your desired key combination when prompted
- Supports combinations with Ctrl, Alt, Shift, and function keys
- Some combinations may be reserved by your operating system
- Disabling Shortcuts: To disable a shortcut, press the Escape key when prompted for a new combination
- Useful for preventing accidental triggering
- Frees up key combinations for use in games or scripts
- Reset to defaults: Restore all shortcuts to their original key combinations
- Useful if you've made many changes and want to start over
- Does not affect custom key bindings created in the Keys editor
Best Practices for Shortcuts
- Choose memorable combinations that don't conflict with game commands
- Consider using function keys (F1-F12) for less commonly used functions
- Avoid shortcuts that your game or operating system uses
- Test shortcuts after setting them to ensure they work as expected
Important: Shortcut changes take effect immediately and are saved with your profile.
Accessibility Tab
This tab provides features to improve Mudlet's accessibility for users with disabilities or specific needs.
Screen Reader Support
Screen readers convert text to speech or braille for visually impaired users:
- Announce incoming text in screen reader: Control whether new game text is read aloud
- When enabled: New text from the game is automatically announced
- When disabled: Prevents automatic reading, useful with custom text-to-speech solutions
- Platform note: Some platforms (like macOS) may have issues with complete text announcement
- Disabling this allows use of alternative TTS systems that avoid announcement gaps
- Advertise screen reader use via protocols: Inform game servers about accessibility needs
- Sends information through supported protocols (NEW-ENVIRON, MNES, MTTS)
- Helps game servers provide more accessible content or features
- May enable server-side accessibility enhancements or alternative content formats
Media Accessibility
- Enable closed caption for media: Show captions for audio/video content
- Displays text captions for sounds and music sent by the game server
- Essential for deaf or hard-of-hearing users
- Provides context for audio cues that affect gameplay
Text Handling Options
- When the game sends blank lines: Choose how to handle empty lines
- Show them: Display blank lines as-is (preserves original formatting)
- Hide them: Skip blank lines entirely (more compact display)
- Replace with a space: Convert blank lines to single spaces (maintains text flow)
- Choice affects screen reader behavior and text navigation
- Switch between input line and main window using: Configure navigation key
- No key: Disable keyboard navigation between interface elements
- Tab: Use Tab key to move between input line and main window
- Ctrl+Tab: Use Ctrl+Tab combination (similar to browser tab switching)
- F6: Use F6 key (Windows standard for interface navigation)
- Essential for keyboard-only navigation and screen reader compatibility
Search Functionality
- Enable F3 search shortcuts: Allow F3/Shift+F3 for text searching
- Checkbox to enable or disable the F3 search shortcut functionality
- When enabled: F3 finds next occurrence, Shift+F3 finds previous
- Disable if F3 conflicts with other keybindings or game commands
- Enables quick text location within the game output buffer
- Particularly useful for finding specific information in lengthy game sessions
Accessibility Best Practices
When configuring accessibility options, consider:
- Screen Reader Users: Enable text announcement and protocol advertising
- Keyboard Navigation: Set appropriate navigation keys and enable search shortcuts
- Audio Processing Difficulties: Enable closed captions for media
- Visual Processing Issues: Consider blank line handling options for cleaner text flow
- Motor Impairments: Choose comfortable navigation key combinations that don't require complex finger positions
These options work together to create a more inclusive gaming experience and can be adjusted based on individual needs and preferences.
Special Options Tab
This tab contains advanced settings for compatibility, debugging, and special use cases. Many options require client restart to take effect.
Compatibility Options
These settings address issues with older or non-standard game servers:
- Force compression off: Disable MCCP (Mud Client Compression Protocol)
- MCCP reduces bandwidth usage by compressing data between server and client
- Some very old servers have buggy MCCP implementations that cause connection issues
- Disable if you experience random disconnections or garbled text
- Force telnet GA signal interpretation off: Disable Go-Ahead processing
- GA (Go-Ahead) signals tell the client when the server is ready for input
- Some servers send incorrect GA signals that can interfere with text processing
- Disable if prompts appear in wrong locations or text timing seems off
- Force CHARSET negotiation off: Disable character set negotiation
- Prevents automatic negotiation of text encoding between client and server
- Some servers have broken CHARSET implementations
- Disable if you experience encoding issues that persist despite encoding tab settings
- Force NEW_ENVIRON negotiation off: Disable environment variable negotiation
- NEW_ENVIRON allows sharing of client environment information with the server
- Some servers improperly handle this negotiation
- Disable if connection takes unusually long or fails during login
- Send Mudlet version in terminal type: Include version in TTYPE negotiation
- Some servers use KaVir's protocol snippet expecting "CLIENT VERSION" format
- Standard RFC compliance omits version numbers from TTYPE responses
- Enable if server assumes Mudlet is version 1.0 and limits color support to 16 colors
- Technical note: Non-standard but required for some server color detection
- Force MXP processing on: Enable MXP without server negotiation
- MXP (Mud eXtension Protocol) enables clickable links and enhanced formatting
- Some servers support MXP but don't properly negotiate its activation
- Enable if you know the server supports MXP but it's not working automatically
- Different from the MXP protocol setting in General tab - this forces processing
- Force new line on empty commands: Add line breaks to empty commands
- Adds LF (Line Feed) character to empty command submissions
- Required by some very specific server configurations
- Usually unnecessary - only enable if specifically advised by server administrators
Media and Updates
- Clear stored media files: Remove cached audio/video files for the current profile
- Media files from Lua API, MCMP (Mud Client Media Protocol), and MSP (Mud Sound Protocol) are cached locally
- Useful for reclaiming disk space or forcing re-download of updated media
- Most games will re-download media automatically when needed
- Disable automatic updates: Prevent Mudlet from checking for updates
- Stops automatic update notifications and download prompts
- Useful for stable production environments or controlled network settings
- Manual updates are still possible through the help menu
Search Engine Selection
- Choose the search engine used for help and documentation lookups
- Affects "search for help" functions and documentation links
- Options typically include Google, DuckDuckGo, and other search providers
- Consider privacy preferences when selecting search engine
Crash Reporting
- Crash report policy: Controls automatic crash report submission
- Always send: Automatically submits crash reports to help developers fix issues
- Never send: Disables crash reporting entirely
- Ask each time: Prompts you when a crash occurs (default)
- Crash reports help improve Mudlet stability but contain technical system information
Advanced Debugging Options
These options are primarily for developers and advanced troubleshooting:
- Show icons on menus: Control menu icon display
- Tri-state option: Default/Enabled/Disabled
- Some desktop environments or accessibility configurations work better without menu icons
- Default follows system preferences
- Expect Color Space Id in SGR codes: Handle non-standard ANSI color codes
- Some MUDs use flawed interpretation of 16M color ANSI codes
- Standard: `\e[38:2::r:g:b:m` (with empty Color Space Id)
- Non-standard: `\e[38;2;id;r;g;b;m` (with explicit Color Space Id)
- Enable if 16M colors aren't displaying correctly despite proper ANSI support
- Store character login passwords in: Choose password storage method
- Computer's password manager (secure): Uses OS-level secure storage (Keychain, Windows Credential Manager, etc.)
- Plaintext with profile (portable): Stores passwords in profile files (less secure but portable)
- Security vs. portability trade-off: secure storage ties passwords to specific computers
Timer Debug Configuration
- Show debug messages for timers not smaller than: Filter timer debug output
- Format: h:mm:ss.zzz (hours:minutes:seconds.milliseconds)
- Default 00:00:00.001 shows all timer messages
- Higher values reduce debug console noise from frequent timers
- Essential for profiles with many short-interval timers that would overwhelm the debug console
Unicode and Network Options
- Report all Codepoint problems immediately: Control Unicode error reporting
- When enabled: Each Unicode issue is reported as it occurs
- When disabled: Issues are collected and summarized when console closes
- Immediate reporting is useful for development; summarized reporting is less intrusive
- Additional text wait time: Adjust timing for text processing
- Range: 0.010-0.500 seconds (default: 0.300)
- On servers without GA (Go-Ahead) or EOR (End-of-Record) signals, controls how long Mudlet waits for more text
- Higher values: Reduce risk of text being split inappropriately (may affect trigger reliability)
- Lower values: More responsive feel but increased risk of text fragmentation
- Technical note: Balances between text completeness and responsiveness
Usage Guidelines
- Most users should not need to modify Special Options
- Changes often require client restart to take effect
- Only modify settings you understand or that have been recommended for your specific server
- Keep notes about changes made for troubleshooting purposes
- Consider consulting with experienced players or server administrators before making changes
Saving Changes
All changes made in the Profile Preferences dialog are saved when you click the Save button at the bottom of the dialog. The button includes a save icon and closes the preferences window.
Immediate vs. Restart Required Changes
- Immediate effect: Most display, color, and behavioral changes take effect immediately
- Restart required: Some changes require restarting Mudlet:
- Interface language changes
- Some protocol settings
- Special compatibility options
- Font changes (in some cases)
- Reconnection required: Some changes require reconnecting to your game:
- Protocol selections
- Connection security settings
- Encoding changes
- Special server compatibility options
The interface will display warnings when restart or reconnection is required, typically in small text below the relevant settings.
Troubleshooting Changes
If changes don't appear to take effect: 1. Check for restart/reconnection requirement messages 2. Verify the Save button was clicked (not just closing the dialog) 3. For display changes, try refreshing the main window 4. For protocol changes, disconnect and reconnect to the game server 5. For major changes, restart Mudlet completely
See Also
- Basic Settings Guide - Introduction to essential settings
- Mapper Documentation - Detailed mapping system guide
- Scripting Guide - Introduction to Lua scripting in Mudlet
- Discord Integration - Advanced Discord features
- Game Protocols - Understanding GMCP, MSDP, and other protocols
- Accessibility Features - Complete accessibility guide
- Color and Formatting - Advanced text appearance customization
Automation and game rules
It is possible to create an Artificial Intelligence (AI) that does everything you can do in a game. Even more so, an AI can outperform you in every routine operation, depending on the complexity of the task. Because scripting is so powerful, it can give you a competitive advantage that some people consider unfair or even cheating. In some cases it can have much more far reaching consequences on a game, such as inflation, loss of balance in terms of game-mechanics or, ultimately, a complete crash of in-game economy. For these and various other reasons the administrators and owners of some games forbid or limit the use of automation tools.
By including scripting support in Mudlet, we effectively give you the ability to create and utilize AI toolkits. However, we do not endorse or promote the usage of automation if it is prohibited in your game! Keep in mind that by cheating you can lessen the quality of gameplay for both your fellow players and yourself.
Mudlet's Automation Features
Mudlet offers a vast array of standard features to automate or otherwise improve your gaming experience. These include, but are not limited to:
- Aliases
- User-defined text input, which is converted into a different, usually longer input before being sent to the game.
- e.g. typing gg to have get gold from ground;put gold in bag be sent to the game.
- Variables
- allow the user to store text or numbers for easier use inside scripts.
- Triggers
- execute user-defined commands upon receiving specific out from the game,
- e.g. gamesends: "You see Elyssa standing here." and Mudlet automatically sends "poke Elyssa" to the game.
- Keybindings
- also known as hotkeys, allow executing certain user-defined commands by simultaneously pressing a specific combination of keys
- e.g. pressing CTRL+H to send "say Hello Miyuki!" to the game or play La Marseillaise
- Timers
- delay the execution of a command or execute it after a specified period of time.
- e.g. throw gauntlet to Eric-wait 3 seconds-exclaim Let us end this here!
- Events
- allow the user to make triggers for specific events like when Mudlet has connected to the game, or even user-defined events to use in complex system making.
To get started on programming in Mudlet, watch these screencasts that explain the basics that'll help you get started.
Keep on reading for an introduction to Mudlet's features:
Aliases
Aliases are the most basic way of automating the gameplay - you can use aliases to shorten the amount of typing you do. See more detailed info here: Manual:Alias Engine
Example - Brew’o'Matic 6000
You’re walking around the epic dungeon of the Unholy Firedragon of Westersand, gathering roots in order to brew a potion and thus restore the growth of hair on Farmer Benedict’s bald head. Once you see a root, you need to:
open the bag of tools
get the sickle of damnation from the bag of tools
cut the root of hair-growth
<wait 5 seconds>
clean the sickle of damnation of deadly root acid
put the sickle of damnation in the bag of tools
close the bag of tools
open the magical bag of storing
take the root
put the root into the magical bag of storing
close the magical of storing
And once you’re done, do the exact same thing nine more times… thrice a day!
Alternatively, you just create an alias that would do this all with a single command - for example, "quest". To make that happen, read on! Here's a sneak peek on what you should have in the end:

Making an Alias
To get started, go click on the Aliases button in Mudlet, and then on the Add one. This will make a blank alias for you, which we’ll now fill in.
The Alias name field is optional - it’s mainly used for the alias listing that you see on the left as an easy way to distinguish all of the aliases. You can just name our alias "test" for now. The Pattern field is where you put your regex pattern to describe the command you'll enter to make your new alias spring into action. Let’s say we want our new alias to send the command "say hello" whenever we type "sh". The regex pattern would be ^sh$. Then we put say hello into the Command field. After you have saved and activated your new alias "test", whenever you type "sh" Mudlet will not send "sh", but "say hello" instead. We call this replacement process alias expansion.
Mudlet uses Perl regular expression aliases. Regexes are a special way of matching patterns of words. For the beginners it is enough to think of them as a general way to specify the words itself and their placement within the line. For basic aliases it is enough to know that the character ^ symbolizes the beginning of the line and the character $ symbolizes the end of the line. If you want to make an alias "tw" that sends the command "take weapon", you don’t have to care about placement or pattern matching in general. All you need to do is fill ^tw$ in the field called "Regex" and type take weapon in the field called "command". Then you need to save the new alias by clicking on the "Save" icon in the top middle. The symbol for unsaved items disappears and makes way for a little blue checkbox. If this box is checked the alias is active. If the blue box is empty, the alias is deactivated and will not work unless you press the "activate" toggle padlock icon. Now you are ready to go. Type "tw" in the command line and press the enter key. Mudlet will send "take weapon" to the game. Aliases are basically a feature to save you a bit of typing (much like buttons which will be described in detail in a later section of the manual). More advance alias usage will be described later in the manual.
Making a Targetting Alias
To make an alias that'll remember your target - making it easier to use your skills and saving you the hassle of typing the target in all the time, do the following:
In the Pattern field, place the following:
^t (.+)$
That will match all commands that you type in the format of t <any words> - it'll match t rat, t tsol'aa, t human and etcetera.
Next, make the big box do this:
target = matches[2]
cecho("<light_slate_blue>My target is now: <red>"..target.."\n")

You can also make an alias with an optional target:
^dd(?: (.+))?$
Now the target, if it is supplied, is going to be matches[2]. You can test if the target was given with this code:
send("cast spell at "..(matches[2] or target))
That's it - whenever you use this alias, your target will be remembered in the target variable.
Next, you'd like to make use of this variable - so make another alias that will do the actual attacking for you! Here's an example one:
Pattern:
^atk$
Code:
send("kick "..target)
This alias will kick the target when you type in atk. Feel free to adjust the "trigger" word and the command as you need them.

Variables
Variables are containers for data. In Lua, they can store numbers or words. You can use variables to store important information like how much gold do you have, or have them remember things for you.
The syntax for making a variable remember a number is the following - create them in the Script editor in a new script:
variable = 1234
Or to make it remember some text:
my_name = "Bob"
It'll then appear in the Variables view, like so:

You can also do basic maths easily, for example:
To concatenate strings together, you can use the .. expression:
my_full_name = "Bob" .. " the Builder"
Don't forget to use a space when you're concatenating two variables together:
firstname = "Apple"
lastname = "Red"

-- bad: will produce "AppleRed"
full_name = firstname .. lastname

-- good: will produce "Apple Red"
full_name = firstname .. " " .. lastname
You can also edit and delete variables from the variables view. Be careful when changing or deleting existing variables made by third-party scripts - you might break them. If that happens, re-opening the profiles will restore the variables back to working order.
While you can create variables in the Variables view, remember that they won't be saved when Mudlet shuts down - if you'd like them to be more permanent, create scripts with the variables instead.
Command-line Shortcuts
The command line has some built in keyboard shortcuts.
| Tab | Tab completion, see this technical manual section. |
| Up or Down | Command line history, see this technical manual section. |
| Home | Move cursor to beginning of line. |
| End | Move cursor to end of line. |
| CTRL+A | Select all. |
| CTRL+F | Move cursor to search bar. |
| SHIFT+Enter | Create an additional input line. |
| SHIFT+Left | Highlight one character left of the cursor (or unhighlight if already highlighted). |
| SHIFT+Right | Highlight one character right of the cursor (or unhighlight if already highlighted). |
| CTRL+Left | Move cursor one word to the left. |
| CTRL+Right | Move cursor one word to the right. |
| Backspace | Deletes the character to the left of the cursor. |
| CTRL+Backspace | Remove one word left of the cursor. |
| Delete | Deletes the character to the right of the cursor. |
| CTRL+Delete | Remove one word right of the cursor. |
| SHIFT+CTRL+Left | Highlight one word left of cursor. |
| SHIFT+CTRL+Right | Highlight one word right of cursor. |
| CTRL+C | Copies the selected text to the clipboard. |
| CTRL+Insert | Copies the selected text to the clipboard. |
| CTRL+K | Deletes to the end of the line. |
| CTRL+V | Pastes the clipboard text into line edit. |
| SHIFT+Insert | Pastes the clipboard text into line edit. |
| CTRL+X | Deletes the selected text and copies it to the clipboard. |
| SHIFT+Delete | Deletes the selected text and copies it to the clipboard. |
| Ctrl+Z | Undoes the last operation. |
| Ctrl+Y | Redoes the last undone operation. |
| PgUp | Scroll up one page in the main window buffer |
| PgDn | Scroll down one page in the main window buffer |
| Ctrl+Enter | Return to the bottom of the main window buffer |
See also: QT manual
Sending commands to the game
To send a command to the game, you can use the send() function. Data inside the quotes is sent to the game.
For example, the following code sends the command to eat bread:
send("eat bread")
If you’d like to include variables in the send command, you need to prefix and suffix them with two dots outside the quotes, like this:
send("My name is " .. full_name .. ". What's yours?")
If your commands ends with a variable, you don't need the two dots after:
send("Hi, my name is " .. character)
Should you want to include double quotes, use a double set of square brackets like this:
send([[say "Hi, I'm new here!"]])
When inserting a variable, you'd use the ]] and [[ appropriately:
send([[poke ]]..victim)
To send many directions, use speedwalk():
speedwalk("n;e;s;w;")
To send many actions, use sendAll():
sendAll("attack", "cast magic missile")
Showing text on screen
To echo (show text to yourself) you can use the echo() or the insertText() function. For example, the following code will display "Time to eat dinner!" on your screen:
echo("Time to eat dinner!")
If you’d like to include variables in your echo, you concatenate (put together) the value of your variable to the text:
my_gold = 5
echo("I have " .. my_gold .. " pieces of gold!\n")
If you'd like to include a new line in your text, insert \n for it:
echo("this echo\nis on\nthree lines!")

-- comes out at:
this echo
is on
three lines!
Seeing errors in your code
Undoubtedly you'll be making mistakes when you're coding! To err is human, after all. There are two types of mistakes you can make in general: when the words you've typed in make no sense to Lua at all, or they do make sense, but they don't do what you actually thought and intended them to do - or other circumstances are preventing it from working at that point in time.
Syntax errors aka Ladybugs
When you type something in that doesn't make sense to Lua, it's called a syntax mistake (or error). Mudlet will realize this and show you a little ladybug, and also tell you on which line the mistake is. Here's an example:

The echo() function on line 3 is missing a closing bracket - every bracket in Lua that's not green needs to be closed. Mudlet showed you a ladybug symbol on the alias, to indicate that the alias has a problem. It also showed you that the ( bracket should be closed on line 3. To fix this, you'd add the ), save, and it will be all happy.
Runtime errors aka Errors View
Another type of mistake is when what you typed in makes sense to Lua when you typed it in, but when it's time for code to be actually run, something wrong happens. For example, you asked Lua to eecho("hey!") - this is valid, you typed it in right, but there is one problem - eecho doesn't exist. So when you run the alias, nothing actually happens. Why?
Mudlet puts all problems that happen when things are run into the Errors view. It is hidden by default, open it by pressing the errors button that you see on bottom-left. This is where the error is logged at - not your main window, so you aren't spammed when you make a mistake in a piece of code that happens very often.
Opening it up will show this:

Let's analyse the message that's shown to us. object:<Some random alias> means that the Mudlet name you gave to the thing that had a problem is Some random alias - which is, indeed, our alias. function will tell you Alias, Trigger, Script or something else - this helps you locate the problematic item in question.
Next red line is the actual error: it's saying that on line 2 (it's off by one - so actually line 1), eecho is a nil value. In Lua, nil means doesn't exist. Hence what it's telling you is that eecho does not actually exist! Change it to echo, run it again, and there will be happiness.
That's it for now - this page in time will be improved with common techniques you can use to diagnose errors quickly, etc... if you know anything about this, feel free to add it here!
Triggers
Triggers are an automation feature offered in all game clients. They help you respond quicker a particular situation and generally make things more convenient for you since you need to do less manual work as your triggers will do the hard work for you often times. This helps you concentrate more on the important aspects of the game and lessen stress.
The way a trigger works is simple: You define some text that you want to trigger some action. This is called the trigger pattern. When the trigger "sees" this text in the game output, it’ll run the commands you’ve told it to.
Simple example: Whenever you see a bunny, you want to attack it (meanie!).
- You type "bunny" in the data field titled "1" to add this word to the list of texts this trigger fires on. Make sure the dropdown next to it says "substring".
- Now you type "kill bunny" in the field called "Command". This will be the command that the trigger will send to your game whenever the trigger fires.
- Finally click "Save Item" to save your new trigger and also click "Activate". By doing this, the blue checkbox icon in front of the trigger name (in the trigger tree on the left side) gets checked. The trigger is now activated.

As the trigger is active, each time the word "bunny" will appear in the game output, your trigger will issue the command "kill bunny" automatically. It will repeat this as long as the trigger stays active. When you want to stop hunting bunnies, you can simply select the bunny trigger and then click on the padlock icon to deactivate the trigger. The check mark will vanish and the trigger will stop firing until you re-enable it again via the padlock icon.
You can also put triggers in a group, then lock a group of triggers or an entire trigger branch. If you do that, all triggers in this group or branch will be locked until you remove the lock again. The locking starts from the root of the tree down to the end. As soon as a lock is met the trigger engine will skip the locked branch. Locking and unlocking branches is one of the most common actions you have to take care of when playing. For example, you can turn on your defensive triggers when engaging into a battle and you turn them off afterwards, or you turn on your harvesting triggers only when you are going to harvest.
Beginners should use Mudlet's automated highlight triggers in the beginning to highlight the text that has been triggered on to get the hang of the different trigger and pattern types. Click on the "highlight trigger" option and pick a foreground and a background color that you like to highlight your trigger with. When the trigger matches it automatically highlights its pattern. This is the most used form of triggers in Mudlet as it is a quick way of highlighting words that are important to you at the moment. You don’t have to know anything about scripting, regular expressions etc. to use highlight triggers. Just type in the word you like to be highlighted, select appropriate colors, save the new trigger and activate it.
Matching one unknown word
You can also set up a trigger to gather the weapons, gold or whatever skeletons could carry around with them. Since we do not know what the loot is exactly just yet, we will need to set up a trigger to match the line, identify the loot and take whatever it is that was dropped.
Examples for messages received could be:
 The skeleton drops ring.
 The skeleton drops gold.
 The skeleton drops scimitar.
 The skeleton drops wooden key.
"The skeleton drops " (including the last space character) is the generic segment of the line, but the loot itself varies. Thus, we need to tell the client to take whatever the skeleton dropped. We do this by setting up a so-called regular expression:
- In the data field titled "1" write the following perl regex type pattern:
^The skeleton drops (.+)\.$
- Make sure to change the dropdown menu for this line to "perl regex" as well
- In the big script box below write the following lua code:
send("take " .. matches[2])

The regular expression (.+) matches any characters that the client receives between "The skeleton drops " (NB: notice the blank/space character at the end) and the full-stop symbol that ends the sentence. Know that the variable matches[2] simply transfers the first matched text fitting the search criteria into the output. For this example, it will be the dropped loot we now will take automatically. This text may actually contain more than one word, like in the fourth example shown above.
In case you may wonder, matches[1] contains the entire line in whitch the matched text was found, whereas matches[2] contains only the first capture group. More on this in section two of the manual. The symbols ^ and $ indicate the start and end of a whole line.
Matching multiple unknowns
Now, we don't want to take only loot from skeletons but from many different sources.
Examples could be:
 The skeleton drops ring.
 The giant drops gold.
 The king drops scimitar.
 The box drops wooden key.
So let’s make a trigger that would gather the loot from anybody:
- In data field "1" write:
^(.+) drops (.+)\.$
- Select perl regex type pattern again
- Below write the lua code:
send("take " .. matches[3])

In this case, any time somebody, or something, "drops" something or someone else, the client will pick it up. Note that we used matches[3] instead of matches[2] this time, in order to pick up the second match. If we used matches[2], we’d end up picking up the skeleton’s corpse.
Matching known variants
If you’re playing a game in English, you’ll notice that these triggers probably won’t work due to English syntax. Compare:
 The skeleton drops ring.
 The skeleton drops a ring.
Chances are that you’ll see the later case a little more often. If we used our old regex, the trigger would produce something like this.
 TRIGGERED LINE: The skeleton drops a ring.
 OUR REACTION: take a ring
However most games can’t handle determiners in user-input, such as articles (i.e. a, an, the) or quantifiers (e.g. five, some, each). In effect, our triggered reaction won't suffice. Instead we would need to react with just "take ring" again.
To correctly handle lines like this, we could either create multiple triggers matching every possible article, which could become very cumbersome. Instead we make one regular expression filtering out all these words and phrases:
- Write a new perl regex type pattern:
(.+) drops (a|an|the|some|a couple of|a few|) (.+)\.$
- With this script:
send("take " .. matches[4])

Once again, note that this time we are using the third matched group through matches[4] now.
Basic Regex Characters
You already know (.+) which will match to any and all characters that follow until the end of line or another specific text that you may put in your regex. How about if you only want to match to certain type of characters?
Retrieving numbers from triggers
Wildcards from triggers are stored in the matches[] table. The first wildcard goes into matches[2], second into matches[3], and so on, for however many wildcards do you have in your trigger.
For example, you’d like to say out loud how much gold did you pick up from a slain monster. The message that you get when you pick up the gold is the following:
You pick up 16 gold.
A trigger that matches this pattern could be:
- Perl Regex:
^You pick up (\d+) gold\.$
- Script:
echo("I got " .. tonumber(matches[2]) .. " gold!")
In your code, the variable matches[2] will contain the amount of gold you picked up - in this case, 16. Now you say out loud how much gold you did loot. Notice also that (\d+) will only recognize numbers but not letters or a space character.
Retrieving alphanumeric characters
Here’s a more advanced example by Heiko, which makes you talk like Yoda:
- Perl Regex:
^say (\w+) *(\w*) .*?(.*)
- Script:
send( "say "..matches[4].." "..matches[2].." "..matches[3] )
The trigger will recognize that you say something, and save in seperate groups the first word, the second word and then the rest of you text. Here the \w wildcards will match any numbers or letters but no non-alphanumeric characters. It then shows you say the rest of the text first, then the first word and finally the second word. Notice this will only affect the text displayed for yourself, but if you want to also adjust the text you are sending to other players, please see the chapter about aliases.
![]() Note: want to learn more regex? Try https://regexlearn.com which is a great, easy to follow resource for this.
Note: want to learn more regex? Try https://regexlearn.com which is a great, easy to follow resource for this.
Highlighting Words
To highlight something in the game output, make a trigger and use the "highlight trigger" option to highlight the matched trigger pattern.
Optionally, you can also make use of the bg() and fg() functions in scripting to highlight.
Keybindings
![]() Note: A basic numberpad movement keybinding package can be found on the forums.
Note: A basic numberpad movement keybinding package can be found on the forums.
Keybindings (also known as hotkeys or macros), are in many respects very similar to aliases. However, instead of typing in what you want to be done (maybe including additional parameters) and pressing Enter, you simply hit a single key (or combination of keys) to let Mudlet do the work.
Example - You don’t drink tea, you sip it! You’re participating in an in-game tea sipping contest. The winner is the first person to sip an Earl Grey, should the quiz-master make a vague reference to a series of tubes, or a Ceylon Mint, if he begins talking about the specific theory of relativity. In order to give us a competitive advantage, we will define two keybindings:
HOTKEY: F1 command on button down: sip earl gray
HOTKEY: F2 command on button down: sip ceylon mint Now you just have to listen, or rather read, carefully and hit either F1 or F2 to claim that prize.
Another practical use for keybindings would be creating a so-called "targeting system", which is especially useful for grinding down armies of pumpkin-men in games without auto-attack. See the Variables chapter for further details.
Example instructions on how to make a keybinding (for a set of settings for binding the keypad):
- Click the Keys button: File:Keys button.jpg
- If you wish to group them together, click the Add Group button
- Then name your group, Keypad for instance
- With the group selected now click the Add Item button
- Name it, let's say North, in the Name: widget
- If you only need a single command, like north for our example, place it into the Command: widget, otherwise skip to step 9
- Click the Grab New Key button
- Click the button sequence you want to use for your keybinding, keypad 8 for north
- Now if you need additional code to execute when you click your keybinding, or want more complicated code, place it into the giant code box.
- Click the Save Item button if done or New Item button if not.
- Click the Activate button when finished to make sure they work.
Here is a link to the resulting keybinding XML file on the forums: [1]
Timers
Timers, as the name suggests, can be used to execute a specific command at a certain time, after a certain time or once every so often. They can be used by clicking in the "timer" editor, or direcly in your script.
To use a simple timer that does something after a period, write like this:
tempTimer(seconds, [[code]])
Seconds needs to be a number, the time until the timer starts. Code can be any commands which you want executed then.
![]() Note: Seconds can be a decimal, so 0.5 for half a second, or 1 for a full second will both work as expected.
Note: Seconds can be a decimal, so 0.5 for half a second, or 1 for a full second will both work as expected.
Here's a finished example which you can copy and put in your code directly:
-- this timer will greet you exactly 2 seconds after it was made
tempTimer(2, [[ echo("hello!\n") ]])
You can combine both normal and timed commands, for example as code in an alias or keybinding:
-- this code will let you go north immediately, then go east after 2 seconds
send("n")
tempTimer(2, [[ send("e") ]])
![]() Note: All timers which are made at the same time, will start counting from this common point in time, not relative to each other - so if you want to make one timer go off 1 second after another, don't do this:
Note: All timers which are made at the same time, will start counting from this common point in time, not relative to each other - so if you want to make one timer go off 1 second after another, don't do this:
-- incorrect:
tempTimer(1, [[ echo("hello!\n") ]])
tempTimer(1, [[ echo("how are you?\n") ]])
Both of these timers will go off at once, because both started together, right away! Instead, do this:
-- correct:
tempTimer(1, [[ echo("hello!\n") ]])
tempTimer(2, [[ echo("how are you?\n") ]])
![]() Note: If you do not want to put all your timed code in [[ brackets ]] there is another way of writing the same example. (This is available since Mudlet 3.5)
Note: If you do not want to put all your timed code in [[ brackets ]] there is another way of writing the same example. (This is available since Mudlet 3.5)
-- this timer will greet you exactly 2 seconds after it was made
tempTimer(2, function() echo("hello!\n") end)
That's it for the basics of scriptable timers in Mudlet. Want to know more? Here is a full description of timers in Mudlet.
Buttons
You can use Mudlet to create simple buttons on your screen without much coding at all - you can attach button bars to the top, left or right side of the screen. Each of these locations can contain an infinite number of button bars that are shown when active or hidden when inactive. You can also create drop-down menus or or two-state buttons - ones that you can click on and they stay pressed down.
To get started with buttons, make a group (buttons have to be in a group to show) and add buttons inside them. Active buttons or groups to make them be visible. Here's an example - by making a new group and a button inside it, and activating both, we got a button to spawn:

Buttons show in the order they appear in - so if you'd like one button to be above another, just drag it visually in the editor!
Menus
An important use case for buttons is to have various menus which contain a number of checkbox buttons or sub menus in order to quickly set various scripting configuration or other options in your scripts. To start a menu of buttons, create another group inside your toolbar group and add individual buttons inside it, like so:

To change the side of Mudlet that the buttons use, change the Dock area <side> option and save. You can also make buttons align themselves top to bottom or left to right with the Orientation <horizontal or vertical> option.

Making buttons do stuff
Buttons are half as useful only being there. You can also make them do commands for you for when you press them! To make a button do your command, or alias, or anything - type it into the Command on Button Down field. Pressing the button will do that command then:

You can also make a button do two things, toggling between each. To do that, enable the Push Down Button option, and type the command you'd like your button to do when it's released in the Command on Button Up field.

![]() Note:
Note:
If you'd like to include & in the button name, put double && - a single & will act as a mnemonic to underline the shortcut letter.
Coloring & customizing buttons
To change how your buttons look, you put descriptions into the CSS Style Sheet field, in the format of <a word describing something>: <how it should look>;. For example, if you'd like to make the button be red, put background-color: red; into the CSS box:

A full list of names you can use to customize your buttons view is available here. Take note of how that page has the descriptions inside {} brackets - you don't need them, only paste what's inside them in Mudlet.
Applying some skills, we can make our buttons look much more aesthetic:

This was the code used, feel free to start your buttons off with it:
color: white; background-color: orange; font-size: 12px;
padding: 6px;
border-radius: 5px;
Users with OS Windows 10 may find that for Mudlet versions 4.11+, the background-color: <colour>; is not changing the background as expected. This can be fixed by changing the border of the button. For example border: none;. Although that may destroy the size of button and it has to be set manualy. To achieve somehow similar size to default buttons you can use something like this:
background-color: <your_colour>;
border: 1px solid gray;
width: 90px; height: 25px;
margin: 1px;
font-size: 14px;
Managed layouts
To get your buttons to align into rows or columns (that depends on their orientation), add a number to the Number of columns or rows field. Here's an example with two columns on the left:

Here's another example with three columns on the left:

![]() Note:
Note:
You can change how your buttons are aligned within rows by clicking on the button group - it will cycle through different possible configurations for you.
Making Buttons with Labels
Labels can also be used to make buttons. They are far more flexible and you can design almost any UI you can dream up considering they are simply clickable images.
We'll start by making twelve buttons along the top of our screen.
-- set a 10% margin from the top border to provide space
local width, height = getMainWindowSize()
setBorderTop(height/10)

-- create some variable space so we don't pollute global variables
MyButtons = {}

-- create a label for the entire margin, for now
MyButtons.Top = Geyser.Label:new({
  name = "MyButtons.Top",
  x = 0, y = 0,
  width = "100%",
  height = "10%",
})

-- create a horizontal box to organise the buttons equally
MyButtons.TopHBox = Geyser.HBox:new({
  name = "MyButtons.TopHBox",
  x = 0, y = 0,
  width = "100%",
  height = "100%",
},MyButtons.Top)

-- add some buttons to the HBox using a Geyser label
for i=1,12 do
  MyButtons["MyButton"..i] = Geyser.Label:new({
    name = "MyButtons.Button"..i,
  },MyButtons.TopHBox)
  MyButtons["MyButton"..i]:echo("<center>My Button "..i)
end

The main function creating the button labels is Geyser.Label. You should now see the results as above. A bit plain, you could add some CSS to spark things up a bit.
-- add some buttons to the HBox using a Geyser label
for i=1, 12 do
  MyButtons["MyButton"..i] = Geyser.Label:new({
    name = "MyButtons.Button"..i,
  },MyButtons.TopHBox)
  MyButtons["MyButton"..i]:echo("<center>My Button "..i)

  -- colour my buttons with CSS
  MyButtons["MyButton"..i]:setStyleSheet([[
    background-color: rgba(135,206,250,100);
    border-style: solid;
    border-width: 1px;
    border-color: white;
    border-radius: 5px;
    margin: 5px;
    qproperty-wordWrap: true;
  ]])
end
Much better. But currently they are just twelve pretty labels that don't perform any function. Let's make them clickable with setClickCallback
setClickCallback assigns a function to a Geyser label that will be called when the mouse is clicked on the label. This function has similar methods for double clicking, hovering, etc.. all of which can be found in the Geyser manual. Let's keep it straightforward for now with a single click. Consider the following addition;
-- add some buttons to the HBox using a Geyser label
for i=1,12 do
  MyButtons["MyButton"..i] = Geyser.Label:new({
    name = "MyButtons.Button"..i,
  },MyButtons.TopHBox)
  MyButtons["MyButton"..i]:echo("<center>My Button "..i)

  -- colour my buttons with CSS
  MyButtons["MyButton"..i]:setStyleSheet([[
    background-color: rgba(135,206,250,100);
    border-style: solid;
    border-width: 1px;
    border-color: white;
    border-radius: 5px;
    margin: 5px;
    qproperty-wordWrap: true;
  ]])

  -- make our buttons clickable
  MyButtons["MyButton"..i]:setClickCallback(function() echo("My Button " ..i.." clicked!\n") end)
end

You should now be able to click the button and see the echo to the main screen.
Adjustable Containers for Labels
Adjustable Containers are a Geyser element that provides a flexible, user configurable, dockable window. Let's move our buttons to one of these containers and see what else we can do.
-- create some variable space so we don't pollute global variables
MyButtons = {}

-- create an adjustable container for more flexibility
MyButtons.Top = Adjustable.Container:new({
  name = "MyButtons.Top",
  x = 0, y = 0,
  width = "100%",
  height = "10%",
})

-- create a horizontal box to organise the buttons equally
MyButtons.TopHBox = Geyser.HBox:new({
  name = "MyButtons.TopHBox",
  x = 0, y = 0,
  width = "100%",
  height = "100%",
},MyButtons.Top)

-- add some buttons to the HBox using a Geyser label
for i=1, 12 do
  MyButtons["MyButton"..i] = Geyser.Label:new({
    name = "MyButtons.Button"..i,
  },MyButtons.TopHBox)
  MyButtons["MyButton"..i]:echo("<center>My Button "..i)

  -- colour my buttons with CSS
  MyButtons["MyButton"..i]:setStyleSheet([[
    background-color: rgba(135,206,250,100);
    border-style: solid;
    border-width: 1px;
    border-color: white;
    border-radius: 5px;
    margin: 5px;
    qproperty-wordWrap: true;
  ]])

  -- make our buttons clickable
  MyButtons["MyButton"..i]:setClickCallback(function() echo("My Button " ..i.." clicked!\n") end)
end

We removed the setBorderTop code because the adjustable container can be docked to a border by right clicking on the title bar and a margin is automatically created. It is docked to the top border in this example.
The container can be resized and moved around or perhaps changed to a VBox for slick left and right border docking.

This example can be further expanded to add images to the labels, highlighting when hovering over labels or even multi-state buttons with variables to track the state. Your imagination is the only limit.
Built-in aliases
The following aliases are available by default in new Mudlet profiles.
| Alias | Description | Examples |
|---|---|---|
| lua | Run Lua code from the input line. | lua print("hello") lua 2+2 lua clearWindow() |
| `echo | Simulate text from the game to test your triggers. You can use $ for a new line. |
`echo You see a rabbit cross the road. `echo line1$line2 |
If an alias on the list isn't working for you - try copying it from a new profile, since existing profiles will not get new aliases as they're introduced to Mudlet.
Misc examples
Here are some more miscellaneous examples.
Game syntax: get coins from corpse and also get coins from corpse 3. Alias Pattern: ^gcc(?:\s(\d+))?$ (can accept simply gcc and also gcc 3 for example).
send("get coins from corpse " .. (matches[2] or "") )
Game syntax: unlock northwest with steel key Alias Pattern: ^un (\w+) (.*)$
send("unlock " .. matches[2] .. " with " .. matches[3] )
See also: Mudlet Technical Manual