Manual:Mapper
Mapper
Mudlet's mapper is split into two parts for the best compatibility on all games:
- The display of the map itself and functions to modify the map in Mudlet, and
- A very game-specific Lua script to track where you are, and provide aliases for using the mapper, automatic mapping, etc.
If your game does not provide a mapping script for you, then you may not see a map at first.
Fear not! Pre-made mapping scripts for many games are available from Mudlet forums - all topics that have the "mapping script"-prefix on them.
If you still don't find any, or if you want to create your own mapping script, see #Making your own mapping script further down below. Remember, you can always find help in Mudlet forums or Discord, etc.
Generic Mapper Additions may be useful if your MUD display is atypical. Check through the solutions for multi-line exits and how other players have handled these situations.
Visual Map Editor
Maps can be comfortably edited by using the visual map editor or by scripts. The editor behaves like the usual WYSIWYG editors. Select objects with a left click and then right click to open a context menus and do actions on the selected objects.
The mapper starts in "view-only" mode to prevent accidental edits. The editing mode can be toggled in the map's right-click menu.
Object selection
- left click = select element
- left click + drag = sizing group selection box choosing all rooms in the box on the current z-level
- left click + shift + drag = sizing group selection box choosing all rooms in the box on all z-levels
- left click + alt (or the mapper menu move map buttons) = move map
- left click + control = add a room to current group selection or remove it
If multiple rooms are being selected, a room id selection list box is being shown where you can fine tune the current room selection via the usual left click + control or left click + shift. The box disappears if the number of rooms in group selection is zero.
Moving Objects
Move selected objects either by right click and select "move" or with following handy short cut:
- left button down on custom line point + drag = move custom line point
- left button down + drag usually moves the item directly (as a handy shortcut) if only one element has been selected
- or hold left button down + control + drag if multiple rooms have been selected
Maps and Autowalking
Maps are implemented as directed graphs of connected nodes (rooms). Nodes are connected by edges (exits). Nodes are referenced by unique integer IDs. Edges fall into 2 categories: Standard exits with a visual representation on the map (e. g. north, south) and "special exits" without a calculated visual representation on the map e. g. the command "jump cliff" is a special exit that connects to a room without a clear spatial orientation. However, special exits can be visually represented if the user provides custom exit line strips. Standard exits are referenced by their respective node and a directional integer value. Special exits are referenced by their respective nodes and strings that hold the exit commands. Both nodes and individual exits can seperately be locked and thus excluded from speed walk path finding graphs. Path finding uses the fast A* search algorithm. Mudlet choses a path with the fastest travel time (-> room weights) as opposed to the shortest path.
Maps are divided into areas or zones where the area/room relationship is unique, i. e. rooms cannot be in more than 1 area.
![]() Note: Areas help make do with the typical geographical irregularities of game maps where an entire city with hundrets of rooms makes up a single room on a wilderness map. In other words, if you can't make a place look geographically correctly, create (sub) areas to deal with the problem.
Note: Areas help make do with the typical geographical irregularities of game maps where an entire city with hundrets of rooms makes up a single room on a wilderness map. In other words, if you can't make a place look geographically correctly, create (sub) areas to deal with the problem.
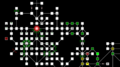
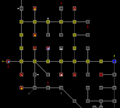
There are 2 forms of visual representations of maps. Standard mode shows exits and custom exit lines whereas "grid mode" hides exit details and sizes rooms to form a perfect grid without any empty space in between rooms. Grid maps can be made to look exactly like ASCII color text maps with character symbols to keep the look and feel of the game. Technically, grid maps are a special optimized representation of the typically very large LPC MUD style wilderness maps where every room has 8 direct neighbors in a n*m grid of rooms with relatively few holes. The grid map implementation uses pre image caching and fast gfx hardware render support and can thus render very large grid maps in less than 1ms that would take much longer if the map were to be displayed in regular mode. Changing the zoom level of maps in grid mode can take a significant amount of time if the maps are very large, because the pre cached images of the map need to be recreated at the new zoom level. Areas remember their particular zoom level so this is no hindering issue in actual gameplay.
Any map can be displayed in both modes, though the visual map editor only works in regular mode. To enable area mode, use the setGridMode() function.
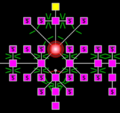
Regular mode:

Grid mode:

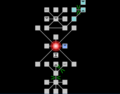
3D mode:

Areas
Areas are defined by a unique integer number ID and a unique area name. Mudlet builds an internal numerical area ID table on the basis of the rooms that belong to the respective areas. Mudlet keeps a seperate lookup table to retrieve the area name on the basis of the area IDs. This name lookup table is not guaranteed to be correct because it may be imported invalid information if the map has been downloaded by the game server as an xml map description file on the basis of the MMP protocol. [1] However, if the map has been created with Mudlet directly, there will be no such problems as the area name lookup table API is made to enforce uniqueness.
Area Properties
- area map display mode (-> regular map display mode or grid mode)
- area name
Rooms
Rooms are invisible on the map unless the required properties have been set.
Room Properties
- Room object need following required properties in order to be shown on the respective area map:
- unique room ID in form of an integer value
- area ID in form of an integer value (To which area does this room belong - or in other words, which area map displays this room)
- x, y and z coordinates as integer values which relate to its paricular area map coordinate system
- Optional room properties:
- regular exits with or without respective exit locks
- special exits with or without respecitve special exit locks
- room lock
- exit stubs (draw exit directions even though the exit rooms have not yet been defined)
- custom exit lines (user defined line strips of various formats to visualize special exits or redefine regular exit lines)
- searchable room name that can be used for bookmarks, annotations etc.
- room weight (How long does it travel through this node. A high room weight makes it less likely that this room will be chosen for pathfinding e. g. a safe road should have a low weight, whereas a dangerous place should have a high weight
- room color
- room character e. g. the symbol $ to symbolize a bank or H for a hotel.
Advanced map features
Map labels
Maps can be embellished with images and text labels. To create one within the mapper window, ensure you are in map editing mode and mouse right-click will have a 'Create label...' entry. Map labels can be either used as background (default) or as the top most foreground e. g. for player name location scripts. Labels are defined by position and size according to the map coordinate system and keep their position and size relative to the rest of the map when the map is zoomed or moved.
Contrary to rooms which work on the basis of integer (natural numbers) coordinates, labels are described (with respect to both position & size) by real numbers in order to allow for more advanced placement and label sizes within the map coordinate system. Map labels are stored in form of png images directly in the map file and are thus a direct part of the map. As these images are being scaled to fit the label creation size, the image quality will depend on the initial size of the label (the large the better the quality, but the more memory will be used).


(The desert and dragon images used in this example are licensed under the Creative Commons Attribution 2.0 Generic license and can be found here: http://en.wikipedia.org/wiki/File:Ninedragonwallpic1.jpg and http://en.wikipedia.org/wiki/File:Siwa_sand_dunes2009a.jpg)
Custom exit line definitions
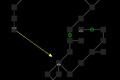
The mapper supports user defined visual exit lines on the basis of a sequence of line points in the map coordinate system. Custom lines as well as labels work on real numbers to allow for fine grained placement. User defined lines can be solid, dotted, dashed etc. line types with or without ending arrows. The line color can be freely selected. By default the regular exit color is being used.


The above example shows 3 different types of user defined exit lines, where the orange one on the left has been selected by the user in order to be edited.
Custom exit lines are purely visual tools and have no effect on the pathfinding, but each custom line must be linked to a valid room exit - either standard or special exit.
Map formats
Whenever a mapping feature is added to Mudlet that requires storing something in the map, the map format version needs to be increased - so older Mudlets can know that a map is too new and they can't load it. To this end, every map has a version number embedded inside it, which you can see by going to mapper settings:

You'll also notice that you have the ability to downgrade a map's version for compatibility with older Mudlets. Be careful when you do so though - features available in the new map won't be available in the older map when you downgrade.
| version | Mudlet version | features |
|---|---|---|
| 20 | 3.16.0 | - Improved way that custom exit line data was held internally, to make coding Mudlet mapper's easier and safer (details). Code is in place to support a workaround to work within map formats back to include version 17. |
| 19 | 3.8.0 | - added support for more than one of any grapheme (symbol) for the 2D map room symbol. Code is in place to support a workaround to work within map formats back to including version 17. |
| 18 | 3.0.0 | - keeps player's position when copying to a new profile
- faster map loading |
| 17 | 3.0.0 | - allows use of setAreaUserData(), setMapUserData(), and related functions |
| 16 | 2.1 | - doors (visual effect on the mapper that a locked/closed/open door is there)
- exit weights (in addition to existing room weights) |
Mapper tips
General
- Don't move the room you're currently in, you'll go haywire
- The number when spreading/shrinking room selections it the multiplication factor - 2 is a good number to try
Merging areas
To merge two areas together, see this how-to by Heiko. In short:
- Zoom out really far away on the area you'd like to move, and select everything (the selection affects all z-levels as well).
- Right-click, select move to area, and move them to another area. Your selection will still be selected - do not unselect
- Right-click again, select move to position, and move all of your still selected rooms in the new area so it fits.
Zooming the mapper
You can zoom in/out in the mapper using your (vertical) mousewheel. If you'd like to zoom quicker, hold down Ctrl while doing so!
To set the zoom level via script, use setMapZoom().
It is easy to add your own options to the menu you see when you right-click on your map. To do so, use addMapMenu, addMapEvent, etc.
Mapper favorites
This post here describes how to add a right click menu to your mapper filled with rooms to speedwalk to.
Placing the mapper
Placing the mapper into a corner
Here's a snippet you can use to place the mapper window into a corner and have it automatically come up whenever you open Mudlet. To use this, create a new script (you can make it anywhere) and copy/paste the code into it.
1local main = Geyser.Container:new({x=0,y=0,width="100%",height="100%",name="mapper container"})
2
3local mapper = Geyser.Mapper:new({
4  name = "mapper",
5  x = "70%", y = 0, -- edit here if you want to move it
6  width = "30%", height = "50%"
7}, main)
Placing the mapper into its own window
It's possible to create the mapper as a map window (similar to clicking the icon) like this:
myMapWidget = Geyser.Mapper:new({embedded=false})
This will open a map window with your saved layout (if there is one, otherwise it will dock at the right corner)
To choose the position of the DockWindow at creation, use:
 -- this will create a map window docked at the left corner
myMapWidget = Geyser.Mapper:new({embedded=false, dockPosition="left"})
Possible dockPositions are: left "l", right "r", top "t", bottom "b" and floating "f"
To change the dockPosition after creation, use:
 -- this will change myMapWidget dockPosition to "f" floating
myMapWidget:setDockPosition("f")
Making your own mapping script
Your own mapping script will need to be tailored specifically to your game, depending on how exactly your rooms are shown, how the exits are listed, or if the game maybe sends some of this relevant information via GMCP, etc.
The generic mapper
To ease your work, all new profiles in Mudlet come with a Generic mapper package, which tries to draw a map by guessing most of the information from your game. It knows the most common ways to write an exit, etc. You can find more details by typing "map basics" in Mudlet.
Even if the generic mapper does not 100% grasp your very game details, you could maybe just adjust a few triggers and be done with it. Remember to stop by and ask for help in forums or chat, if you get stuck anywhere.
Some players have collected a list of Generic Mapper Additions on how to modify the generic mapper to better fit their game already.
Starting from scratch
If you'd like to code your own mapping script, see the Mapper API and read on for a short tutorial.
To start off, create a new script that'll be included with your mapping script (can even place it into the script folder for your mapping script), and have it do:
mudlet = mudlet or {}; mudlet.mapper_script = true
This'll let Mudlet know that a mapping script is installed, so it won't bother you or whoever else installs your script with a warning that one is necessary.
Next, you want to hook into Mudlet's gotoRoom(id) function and the user clicking on a room in the visual map - for that, define your own doSpeedWalk() function. Mudlet will store the directions / special exits commands your script will need to take in the speedWalkDir table, and the room IDs you'll pass through in the speedWalkPath table:
function doSpeedWalk()
  echo("Path we need to take: " .. table.concat(speedWalkDir, ", ") .. "\n")
  echo("Rooms we'll pass through: " .. table.concat(speedWalkPath, ", ") .. "\n")
end
speedWalkPath is especially useful for making sure you're still on the path. Most Mudlet mapping scripts keep track of how many rooms along the path they have visited so far and check upon arrival into a new room to make sure it's still on the path.
That's it! (But see below if you want more.)
From here, you'd want to build a walking script that'll send the commands to walk you along the path, along with aliases for the user to use - see the Mapper API functions and Mudlet mapper events.
Adding rooms
To make your first room, do the following steps:
- create an area with setAreaName(areaID, areaname). You can choose any areaID - if you'd like to use the IDs incrementally, see which is the latest from getAreaTable()
- if you want the Mudlet mapper to generate roomIDs for you, get one with createRoomID(). This is an optional step
- create your room with addRoom(roomID)
- give the room coordinates with setRoomCoordinates(roomID, x, y, z). If you're just starting out, put it at 0,0,0 so the room is at the center of the map
- assign your room to an area with setRoomArea(roomID, areaID)
- and finally, call centerview(roomID) to make the map view refresh and show your new room!
Labelling rooms
Rooms have three attributes which you can show on the map:
- an ID. You can't change it; the ID is shown in the room's box when you check "IDs" in the dialog below the map and you're zoomed in far enough.
- a symbol, also displayed in the room's box. You set it with the setRoomChar Lua function, or via the map's context menu.
- a name, typically sent via GMCP. You add it to the map with setRoomName.
The room name can be displayed along with a room's box. Its position defaults to "centered below the room". It is not visible by default because many maps have rooms that are quite close to each other; showing the names by default would create an ugly visual mess.
If you want to enable room names in your mapper, you need to
- stagger rooms. Four or five units' distance instead of one works best if you want to show every label; less is OK if you only show labels when the user asks you to.
- call setMapUserData("room.ui_showName","1"). The existence of this entry controls whether the "Names" checkbox is shown next to "IDs", below the map. This value is zero if the user has unchecked the "Names" checkbox.
- optionally call setMapUserData("room.ui_nameFont","FontName") to change the names' font. The default is the same monospaced font used for the room IDs and symbols.
- call setRoomUserData(room_id, "room.ui_showName","1") to show a room's label. You might want to add an entry to the map's pop-up menu which toggles this.
If the name is misplaced (collision with another room, label, or whatever), you can modify the room's "room.ui_nameOffset" attribute to move it around. The value of this attribute consists of two floating-point values, separated by a space, which offset the room's label (in units of the room box's size). You might want to bind functions that increase or decrease these values to keys like Shift-Control-Arrow and/or Control-Numpad-2468. A hotkey to toggle a room's label display from "on" to "off" and back (e.g. Control-Numpad-5?) is also a good idea.
You also might default to staggering room names. One possible algorithm: if a new room's X coordinate, divided by your default room distance, is an odd number then position its label with an offset like "0 -1.6", which would place it above the room in question. The optimal value for the Y offset depends on the font.
Changes are displayed only when the map is next redrawn.
Font options are global. Overriding them for a single room can be be implemented if requested.
Working with the mapper API
Whenever working with mapper API, keep in mind of the following things:
- You'll want to call
updateMap()after you do some modifications, to get to have the map render your new changes
Translating directions
Several functions in the mapper API take and return #'s for directions - and to make it easier to work with them, you can define a table that maps directions to those numbers in a script with the following:
exitmap = {
  n = 1,
  north = 1,
  ne = 2,
  northeast = 2,
  nw = 3,
  northwest = 3,
  e = 4,
  east = 4,
  w = 5,
  west = 5,
  s = 6,
  south = 6,
  se = 7,
  southeast = 7,
  sw = 8,
  southwest = 8,
  u = 9,
  up = 9,
  d = 10,
  down = 10,
  ["in"] = 11,
  out = 12,
  [1] = "north",
  [2] = "northeast",
  [3] = "northwest",
  [4] = "east",
  [5] = "west",
  [6] = "south",
  [7] = "southeast",
  [8] = "southwest",
  [9] = "up",
  [10] = "down",
  [11] = "in",
  [12] = "out",
}
Then, using exitmap[input], you'll get a direction number or a direction name. Here's an example that uses it to work out in which directions are the exit stubs available in room 6:
local stubs = getExitStubs(6)
for i = 0, #stubs do print(exitmap[stubs[i]]) end
Custom speedwalking and pathfinding
If you'd like to use a custom pathfinding algorithm instead of the built-in one, you can do that:
- Set mudlet.custom_speedwalk = true.
- Your doSpeedWalk script will now see different parameters:
function doSpeedWalk()
  echo("Room we're coming from: " .. speedWalkFrom .. "\n")
  echo("Room you're going to: " .. speedWalkTo .. "\n")
end
The forum topic Wayfinder contains an example package that implements a shortest-path-first algorithm.
Custom room name search function in the generic_mapper
Sometimes the generic_mapper script is not flexible enough to find the room name in your favorite game. You can create a custom function that handle that search instead of the standard one included in the mapper:
- Type in the input area map config custom_name_search true to enable the usage of the custom function.
- Write your own function called mudlet.custom_name_search. The script call it for your:
mudlet.custom_name_search = function (lines)
    -- ...
        local line_count = #lines + 1
        if string.match(cur_line, "   ") then
          line_count = line_count - 1
          room_name = lines[line_count]
          -- map.echo("Name Search: room_nameome:" ..room_name)
        elseif string.find(cur_line,prompt_pattern) then
    -- ...
    return room_name
end
I suggest to start from original name_search function in generic_mapper to avoid common problem.
onVisionFail for generic_mapper - moving through dark rooms
generic_mapper uses a combination of room titles, descriptions and exits to locate your character position in the mapper. Sometimes this information may not be available due to blindness, dark rooms or other affects that may prevent full vision and correct room matching. Using the onVisionFail event and appropriate triggers you can force your character to move to the next room and update the map accordingly even when vision is limited.
generic_mapper comes with two predefined triggers, add or replace these as necessary with the appropriate lines your game sends.

In these examples when the game sends It is pitch black... or It's too dark or It is too dark starting on a newline (^ character) then it will raise the onVisionFail event. When called this event will skip looking to match the room, and simply move the character in the direction they sent prior.
Map Legend
| Symbol | Explanation |
|---|---|
| a room, square mode | |
| a room, square mode with player location (default marker) | |
| a room, square mode with player location (red marker) | |
| a room, square mode with player location (blue-yellow marker) | |
| a room, square mode with player location (custom user marker) | |
| a selected room | |
| a room, round mode | |
| exits stubs, to lead south and east | |
| two way link | |
| one way link | |
| single open door leading east, no door in other direction (unlikely in practice unless a one-way exit) | |
| two way open door | |
| two way door, closed in easterly direction and locked going west (orange is closed, red is locked) | |
| up stub exit; no door, door open, door closed, door locked - in this, and the next three, actual exits have a finer mesh fill | |
| down stub exit: no door, door open, door closed, door locked | |
| in stub exit: no door, door open, door closed, door locked | |
| out stub exit: no door, door open, door closed, door locked | |
| up exit; no door, door open, door closed, door locked | |
| down exit: no door, door open, door closed, door locked | |
| in exit: no door, door open, door closed, door locked | |
| out exit: no door, door open, door closed, door locked | |
| room identifiers (built in numbering) | |
| custom room symbols | |
| custom emoji room symbols | |
| custom room symbols with user selected colours (on both room and symbol) | |
| custom exit lines; solid, dot, dash, dash-dot, dash-dot-dot-dash | |
| custom exit line with open door |


Screenshots
Just a few example maps from different players and games:
Here is the full image (17160 x 10120 pixel)


Notes
- ↑ MMP allows for an area ID/area names table to be defined, but Mudlet has no means to verify which definition is the correct one if 2 different area names relate to the same area ID.